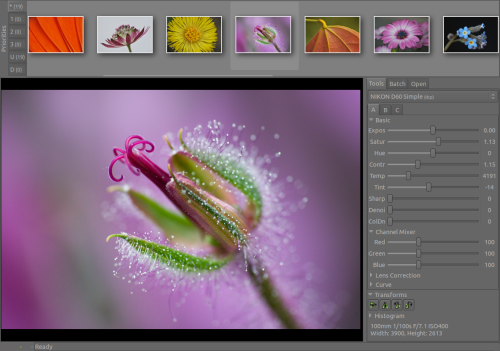
Photo management software like digiKam can help you to process, organize, and manage your photos, but if your photographic workflow is built around RAW files, then you might consider a more specialized application like Rawstudio. This software darkroom offers a wide range of powerful tools for sorting and processing your digital negatives. Although Rawstudio is designed for serious amateurs and professional photographers alike, the application sports a slick and user-friendly interface which puts all the essential tools at your fingertips and makes it easy to get to grips with this powerful application.
The first order of business is, of course, to install Rawstudio on your machine. Ubuntu users will be pleased to learn that the latest version of the application is available in the official software repository, so you can install Rawstudio from the Ubuntu Software Center or using the Synaptic package manager. On other Linux distros, you can compile Rawstudio from source using the standard ./configure; make; make install routine.
Before you start using Rawstudio, it’s a good idea to adjust the default settings. To do this, choose Edit » Preferences. By default, Rawstudio creates a hidden .rawstudio directory in every folder you open in the application. Rawstudio uses these hidden directories to save image settings, such as basic adjustments, crop, rotation, etc. If you prefer to store this information in a single location in your home directory, tick the Place cache in home directory check box in the General section. In the Quick export section, you can specify output settings, including file format, color space, and destination directory. Here you can also define a custom file naming rule using several variables. To see a list of available variables and their brief explanations, press the plus button next to the Filename template drop-down list. In addition to standard file formats such as JPEG, TIFF, and PNG, Rawstudio can upload processed photos directly to popular photo sharing services like Flickr, Picasa, and Facebook.
Once you’ve configured the settings, you are ready to put the application to some practical use. Rawstudio’s interface is split into three main areas. The thumbnail bar at the top displays thumbnails of photos in the currently opened directory. The preview pane displays a large version of the currently selected photo, and the sidebar to the left gives you access to essential editing and tweaking tools.
There are two ways to add RAW files to Rawstudio. Using the File » Open Directory command, you can pick a folder containing RAW files. Alternatively, you can use the Open tab in the left sidebar to navigate and select the desired directory by double-clicking on it. In addition to that, Rawstudio supports tethered shooting, so you can plug your camera to your computer and take photos directly from within the application. To evoke the Tethered Shooting dialog window, press F9 or choose View » Tethered Shooting. Select your camera from the Select camera drop-down list and press the Connect button to establish a connection between the camera and Rawstudio. Press then the Take Photo button. Your camera should take a shot which is then automatically transferred to Rawstudio.
Rawstudio lets you assign a priority to each image using the number keys from 1 to 3, which can help you to triage your RAW files quickly and efficiently. And you can use the tabs in the thumbnail bar to view RAW files by their priorities. The application includes basic tagging capabilities, too. Select the RAW files you want to tag in the thumbnail bar and press Alt+T (or choose the Photo » Tag Photo command). Enter the desired tags separated by spaces, and hit the Apply button. You can then filter photos by a specific tag using the Tag search feature in the Open section.
Most of Rawstudio’s photo tweaking tools are tucked under the Tools tab in the right sidebar. The application allows you to work with up to three versions (or snapshots) of the RAW file simultaneously, and each version has its own tab: A, B, and C. This allows you to try different settings, compare the results, and pick the one you like. All tools in Rawstudio are grouped into collapsible sections. Using the tools available in the Basic section, you can adjust exposure, saturation, hue, and contrast as well as sharpen and denoise the photo. You can use sliders to adjust each parameter, or enter exact values for more precise control. To do the latter, click on the number next to the parameter you want to adjust, and enter the desired value in the appeared pop-up window. Options in the Channel Mixer section allow you adjust red, green, and blue colors, while the Lens Correction section contains lens correction tools that can help you to fix chromatic aberration and vignetting. As the name suggests, the Curve section offers a tool for tweaking the photo’s curve, and you can quickly flip and rotate the photo using the tools in the Transform section. You can individually reset most of the parameters to their default values by clicking on the parameters’ labels. Alternatively, you can reset all the parameters in one fell swoop by using the Edit » Reset settings command.
There are a few other handy tools hidden in Rawstudio’s interface. The Photo menu, for example, contains commands that allow you to crop and straighten the photo. The View menu offers a couple of useful commands, too. The Exposure Mask tool highlights overexposed areas in the photo, making it easier for you to adjust exposure settings. Using the Split command, you can display two snapshots side-by-side, so you can easily compare two different versions of the photo. Finally, the Lights out command dims the interface, making the photo stand out.
When it comes to saving the converted and tweaked RAW files, Rawstudio offers three options. You can use the File » Quick Export command to save the currently opened photo using the default export settings. Alternatively, you can use the File » Export As command to change export settings on the fly. To export multiple photos, you need to add them to the batch queue first. To do this, select the photos you want to export in the thumbnail bar, then choose the Batch » Add to batch queue command (or use the Insert key). Under the Batch tab in the right sidebar, adjust the export settings to your liking and choose the Batch » Start command to run the batch export.


When compiling from source on openSuSE, follow this link
http://mysuseproject.blogspot.com/2011/04/installing-rawstudio-20-from-source-on.html
I know that I am asking too much here. But why is such a fine program not documented in some for useful for newcomers ? I have been using it for some time, unfortunately I can’t get it to work with the Sigma X3F files…. Help please. The other question to this software is and other raw converters, they are based on DCRAW but all produce very different results.
I find that when processing the raw files from an Olympus E-450 the UFRAW produced best results and when using Olympus E-P1 the RawStudio won convincingly.
Is there some dark corner on the internet has only deals with current file formats and rawconverters for Linux ?
/J
Unlike conversions within digikam/showfoto I have no access to 16 bit png and I lose all,well most of, my metadata.
Some of the metadata may appear lost in digikam if digikam starts reading the output from rawstudio before rawstudio has finished writing it. This may also result in thumbnails with a gray lower part. There is a menu-item to re-read the metadata in digikam.
Rawstudio developers could have avoided the problem by writing the image to a file with a different extension and renaming the file when it is complete.