On this page
Contacts and events everywhere - successful syncing between thunderbird and android with Baikal

by joakant, pixabay.com
I got a new Android phone lately and was wondering how to handle my life. New phone, new chances, new life ;-)
I have a lots of contacts. I used to store addresses in an openLDAP server, but I found these hard to manage especially since Ubuntu 14.04 does not ship "luma" anymore! I used to run radicale, but I did not manage to fix my sync-performance issues.
Then i stumbled upon baikal, which is a carddav and caldav server and claims to be small and lightweight. Well, it is written in PHP, which usually makes me check things a bit more carefully. It is hosted on github and is watched and forked by several people. While the last commit was on February, 18th. For me it ran stable for two month and synced two computers and one adroid phone with nearly 500 contacts (Who the heck is this!?) and corresponding events.
The setup
Baikal runs as a caldav and carddav server. So the contacts and events are stored on the server and synced via the server between the devices.
Note: As this is a server based solution, you need some kind of server. A server on the internet allows you syncing all the time but you could also run a server in your local network and only sync when your client and your phone is connected to the local network.
I will create a setup on an Ubuntu 12.04 LTS machine. You propably can adapt this to any other distribution that is running an Apache2 and PHP.
On the client side I will use Thunderbird, probably wellknown Lightning and the maybe less known SOGo Connector for the contacts.
On my Android phone I will use aCalender (since I do not like the Calender the phone ships with), CardDAV-Sync free to sync the contacts and the CalDav Sync Adapter.
The server
Download the latest stable package if you are not daring enough to get the github snapshot. The master branch was 6 commits ahead of the 0.2.7 at the time of writing. Anyway, in this howto please use 0.2.7.
Get baikal
Download and extract to your www-directory.
wget http://baikal-server.com/get/baikal-regular-0.2.7.tgz
tar -zxf baikal-regular-0.2.7.tgz -C /var/www
Note: In the top level directory baikal comes with a good INSTALL.md file!
Install required packages
apt-get install php5-sqlite
Configure Apache
Create a apache configuration, that looks roughly like this:
        ServerAdmin webmaster@localhost
        DocumentRoot /var/www/baikal-regular/html

                Options Indexes FollowSymLinks MultiViews
                AllowOverride None
                Order allow,deny
                allow from all


        ErrorLog ${APACHE_LOG_DIR}/error.log
        LogLevel warn
        CustomLog ${APACHE_LOG_DIR}/access.log combined
Please be sure to setup SSL if you are running your server on the internet!
Disable the default site and enable baikal:
a2dissite default
a2ensite baikal
service apache2 restart
Set the access rights right:
chown -R www-data /var/www/baikal-regular/Specific/
Baikal has same simple but effective safeguards. For installation and administration it checks for the existence of special files in the directory /var/www/baikal-regular/Specific. For installation this is the file ENABLE_INSTALL:
touch /var/www/baikal-regular/Specific/ENABLE_INSTALL
Visit your new server and baikal welcomes you with a lean installation wizard:
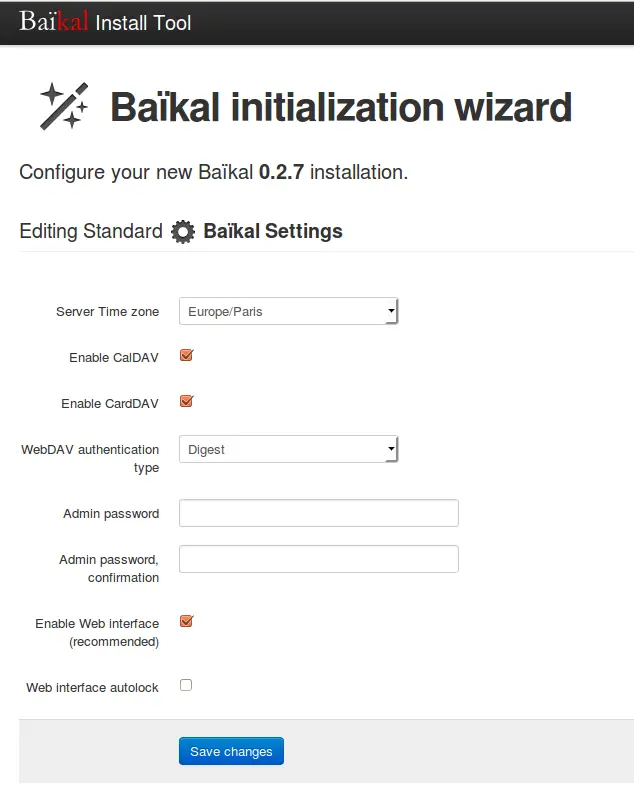
You need to
- set the admin password
- check "webinterface autolock", which requires that you genrate a file /var/www/baikal-regular/Specific/ENABLE_ADMIN, each time you want to perform administrative tasks! Usually this is very seldom, so that I like this option, to avoid brute force attacks on the admin interface.
- Uncheck "use MySQL", since we are using SQLite
and hit the save button. After this you will be taken to admin interface http://yourserver/admin. There you can create users and calendars.
Under Users and Resources add a user YOU with the right name and email address. Pick a good password. A default calendar and addressbook are created automatically. So if you do not want to use several calendars or addressbooks you are already done!
Congratulations!
The client with thunderbird
I use a Ubuntu 14.04 client with a thunderbird 24.6.
Events
We are using lightning to manage the events. You can either install the package xul-ext-lightning or you can install lightning from within Thunderbird from Tools > Add-ons. I choose the later.
Open the calender tab, right-click the left area and choose New calendar.
You need to select the new calendar to be on the network.

Choose CalDav, offline support and enter the URL of your server like http://yourserver/cal.php/calendars/yourname/default.

Finally you can choose the connected email address and pick a fancy color.
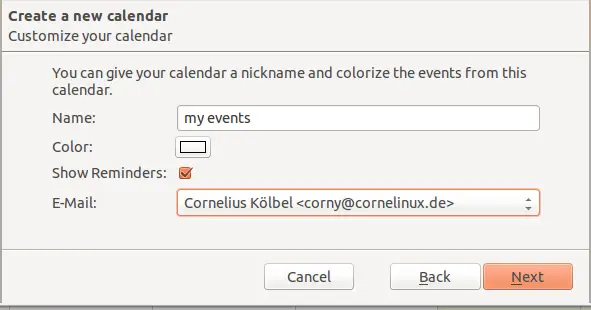
Now you are done. The first time you connect to this calendar you are asked for the username and the password. Create new event and choose this calendar to be the storage for the new events!
Contacts
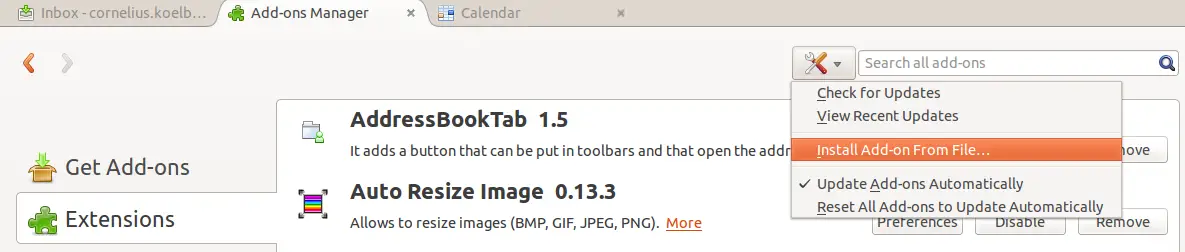
The contact addon we will use is neither available via the Add-Ons dialog nor via the ubuntu repository. Thus we need to download it manually:
wget http://www.sogo.nu/files/downloads/extensions/sogo-connector-24.0.5.xpi
To install this downloaded file go to Tools > Add-ons and install this file as shown in the screenshot:
Now you can open the Thunderbird address book and add a new Remote Addressbook.
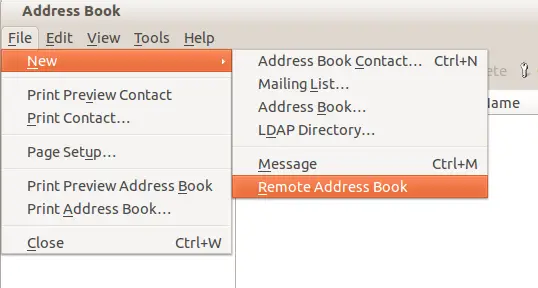
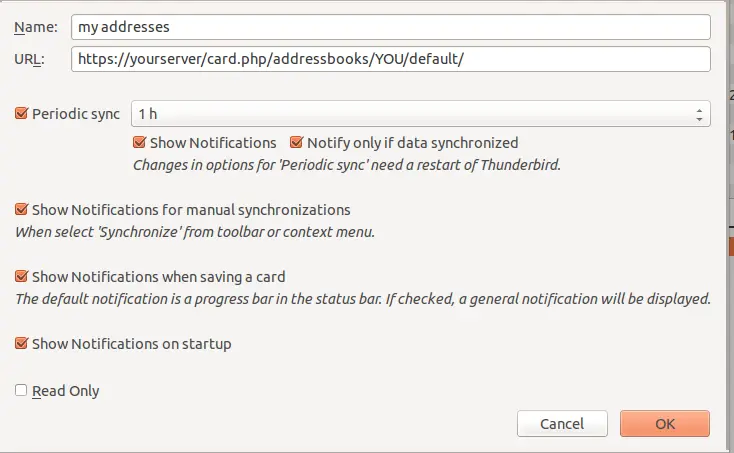
In the configuration of the new remote addressbook you need to enter the right URL like http://yourserver/card.php/addressbooks/YOU/default/ and I recommend checking most checkboxes.
Done! The first time you connect to this addressbook you are asked for the username and the password. Now you can sync your events and contacts from Thunderbird to the caldarv/carddav-server. Even in this scenario with only one client the server already acts as a perfect backup for your contacts and events.
The phone
Install apps
If you are reading this on your computer, you can scan these QR codes with your phone to install the apps:
carddav sync
caldav sync

acalendar
Events
To be able to sync the events you need to install the CalDav Sync Adapter. I also installed aCalender since I like the week view better.
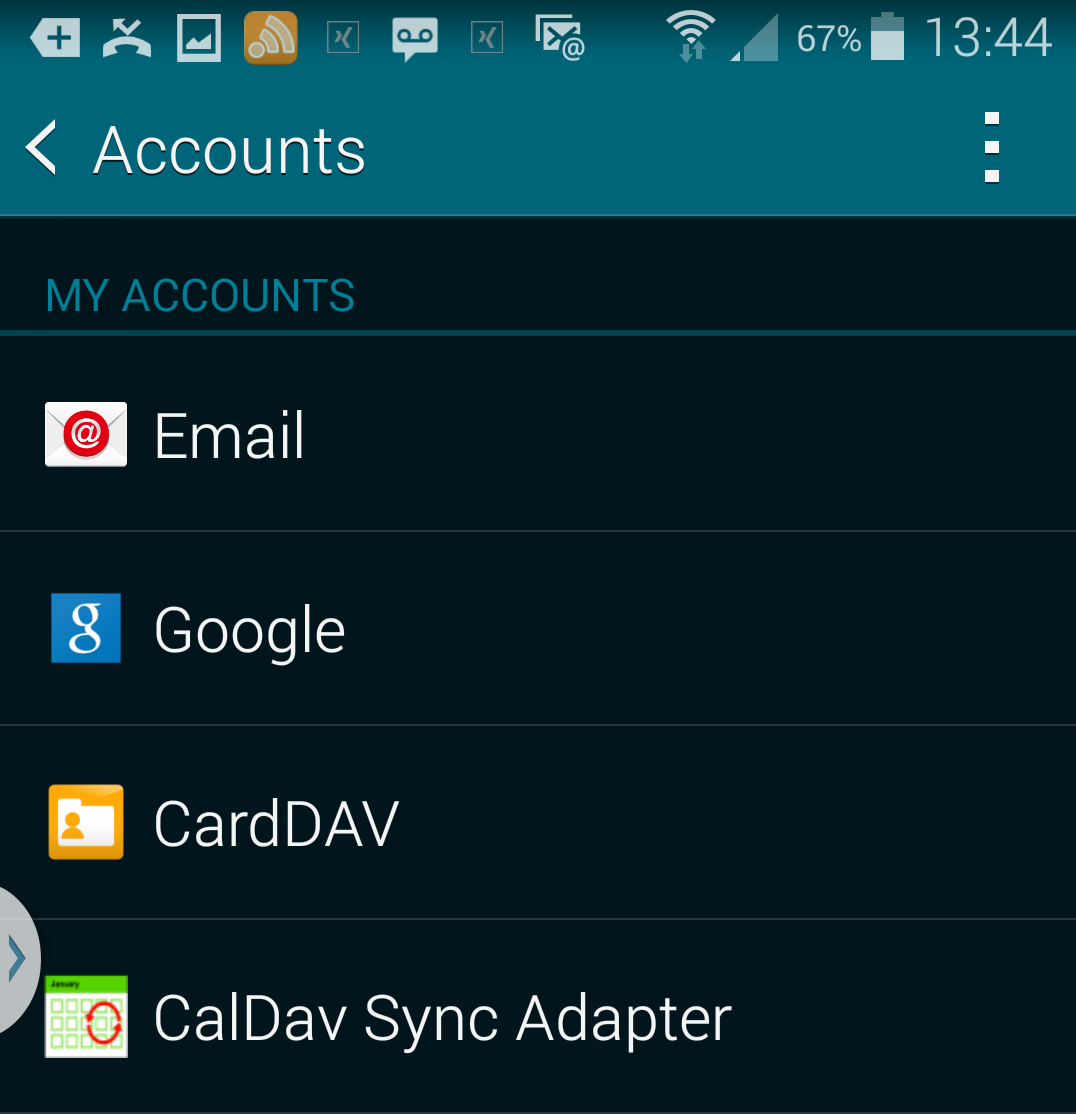
The caldav sync adapter does not create its own icon. Rather go to the account settings.
Create a new Caldav Sync account and use the same URL and username/password as you used when setting up lightning.
Contacts
Install the CardDAV-Sync free app. As soon as it is installed, you get an additional icon but you will also see it in the account settings.
Create a new Carddav Sync account and use the same URL and username/password as you used when setting up the SOGo Addon with thunderbird.
Conclusion
Syncing contacts and events between several devices is now very easy. The data being stored in an SQLite database make it as easy to backup as calling a cp. As you can create several calendars for several users, you can also use this kind of setup with colleages, wife and kids!

