Manage Yubikeys for LUKS encryption with privacyIDEA

by Yubico
This howto mangles with your LUKS system. So please do this in a lab environment or be sure to have a backup to avoid annoying loss of data.
Earlier I showed how you can protect your LUKS encrypted harddisk with the Yubikey in challenge response mode.
But what if you have many Yubikeys? Or if you have many different notebooks, that are used by different users?
So today we will show, how you can manage many yubikeys for many notebooks using privacyIDEA. privacyIDEA is an authentication system for two factor authentication - usually with OTP devices. In a recent version privacyIDEA started to not only answer authentication request, but it was also enhanced to be able to define client machines and add information, which authentication device could be used for an application on a client machine.
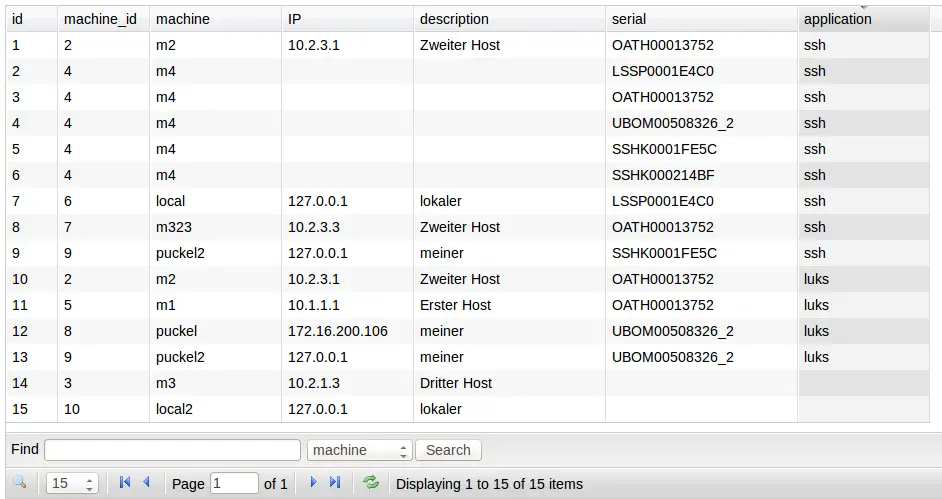
Each machine can be assigned several tokens that work for certain applications. Depending on the application the necessary authentication information will be transferred to this client, so that the application can be access with this token.
Today privacyIDEA supports two application types: luks and ssh. Certain token types work well with LUKS, other work well with SSH. The modular design allows the easy creation of new application types.
In case of the application luks the challenge and the response that generates such a token will be transferred.
This idea was originally initiated by me for the Chemnitzer Linuxtage in 2014. You can find a German paper about this here.
Setting it up
You need to have a privacyIDEA installation. You can follow different guides to do this. Please be sure to have the latest version 1.2.3 installed. On Ubuntu 14.04 you can do:
add-apt-repository ppa:privacyidea/privacyidea
apt-get update
apt-get install privacyidea
You should also install privacyideaadm (1.2.2+), the command line administration client. You need to install it on your privacyidea server and on the client machine. On Ubuntu you can do:
add-apt-repository ppa:privacyidea/privacyidea
apt-get update
apt-get install privacyideaadm
Create a machine
First you need to create a client machine in privacyidea. You can do this using the command line client either from the client machine or from the server itself:
privacyideaadm -U https://172.16.200.139:5001 --admin=admin@admin -C createmachine --name 1stclient --ip 172.16.200.105
172.16.200.139 being your privacyIDEA server and 172.16.200.105 your client machine. The name parameter should contain the hostname of your client and the ip the IP address, the client uses to talk to the privacyIDEA server.
Create a Yubikey
Create a yubikey that is manage by privacyidea:
privacyideaadm -U https://172.16.200.139:5001 --admin=admin@admin -C yubikey_mass_enroll --yubiCR
Assign Yubikey to client
Now that privacyIDEA knows the yubikey, you can assign this token to a client machine:
privacyideaadm -U https://172.16.200.139:5001 --admin=admin@admin -C machine_addtoken --name=1stclient --serial=UBOM00508326_2 --app=luks -option=slot=7 --option=partition=/dev/sda3
Now privacyIDEA knows, that this yubikey is to be used with LUKS on the client machine 1stclient. privacyIDEA has additional settings for LUKS, it knows that this token should be enrolled to slot 7 for partition /dev/sda3.
Install LUKS slot
Please note, that you will also need to have yubikey-luks installed. Otherwise, you will write yubikey information to a key slot, but the grub boot loader will not know how to use it. You can find it here or you can install it on your ubuntu machine:
apt-get install yubikey-luks
Now you are able to fetch the authentication information from the privacyIDEA server:
privacyidea-luks-assign -U https://172.16.200.139:5001 --admin=admin@admin --name=1stclient --clearslot
This will ask you for a Yubikey password, which in fact is the challenge during boot up. The privacyIDEA server will provide the response to this password (challenge). The response is written as passphrase to the LUKS slot. During the enrollment process you need to provide an existing LUKS passphrase, so that the new slot can be written.
Putting the privacycidea-luks-assign in some kind of cron job, lets you controll the authentication of LUKS remotely from within privacyIDEA. Each time you assign a new token and app to this machine, it will create a new LUKS slot.
Processes are not smooth, yet. E.g. at the moment removing a token from the machine will not remove the slot from the local LUKS. But as soon as you assign another token to the same slot, this slot will be overwritten with the new token.
Think about it, try it, improve it.
Till then: Happy authenticating and data protecting!

