The Perfect Server – CentOS 7 (Apache2, Dovecot, ISPConfig 3)
This tutorial exists for these OS versions
On this page
This tutorial shows how to prepare a CentOS 7 x86_64 server for the installation of ISPConfig 3 and how to install ISPConfig 3. ISPConfig 3 is a webhosting control panel that allows you to configure the following services through a web browser: Apache web server, Postfix mail server, MySQL, BIND nameserver, PureFTPd, SpamAssassin, ClamAV, Mailman, and many more. Since version 3.0.4, ISPConfig comes with full support for the nginx web server in addition to Apache; this tutorial covers the setup of a server that uses Apache, not nginx.
ISPConfig 3 Manual
In order to learn how to use ISPConfig 3, I strongly recommend to download the ISPConfig 3 Manual.
On more than 300 pages, it covers the concept behind ISPConfig (admin, resellers, clients), explains how to install and update ISPConfig 3, includes a reference for all forms and form fields in ISPConfig together with examples of valid inputs, and provides tutorials for the most common tasks in ISPConfig 3. It also lines out how to make your server more secure and comes with a troubleshooting section at the end.
1 Requirements
To install such a system you will need the following:
- A Centos 7 minimal server system. This can be a server installed from scratch as described in our Centos 7 minimal server tutorial or a virtual-server or root-server from a hosting company that has a minimal Centos 7 setup installed.
- A fast Internet connection.
2 Preliminary Note
In this tutorial I use the hostname server1.example.com with the IP address 192.168.1.100 and the gateway 192.168.1.254. These settings might differ for you, so you have to replace them where appropriate.
3 Set the keyboard layout
The current CentOS 7 installer has a bug, so you might end up with a different keyboard layout on the shell then the one selected during install. If you hit that bug, then you can switch to the right keyboard (in my case "de" for a german keyboard layout, with the localectl command:
localectl set-keymap de
To get a list of all available keymaps, run:
localectl list-keymaps
I want to install ISPConfig at the end of this tutorial which comes with its own firewall. That's why I disable the default CentOS firewall now. Of course, you are free to leave it on and configure it to your needs (but then you shouldn't use any other firewall later on as it will most probably interfere with the CentOS firewall).
Run...
systemctl stop firewalld.service
systemctl disable firewalld.service
Now I will install some basic network tools and a shell based editor that we need in the next steps:
yum -y install nano wget net-tools NetworkManager-tui
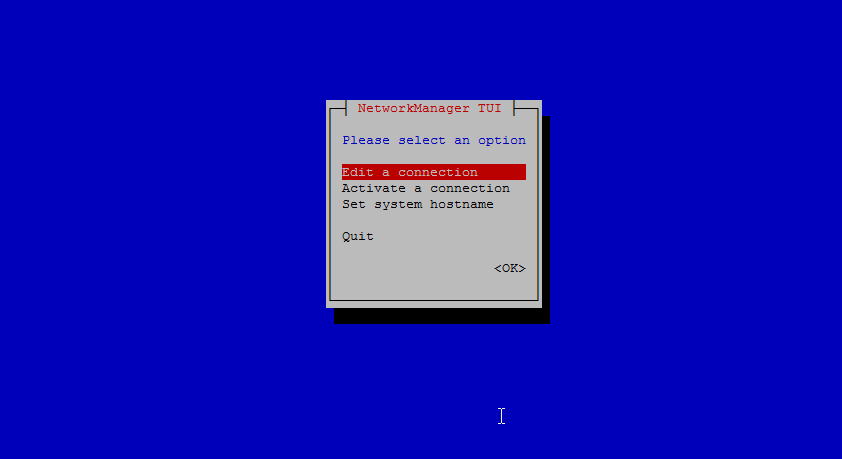
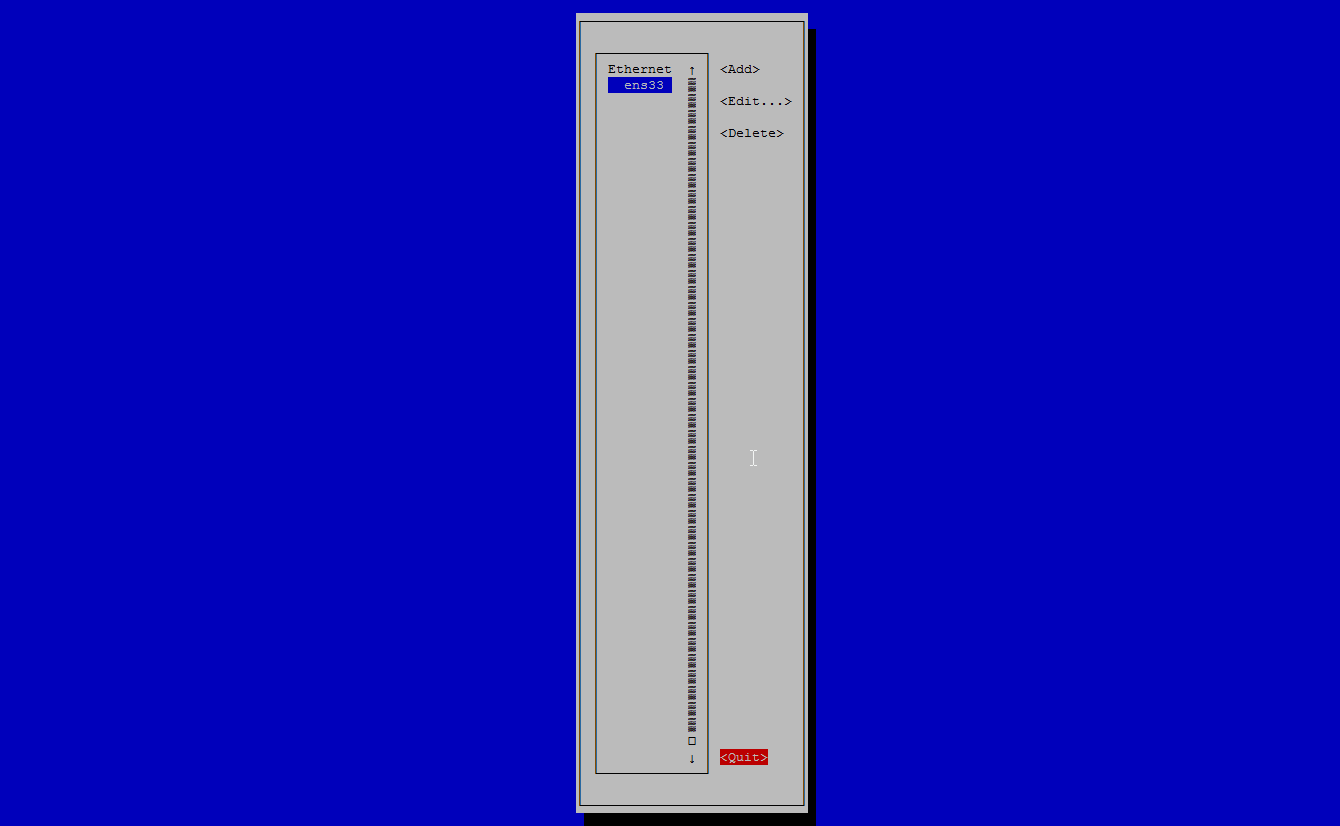
If you did not configure your network card during the installation, you can do that now. Run...
nmtui
... and go to Edit a connection:
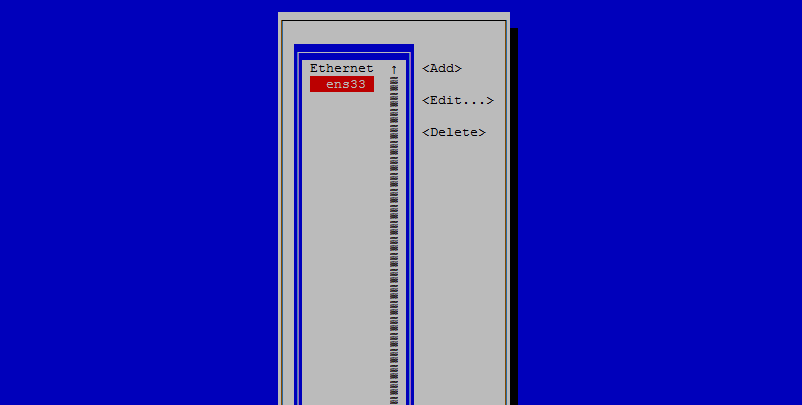
Select your network interface:
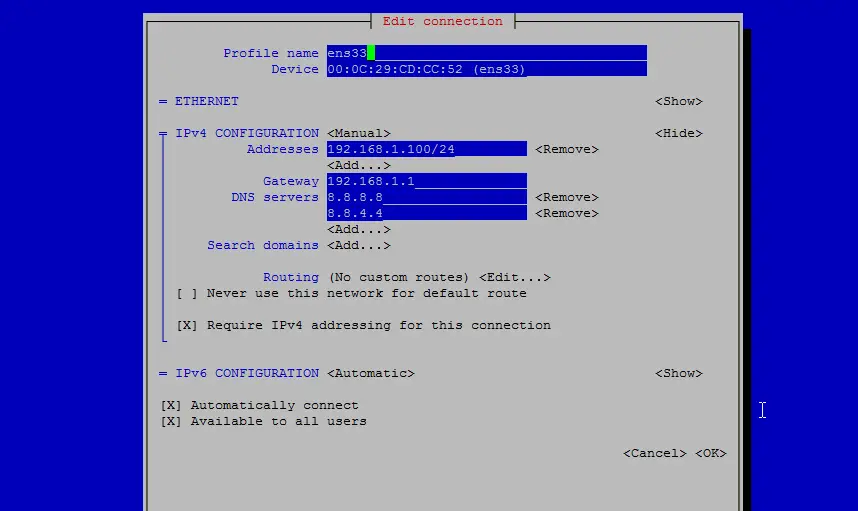
Then fill in your network details - disable DHCP and fill in a static IP address, a netmask, your gateway, and one or two nameservers, then hit Ok:
Next select OK to confirm the changes that you made in the network settings
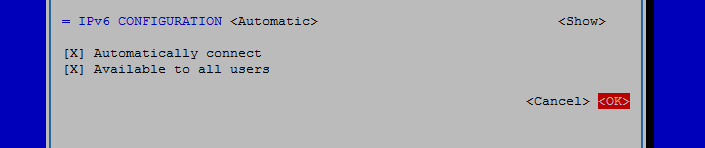
and Quit to close the nmtui network configuration tool.
You should run
ifconfig
now to check if the installer got your IP address right:
[root@server1 ~]# ifconfig
ens33: flags=4163<UP,BROADCAST,RUNNING,MULTICAST>  mtu 1500
        inet 192.168.1.100  netmask 255.255.255.0  broadcast 192.168.1.255
        inet6 fe80::20c:29ff:fecd:cc52  prefixlen 64  scopeid 0x20

        ether 00:0c:29:cd:cc:52  txqueuelen 1000  (Ethernet)
        RX packets 55621  bytes 79601094 (75.9 MiB)
        RX errors 0  dropped 0  overruns 0  frame 0
        TX packets 28115  bytes 2608239 (2.4 MiB)
        TX errors 0  dropped 0 overruns 0  carrier 0  collisions 0

lo: flags=73<UP,LOOPBACK,RUNNING>  mtu 65536
        inet 127.0.0.1  netmask 255.0.0.0
        inet6 ::1  prefixlen 128  scopeid 0x10
        loop  txqueuelen 0  (Local Loopback)
        RX packets 0  bytes 0 (0.0 B)
        RX errors 0  dropped 0  overruns 0  frame 0
        TX packets 0  bytes 0 (0.0 B)
        TX errors 0  dropped 0 overruns 0  carrier 0  collisions 0
If your network card does not show up there, then it not be enabled on boot, In this case, open the file /etc/sysconfig/network-scripts/ifcfg-eth0
nano /etc/sysconfig/network-scripts/ifcfg-ens33
and set ONBOOT to yes:
[...]
ONBOOT=yes
[...]
and reboot the server.
Check your /etc/resolv.conf if it lists all nameservers that you've previously configured:
cat /etc/resolv.conf
If nameservers are missing, run
nmtui
and add the missing nameservers again.
Now, on to the configuration...
4 Adjust /etc/hosts
Next we edit /etc/hosts. Make it look like this:
nano /etc/hosts
127.0.0.1   localhost localhost.localdomain localhost4 localhost4.localdomain4
192.168.1.100   server1.example.com     server1

::1         localhost localhost.localdomain localhost6 localhost6.localdomain6
5 Configure The Firewall
(You can skip this chapter if you have already disabled the firewall at the end of the basic system installation.)
I want to install ISPConfig at the end of this tutorial which comes with its own firewall. That's why I disable the default CentOS firewall now. Of course, you are free to leave it on and configure it to your needs (but then you shouldn't use any other firewall later on as it will most probably interfere with the CentOS firewall).
Run
systemctl stop firewalld.service
systemctl disable firewalld.service
and disable the firewall.
To check that the firewall has really been disabled, you can run
iptables -L
afterwards. The output should look like this:
[root@server1 ~]# iptables -L
Chain INPUT (policy ACCEPT)
target prot opt source destination
Chain FORWARD (policy ACCEPT)
target prot opt source destination
Chain OUTPUT (policy ACCEPT)
target prot opt source destination
Or use the firewall-cmd command:
firewall-cmd --state
[root@server1 ~]# firewall-cmd --state
not running
[root@server1 ~]#
6 Disable SELinux
SELinux is a security extension of CentOS that should provide extended security. In my opinion you don't need it to configure a secure system, and it usually causes more problems than advantages (think of it after you have done a week of trouble-shooting because some service wasn't working as expected, and then you find out that everything was ok, only SELinux was causing the problem). Therefore I disable it (this is a must if you want to install ISPConfig later on).
Edit /etc/selinux/config and set SELINUX=disabled:
nano /etc/selinux/config
# This file controls the state of SELinux on the system.
# SELINUX= can take one of these three values:
#     enforcing - SELinux security policy is enforced.
#     permissive - SELinux prints warnings instead of enforcing.
#     disabled - No SELinux policy is loaded.
SELINUX=disabled
# SELINUXTYPE= can take one of these two values:
#     targeted - Targeted processes are protected,
#     mls - Multi Level Security protection.
SELINUXTYPE=targeted
Afterwards we must reboot the system:
reboot
7 Enable Additional Repositories And Install Some Software
First we import the GPG keys for software packages:
rpm --import /etc/pki/rpm-gpg/RPM-GPG-KEY*
Then we enable the EPEL repository on our CentOS system as lots of the packages that we are going to install in the course of this tutorial are not available in the official CentOS 7 repository:
rpm -ivh http://dl.fedoraproject.org/pub/epel/7/x86_64/e/epel-release-7-2.noarch.rpm
yum -y install yum-priorities
Edit /etc/yum.repos.d/epel.repo...
nano /etc/yum.repos.d/epel.repo
... and add the line priority=10 to the [epel] section:
[epel]
name=Extra Packages for Enterprise Linux 7 - $basearch
#baseurl=http://download.fedoraproject.org/pub/epel/7/$basearch
mirrorlist=https://mirrors.fedoraproject.org/metalink?repo=epel-7&arch=$basearch
failovermethod=priority
enabled=1
priority=10
gpgcheck=1
gpgkey=file:///etc/pki/rpm-gpg/RPM-GPG-KEY-EPEL-7
[...]
Then we update our existing packages on the system:
yum update
Now we install some software packages that are needed later on:
yum -y groupinstall 'Development Tools'
8 Quota
(If you have chosen a different partitioning scheme than I did, you must adjust this chapter so that quota applies to the partitions where you need it.)
To install quota, we run this command:
yum -y install quota
Now we check if quota is already enabled for the filesystem where the website (/var/www) and maildir data (var/vmail) is stored. In this example setup, I have one big root partition, so I search for ' / ':
mount | grep ' / '
[root@server1 ~]# mount | grep ' / '
/dev/mapper/centos-root on / type xfs (rw,relatime,attr2,inode64,noquota)
[root@server1 ~]#
If you have a separate /var partition, then use:
mount | grep ' /var '
instead. If the line contains the word "noquota", then proceed with the following steps to enable quota.
Enabling quota on the / (root) partition
Normally you would enable quota in the /etc/fstab file, but if the filesystem is the root filesystem "/", then quota has to be enabled by a boot parameter of the Linux Kernel.
Edit the grub configuration file:
nano /etc/default/grub
search fole the line that starts with GRUB_CMDLINE_LINUX and add rootflags=uquota,gquota to the commandline parameters so that the resulting line looks like this:
GRUB_CMDLINE_LINUX="rd.lvm.lv=centos/swap vconsole.font=latarcyrheb-sun16 rd.lvm.lv=centos/root crashkernel=auto vconsole.keymap=us rhgb quiet rootflags=uquota,gquota"
and apply the changes by running the following command.
cp /boot/grub2/grub.cfg /boot/grub2/grub.cfg_bak
grub2-mkconfig -o /boot/grub2/grub.cfg
and reboot the server.
reboot
Now check if quota is enabled:
mount | grep ' / '
[root@server1 ~]# mount | grep ' / '
/dev/mapper/centos-root on / type xfs (rw,relatime,attr2,inode64,usrquota,grpquota)
[root@server1 ~]#
When quota is active, we can see "usrquota,grpquota" in the mount option list.
Enabling quota on a separate /var partition
If you have a separate /var partition, then edit /etc/fstab and add ,uquota,gquota to the / partition (/dev/mapper/centos-var):
nano /etc/fstab
#
# /etc/fstab
# Created by anaconda on Sun Sep 21 16:33:45 2014
#
# Accessible filesystems, by reference, are maintained under '/dev/disk'
# See man pages fstab(5), findfs(8), mount(8) and/or blkid(8) for more info
#
/dev/mapper/centos-root /                       xfs     defaults        1 1
/dev/mapper/centos-var /var                     xfs     defaults,uquota,gquota        1 2
UUID=9ac06939-7e43-4efd-957a-486775edd7b4 /boot                   xfs     defaults        1 3
/dev/mapper/centos-swap swap                    swap    defaults        0 0
Then run
mount -o remount /var
quotacheck -avugm
quotaon -avug
to enable quota.
9 Install Apache, MySQL, phpMyAdmin
We can install the needed packages with one single command:
yum -y install ntp httpd mod_ssl mariadb-server php php-mysql php-mbstring phpmyadmin

