Using secure shell (SSH) for login and secure copy (SCP) for data transfer on Linux
On this page
SSH stands for secure shell. It is an encrypted remote login protocol. Once it has been set up on each node, it can be used to communicate with various other nodes in that network.
The main benefits of SSH are:
- SSH uses the RSA encryption algorithm to generate public and private keys, making intrusion extremely difficult.
- Since SSH is a remote login protocol, it can be configured on a laptop. That means you can use your laptop to wirelessly connect to the Raspberry Pi cluster.
- Because protocols like SCP (Secure Copy) and SFTP (Secure File Transfer Protocol) run on top of SSH, you can use them to transfer files and folders directly from one node to another.
- SSH supports one time log in. This means that you only have to enter credentials the first time you log in. From the second log in onwards, it's not necessary.
Let's start with, generating SSH keys. For the SSH to be used, the keys should be generated between two or more nodes so that data transfer can happen. We use the RSA for encryption. Note that on one node, we generate the keys and it will have the private or secret keys. The same node will also generate a public key which will be sent to other nodes who wish to send data to this node. Perform the following commands on the node you wish to send data from. I am calling this node the "master node" and the other nodes "worker nodes".
cd ~
ssh-keygen --t rsa --C "raspberrypi@raspberrypi"
These two commands set a default location of /home/pi/_ssh/id_rsa to store the key.
If asked for a passphrase, leave the passphrase blank. Once this is done, next step is to send the public keys to the worker node. So make sure you have the worker node connected to the network. Now we can setup the encryption keys on the worker node, so the IP address used is the IP address of the worker node. Run the following command on the master node.
cat ~/.ssh/id_rsa.pub | ssh [email protected] "mkdir .ssh;cat >> .ssh/authorized_keys"
Once the SSH keys are generated, we can log in to any other node to which the keys have been sent from the master node and to do so use the command:
ssh [email protected]
In the above command "pi" indicates the user, by default all PIs using Raspbian will have the user as "pi" and "192.168.3.216" is the IP of my client. you will have to change it to represent your client PI's IP address.
This will ask for a password. Once you log in, all the commands you type will run on that node and not on the master, but the output will be displayed on the master itself. SSH can also be used to run commands directly on the other nodes. For example, to change the hostname of different nodes, use this commands in a format as below:
ssh [email protected] 'sudo echo "cilent001" | sudo nano /etc/hostname'
ssh [email protected] 'sudo echo "cilent002" | sudo nano /etc/hostname'
ssh [email protected] 'sudo echo "cilent003" | sudo nano /etc/hostname'
As shown above, we can use SSH to run commands in other nodes/PIs without actually login in into them. Following is another example to safely shutdown a node in the network with IP address 192.168.3.216
ssh [email protected] 'sudo poweroff'
The following figure shows how SSH is used to log in to a worker node (192.168.3.216) and from the worker node, get the control terminal back to the master node.
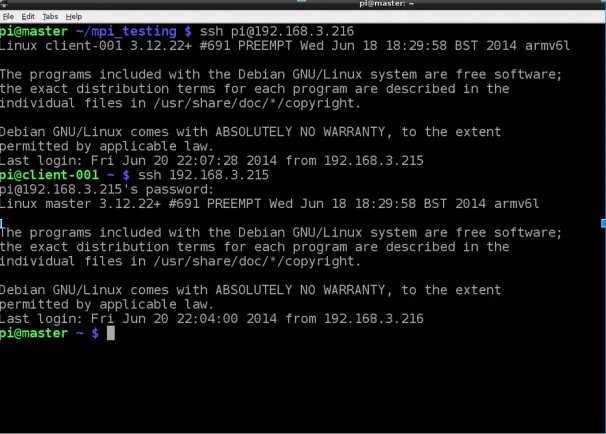
As it can be seen in the above figure, logging in to a worker node happens directly, that is without password entry except for the first time. But each time the control of the terminal comes back to the master node (192.168.3.215), the login credential has to be entered. This way the master is always protected from outside threat.
So, after issuing commands via SSH to other nodes, there might be situations where data has to be sent to multiple nodes. If the number of nodes are small, then we can manually log in to each node, connect it to a display and keyboard, and send files. But this is a highly inefficient way to do it when the size of the cluster is large. An easier way would be to use SCP to send files. Install SCP using the command:
sudo apt-get install scp
Please do note that some linux OS may come with SCP pre-installed, but the Raspbian that we were using, didn't have it. The general command to send a single file is:
scp (path of file on local device) [email protected] (path of remote location)
Example:
scp /pi/example.c [email protected] /pi/project
Here, the remote device to send data to is recognised by the IP address. Many files in a directory can be sent using the recursive option (-R). For example:
scp -r /pi/project [email protected] /pi/project
The above command recursively transfers all the files in the /pi/project from the local host to the recursively folder in the remote host identified by the IP address.
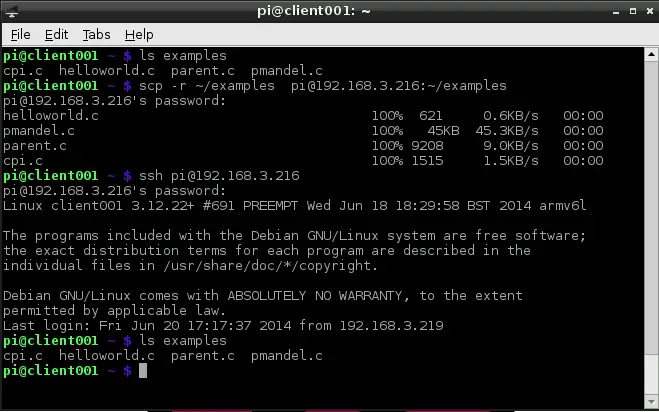
The image below demonstrates the various ssh and scp commands. It starts off by listing the contents of its current folder, then calles "scp" recursively to trasfer all the files in the current folder to a folder in another node. It then logs into the other node and shows that the scp has successfully transferred the contents to the destination.
SCP can be used with few other options to make the transfer to meet some of our conditions. Here are a few options:
-
We can use the "-p" option to preserve modification times, access times, and modes from the original file. Example:
scp -p test.c [email protected]:~/
Here the access time, access modes and last modification time of the file "test.c" will be preserved in the destination node as well.
-
SCP allows the files to be compressed before they can be sent across the network to the destination. This is very useful when the file(s) is very big to be transferred, and hence compressing will increase the speed at which it will be sent. To do this we use the option "-C". Example:
scp -pC test.c [email protected]:~/
Here we can see that multiple options can be used and both their features will be applied to the command.
-
Socket programming involves sending and receiving data through ports and SCP can be used to send data through specific ports to the remote host. This can be done using the "-P" option.Example:
scp -P 21938 test.c [email protected]:~/
Here, the port used to send data is 1938.
-
There might be cases, where you wouldn't want to know the status of transfer of files, like in the image above. It makes sense, to turn off the transfer status when there is a large amount of files. We can do that by using the "-q" option. Example:
scp -rq ~/files [email protected]:~/files
Here, the contents of the folder named files is trasferred to files folder on another node, but the status bar and debugging messages are all disabled, that is not displayed.

