On this page
Getting started with commandline encryption tools on Linux
1 Introduction
Encryption is the process of encoding messages or information in such a way that only authorized parties can read them. With almost no privacy in this digital generation of our's, encryption of our data is one of the most required tools. Most of the applications like gmail encrypt our data, but the data on your system is still unsecured and there are hackers or unauthorised users waiting to access them. One way to minimize the risk of data theft is to encrypt the data that is present even on our local system.
This tutorial demonstrates several methods of encrypting the data on Linux systems using commandline tools.
2 Encryption using GPG
2.1 GPG Introduction
GPG stands for GNU Private Guard which is a commandline utility that is used to encrypt and decrypt data files or folders using either symmetric or public key encryption. GPG is a GPL Licensed alternative to the PGP cryptographic software suite. GPG is used by OpenPGP-compilant systems as well.
2.2 Encryption using Symmetric Key
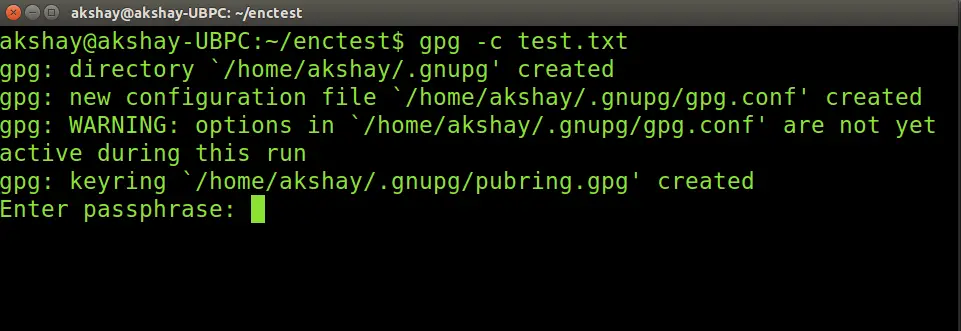
Here I have a file named "test.txt" that I will encrypt and then decrypt with a symmetric key and print the decrypted text into another file called "output.txt".
Run the following command to encrypt the file test.txt using a symmetric key. The option "-c" indicated the GPG to use symmetric keys.
gpg -c test.txt
The result of this will look like the image below. The first time when GPG is run, a .gnupg folder is created. It contains the files that are necessary for the encryption process. It then asks you to enter a passphrase twice. Please make sure that you enter a strong passphrase and that you remember it as you need this in future to decrypt your files.
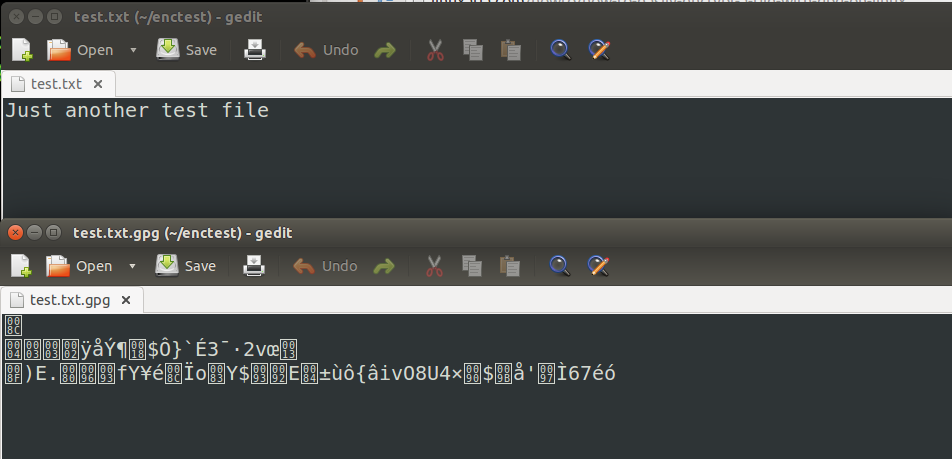
So, once the passphrase is entered correctly, a file called "test.txt.gpg" is created. This is the encrypted file. The following image shows the file before and after encryption.You can see that the encrypted text is in an unreadable format.
Use the following command to decrypt the encrypted file
gpg -o output.txt test.txt.gpg
You will be prompted to enter the passphrase used to encrypt. Once you enter that correctly, "output.txt" file will be created with the same contents as that of "test.txt". The output of decryption might look similar to the image below:

2.3 Public Key Encryption
Here we will encrypt a set of files using the public / private key encryption mechanism of GPG. It involves creation of a private key which should never be shared with anyone and a public key that has to be shared with the people who want to send you encrypted data.
First, we will have to pack the files into a compressed folder. Here I have a directory called "enctest"with three files test1.txt to test3.txt .We will compress this directory tar.gz file. I wll use the following command to create the compressed tar.gz archive:
tar czf files.tar.gz ~/enctest
This creates a file "files.tar.gz" . We now have to generate the public/private key pair. Run the following command to generate the key:
gpg --gen-key
Remember, this has to be done only once and any number of files and folders can be encrypted with this key. Once you type this command, various set of questions will be asked. The questions will be:
- What kind of encryption to use? I selected 1 which is RSA and RSA.
- What should be the key size? I chose 2048, you can choose any size in the range of 1024 and 4096.
- When should the Key expire? I selected 0 , which means that the key never expires. But can provide days, weeks or years if you want it to expire in a particular time.
Other things like passphrase will be asked, you will be prompted to enter it twice. Make sure you use a strong one and that you remember the passphrase. Also your credentials will be used. The credentials that I have used here (provided below) are just for testing. It is recommended that you use your genuine credentials like name, email ID and provide some comment.
The following content shows my answer and how the output will be:
gpg (GnuPG) 1.4.16; Copyright (C) 2013 Free Software Foundation, Inc.
This is free software: you are free to change and redistribute it.
There is NO WARRANTY, to the extent permitted by law.

Please select what kind of key you want:
   (1) RSA and RSA (default)
   (2) DSA and Elgamal
   (3) DSA (sign only)
   (4) RSA (sign only)
Your selection? 1
RSA keys may be between 1024 and 4096 bits long.
What keysize do you want? (2048) 2048
Requested keysize is 2048 bits
Please specify how long the key should be valid.
         0 = key does not expire
        = key expires in n days
      w = key expires in n weeks
      m = key expires in n months
      y = key expires in n years
Key is valid for? (0) 0
Key does not expire at all
Is this correct? (y/N) y

You need a user ID to identify your key; the software constructs the user ID
from the Real Name, Comment and Email Address in this form:
    "Heinrich Heine (Der Dichter) <[email protected]>"

Real name: John Doe
Email address: [email protected]
Comment: tis is key generation
You selected this USER-ID:
    "John Doe (tis is key generation) <[email protected]>"

Change (N)ame, (C)omment, (E)mail or (O)kay/(Q)uit? o
You need a Passphrase to protect your secret key.
Once you enter the passphrase, it begins to generate the key. It will ask you to do some work. It is recommended to move the mouse or type something or use the drives to open some files. It will use this work to generate random bits. You may have to do this multiple times. The output for me is shown below:
We need to generate a lot of random bytes. It is a good idea to perform
some other action (type on the keyboard, move the mouse, utilize the
disks) during the prime generation; this gives the random number
generator a better chance to gain enough entropy.

Not enough random bytes available.  Please do some other work to give
the OS a chance to collect more entropy! (Need 187 more bytes)
+++++
...+++++
We need to generate a lot of random bytes. It is a good idea to perform
some other action (type on the keyboard, move the mouse, utilize the
disks) during the prime generation; this gives the random number
generator a better chance to gain enough entropy.

Not enough random bytes available.  Please do some other work to give
the OS a chance to collect more entropy! (Need 92 more bytes)
.....+++++

Not enough random bytes available.  Please do some other work to give
the OS a chance to collect more entropy! (Need 114 more bytes)

+++++
Once done, the key has been generated. It will look similar to the content below:
gpg: /home/akshay/.gnupg/trustdb.gpg: trustdb created
gpg: key FA2314B6 marked as ultimately trusted
public and secret key created and signed.

gpg: checking the trustdb
gpg: 3 marginal(s) needed, 1 complete(s) needed, PGP trust model
gpg: depth: 0  valid:   1  signed:   0  trust: 0-, 0q, 0n, 0m, 0f, 1u
pub   2048R/FA2314B6 2015-04-02
      Key fingerprint = 5A02 5D77 3E0A 8B69 8086  3032 DE51 6EA5 FA23 14B6
uid                  John Doe (tis is key generation) <[email protected]>
sub   2048R/6F78E642 2015-04-02
There are two important things here: provide a strong passphrase and make sure to remember your passphrase
Now that the keys are generated, we will now have to export the public key file for importing it on other systems or to send it by email. To start the export, use the following command:
gpg --armor --output file-enc-pubkey.txt --export 'John Doe'
Replace 'John Doe' with the name you used while generating the key.
It is also recommended to take a backup of the private key. We can use gpg to do that. To take the backup, use the following command:
gpg --armor --output file-enc-privkey.asc --export-secret-keys 'John Doe'
Here the file "file-enc-privkey.asc" will hold the backup of the private key safely. Once exporting and key backup is complete, we can now encrypt and decrypt the .tar.gz file. Use the following command to encrypt:
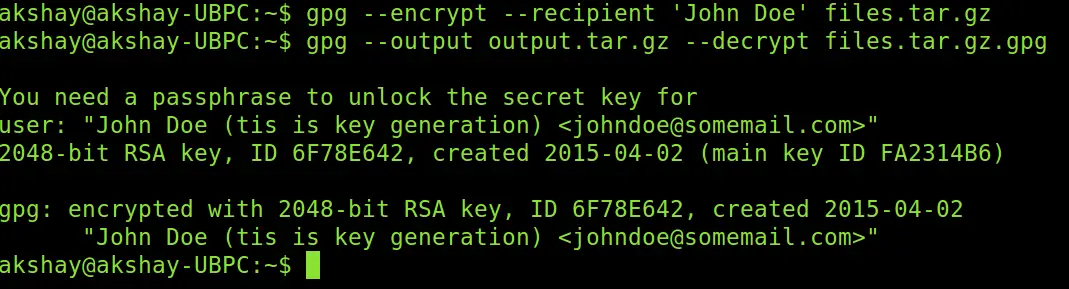
gpg --encrypt --recipient 'John Doe' files.tar.gz
Remember to change 'John Doe' in the above command to the name given by you during key generation, else the encryption will fail. When the command runs successfully, an encrypted file called "files.tar.gz.gpg" will be created.
Now we can decrypt the tar.gz archive using the following command. It will use the private key along with the passphrase to decrypt and provide the decrypted folder. Use the following command to decrypt:
gpg --output output.tar.gz --decrypt files.tar.gz.gpg
The above command will ask for the passphrase and then decrypt the encrypted file and create a compressed file named "output.tar.gz" which can then be extracted to folder with tar to get back the files. The following image shows the output of encrypting and decrypting commands:
2.4 Why GPG?
GPG supports both: public key encryption and symmetric encryption and this provides a good amount of flexibility and can be used for a wide range of applications. There isn't a need to provide any kind of sensitive information and also gpg can have any number of encryptors by using the public key. Choice is given to the user to select from multiple encryption algorithms. These reasons make it a very useful security tool to for encryption of files and folders or data.
3 Encryption using OpenSSL
3.1 Introduction to OpenSSL
The OpenSSL project is a collaborative effort to develop a robust, commercial-grade, full-featured and Open Source toolkit implementing the Secure Sockets Layer (SSL v2/v3) and Transport Layer Security (TLS) protocols as well as a full-strength general purpose cryptographic library. OpenSSL is available for most Unix-like operating systems and it is based on SSLeay. OpenSSL supports also many SSH, SFTP, and SCP applications. Here we use OpenSSL to encrypt data by making use the asymmetric encryption and the AES cipher. Symmetric encryption can be used for encrypting bigger files or data.
3.2 Generating the Public and Private keys
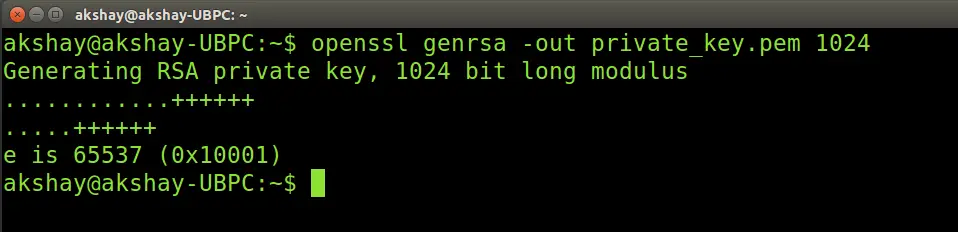
The first thing we have to do is generate the public and private keys.We first generate the private key. To do so, use the following command:
openssl genrsa -out private_key.pem 1024
The above command instructs OpenSSL to use RSA to generate a private key with a size of 1024 bytes. The key is then stored securely within a file called "private_key.pem". The output of this command will look similar to the image below:
Once the private (the secret) key is generated, we can use that to generate the public key so that they form a pair. Use the following command to generate the public key:
openssl rsa -in private_key.pem -out public_key.pem -outform PEM -pubout
It will look like the image below:

3.3 Encrypting data
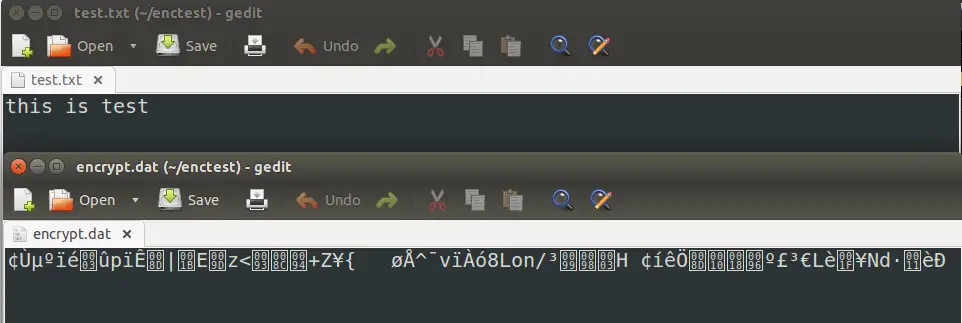
We can now use the public key to encrypt data. Here we will encrypt the file "test.txt" and store the encrypted text in the file encrypt.dat. Execute the following command:
openssl rsautl -encrypt -inkey public_key.pem -pubin -in encrypt.txt -out encrypt.dat
The following images show the text file before and after encryption:
3.4 Decrypting data
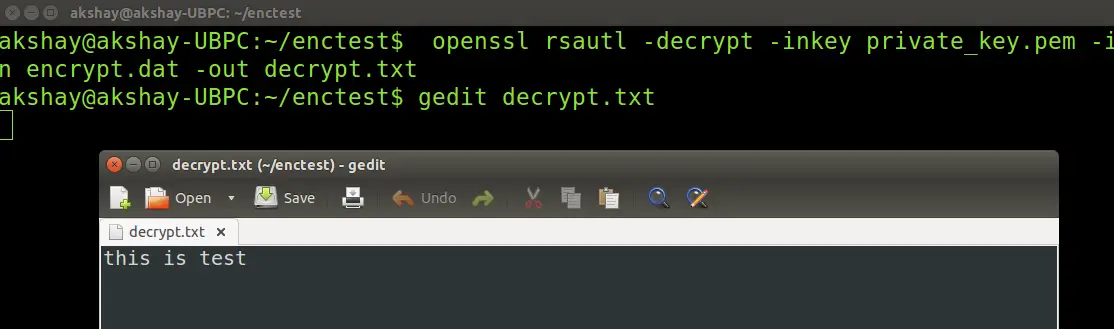
Here we use the private key to decrypt the file. Run the following command:
openssl rsautl -decrypt -inkey private_key.pem -in encrypt.dat -out decrypt.txt
The file decrypt.txt will contain the decrypted data. The execution of the above command and also the file content is shown in the image below:
4 Conclusion
The methods shown above are highly secure when used carefully and allow multiple ciphers and security levels to suit different security levels. Thus any of these can be used is various scenarios for encrypting files/folders and raw data.

