 In this article we will cover the steps needed to install MediaWiki on your CentOS 7 VPS. MediaWiki is a free and open source wiki application. It is written in the PHP programming language and uses a backend database.
SERVER REQUIREMENTS
Apache Web server
PHP version 5
Database server (MySQL, PostgreSQL, or SQLite)
If your server has a bare minimum CentOS 7 installation, you can install a LAMP (short for Linux, Apache, MySQL and PHP) stack by following our excellent tutorial.
UPDATE THE SYSTEM
Log in to your Linux VPS as user root and first of all make sure that all packages are up to date:
# yum -y update
SETTING UP YOUR SERVER
Once you have a working LAMP stack on your server, you will need to install a few additional PHP 5 modules which are required for MediaWiki to run. Enter the following command:
# yum install php-xml php-intl php-gd texlive php-mysqli
You can boost your MediaWiki performance by installing XCache. But first, you will need to install the EPEL repository. Execute:
# yum install epel-release
Install XCache:
# yum install php-xcache
Restart Apache to finish the module installations:
# systemctl restart httpd.service
DOWNLOAD AND INSTALL MEDIAWIKI
We will navigate and download the latest version of MediaWiki to the /var/www/html directory which is Apache default document root. Of course you can change the location according to your needs. Enter the below commands to download, extract and move the installation to the /var/www/html directory:
# cd /opt

# curl -O http://releases.wikimedia.org/mediawiki/1.24/mediawiki-1.24.2.tar.gz

# tar xvzf mediawiki-*.tar.gz

# mv mediawiki-1.24.2/* /var/www/html/
CREATE A DATABASE
Log in as root into MariaDB which is an enhanced, drop-in replacement for MySQL.
# mysql -u root -p
Create a database with the following commands:
MariaDB > create database mediawiki;

MariaDB > grant all privileges on mediawiki.* to mwuser@localhost identified by 'your_password';

MariaDB > > flush privileges;

MariaDB > quit;
With this step, you finished the work that needed to be done via the command line. Now, you need to finish the installation by opening your favorite web browser and navigate to: http://your_server_ip/ .
Once welcomed by the first page, please select ‘set up the wiki‘ which will start the installation.
Select a language on the first page and click continue. The next page will show and check your server environment. You should find the ‘The environment has been checked. You can install MediaWiki. Click Continue.‘ line in the text which means that your MediaWiki installation can proceed.
In the following page, enter your MySQL settings.
Select MySQL (or compatible) for the database type. Type localhost for database host. The values for the database name, username and password will be the ones you created in the CREATE A DATABASE section above.
Leave the default values in the next screen.
Next, you will need to fill in the details of your wiki and create the admin user for it.
Once you have completed all the steps, you will be welcomed by the following page:
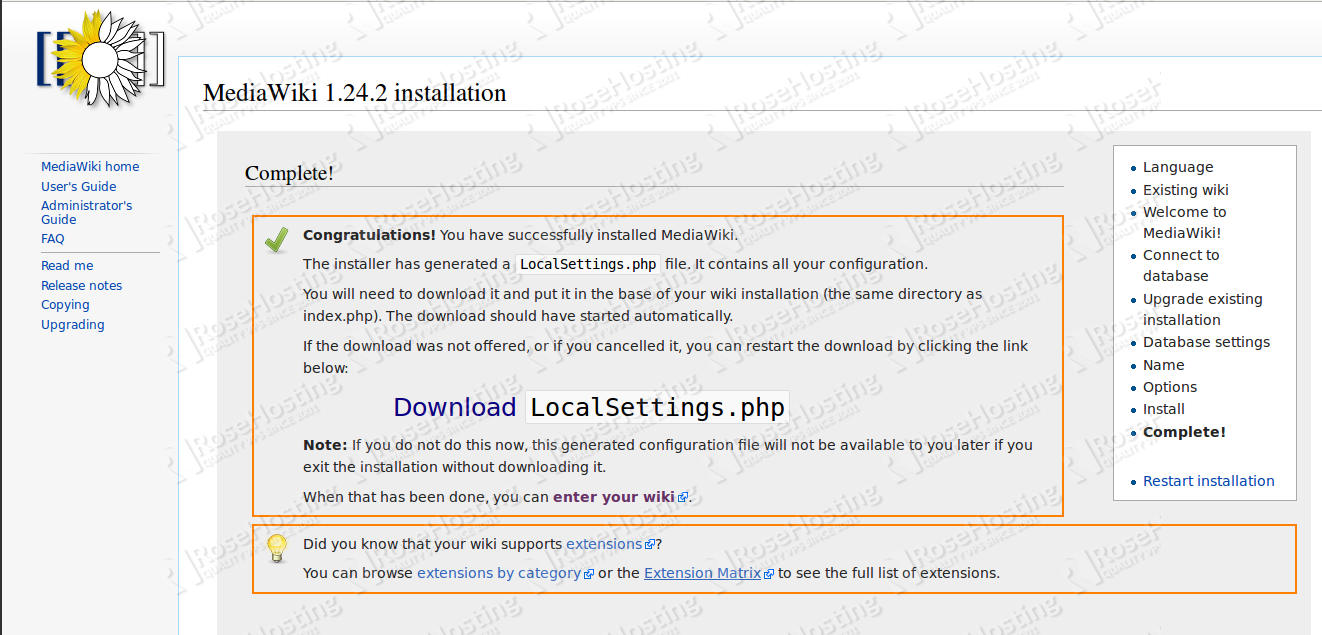
As you can see, you need to move a file called LocalSettings.php to your server. If the download didn’t start automatically, you should download this file before closing the page.
Next, you will need to upload the file to /var/www/html. You can do that via FTP, but to speed up the process, just open the downloaded file with a text editor, copy all the content from it and paste it to a new LocalSettings.php file that you can create using the following command:
# touch /var/www/html/LocalSettings.php
Congratulations, you have successfully installed MediaWiki on your CentOS 7 VPS.
You can further customize your page by visiting the System administration page for MediaWiki.
Of course you don’t have to do any of this if you use one of our Linux VPS Hosting services, in which case you can simply ask our expert Linux admins to install MediaWiki for you. They are available 24×7 and will take care of your request immediately.
PS. If you liked this post please share it with your friends on social networks using the buttons on the left or simply leave a reply below. Thanks.
why would you not use the mediawiki provided in EPEL?
Of course, as an alternative to the our install procedure (which is recommended by MediaWiki), EPEL maintains a pre-built package (.rpm file), so you can install MediaWiki via rpm package.
I start the installation but I receive an Error500. I changed the permission to 755 (mw-config) and the owner of files to “apache” but I still receive the same error. Any new idea???
Did you check the web server log files?
I managed to fix it by installing everything from scratch. Everything works now.