Shell Scripting Part I: Getting started with bash scripting
Hello. This is the first part of a series of Linux tutorials. In writing this tutorial, I assume that you are an absolute beginner in creating Linux scripts and are very much willing to learn. During the series the level will increase, so I am sure there will be something new even for more advanced users. So let's begin.
Introduction
Most of our operating systems including Linux can support different user interfaces (UI). The Graphical User Interface (GUI) is a user-friendly desktop interface that enables users to click icons to run an application. The other type of interface is the Command Line Interface (CLI) which is purely textual and accepts commands from the user. A shell, the command interpreter reads the command through the CLI and invokes the program. Most of the operating systems nowadays, provide both interfaces including Linux distributions.
When using shell, the user has to type in a series of commands at the terminal. No problem if the user has to do the task only once. However, if the task is complex and has to be repeated multiple times, it can get a bit tedious for the user. Luckily, there is a way to automate the tasks of the shell. This can be done by writing and running shell scripts. A shell script is a type of file which is composed of a series and sequence of commands that are supported by the Linux shell.
Why create shell scripts?
The shell script is a very useful tool in automating tasks in Linux OSes. It can also be used to combine utilities and create new commands. You can combine long and repetitive sequences of commands into one simple command. All scripts can be run without the need of compiling it, so the user will have a way of prototyping commands seamlessly.
I am new to Linux environment, can I still learn how to create shell scripts?
Of course! Creating shell scripts does not require complex knowledge of Linux. A basic knowledge of the common commands in the Linux CLI and a text editor will do. If you are an absolute beginner and have no background knowledge in Linux Command Line, you might find this tutorial helpful.
Creating my first shell script
The bash (Bourne-Again Shell) is the default shell in most of the Linux distributions and OS X. It is an open-source GNU project that was intended to replace the sh (Bourne Shell), the original Unix shell. It was developed by Brian Fox and was released in 1989.
You must always remember that each Linux script using bash will start with the following line:
#!/bin/bash
Every Linux script starts with a shebang (#!) line. The bang line specifies the full path /bin/bash of the command interpreter that will be used to run the script.
Hello World!
Every programming language begins with the Hello World! display. We will not end this tradition and create our own version of this dummy output in Linux scripting.
To start creating our script, follow the steps below:
Step 1: Open a text editor. I will use gedit for this example. To open gedit using the terminal, press CTRL + ALT + T on your keyboard and type gedit. Now, we can start writing our script.
Step 2: Type the following command at the text editor:
#!/bin/bash
 echo "Hello World"
Step 3: Now, save the document with a file name hello.sh. Note that each script will have a .sh file extension.
Step 4: As for security reasons enforced by Linux distributions, files and scripts are not executable by default. However we can change that for our script using the chmod command in Linux CLI. Close the gedit application and open a terminal. Now type the following command:
chmod +x hello.sh
The line above sets the executable permission to the hello.sh file. This procedure has to be done only once before running the script for the first time.
Step 5: To run the script, type the following command at the terminal:
./hello.sh
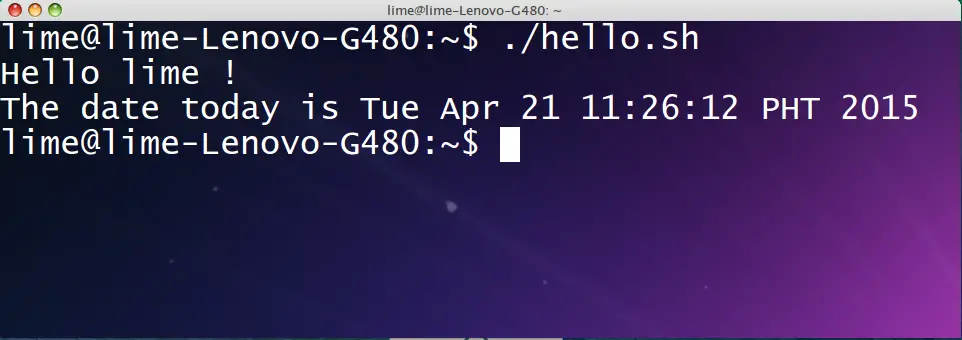
Let's have another example. This time, we will incorporate displaying some system information by using the whoami and date commands to our hello script.
Open the hello.sh in our text editor and we will edit our script by typing:
#!/bin/bash
 echo "Hello $(whoami) !"
 echo "The date today is $(date)"
Save the changes we made in the script and run the script (Step 5 in the previous example) by typing:
./hello.sh
The output of the script will be:
In the previous example, the commands whoami and date were used inside the echo command. This only signifies that all utilities and commands available in the command line can also be used in shell scripts.
Generating output using printf
So far, we have used echo to print strings and data from commands in our previous example. Echo is used to display a line of text. Another commmand that can be used to display data is the printf command. The printf controls and prints data like the printf function in C.
Below is the summary of the common prinf controls:
| Control | Usage |
| \" | Double quote |
| \\ | Backslash |
| \b | Backspace |
| \c | Produce no further output |
| \e | Escape |
| \n | New Line |
| \r | Carriage Return |
| \t | Horizontal tab |
| \v | Vertical Tab |
Example3: We will open the previous hello.sh and change all echo to printf and run the script again. Notice what changes occur in our output.
#!/bin/bash
 printf "Hello $(whoami) !"
 printf "The date today is $(date)"
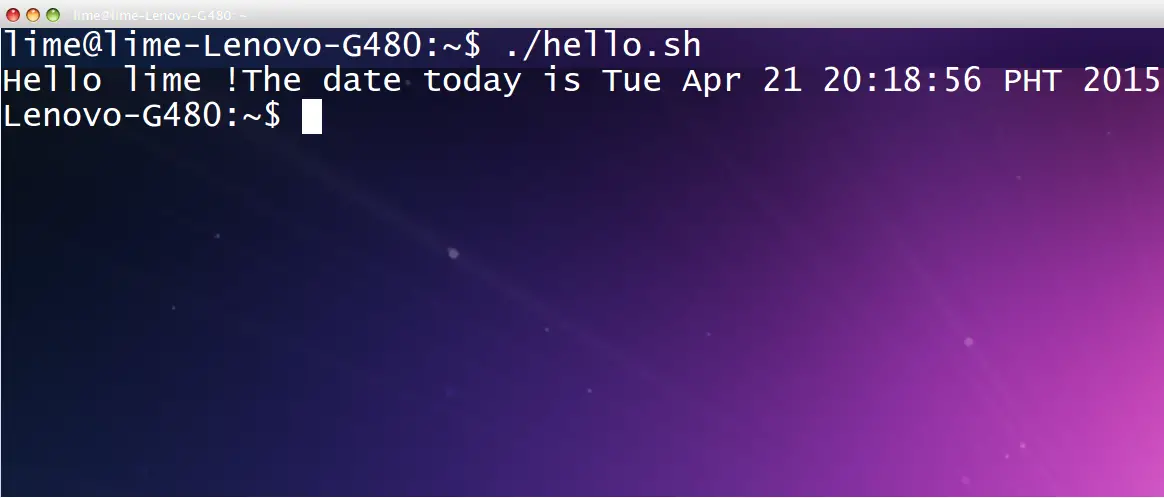
All lines are attached to each other because we didn't use any controls in the printf command. Therefore the printf command in Linux has the same properties as the C function printf.
To format the output of our script, we will use two of the controls in the table summary above. In order to work, the controls have to be indicated by a \ inside the quotes of the printf command. For instance, we will edit the previous content of the hello.sh into:
#!/bin/bash
 printf "Hello \t $(whoami) !\n"
 printf "The date today is $(date)\n"
The script outputs the following:

Conclusion
In this tutorial, you have learned the basics of shell scripting and were able to create and run shell scripts. During the second part of the tutorial I will introduce how to declare variables, accept inputs and perform arithmetic operations using shell commands.

