How to Install and Configure PostgreSQL Replication with Hot Standby on Ubuntu 15.04
This tutorial exists for these OS versions
- Ubuntu 16.04 (Xenial Xerus)
- Ubuntu 15.04 (Vivid Vervet)
On this page
PostgreSQL or Postgres is an open source object-relational database management system (ORDBMS) with more than 15 years of active development. It's a powerful database server and can handle high workloads. PostgreSQL can be used on Linux, Unix, BSD and Windows servers.
The master/slave database replication is a process of copying (syncing) data from a database on one server (the master) to a database on another server (the slaves). The main benefit of this process is to distribute databases to multiple machines, so when the master server has a problem, there is a backup machine with same data available for handling requests without interruption.
PostgreSQL provides several ways to replicate a database. It can be used for backup purposes and to provide a high availability database server. In this tutorial, we I will show you how to install and configure PostgreSQL replication by using hot standby mode. Hot standby mode is easy to configure, and it's a very good starting point to learn PostgreSQL in depth.
Hot standby mode requires 2 database servers, we will use Ubuntu as operating system on both servers.
- Master Server - accepts connections from the client with read and write permissions.
- Slave Server - the standby server runs copy of the data from the master server with read-only permission.
Prerequisites
- 2 Ubuntu servers - 1 for master and 1 for slave.
- Root privileges on the servers.
- Some basic knowledge about Ubuntu, apt, etc.
Step 1 - Setup the Hostname
Login to both servers with ssh:
ssh user@masterip
ssh user@slaveip
Now set the hostname for both servers - master server and slave server - with the hostnamectl command.
On the master server:
sudo hostnamectl set-hostname master-server
On the slave server:
sudo hostnamectl set-hostname slave-server
Next, edit the /etc/hosts file with vim editor:
sudo vim /etc/hosts
Paste this configuration for the master server:
192.168.1.249 master-server
Paste this configuration for the slave server:
192.168.1.248 slave-server
Save the file and exit the editor.
Step 2 - Install PostgreSQL on Master and Slave Server
Before we start to install PostgreSQL, update the Ubuntu repository:
sudo apt-get update
Next, install PostgreSQL with all its dependencies:
sudo apt-get install postgresql postgresql-client postgresql-contrib
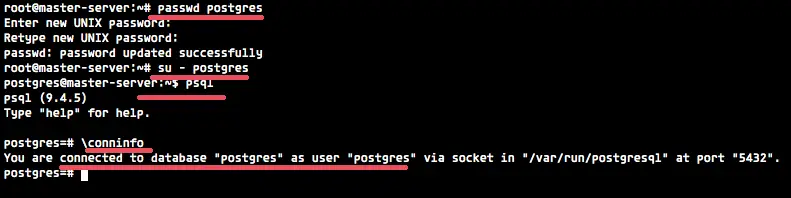
After Postgres installed, give a new password for postgres user (created automatically when the installation).
passwd postgres
Type your postgres user password.
Now testing the PostgreSQL:
su - postgres
psql
\conninfo
You will see result below:
Step 3 - Configure Master-server
In this step, we will configure the 'master server' with IP address '192.168.1.249'. We will create a new user/role with special permission to perform the replication, then we edit the PostgreSQL configuration file to enable the hot standby replication mode.
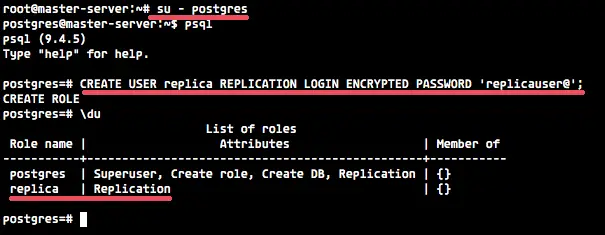
From the root privileges, switch to the PostgreSQL user with the su command:
su - postgres
Access the Postgres shell with the psql command and type in this PostgreSQL query to create the new user/role:
psql
CREATE USER replica REPLICATION LOGIN ENCRYPTED PASSWORD 'replicauser@';
Check new replica user with PostgreSQL command below:
\du
New replica user has been created.
Next, go to the PostgreSQL directory '/etc/postgresql/9.4/main' to edit the configuration file.
cd /etc/postgresql/9.4/main/
Open the postgresql.conf file with vim:
vim postgresql.conf
Uncomment line 59 and add the server IP address.
listen_addresses = 'localhost,192.168.1.249'
In the WAL (Write Ahead Log) setting line 175, uncomment and change the value to hot_standby.
wal_level = hot_standby
In the checkpoints section line 199, uncomment the 'checkpoint_segments' and change the value to 8.
checkpoint_segments = 8
In the archive section line 206 and 208, turn on the archiving option and add the archiving command.
archive_mode = on
archive_command = 'cp -i %p /var/lib/postgresql/9.4/main/archive/%f'
In the replication section line 224 and 226, change the value to the max number of WAL sender process.
max_wal_senders = 3
wal_keep_segments = 8
Save the file and exit vim.
Now create a new directory inside of the 'main' directory for the archive configuration - run the command below as postgres user:
mkdir -p /var/lib/9.4/main/archive/
Next, edit pg_hba.conf file to allow the replication connection.
vim pg_hba.conf
In the end of the line, add a new configuration for user 'replica' to make the connection.
host    replication     replica      192.168.1.248/24            md5
#192.168.1.248 is slave-server ip address
Save and exit.
Step 4 - Slave-server Configuration
Configure the slave server like the master server. Use su to become the postgres user and go to the PostgreSQL configuration directory.
su - postgres
cd /etc/postgresql/9.4/main/
Edit the postgresql.conf with vim:
vim postgresql.conf
Uncomment line 59 and add the slave server IP address.
listen_addresses = 'localhost,192.168.1.248'
Go to line 175 and uncomment the wal_level setting, change the value to hot_standby.
wal_level = hot_standby
Uncomment line 199 on the checkpoint section.
checkpoint_segments = 8
Uncomment line 224 and 226 to configure max_wal_sender process.
max_wal_senders = 3
wal_keep_segments = 8
Uncomment line 245 to enable hot_standby mode on the slave server.
hot_standby = on
Save and exit.
Step 5 - Syncronize Data from Master server to Slave server
In this step, we will move the PostgreSQL data directory '/var/lib/postgresql/9.4/main' to a backup folder and then replace it with the latest master data with 'pg_basebackup' command.
Run all the command sbelow on the slave server only!
Stop PostgreSQL on the slave server:
systemctl stop postgresql
Now login to the postgres user and rename the 'main' directory to 'main_original' as a backup.
su - postgres
mv 9.4/main 9.4/main_original
Run the command below to copy data from the master server to slave server:
pg_basebackup -h 192.168.1.249 -D /var/lib/postgresql/9.4/main -U replica -v -P

Note:
- 192.168.1.249 is master server IP address.
- And you will be prompted to entering the password for user 'replica' for the replication.
Go to the new 'main' directory and create the new recovery file 'recovery.conf' with vim:
cd /var/lib/postgresql/9.4/main/
vim recovery.conf
Paste the configuration below:
standby_mode = 'on'
primary_conninfo = 'host=192.168.1.249 port=5432 user=replica password=replicauser@'
restore_command = 'cp //var/lib/postgresql/9.4/main/archive/%f %p'
trigger_file = '/tmp/postgresql.trigger.5432'
Now back to the root user with exit and start PostgreSQL with systemctl command:
exit
systemctl start postgresql
Make sure there is no error after run the start command.
Step 6 - Testing
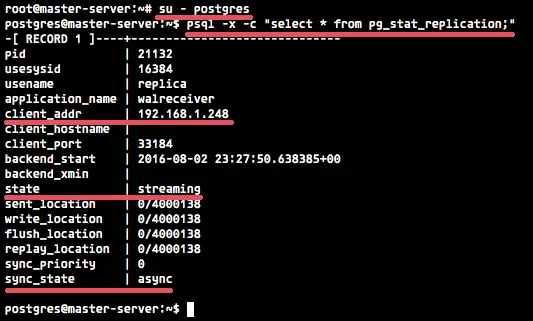
Go to the master server and log into the postgres user, then run the command below to see the replication info.
su - postgres
psql -x -c "select * from pg_stat_replication;"
You will see the replication info below:
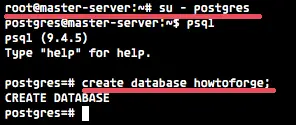
Next, test to create a new database from the master server and then check that the database exist on the slave server.
su - postgres
psql
create database howtoforge;
Now login to the slave server and check that the 'howtoforge' database has been mirrored to the slave server automatically.
su - postgres
psql
\list
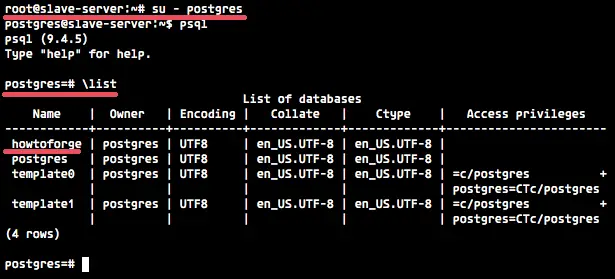
The database has been replicated from the master server to the slave server.

