Perform Hot Backups of MySQL Databases with Percona XtraBackup on Ubuntu 16.04
Percona XtraBackup is an open source backup utility for MySQL. It supports all MySQL flavours like Percona Server, MariaDB, and (Oracle) MySQL. Percona Xtrabackup performs a Hot Backup for MySQL. Hot Backup means to create a backup of a MySQL server while it is running without a downtime.
In this tutorial, I will show you how to create a hot MySQL database backup with the OpenSource tool Percona XtraBackup on Ubuntu 16.04 (Xenial Xerus). I will use MariaDB as the database server to perform the backup but th same setup will work for MySQL servers as well.
Prerequisite
- Ubuntu server 16.04 - (Xenial Xerus)
- MySQL or MariaDB server
- Root Privileges
Step 1 - Install Percona XtraBackup
The first step is to install latest Percona XtraBackup software on our Ubuntu server. Log in to your server by SSH (or on the console):
ssh [email protected]
TYPE YOUR PASSWORD
Percona XtraBackup is available in the Ubuntu repository, but we want to use the latest version from the Percona repository.
Add the Percona repository by downloading the deb package from the web and install it with the dpkg command:
wget https://repo.percona.com/apt/percona-release_0.1-3.$(lsb_release -sc)_all.deb
sudo dpkg -i percona-release_0.1-3.$(lsb_release -sc)_all.deb
Next, update the repository and install Ppercona XtraBackup 2.4 (the latest version at the moment):
sudo apt-get update
sudo apt-get install percona-xtrabackup-24
Percona XtraBackup is installed.
Step 2 - Configure User and Backup Directory
To perform the hot backup, we need to create a new mysql user with special privileges and permissions. In this tutorial, I will use MariaDB 10.0 as the database server. If you have not installed a MySQL compatible database yet then you can install with command below:
sudo apt-get install mariadb-server mariadb-client
Set a secure password for the root user with this command:
mysql_secure_installation
If the MariaDB is installed, access the MariaDB/MySQL shell as root user with mysql client command:
mysql -u root -p
TYPE MySQL PASSWORD
Create a new user called 'bekupuser' with the password 'mypassword' (chose a secure password for your server!):
CREATE USER 'bekupuser'@'localhost' IDENTIFIED BY 'mypassword';
Grant the user the following privileges: 'RELOAD, PROCESS, LOCK TABLES, REPLICATION CLIENT'.
GRANT RELOAD, LOCK TABLES, PROCESS, REPLICATION CLIENT ON *.* TO 'bekupuser'@'localhost';
FLUSH PRIVILEGES;
exit
Next, create a new directory to store the MySQL backup files:
mkdir -p /data/backups/mysql/
The new backup user and a backup directory have been created.
Step 3 - Perform Backup with Innobackupex
Innobackupex is a Perl script wrapper for the xtrabackup program. It's a patched version of the innobackup script provided by oracle, distributed with InnoDB Backup tool. Innobackupex provides backup for a whole MySQL database instance, using xtrabackup in combination with xbstream and xbcrypt.
In this step, we will create and prepare a full backup for the MySQL instance.
A. Create a backup with Innobackupex
In step 2, we've created a new directory for the backup and added a new mysql backup user. We will use them now to create a backup with innobackupex command.
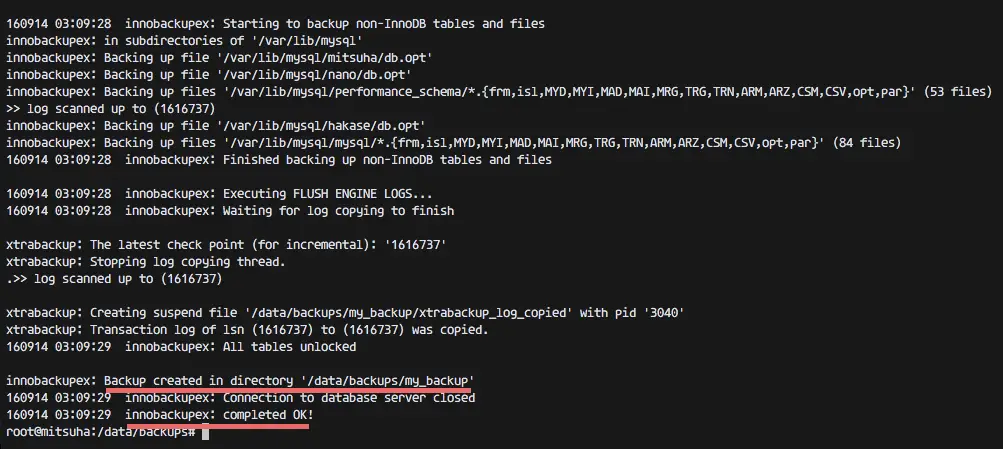
Create a MySQL backup with the innobackupex to new directory '/data/backups/my_backup':
innobackupex --user=bekupuser --password=mypassword --no-timestamp /data/backups/my_backup
Note:
--user = user with required backup privileges (step-2).
--password = password of the backup user.
--no-timestamp = disable the creation of a new time-stamped subdirectory in the backup root dir.
/data/backups/my_backup = directory for the backup, it will be created automatically during backup process. If the directory exists, you will get an error message.
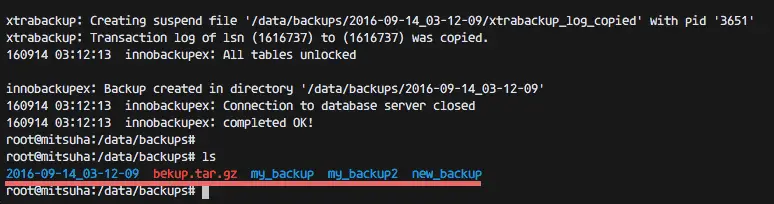
Another option:
mkdir -p /data/backups/my_backup2

innobackupex --user=bekupuser --password=mypassword /data/backups/my_backup2

or

innobackupex --user=bekupuser --password=mypassword /data/backups/
Note:
If there is no directory 'my_backup2', you will get your directory based on 'timestamp' format.
Results:
B. Prepare a Full Backup with Innobackupex
After creating a new backup, the data isn't ready for a restore. There is one more step so the data is ready to be restored. We need the 'prepare stage' so the data can be restored.
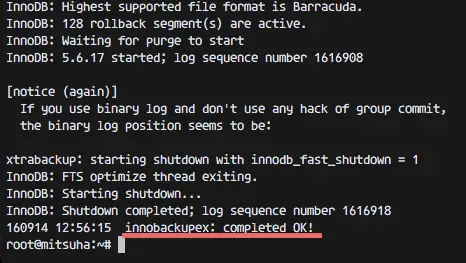
Prepare backup using innobackupex with option --apply-log to the backup directory '/data/backups/my_backup':
innobackupex --apply-log /data/backups/my_backup
Make sure the process is complete without error before you proceed.
If you have enough memory and a large database, then you can use the option --use-memory=memorynumber to tell innobackupex how much memory it may use:
innobackupex --apply-log --use-memory=4G /data/backups/my_backup
The data is ready to be restored now. We can restore it on the same server or on the another server that's running MariaDB.
Step 4 - Restore Full Backup with Innobackupex
In this step, we will restore the MySQL instance with innobackupex.
Before we restore the MySQL instance, we need to stop the MySQL process with systemctl command (the MariaDB process is named mysql):
systemctl stop mysql
Make a backup of the old MySQL data directory:
mkdir ~/mysql_old/
mv /var/lib/mysql/* ~/mysql_old/
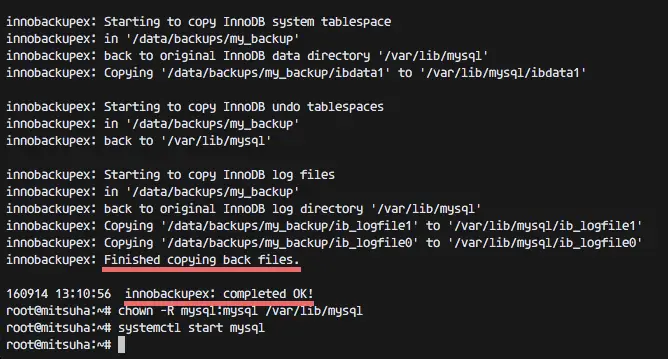
Next, restore the mysql instance from the full backup with innobackupex:
innobackupex --copy-back /data/backups/my_backup
When you see the result 'innobackupex: completed OK', then you have successfully restored your MySQL instance.
Now change the owner of the MySQL data directory to the mysql user and start the service again:
chown -R mysql:mysql /var/lib/mysql
systemctl start mysql
The MySQL instance has been successfully restored with percona-xtrabackup.

