How to Install a MySQL Cluster on Ubuntu 16.04
MySQL Cluster is a technology to provide high availability for MySQL Databases. It uses NDB (Network DataBase) or NDBCLUSTER as the database storage engine. MySQL Cluster is designed as multi-master ACID architecture with no single point of failure, it uses automatic sharding (partitioning) to scale out read and write processes.
To implement a MySQL Cluster, we need 3 different types of nodes:
- Management Node (ndb_mgmd)
- Used for monitoring and configuring the cluster.
- Data Node (ndbd)
- These nodes are used to store the data they provide automatic sharding and can handle replication.
- SQL Node (mysqld)
- MySQL Server interfaces for connecting to all nodes.
In this tutorial, I will show you how to install a 'MySQL Cluster' on Ubuntu 16.04 LTS (Xenial Xerus).
Prerequisites
- 4 nodes with Ubuntu server 16.04
- 192.168.1.11 management-node
- 192.168.1.12 data-node1
- 192.168.1.13 data-node2
- 192.168.1.14 sql-node
- Root privileges on the nodes.
Step 1 - Install and Configure the Management Node
In this step, we will install the management node for our cluster with IP address 192.168.1.11. We install MySQL cluster software and configure it as management node for the cluster.
Log in to the management node with ssh:
ssh [email protected]
TYPE YOUR PASSWORD
A. Install MySQL Cluster Management Node
Open the MySQL cluster site here and choose the option 'Linux-generic' and download the 64-bit package by clicking the 'Download' button.
Download the MySQL cluster package with wget and extract it.
wget http://dev.mysql.com/get/Downloads/MySQL-Cluster-7.4/mysql-cluster-gpl-7.4.12-linux-glibc2.5-x86_64.tar.gz
tar -xzvf mysql-cluster-gpl-7.4.12-linux-glibc2.5-x86_64.tar.gz
Rename directory to mysql:
mv mysql-cluster-gpl-7.4.12-linux-glibc2.5-x86_64/ mysql/
Go to the mysql directory and copy the 2 binary files for the cluster management command 'ndb_mgmd and ndb_mgm' to the '/usr/local/bin/' directory, and then make them executable with the chmod command.
cd ~/mysql/
cp bin/ndb_mgm* /usr/local/bin/
chmod +x /usr/local/bin/ndb_mgm*
B. Configure MySQL Cluster Management Node
Configure the management node by creating a new directory 'mysql-cluster' for the configuration files in the '/var/lib/' directory.
Create a directory 'mysql-cluster' and create a new configuration 'config.ini' in the directory:
mkdir -p /var/lib/mysql-cluster/
vim /var/lib/mysql-cluster/config.ini
Paste the configuration below:
[ndbd default]
NoOfReplicas=2
DataMemory=80M
IndexMemory=18M

[mysqld default]

[ndb_mgmd default]

[tcp default]

# Cluster Control / Management node
[ndb_mgmd]
hostname=192.168.1.11

# Data Node 1
[ndbd]
hostname=192.168.1.12
DataDir= /var/lib/mysql-cluster

# Data Node 1
[ndbd]
HostName=192.168.1.13
DataDir=/var/lib/mysql-cluster

# SQL Node
[mysqld]
hostname=192.168.1.14

# If you to add new SQL Node
[mysqld]
Change the IP address of ndb_mgmd for management, ndbd for data node and mysqld for the sql node to match your setup.
Save the file and exit.
Next, start the management node process with the command below:
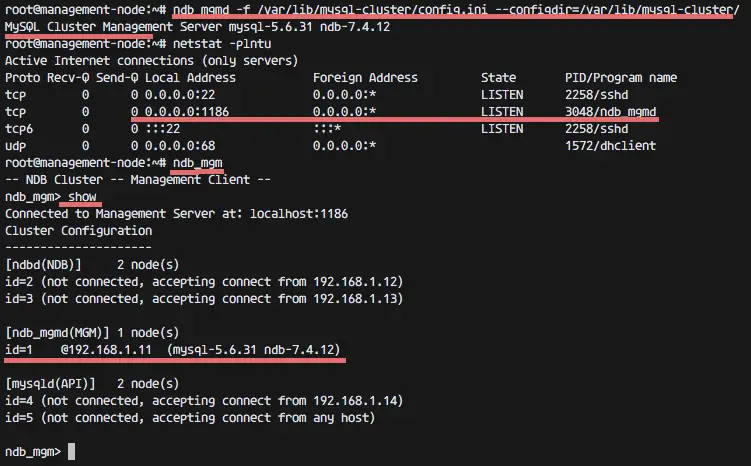
ndb_mgmd -f /var/lib/mysql-cluster/config.ini --configdir=/var/lib/mysql-cluster/
Make it to be started at boot time by adding command to '/etc/rc.local' file:
echo 'ndb_mgmd -f /var/lib/mysql-cluster/config.ini --configdir=/var/lib/mysql-cluster/' >> /etc/rc.local
If you see the results:
MySQL Cluster Management Server mysql-5.6.31 ndb-7.4.12
Then the management node process is running.
Check the management node with another command:
# Checking port 1186 used by ndb_mgmd
netstat -plntu
# Checking the management node is ready
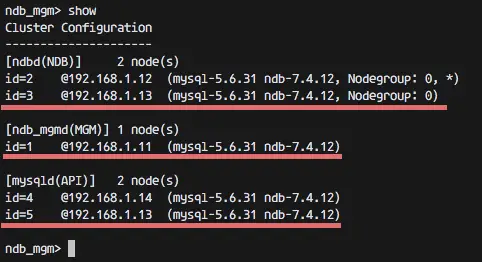
ndb_mgm
show
Step 2 - Install and Configure the Data Node
In this step, we will install the MySQL cluster software and configure it as data node. We will use 2 ubuntu 16.04 servers as data nodes: data-node1 with IP address 192.168.1.12 and data-node2 with IP address 192.168.1.13.
Log in to the data-node1 server with ssh:
ssh [email protected]
A. Install MySQL Cluster on the Data Node
Before we install the MySQL cluster software, we need to install a new package 'libaio1' and create a new user and group mysql. Run the command below as root for that:
apt-get install libaio1
groupadd mysql
useradd -g mysql mysql
Now download the MySQL cluster package 'Linux-Generic', extract and rename the directory to mysql.
wget http://dev.mysql.com/get/Downloads/MySQL-Cluster-7.4/mysql-cluster-gpl-7.4.12-linux-glibc2.5-x86_64.tar.gz
tar -xzvf mysql-cluster-gpl-7.4.12-linux-glibc2.5-x86_64.tar.gz
mv mysql-cluster-gpl-7.4.12-linux-glibc2.5-x86_64/ mysql/
Move 'mysql' directory to '/usr/local/' and go to that directory.
mv mysql /usr/local/
cd /usr/local/mysql/
Run the script for creating the system databases:
./scripts/mysql_install_db --user=mysql
If there is no error, copy the mysql service file to '/etc/init.d' directory and add the mysql start script to run at boot time.
cp support-files/mysql.server /etc/init.d/mysql
systemctl enable mysql
Next, move all mysql binary commands to the '/usr/local/bin' directory and create a new symlink.
mv bin/* /usr/local/bin/
rm -rf bin/
ln -s /usr/local/bin /usr/local/mysql/
Change the owner of the mysql directory to user root and group mysql, and change the data directory to mysql as owner.
chown -R root:mysql .
chown -R mysql data
B. Configure MySQL Cluster Data Node
Create a new mysql configuration file 'my.cnf' with vim:
vim /etc/my.cnf
Paste configuration below:
# MySQL Config
[mysqld]
datadir=/usr/local/mysql/data
socket=/tmp/mysql.sock
user=mysql

# Run ndb storage engine
ndbcluster
# IP address management node
ndb-connectstring=192.168.1.11

[mysql_cluster]
# IP address management node
ndb-connectstring=192.168.1.11

# MySQL Pid and Log
[mysqld_safe]
log-error=/var/log/mysqld.log
pid-file=/var/run/mysqld/mysqld.pid
Save and exit.
Create a new directory for the data node's and change the ownership to the mysql user.
mkdir -p /var/lib/mysql-cluster/
chown -R mysql /var/lib/mysql-cluster
C. Start MySQL on the Data Node
Start the mysql service with the command below:
ndbd --initial
systemctl start mysql
Make sure there is no error, and the results are below (data-node2):
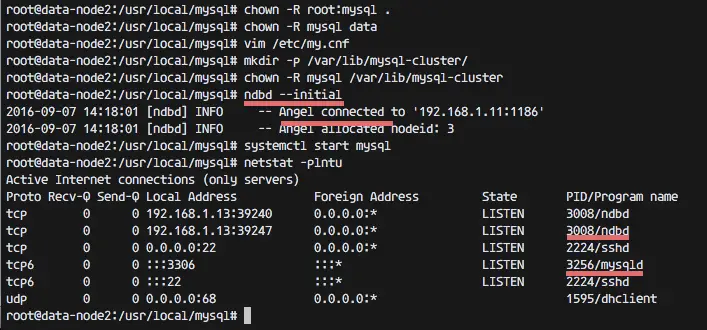
MySQL on the data node is started. Now you can configure the MySQL password with the command:
mysql_secure_installation
or access the MySQL shell.
mysql -u root -p
NOTE:
Redo this step on 'data-node2' server IP address 192.168.1.13.
Step 3 - Install and Configure SQL Node
In this step, we will install MySQL Cluster software and configure it as SQL Node. This node is used for accessing the databases on the data nodes. The installation process is same as the data node, but we do not have to run the ndbd service in the SQL Node.
Log in to the SQL Node with ssh:
ssh [email protected]
A. Install MySQL Cluster on th SQL Node
Install the libaio1 package and create a new user and group mysql:
apt-get install libaio1
groupadd mysql
useradd -g mysql mysql
Download the mysql cluster package from the site, extract and rename it:
http://dev.mysql.com/get/Downloads/MySQL-Cluster-7.4/mysql-cluster-gpl-7.4.12-linux-glibc2.5-x86_64.tar.gz
tar -xzvf mysql-cluster-gpl-7.4.12-linux-glibc2.5-x86_64.tar.gz
mv mysql-cluster-gpl-7.4.12-linux-glibc2.5-x86_64/ mysql/
Move the mysql directory:
mv mysql /usr/local/
cd /usr/local/mysql/
Run the mysql_install_db script:
./scripts/mysql_install_db --user=mysql
Copy the service file and add it be started at boot time:
cp support-files/mysql.server /etc/init.d/mysql
systemctl enable mysql
Move all mysql binaries to the '/usr/local/bin' directory:
mv bin/* /usr/local/bin/
rm -rf bin/
ln -s /usr/local/bin /usr/local/mysql/
Change the owner of all files and the directory:
chown -R root:mysql .
chown -R mysql data
B. Configure MySQL Cluster SQL Node
Create a new my.cnf configuration file with vim:
vim /etc/my.cnf
Paste the configuration below:
# MySQL Config
[mysqld]
datadir=/usr/local/mysql/data
socket=/tmp/mysql.sock
user=mysql

# Run ndb storage engine
ndbcluster
# IP address management node
ndb-connectstring=192.168.1.11

[mysql_cluster]
# IP address management node
ndb-connectstring=192.168.1.11

# MySQL Pid and Log
[mysqld_safe]
log-error=/var/log/mysqld.log
pid-file=/var/run/mysqld/mysqld.pid
Save and exit.
C. Start the SQL Node
Start the SQL node by starting the mysql service with the systemctl command:
systemctl start mysql
The SQL Node is started, now you can configure the password for MySQL.
mysql_secure_installation
Step 4 - Testing
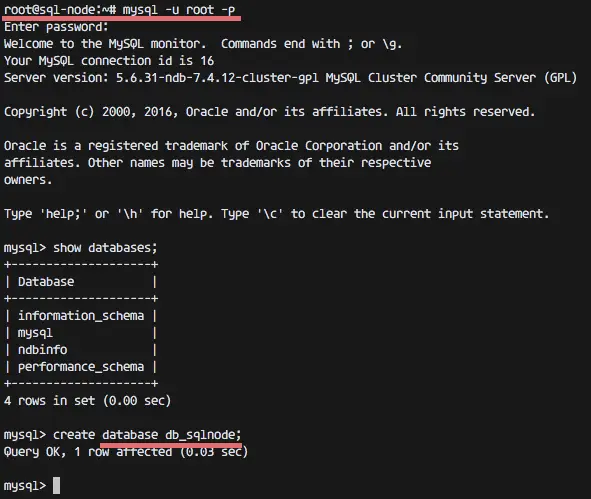
Test to create a new database from the SQL node.
mysql -u root -p
TYPE PASSWORD


create database nanana;
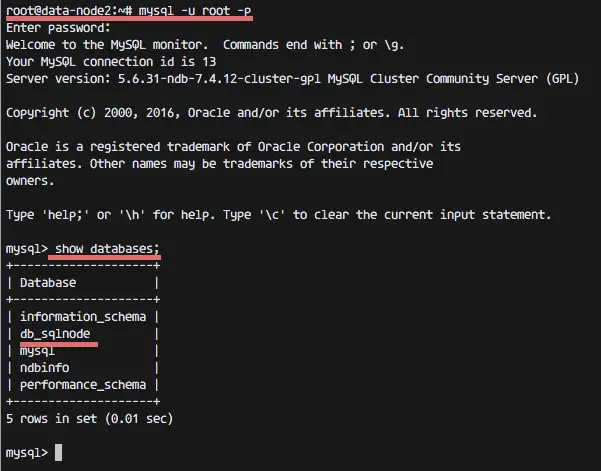
Check that the database is replicated on the data-node servers.
And when a node is off, another node will handle the connection from the SQL node.
mysql -u root -p
TYPE PASSWORD


show databases;
Checking the cluster status from the management node:
ndb_mgm
show
Step 5 - Additional Tips
Performing a safe restart and shutdown of the cluster.
Go to the cluster management node and type in the command below to shutdown the cluster:
ndb_mgm
shutdown
The command will shutdown all ndb services on data nodes.
If you want to start the cluster again, you can run command below on the management node:
ndb_mgmd -f /var/lib/mysql-cluster/config.ini --configdir=/var/lib/mysql-cluster/
And run the command below on all data nodes:
ndbd
systemctl start mysql
Then start mysql service on the SQL node(s):
systemctl start mysql
Now your MySQL Cluster is running again.

