How to Install Seafile with Nginx on CentOS 7
On this page
- Prerequisites
- Step 1 - Prepare CentOS for Seafile
- Step 2 - Install the Seafile Dependencies
- Step 3 - Configure MariaDB
- Step 4 - Install Seafile
- Step 5 - Configure Seafile and Seahub Service
- Step 6 - Generate SSL Certificate Files
- Step 7 - Configure Nginx as Reverse Proxy
- Step 8 - Configure FirewallD
- Step 9 - Testing Seafile
- Conclusion
Seafile is a private cloud software to that provides similar features like Dropbox, mega.co.nz, and others, just hosted on your own server. Seafile is based on the python programming language and it is released under an open source license so that you can create your own private cloud and it will be much more secure.
Seafile supports encryption to store your data securely. To encrypt files in a storage library, you need to set a password when you create the library. The password won't be stored in the Seafile cloud. So even the administrator of the servers cannot view your encrypted data without the password.
In this tutorial, I will install Seafile on CentOS 7 with Nginx web server and MariaDB as the database server.
Prerequisites
- CentOS 7 server
- Root privileges
Step 1 - Prepare CentOS for Seafile
Login to the centOS server with your ssh root password.
ssh [email protected]
TYPE YOUR PASSWORD
Edit the SELinux configuration file with vim.
vim /etc/sysconfig/selinux
Replace value 'enforcing' with 'disabled'.
SELINUX=disabled
Save the file and exit the editor.
Reboot the server to apply the change of the SELinux policy.
reboot
Wait for server rebooting, then login to your server again as root user.
Check the selinux with command below:
getenforce
You should see 'Disabled' as the result.
Step 2 - Install the Seafile Dependencies
Seafile is based on python, so we need to install python for the installation first. Seafile has support for SQLite and MySQL/MariaDB databases, I will use MariaDB as the database for seafile here as it provides a better performance than SQLite. Nginx is used as the reverse proxy for Seafile and Seahub.
In this step, we will install several python packages, MariaDB and Nginx. We begin with the installation of the EPEL repository on our CentOS server.
yum -y install epel-release
Next, install python the packages, MariaDB and Nginx.
yum -y install python-imaging MySQL-python python-simplejson python-setuptools mariadb mariadb-server nginx
Wait until all packages are installed.
Step 3 - Configure MariaDB
In step 2, we've already installed the MariaDB server, we just need to start the service and configure the root password now.
Start MariaDB and configure the root password with the commands below:
systemctl start mariadb
mysql_secure_installation
Type in your root password.
Set root password? [Y/n] Y
New password:
Re-enter new password:
Remove anonymous users? [Y/n] Y
Disallow root login remotely? [Y/n] Y
Remove test database and access to it? [Y/n] Y
Reload privilege tables now? [Y/n] Y
The MariaDB root password is configured and we can login to the mysql shell now.
Notice: The MariaDB commandline shell is named mysql.
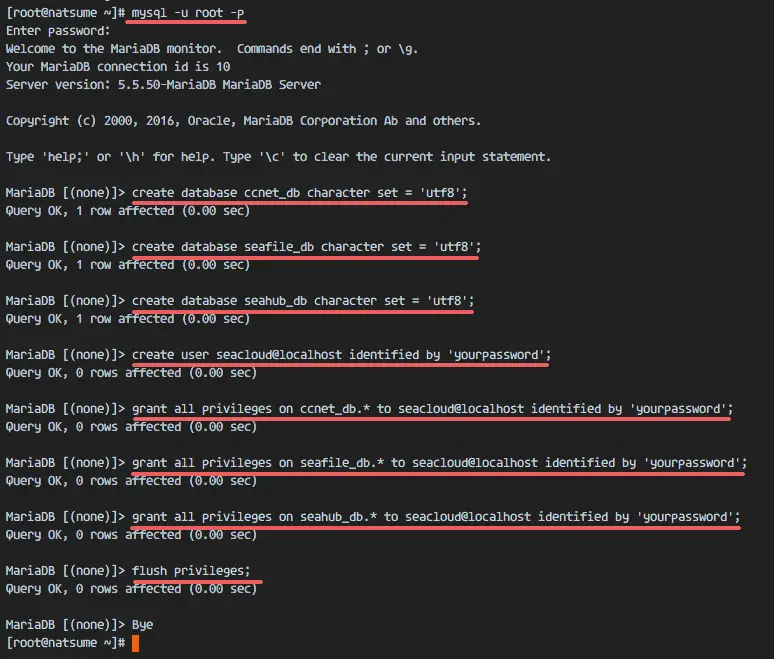
We will create 3 databases for seafile:
- ccnet_db
- seafile_db
- seahub_db
And we will create a new user 'seacloud' with the password 'yourpassword'. Replace yourpassword with a secure password!
Login to the mysql shell with the mysql client.
mysql -u root -p
TYPE YOUR PASSWORD
Run the mysql queries below to create the databases and the user for the seafile installation.
create database ccnet_db character set = 'utf8';
create database seafile_db character set = 'utf8';
create database seahub_db character set = 'utf8';

create user seacloud@localhost identified by 'yourpassword';

grant all privileges on ccnet_db.* to seacloud@localhost identified by 'yourpassword';
grant all privileges on seafile_db.* to seacloud@localhost identified by 'yourpassword';
grant all privileges on seahub_db.* to seacloud@localhost identified by 'yourpassword';
flush privileges;
exit
Replace yourpassword in the above commands with your own password.
Step 4 - Install Seafile
In this step, we will install Seafile. Seafile will be executed under the nginx user so we can use nginx as the reverse proxy for the seafile and seahub services.
We will install seafile under the nginx user in the directory '/var/www/seafile', create that dirctory and enter it with cd.
mkdir -p /var/www/seafile
cd /var/www/seafile
Download Seafile with the wget command, and extract the downloaded archive.
wget https://bintray.com/artifact/download/seafile-org/seafile/seafile-server_6.0.5_x86-64.tar.gz
tar -xzvf seafile-server_6.0.5_x86-64.tar.gz
Rename the directory to 'seafile-server' and switch to that directory.
mv seafile-server-6.0.5 seafile-server
cd seafile-server/
Execute the 'setup-seafile-mysql.sh' file to configure the database.
./setup-seafile-mysql.sh
Press Enter and you will be asked for information below:
- server name - I will use the server hostname 'natsume'
- server's ip or domain - ip address of the server, in my case '192.168.1.115'
- default data dirctory - just press Enter
- default port - press Enter
- Now for the database configuration, choose number 2
For the MySQL configuration:
- use deafult host - localhost
- default port - 3306
- the mysql user - 'seacloud'
- and the password is 'yourpassword'
- ccnet database is 'ccnet_db'
- seafile database is 'seafile_db'
- seahub database is 'seahub_db'
Press enter and the script will create the database tables for the seafile.

Now we can start the seafile and seahub services.
./seafile.sh start
./seahub.sh start
When the seahub.sh file is executed, we will be asked for the admin configuration.
Type in your admin email and password, then the seahub service will runing.
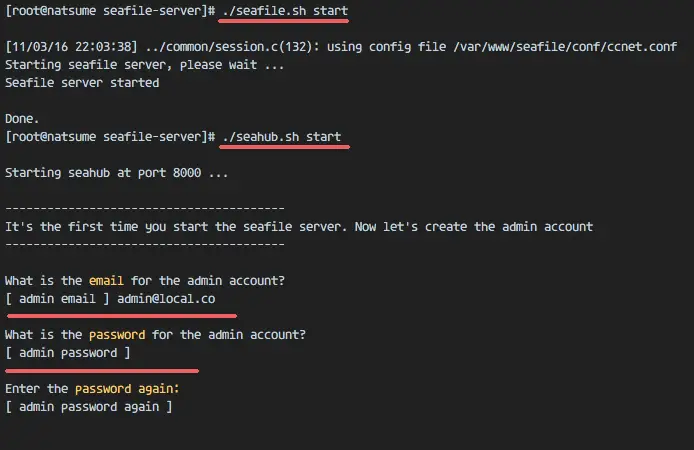
Seafile is installed and running now, we can access Seafile from a web browser with the server IP on port 8000 (in my case - 192.168.1.115:8000), but we will not do it now because we will use a reverse proxy for the seafile server and we will run seafile with a systemd service file.
So we need to stop seafile and seahub service for now.
./seafile.sh stop
./seahub.sh stop
Step 5 - Configure Seafile and Seahub Service
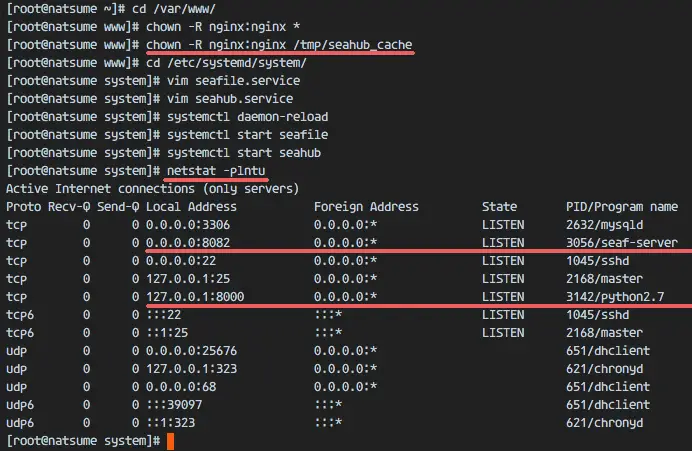
We will run seafile as nginx user, so we need to change the owner of seafile installation directory and seahub_cache directory to nginx user:
cd /var/www/
chown -R nginx:nginx *
chown -R nginx:nginx /tmp/seahub_cache
Next, go to the systemd directory and create a seafile.service file with vim:
cd /etc/systemd/system/
vim seafile.service
Paste seafile service configuration below:
[Unit]
Description=Seafile Server
Before=seahub.service
After=network.target mariadb.service

[Service]
Type=oneshot
ExecStart=/var/www/seafile/seafile-server/seafile.sh start
ExecStop=/var/www/seafile/seafile-server/seafile.sh stop
RemainAfterExit=yes
User=nginx
Group=nginx

[Install]
WantedBy=multi-user.target
Save and exit.
Now create new seahub.service file.
vim seahub.service
And paste configuration below.
[Unit]
Description=Seafile Hub
After=network.target seafile.target mariadb.service

[Service]
Type=oneshot
ExecStart=/var/www/seafile/seafile-server/seahub.sh start-fastcgi
ExecStop=/var/www/seafile/seafile-server/seahub.sh stop
RemainAfterExit=yes
User=nginx
Group=nginx

[Install]
WantedBy=multi-user.target
Save and exit.
Reload the systemd service and start seafile and seahub with systemctl.
systemctl daemon-reload
systemctl start seafile
systemctl start seahub
Make sure there is no error and check that the seafile and seahub service is running on port 8082 and 8000.
netstat -plntu
Step 6 - Generate SSL Certificate Files
For this tutorial, we will run seafile over a Nginx proxy, and Nginx will provide secure (HTTPS) connections for data security. We can use a free SSL certificate file or the paid SSL certificate, this does not matter for the configuration. In this step, I will generate a self-signed SSL certificate file with the OpenSSL in the '/etc/nginx/ssl' directory.
Create the ssl directory.
mkdir -p /etc/nginx/ssl
cd /etc/nginx/ssl
Generate self signed certificate files and a dhparam file with command below:
openssl dhparam -out /etc/nginx/ssl/dhparam.pem 2048
openssl req -new -x509 -sha256 -days 365 -newkey rsa:2048 -nodes -keyout server.key -out server.crt
Answer the certificate details as requested by OpenSSL like your name, state, email, domain name etc. Then change the permissions of the directory and certificate files.
chmod -R 700 /etc/nginx/ssl
chmod 400 server.*
chmod 400 dhparam.pem
The SSL certificate files have been generated.
Step 7 - Configure Nginx as Reverse Proxy
In this step, we will configure Nginx as a reverse proxy for the seafile-server on port 8000 and 8002.
Go to the nginx configuration directory and create a new virtual host file for seafile.
cd /etc/nginx/
vim conf.d/seafile.conf
Paste virtual host configuration below:
server {
        listen        80;
        server_name   cloud.natsume.co;
        return 301  https://$host$request_uri;
}

server {
    listen 443 ssl;
    server_name cloud.natsume.co;
    ssl on;
    ssl_protocols           TLSv1 TLSv1.1 TLSv1.2;
    ssl_certificate         /etc/nginx/ssl/server.crt;
    ssl_certificate_key    /etc/nginx/ssl/server.key;

    ssl_ciphers  'ECDHE-RSA-AES256-GCM-SHA384:ECDHE-RSA-AES128-GCM-SHA256:DHE-RSA-AES256-GCM-SHA384:DHE-RSA-AES128-GCM-SHA256:ECDHE-RSA-AES256-SHA384:ECDHE-RSA-AES128-SHA256:ECDHE-RSA-AES256-SHA:ECDHE-RSA-AES128-SHA:DHE-RSA-AES256-SHA256:DHE-RSA-AES128-SHA256:DHE-RSA-AES256-SHA:DHE-RSA-AES128-SHA:ECDHE-RSA-DES-CBC3-SHA:EDH-RSA-DES-CBC3-SHA:AES256-GCM-SHA384:AES128-GCM-SHA256:AES256-SHA256:AES128-SHA256:AES256-SHA:AES128-SHA:DES-CBC3-SHA:HIGH:!aNULL:!eNULL:!EXPORT:!CAMELLIA:!DES:!MD5:!PSK:!RC4';
    ssl_dhparam   /etc/nginx/ssl/dhparam.pem;
    ssl_prefer_server_ciphers  on;

    location / {
        fastcgi_pass    127.0.0.1:8000;
        fastcgi_param   SCRIPT_FILENAME     $document_root$fastcgi_script_name;
        fastcgi_param   PATH_INFO           $fastcgi_script_name;

        fastcgi_param   SERVER_PROTOCOL        $server_protocol;
        fastcgi_param   QUERY_STRING        $query_string;
        fastcgi_param   REQUEST_METHOD      $request_method;
        fastcgi_param   CONTENT_TYPE        $content_type;
        fastcgi_param   CONTENT_LENGTH      $content_length;
        fastcgi_param   SERVER_ADDR         $server_addr;
        fastcgi_param   SERVER_PORT         $server_port;
        fastcgi_param   SERVER_NAME         $server_name;
        fastcgi_param   REMOTE_ADDR         $remote_addr;

        access_log      /var/log/nginx/seahub.access.log;
        error_log       /var/log/nginx/seahub.error.log;
        fastcgi_read_timeout 36000;
    }

    # Reverse Proxy for seahub
    location /seafhttp {
        rewrite ^/seafhttp(.*)$ $1 break;
        proxy_pass http://127.0.0.1:8082;
        client_max_body_size 0;
        proxy_connect_timeout  36000s;
        proxy_read_timeout  36000s;
        proxy_send_timeout  36000s;
        send_timeout  36000s;
    }

    #CHANGE THIS PATH WITH YOUR OWN DIRECTORY
    location /media {
        root /var/www/seafile/seafile-server/seahub;
    }

}
Save and exit.
I will use use 'cloud.natsume.co' as the domain name. Please replace that with your own domain name in the config above.
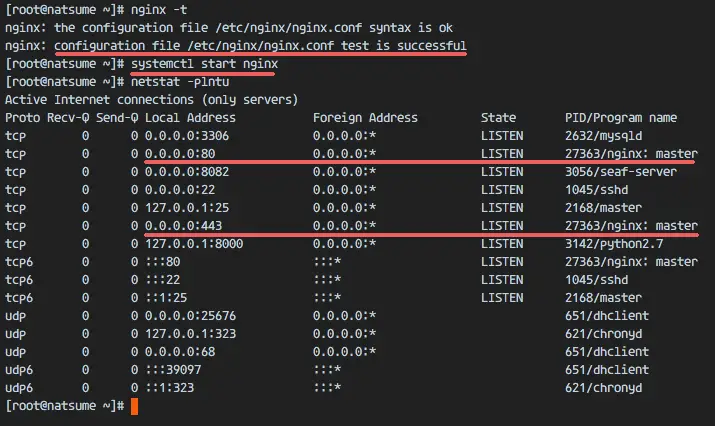
Now test the Nginx configuration and make sure that there are no errors.
nginx -t
Start Nginx with the systemctl command:
systemctl start nginx
Make sure port 80 and 443 are available in the list that netstat provides:
netstat -plntu
Next, we have to add the domain name to the seafile configuration. Go to the seafile directory and edit the configuration file.
cd /var/www/seafile/
vim conf/ccnet.conf
Change the service URL to your domain name.
SERVICE_URL = https://cloud.natsume.co
Save and exit.
Edit the seahub configuration file.
vim conf/seahub_settings.py
On the second line, add configuration below:
HTTP_SERVER_ROOT = 'https://cloud.natsume.co/seafhttp'
Replace the domain name with your domain here again. Save and exit.
Restart seafile and add all services to start at boot time:
systemctl restart seafile
systemctl restart seahub

systemctl enable nginx
systemctl enable mariadb
systemctl enable seafile
systemctl enable seahub
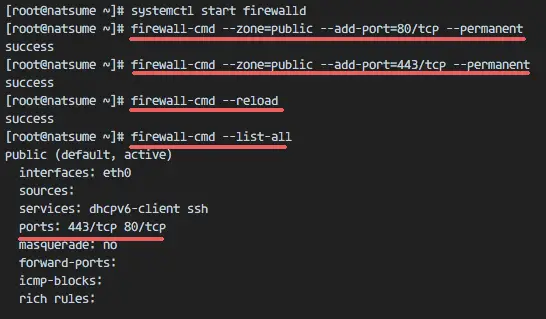
Step 8 - Configure FirewallD
In step 7, we've configured Nginx to use the HTTP and HTTPS port. Now we have to open that ports in the Firewall by adding them to firewalld.
Start firewalld.
systemctl start firewalld
systemctl enable firewalld
Add HTTP and HTTPS port to the firewall configuration with the firewall-cmd command below:
firewall-cmd --zone=public --add-port=80/tcp --permanent
firewall-cmd --zone=public --add-port=443/tcp --permanent
Reload the firewall configuration and check the port list.
firewall-cmd --reload
firewall-cmd --list-all
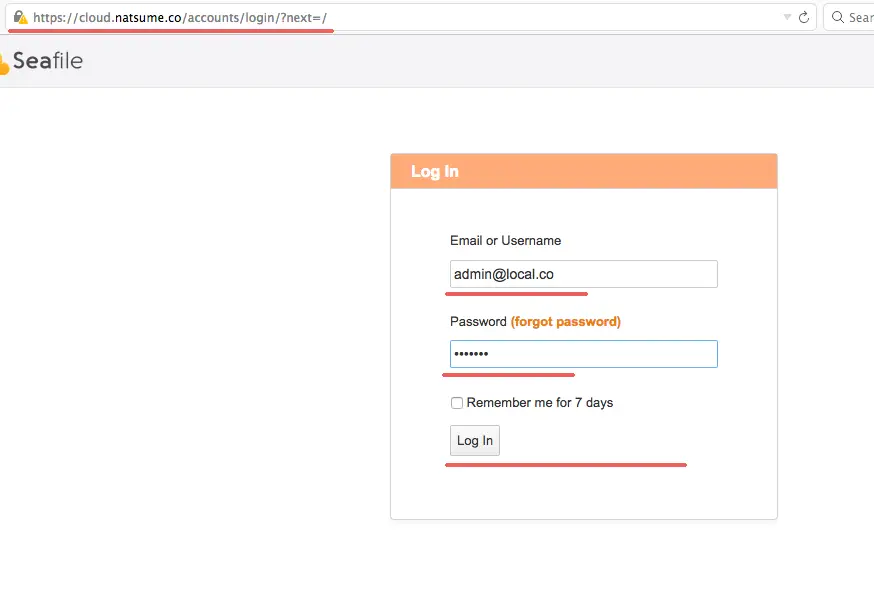
Step 9 - Testing Seafile
Open your browser, type the seafile domain name, in my case cloud.natsume.co and you will be redirected to the https connection.
Type your admin email and password and click 'Log in'.
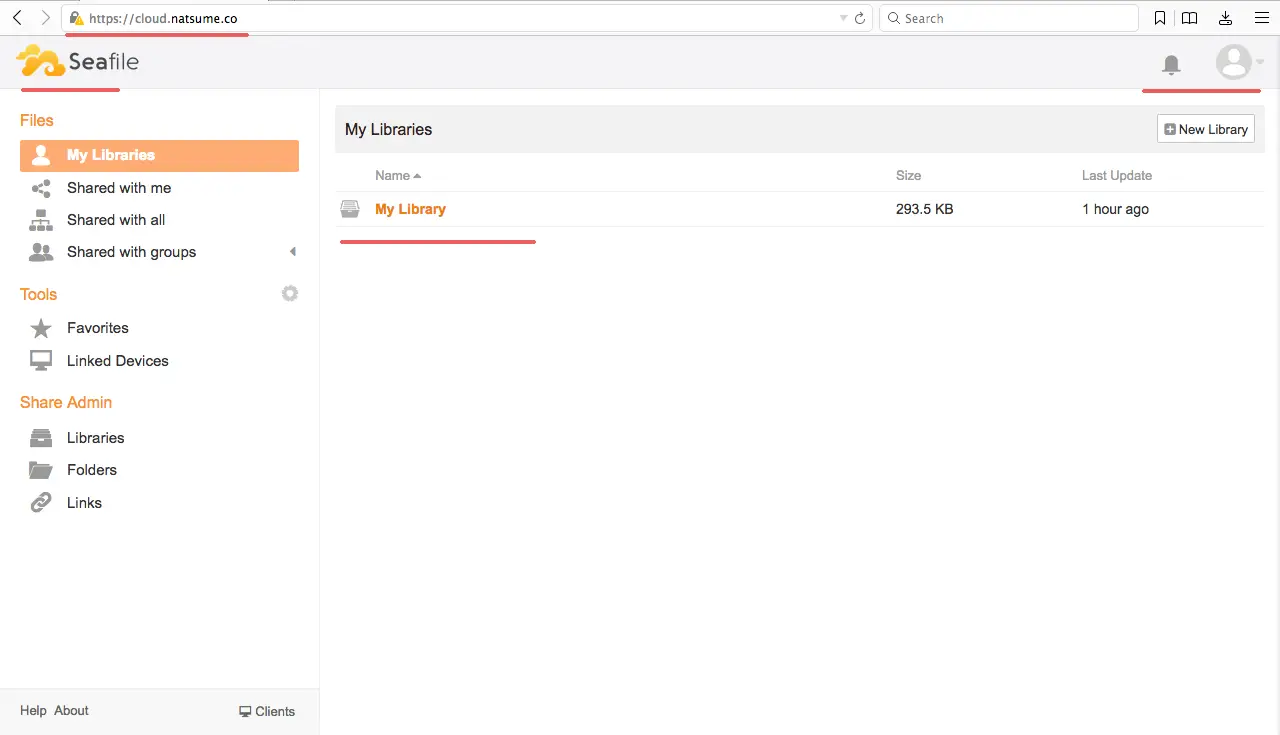
Seafile admin dashboard:
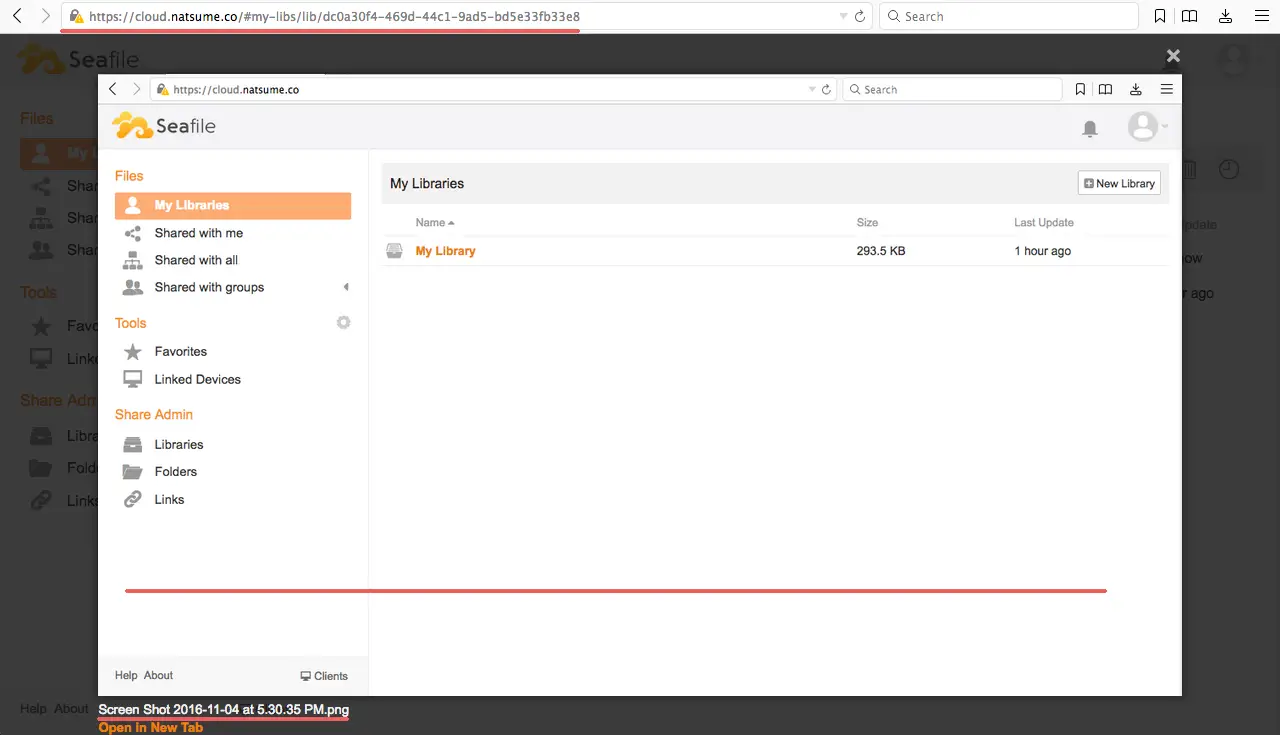
Seafile file view.
Seafile with Nginx as Reverse Proxy and SSL has been successfully installed on CentOS 7 server.
Conclusion
With the wide variety of cloud applications today, Seafile is a private cloud solution that is good for use on this day. With the encryption feature at the library/folder level, you can store your data securely on a Seacloud server. Beside that, Seafile is easy to configure and implement on your own server.

