How to Install and Configure MongoDB on CentOS 7
MongoDB is a NoSQL database that provides high performance, high availability, and automatic scaling. NoSQL database means that, unlike MySQL or PostgreSQL, it does not support SQL (Structured Query Language) to retrieve or manipulate the stored data. MongoDB does not store data in tables, instead, it stores data in a "document" structure similar to JSON (in MongoDB called BSON). MongoDB was first introduced in 2009, six years ago. Currently developed by the company MongoDB MongoDB Inc.
In this tutorial, I will guide you to install and configure MongoDB 3.2 (stable) on a CentOS 7 server. We will add and configure the administrator user for MongoDB and configure the authentication for MongoDB services.
Prerequisites
- CentOS 7
- Root privileges
What we will do in this tutorial :
- Add the MongoDB repository.
- Installing MongoDB.
- Fix some MongoDB errors.
- Create an administrator user.
- Enable MongoDB authentication and Testing.
Step 1 - Add the MongoDB Repository in CentOS
Connect to your CentOS 7 server with the ssh root account:
ssh [email protected]
We need to to go to the 'yum.repos.d' directory in order to add the new CentOS repository. Go to that directory and create new repository file 'mongodb-org-3.2.repo' with vim:
cd /etc/yum.repos.d/
vim mongodb-org-3.2.repo
Paste MongoDB repository configuration that is shown below:
[mongodb-org-3.2]
name=MongoDB Repository
baseurl=https://repo.mongodb.org/yum/redhat/$releasever/mongodb-org/3.2/x86_64/
gpgcheck=1
enabled=1
gpgkey=https://www.mongodb.org/static/pgp/server-3.2.asc
Save the file and exit the editor.
Step 2 - Installing MongoDB
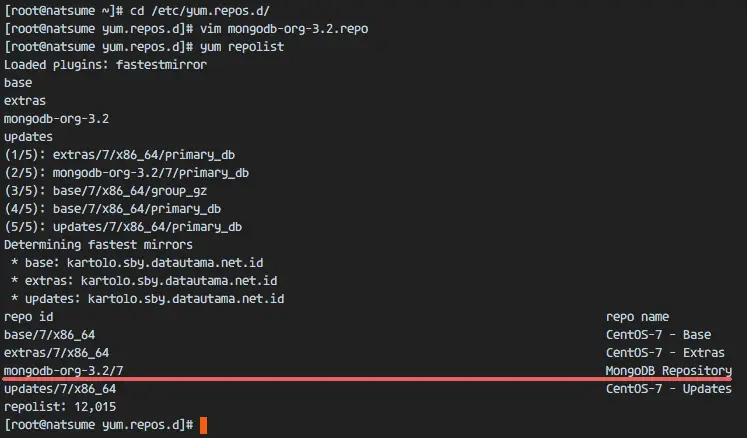
We've added MongoDB repository, now check the repository list on the server to make sure that the MongoDB repository is available in the list.
Run the command below as root to do so:
yum repolist
You sould see results below. The MongoDB repository is on the list.
Next, install MongoDB with the yum command.
yum -y install mongodb-org
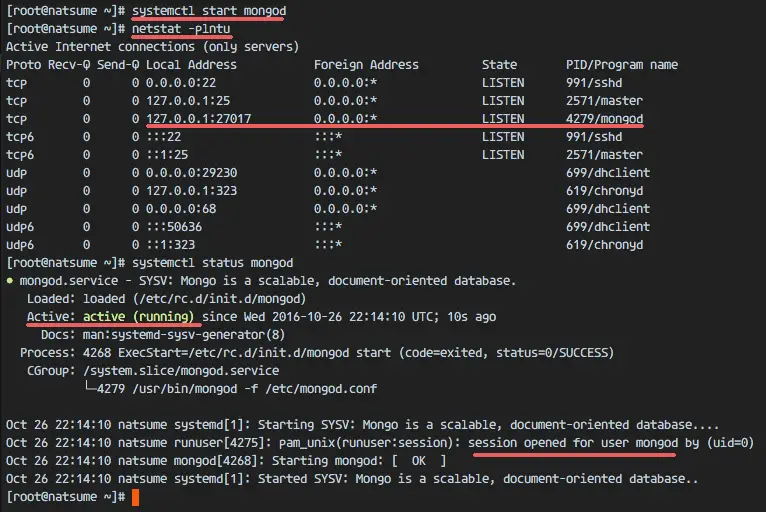
When the installation is finished, start MongoDB with this systemctl command:
systemctl start mongod
Check that MongoDB is running by checking that the port '27017' is open.
netstat -plntu
And make sure the mongodb service is active.
systemctl status mongod
Step 3 - Fix a MongoDB Error
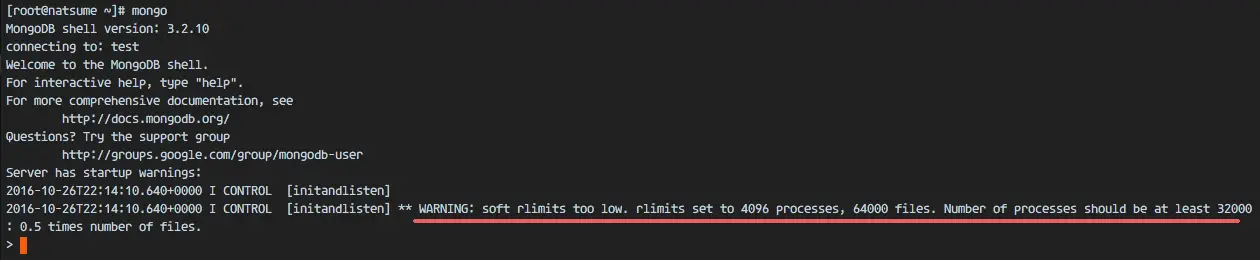
MongoDB is installed. Now we can access the mongodb shell by using the command below:
mongo
You will probably see this error about ulimit configuration on the server.
** WARNING: soft rlimits too low. rlimits set to 4096 processes, 64000 files. Number of processes should be at least 32000...
Ulimits or User limits define how much of a system-wide resource a user may use.
In order to resolve this problem, we need to increase the ulimit configuration of the user mongod.
On CentOS 7 server, the MongoDB database is running under the user 'mongod'. Go to the 'security' directory and edit the 'limits.conf' configuration file.
cd /etc/security/
vim limits.conf
I will increase the limits of the mongod user to '64000' - number of processes or nproc and the number of open files or nofile to 64000.
Paste new configuration below to the end of the file:
mongod soft nproc 64000
mongod hard nproc 64000
mongod soft nofile 64000
mongod hard nofile 64000
Save the limits.conf file.
Run the sysctl command below to apply the changed limits to the system:
sysctl -p
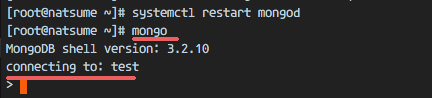
Then restart the MongoDB service and try again to access the mongo shell, the error is gone now.
systemctl restart mongod
mongo
Step 4 - Create a MongoDB Administrator User
In this step, we will create a new user "admin" for MongoDB with the role 'UserAdminAnyDatabase' from the mongo shell.
Open the mongodb shell:
mongo
I will create new user administrator named 'admin' with password 'admin123'. Please use a secure password on your server. Then we will configure the role of the user to be 'UserAdminAnyDatabase'.
Switch to the database 'admin'.
use admin
Type in the MongoDB query below to create the new administrator user:
db.createUser(
  {
    user: "admin",
    pwd: "admin123",
    roles: [ { role: "userAdminAnyDatabase", db: "admin" } ]
  }
)
Next, ensure that the user has been created with the MongoDB query below.
show users
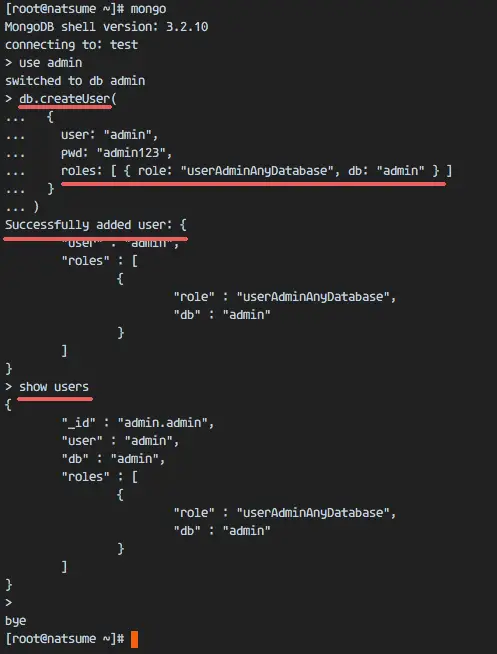
The MongoDB administrator user has been created.
Step 5 - Enable User Authentication in MongoDB
In this step, we will enable authentication for users to prevent that another user without sufficient privileges is able to see the data on the database.
On our CentOS 7 server, MongoDB is running under systemd with an init script in the '/etc/init.d/' dirctory. We will edit that script to force the mongodb service to run with the '--auth' option.
Go to the '/etc/init.d/' directory and edit the "mongod" file:
cd /etc/init.d/
vim mongod
On line 15 you will find the "OPTION" variable, there we will add the "mongod" option.
OPTIONS=" --auth -f $CONFIGFILE"
Save the file.
Reload the systemd service and restart MongoDB.
systemctl daemon-reload
systemctl restart mongod
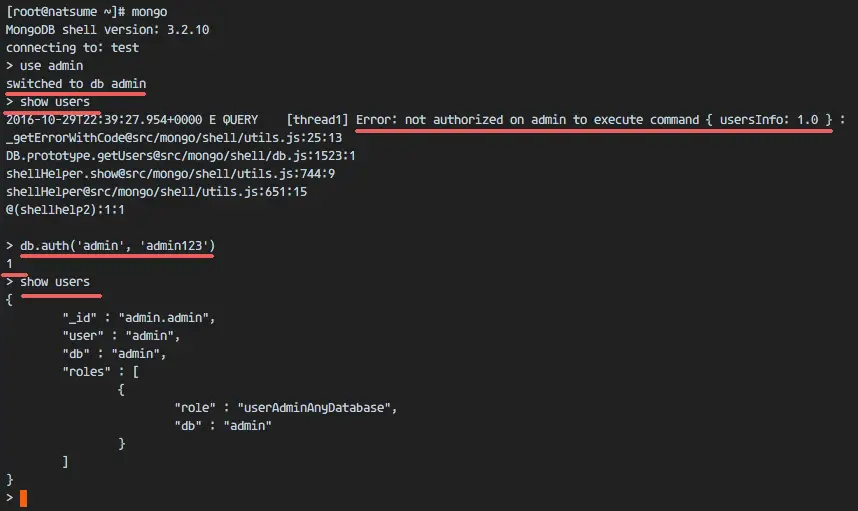
Next, we have to test the configuration by logging into the mongo shell and switch to the admin database, then try to see the admin users.
mongo

use admin
show users
You will see an error about the unauthorized execution of the command in the database admin. Now we need to use the command 'db.auth()' for the authentication.
db.auth('admin', 'admin123')
Now you can see the users with their roles and the privileges.
MongoDB 3.2 has been installed and configured on a CentOS 7 Server.

