For environments where you have the need to know immediately if any issues arise, such as production environments, security or critical resources of your company, this Pandora FMS integration with Telegram is absolutely perfect, as it is the answer to that required immediacy, as well as the possibility of offering exact information about the location and cause of the problem, thanks to the powerful Pandora FMS system of alerts and macros.
Likewise, being a messaging service based on telephone communications through the data network, it guarantees your technicians, managers and on-call operators that they will find out aboutany problem at the exact moment it appears, without the need to access a computer or manually check their email.
Thanks to the plugins of your library and the flexible alert system offered by Pandora FMS, we will show you how to configure your monitoring tool to send instant messages whenever a problem is detected.
First of all, you must start from the necessary environment, whose requirements are:
- Pandora FMS environment running on Linux, in this case we will use Rocky Linux 8, the distribution recommended by the manufacturer.
- Our library plugin: Telegram bot CLI.
- Telegram account available to be used as a broadcaster for alert messages.
Bot creation
First of all, create the Telegram bot that will be in charge of sending messages. From the Telegram account you wish to use, you will have to interact with the user BotFather using the “/start”command:

Then use the comman “/newbot” to create your bot.

It will ask you for the name you wish your bot to have. Here specify the name you wish for your bot. It is important for the name to end with “bot”, for example Pandora_FMS_telegram_bot.
By sending you the name, if it is not in use, it will confirm that the bot was properly created, with a link to your chat and give you a Token that is important for you to save to set up the alert later.

Group Setup
Now enter the bot that you just created in an existing group you may have or a new one that you create, to receive your alerts.
The next step is to add another bot called GetIDs Bot to the same group in order to get the group identifier. By adding it, it will leave you a message with the ID of your group, and you should also take note of that for later.

With all of this you will already have your Telegram ready to receive alerts.
Integration with Pandora FMS (versions 773 and earlier)
First you should start by downloading our plugin Telegram bot CLI.
It will download a zip file called telegram-bot-cli.zip, which you should decompress.
Inside, you will find a file called “pandora-telegram-cli.py” which must be added to your Pandora FMS server in the path “/usr/share/pandora_server/util/plugin”.
Now, from the terminal of your server, install the Python3 dependencies (if you do not already have them) by means of the command “dnf install python3”:

Once installed, run the plugin to verify that it is running, through the command “python /usr/share/pandora_server/util/plugin/pandora-telegram-cli.py”:

We will now move on to Pandora FMS server console.
Go to the “Management > Alerts > Commands” section and click “Create”:

And set up your alert command as follows:

On command, type in the following:
python3
/usr/share/pandora_server/util/plugin/pandora-telegram-cli.py -t _field1_ -c _field2_ -m “_field3_”
The command that we will use is for executing the plugin that you downloaded, with the arguments -t, -c and -m. It is important for the argument -m to be enclosed in quotation marks “”.
- In the field of argument -t, Bot Token, enter the token of your bot.
- In the field of argument -c, Chat ID, enter the ID of the group that bot “GetIDs Bot” provided you with.
- And in the -m field, Alert Message, enter the alert message that you want your bot to send to the group. You may use all the alert macros you need, some examples are:
- _module_: Name of the module that triggered the alert.
- _agentalias_: Alias of the agent that triggered the alert.
- _modulestatus_: Status of the module when the alert was triggered.
- _agentstatus_: Status of the agent when the alert was triggered.
- _data_: Data of the module that triggered the alert.
- _timestamp_: Time and date the alert was triggered.
For example, you could use this message (which we will enter in field3): “The module _module_ of agent _agentalias_ has changed to _modulestatus_ status”
.
Once all this is filled in, click “Create”.
Now access the “Management > Alerts > Actions” section of your Pandora FMS console and click “Create” to create your action.
Enter the name you want your action to have, select the group, the alert command that you created previously and choose a Threshold. All the fields will be filled in automatically and click “Create”:

Now access the “Management > Alerts > List of Alerts” section and configure the alert for the Agent and Module you want.
In this case select that when the “Host Alive” Module of the “Router” agent goes into critical state, your previously created “Telegram Message” action will be executed:

If your module goes into critical state, you will receive this message to your Telegram group:

When your alert recovers you will receive a message like this:

Integration with Pandora FMS (versions 774 and later)
In version v7.0NG.774, the Telegram plugin of your library has been added by default to Pandora FMS alert, with a standard basic configuration.
If you access the Management > Alerts > Commands section, you will have a command called “Pandora Telegram”:

When accessing it, you will see that the command that will execute your alert is already configured.
Fill the -t “TOKEN” parameter of the command with the token given to you by BotFather and save the command:

After this, access the Management > Alerts > Actions section and access Pandora Telegram action.
At the bottom, add the Chat ID of your group that gave you the bot “GetIDs Bot” In the Triggering and Recovery sections, you may modify the message to your liking using the alert macro as you saw previously, and click “Update”:

Once saved, enter the Alert List menu from Management > Alerts > List of Alerts and create a new alert.
Select the agent and module, the action you updated “Pandora Telegram”, the template you want and create the alert:

Once your alert is triggered, you will receive your message by Telegram:

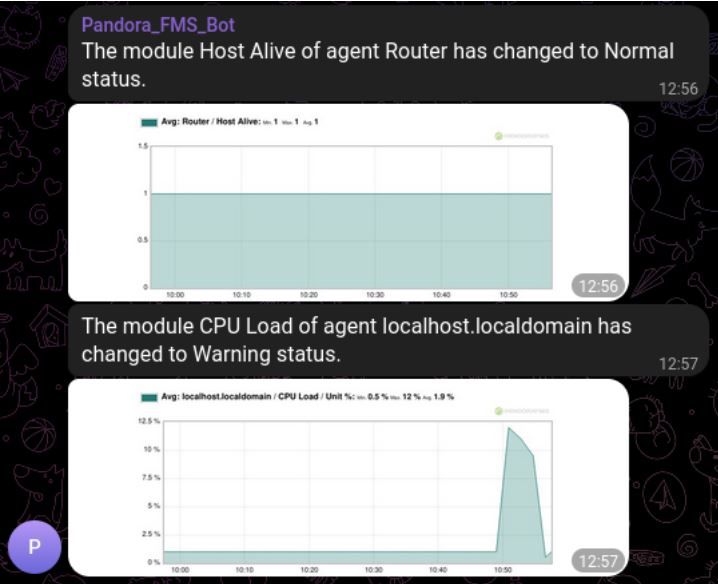
Sending alerts with data graphs
In our integration of Pandora FMS alerts and Telegram, you may add to the message a graph with the latest data of the module that triggered the alert, this applies both for version 773 and earlier and for 774 and later. You will be able to send graphs in your alerts by adding a call to the API of your Pandora FMS server to the script you used previously.
The first step that you must configure on your server is access to Pandora FMS API in the “Setup > Setup > General Setup” section, in the “API password” field you will have the API password and in the “IP list with API access” enter the IPs that need access or you may provide access to any IP (*).

Now edit the command that you had previously created to add the necessary data to send the graph. You need to add the following parameters:
- –api_conf: Here indicate the configuration parameters of the API of your server, it is important to fill in the fields ” < >“:
“user=,pass= ,api_pass= ,api_url=http:// /pandora_console/include/api.php”.
Example: “user=admin,pass=pandora,api_pass=1234,api_url=http://10.0.5.100/pandora_console/include/api.php” - –module_graph: Parameters of the module from which you will retrieve the graph, in this case there is two of them:
- module_id: Where the ID of the module that triggered the alert is entered. In this case use the alert macro_id_module_ so that it is always filled in with the module ID of the alert.
- interval: Total time interval shown in the graph, in seconds. We will use 3600 seconds by default, the equivalent of 60 minutes or 1 hour but you may configure the interval that best suits you.
The resulting full command will be as follows:

Command:

And field configuration:

And save the changes.
When the alert is triggered, you will receive the message with the data graph of your module:
Pandora FMS’s editorial team is made up of a group of writers and IT professionals with one thing in common: their passion for computer system monitoring. Pandora FMS’s editorial team is made up of a group of writers and IT professionals with one thing in common: their passion for computer system monitoring.