How to Mount CephFS on CentOS 7
On this page
Ceph is an open source storage platform, it offers high performance, reliability, and scalability. It's a free distributed storage system that provides an interface to object, block, and file-level storage without a single point of failure.
This is the third part of the Ceph tutorial series. In the first part, I've shown you how to build a 'Ceph Cluster' with multiple nodes on CentOS7. The second part is a guide that shows how to use Ceph as a Block Device on the CentOS 7. In this third part, I will show you how to mount Ceph as a File System on CentOS 7 as Client.
Prerequisites
- Ceph Cluster - 1 Ceph-admin node, 1 Moinitor node (ceph-mon), 3 Ceph-osd nodes (see part 1).
- Client2 - CentOS 7 server (see part 2).
- Root privileges
Step 1 - Configure the Client2 Node
In this first step, we will make the base installation of the client. This is the same procedure that we used on the other cluster nodes. We will create a new user named cephuser on the box, synchronize the time with ntpdate, configure sudo password-less for cephuser etc. So let's start...
Connect to the client2 node with SSH as root user:
ssh root@client2
We logged into the server with root access, now we can create the new cephuser.
useradd -m -d /home/cephuser cephuser
passwd cephuser
TYPE YOUR NEW PASSWORD
After the new user has been created, enable sudo password-less for the user by creating a new configuration file in the sudoers directory.
echo "cephuser ALL = (root) NOPASSWD:ALL" | sudo tee /etc/sudoers.d/cephuser
sed -i s'/Defaults requiretty/#Defaults requiretty'/g /etc/sudoers
chmod 0440 /etc/sudoers.d/cephuser
Next, install NTP, ntpdate command line tool and open-vm tools. Then update and synchronize the system time with ntpdate.
yum install -y open-vm-tools
yum install -y ntp ntpdate ntp-doc
ntpdate 0.us.pool.ntp.org
hwclock --systohc
systemctl enable ntpd.service
systemctl start ntpd.service
Disable SELinux and edit the host's file.
sed -i 's/SELINUX=enforcing/SELINUX=disabled/g' /etc/selinux/config
vim /etc/hosts
Paste hosts configuration below:
10.0.15.10        ceph-admin
10.0.15.11        mon1
10.0.15.21        osd1
10.0.15.22        osd2
10.0.15.23        osd3
10.0.15.15        client
10.0.15.16        client2
Save the hosts file and exit the editor. Now try to ping the ceph-admin node to test the connection and hostname setup.
ping -c 3 ceph-admin
You should see the ceph-admin node IP address as the result.
Step 2 - Install Ceph Common Utilities on Client2 Node
The ceph-common package can be installed from the Ceph repository. It contains the Ceph utilities to mount and interact with the Ceph Storage Cluster.
Before we can proceed with the installation of the ceph-common package, we have to add the epel-repository and the Ceph repository.
sudo yum -y install epel-release
sudo rpm -Uhv http://download.ceph.com/rpm-jewel/el7/noarch/ceph-release-1-1.el7.noarch.rpm
Update the system and install the Ceph common utilities.
sudo yum -y update
sudo yum -y install ceph-common
Next, we have to add the configuration on the ceph-admin node.
Step 3 - Configure the Ceph-admin Node
In this step, we will configure the cluster so that we can connect from admin to the client2 node with ssh key (without the password).
Connect to the ceph-admin node as root and then login to the cephuser with su.
ssh root@ceph-admin
su - cephuser
Edit the ssh config file and define a new client2 config section.
vim ~/.ssh/config
At the end of the file, paste the configuration below:
Host client2
    Hostname client2
    User cephuser
Next, add the host configuration line for the client node to the '/etc/hosts' file on the ceph-admin node.
sudo vim /etc/hosts
Paste the host configuration below at the end of the file.
10.0.15.16 client2
Save the hosts file and exit the editor.
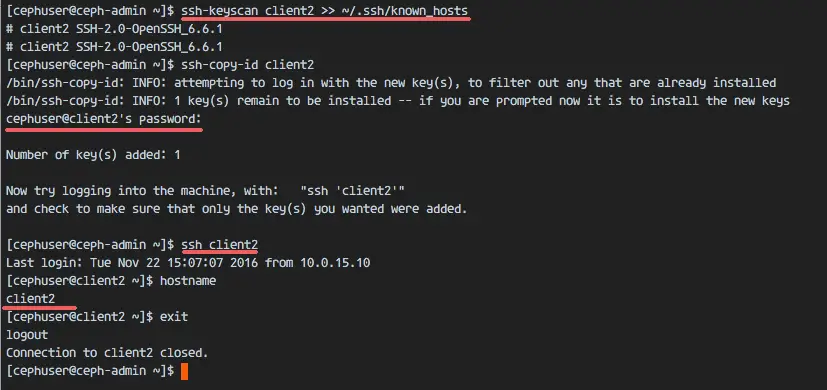
Now add the ssh key of the ceph-admin node to the client2 node.
ssh-keyscan client2 >> ~/.ssh/known_hosts
ssh-copy-id client2
TYPE THE client2 PASSWORD
The ceph-admin key has been added. Now we can access the client2 node without the password from the ceph-admin node.
ssh client2
Step 4 - Create the Ceph MetaData Server
If you want to run and mount CephFS, you need a ceph metadata server (Ceph MDS). Ceph MDS is running on the OSD nodes. We can install Ceph MDS to the OSD node with the ceph-deploy command from the ceph-admin node.
Login to the ceph-admin node and become the cephuser.
ssh root@ceph-admin
su - cephuser
Go to the cluster directory and run the ceph-deploy command for creating a new ceph metadata-server (Ceph MDS). I will use the 'osd1' node as the metadata server.
cd cluster/
ceph-deploy mds create osd1

After creating the MDS server on osd1 node, we have to connect to the node with ssh.
ssh osd1
Next, create new pools for the MDS server, at least we need 2 pools - cephfs_data and cephfs_metadata.
Create new pools on the 'osd1' node.
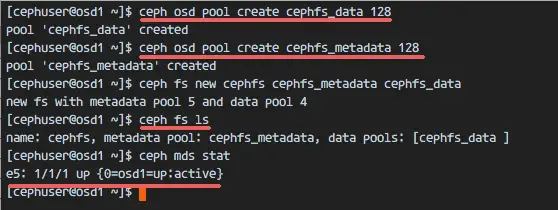
ceph osd pool create cephfs_data 128
ceph osd pool create cephfs_metadata 128
The new pools are ready. Now we can create the new filesystem by using the named pools: cephfs_data and cephfs_metadata.
ceph fs new cephfs cephfs_metadata cephfs_data
cephfs = File System name.
When you finished this step without an error, then check the MDS server with the command below.
Check the list of MDS servers:
ceph fs ls
Now you can see that the filesystem name is 'cephfs', the metadata pool is 'cephfs_metadata', and the data pool is 'cephfs_data'.
Show the MDS Status:
ceph mds stat
Make sure the MDS is up and active before you proceed.
Step 5 - Mount CephFS with the Kernel Driver
The Ceph MDS server has been created on the 'osd1' node. Now we are able to use CephFS. In this step, we will mount CephFS on the client2 node as the file system with the mount command.
Before we start with the next step, we need to install ceph-fuse from the ceph repository on the client2 node.
sudo yum -y install ceph-fuse
When the installation is done, copy the key of the user. In our default configuration, the cephx authentication is enabled. The default user is 'admin'.
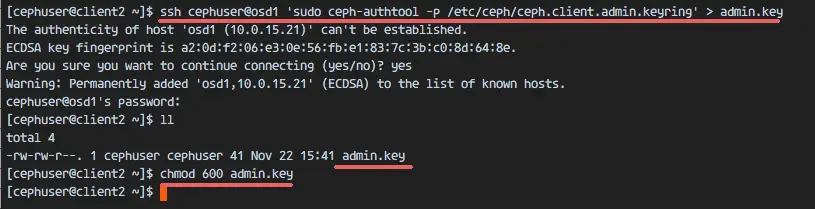
Copy the key from the MDS server node 'osd1' to the client2 node with the scp command, then change the permission of the key.
ssh cephuser@osd1 'sudo ceph-authtool -p /etc/ceph/ceph.client.admin.keyring' > ceph.key
chmod 600 ceph.key
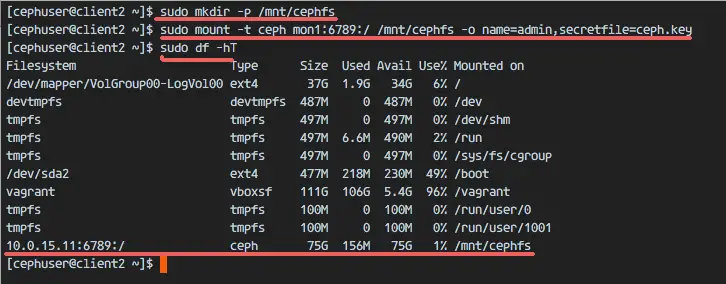
Next, create a new cephfs directory and mount the CephFS to that directory.
sudo mkdir -p /mnt/cephfs
sudo mount -t ceph mon1:6789:/ /mnt/cephfs -o name=admin,secretfile=ceph.key
Note:
Default username = admin
secretfile = ceph.key from the MDS node osd1
You will see a new filesystem of type 'ceph' mounted in the list.
sudo df -hT
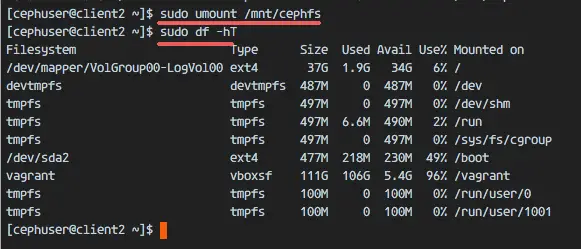
To unmount the filesystem, use the umount command utility.
umount /mnt/cephfs
Step 6 - Mount CephFS as Fuse
After we've successfully mounted CephFS as the filesystem, we will mount CephFS as Fuse (Filesystem in USErspace). For this setup, we need to copy the configuration file 'ceph.conf' and the key from the monitoring node 'mon1'.
Create a new ceph directory on the client2 node and copy the configuration file and key.
sudo mkdir -p /etc/ceph/
sudo scp root@mon1:/etc/ceph/ceph.conf /etc/ceph/ceph.conf
sudo scp root@mon1:/etc/ceph/ceph.client.admin.keyring /etc/ceph/ceph.client.admin.keyring
Change the permissions of the files.
sudo chmod 644 /etc/ceph/ceph.conf
sudo chmod 644 /etc/ceph/ceph.client.admin.keyring
Next, create a new fuse directory and mount CephFS as Fuse to '/mnt/fuse' directory.
sudo mkdir -p /mnt/fuse
sudo ceph-fuse -m mon1:6789 /mnt/fuse
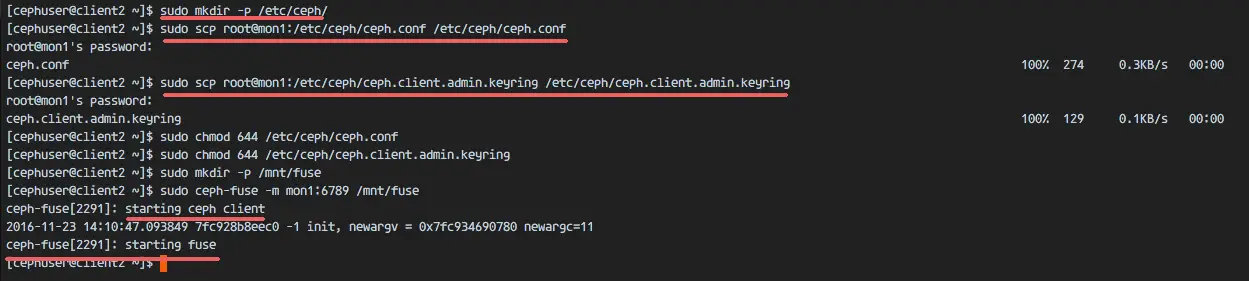
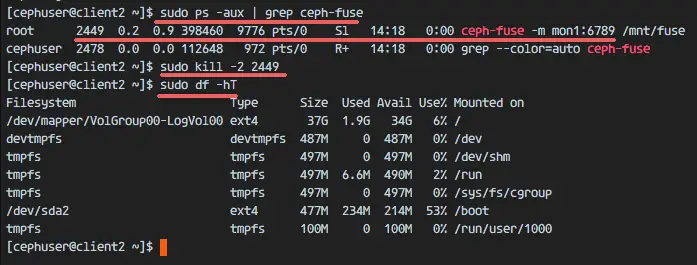
Make sure there is no error, and check that the CephFS is mounted.
sudo df -hT
To umount the CephFS Fuse, use the kill command.
sudo ps -aux | grep ceph-fuse
kill -2 PID
Step 7 - Mount CephFS using fstab
In this step, we will permanently mount CephFS with fstab. We will edit /etc/fstab and add the configuration for mounting CephFS with the kernel driver, using the mount command.
Edit the fstab file.
sudo vim /etc/fstab
Paste the configuration below at the end of the file:
mon1:6789:/ /mnt/cephfs ceph name=admin,secretkey=/home/cephuser/ceph.key,_netdev,noatime 0 0
Save the file and exit vim.
Mount all disks from the fstab with the mount -a command, then list all available disks.
sudo mount -a
sudo df -hT
Finally, reboot the system and check the available disks to ensure that the configuration is reboot-safe.
reboot
sudo df -hT
You will see that CephFS has been mounted automatically with fstab.

