Monitoring of a Ceph Cluster with Ceph-dash on CentOS 7
Ceph-dash is is a WSGI application based on the Flask framework for monitoring of Ceph clusters. It uses librados to communicate with the Ceph cluster. Ceph-dash has a nice dashboard, it is easy to install has many features, including InfluxDB and Graphite support.
In this tutorial, I will show you to install Ceph-dash and configure it to run under an apache web server with SSL and mod_auth support. In the first Ceph tutorial, we've already installed a 'Ceph cluster', in this tutorial, we will configure ceph-dash on the monitor host 'mon1' of that setup.
Prerequisites
- Ceph Cluster - Ceph I Tutorial
- Monitor node CentOS 7 - mon1
- Root privileges
Step 1 - Installing Ceph-dash Dependencies
In this first step, we will install the dependencies needed by ceph-dash, including apache web server and mod_ssl.
Connect to the mon1 node from the ceph-admin node.
ssh mon1
Install all dependencies needed with the yum command.
sudo yum -y install httpd mod_wsgi mod_ssl git
Then start apache/httpd and add it to be started at boot time.
sudo systemctl start httpd
sudo systemctl enable httpd
Step 2 - Download Ceph-dash
Ceph-dash is an open source application, available from the github repository. Clone the repository to the /var/www/ directory.
cd /var/www/html/
git clone https://github.com/Crapworks/ceph-dash.git
By default, apache/httpd is running under the user name 'apache', so we need to change the owner of ceph-dash files and directories to the 'apache' user.
sudo chown -R /var/www/html/ceph-dash/
Step 3 - Configure an Apache Virtual Host for Ceph-dash
Ceph-dash provides a sample of a virtual host configuration for apache and Nginx in the 'contrib' directory. We will use apache as the web server for Ceph-dash, so we need to copy the configuration file for apache to the apache/httpd directory.
cd /var/www/html/ceph-dash/
cp contrib/apache/cephdash /etc/httpd/conf.d/cephdash.conf
Go to the virtual host configuration directory and edit cephdash.conf file.
cd /etc/httpd/conf.d/
vim cephdash.conf
Change value of the 'ServerName' to your domain name - in my case ceph-mon.co
Change the wsgi daemon process to runn as the apache user.
Change the cephdash.wsgi directory to '/var/www/html/ceph-dash/contrib/wsgi/cephdash.wsgi'.
Change the SSL configuration directory to '/etc/httpd/ssl/'.
Change the ceph-dash directory to '/var/www/html/ceph-dash', then add the basic auth configuration.
Below is the configuration.
<VirtualHost *:80>
    ServerName ceph-mon.co

    RewriteEngine On
    RewriteCond %{REQUEST_URI} !^/server-status
    RewriteRule ^/?(.*) https://%{HTTP_HOST}/$1 [R,L]
</VirtualHost>

<VirtualHost *:443>
    ServerName ceph-mon.co

    WSGIDaemonProcess cephdash user=apache group=apache processes=1 threads=5
    WSGIScriptAlias / /var/www/html/ceph-dash/contrib/wsgi/cephdash.wsgi
    WSGIPassAuthorization On

    SSLEngine on
    SSLCertificateFile /etc/httpd/ssl/ssl.crt
    SSLCertificateKeyFile /etc/httpd/ssl/ssl.key

    <Directory /var/www/html/ceph-dash>
        WSGIProcessGroup cephdash
        WSGIApplicationGroup %{GLOBAL}
        Order deny,allow
        Allow from all

        AuthType Basic
        AuthName "Restricted Content"
        AuthUserFile /etc/apache2/.htpasswd
        Require valid-user
    </Directory>
</VirtualHost>
Save the file and exit the editor.
Step 4 - Configure SSL and Apache Basic Auth
In the virtual host configuration, we've already defined the SSL configuration in the '/etc/httpd/ssl' directory, so we need to create the SSL cert and key there.
mkdir -p /etc/httpd/ssl/
Now generate a self-signed SSL certificate file with the OpenSSL command.
openssl req -x509 -nodes -days 365 -newkey rsa:2048 \
-keyout /etc/httpd/ssl/ssl.key -out \
/etc/httpd/ssl/ssl.crt
Change the permissions of the certificate file to 600.
chmod 600 /etc/httpd/ssl/*
Next, add apache basic auth with the htpasswd command below to password protect the Ceph-dash access.
htpasswd -c /etc/httpd/htpasswd hakase
Type your password:
hakase is the username that I#ve chosen.
If all is done, test the apache configuration file with the apachectl command and make sure the result is 'Syntax OK', then restart apache.
apachectl configtest
sudo systemctl restart httpd
Step 5 - Add HTTP and HTTPS Port to Firewalld
On the monitor node 'mon1', firewalld is enabled. We have to open a new port for the http and https connection so we can access Ceph-dash from a web browser.
Add the http and https port to firewalld with the firewall-cmd command.
sudo firewall-cmd --zone=public --add-port=80/tcp --permanent
sudo firewall-cmd --zone=public --add-port=443/tcp --permanent
Reload the firewalld configuration.
sudo firewall-cmd --reload
Step 6 - Testing
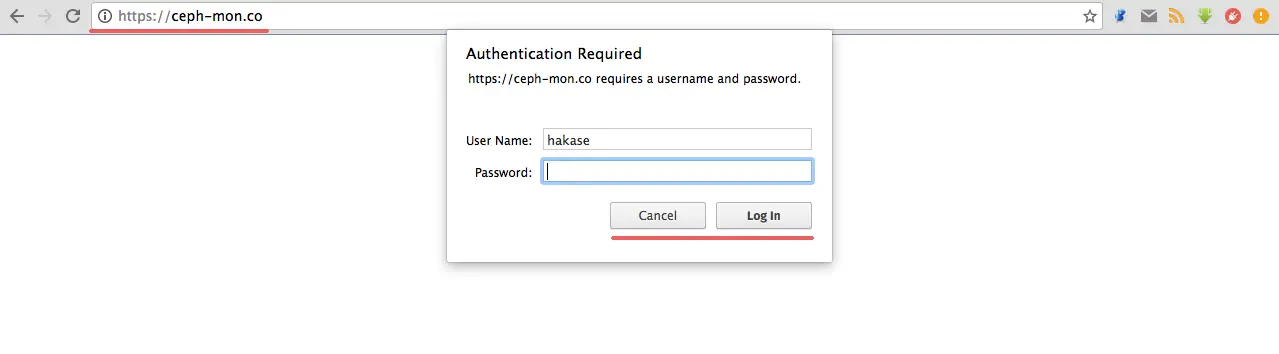
Open your web browser and type in the ceph-mon.co domain (use the domain name that you have chosen for your ceph-dash installation) in the address bar, press enter.
You will be asked for username and password, type in your username and password that you used in the htpasswd file.
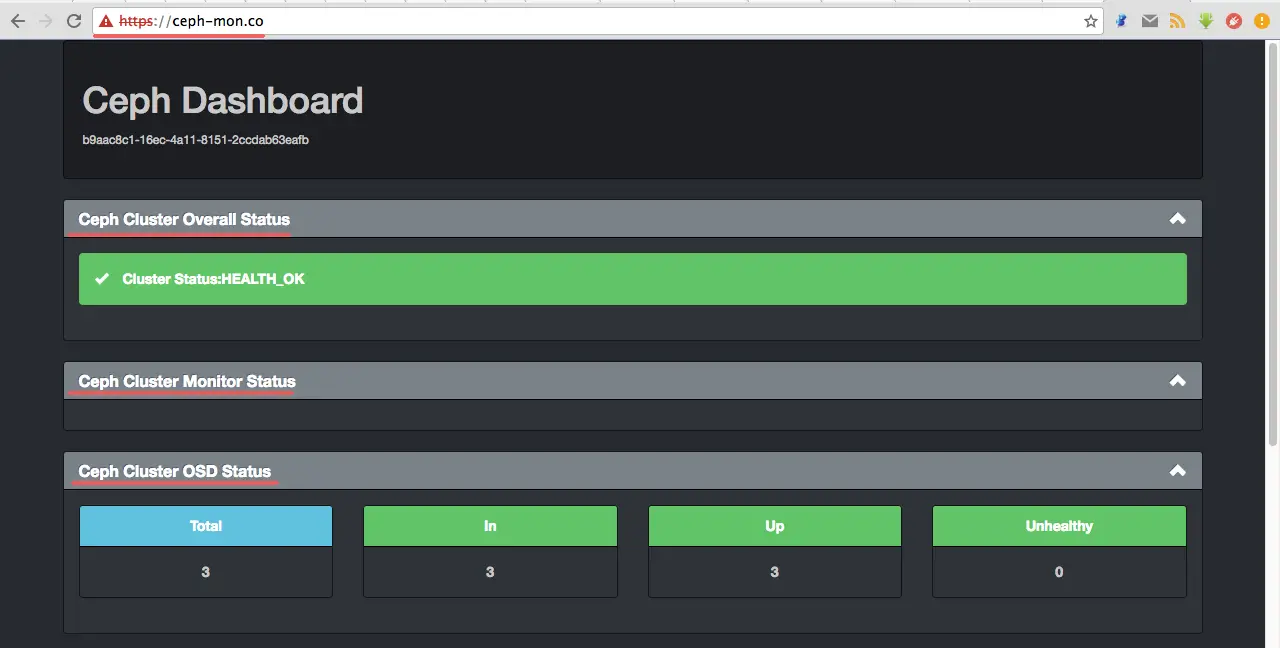
Now you can see the Ceph-dash dashboard.
Cluster health Status, Monitor node status, OSD nodes status.
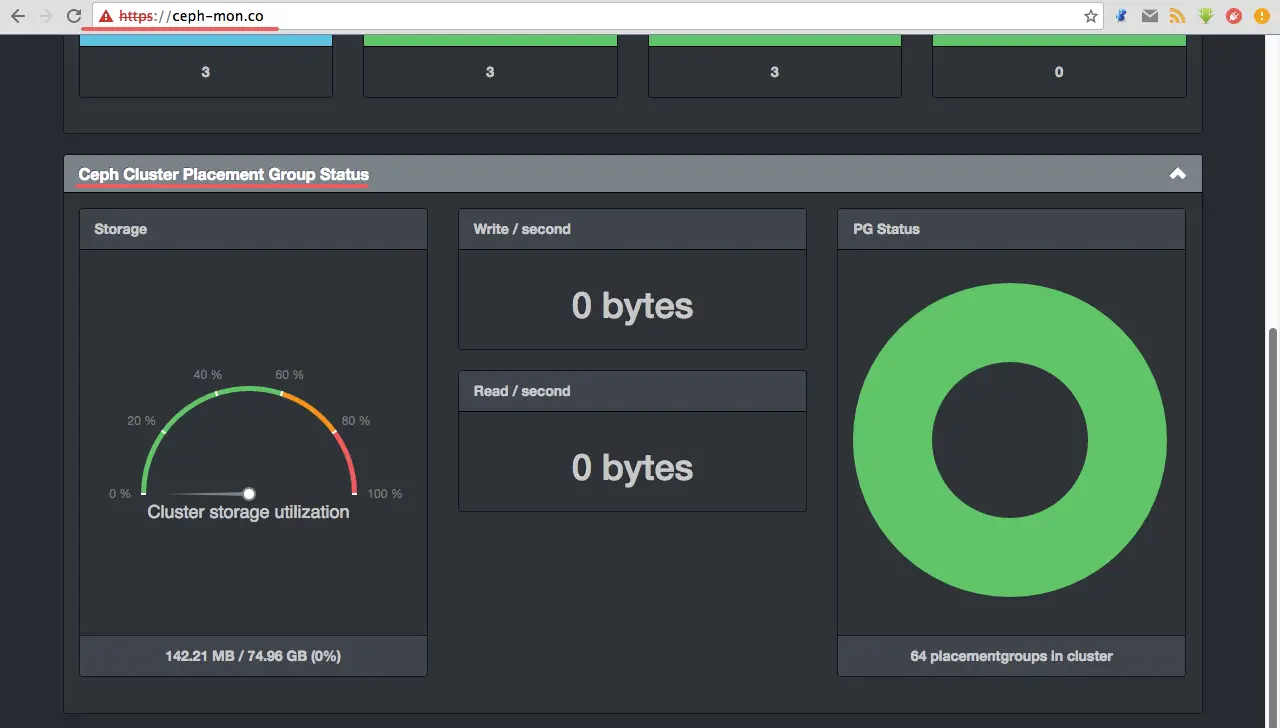
Storage and PG status.
Ceph-dash has been installed under an apache web server on the monitor node 'mon1'.

