How to install Moodle 3.2 on Ubuntu 16.04
This tutorial exists for these OS versions
- Ubuntu 22.04 (Jammy Jellyfish)
- Ubuntu 20.04 (Focal Fossa)
- Ubuntu 16.04 (Xenial Xerus)
On this page
Moodle is an open source learning management system software written in PHP, released under the GNU General Public License. It is used for distance education, e-learning projects, blended learning and similar purposes. Moodle is an acronym for 'Modular-object-oriented dynamic learning environment', developed by Martin Dougiamas to help educators and teachers to create online courses that focus on interaction and collaborative construction of content.
In this tutorial, I will guide you how to build your own learning center with moodle. We will install and configure Moodle on a Nginx web server, MySQL database, and PHP-FPM7. For the operating system, we will use Ubuntu 16.04 (Xenial Xerus).
What we will do:
- Install Nginx.
- Install and Configure PHP-FPM7.0.
- Install and Configure MySQL.
- Download and Configure Moodle.
- Configure SSL and Virtual Host.
- Installing Moodle.
- Testing.
Prerequisite
- Ubuntu 16.04 server.
- Root privileges.
Step 1 - Install Nginx
In this tutorial, Nginx is used as the web server for Moodle. Nginx is available on the Ubuntu repository and can be installed with the apt command easily.
apt-get install -y nginx
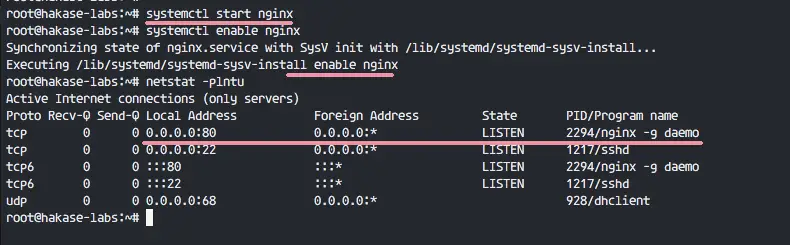
When the installation has been completed, start Nginx and enable it to start automatically at boot time.
systemctl start nginx
systemctl enable nginx
Nginx will run on port 80, check that the port is open with the command below and make sure Nginx uses port 80.
netstat -plntu
Step 2 - Install and Configure PHP-FPM7
Moodle is based on PHP, so PHP has to be installed on the system. We will use PHP-FPM because we are using Nginx web server. For the version, we will use PHP-FPM7.0, it's supported by the 'Moodle 3.2 stable' version.
Install PHP-FPM7.0 and all extensions needed by Moodle with the single apt command below.
sudo apt-get install -y graphviz aspell php7.0-fpm php7.0-cli php7.0-pspell php7.0-curl php7.0-gd php7.0-intl php7.0-mysql php7.0-xml php7.0-xmlrpc php7.0-ldap php7.0-zip php7.0-json php7.0-opcache php7.0-readline php7.0-mbstring php7.0-soap
When the installation of all packages is finished, go to the PHP configuration directory and edit the php.ini files.
cd /etc/php/7.0/
Edit fpm php.ini file with vim.
vim fpm/php.ini
Uncomment the line below and change the value to 0.
cgi.fix_pathinfo=0
Save the php.ini and exit the editor.
Edit cli php.ini file.
vim cli/php.ini
Uncomment the cgi.fix line below and change the value to 0.
cgi.fix_pathinfo=0
Save the file and exit vim.
Next, edit the php-fpm configuration file www.conf.
vim fpm/pool.d/www.conf
Uncomment the security limit line and make sure the value is .php.
security.limit_extensions = .php
Save the file and exit vim.
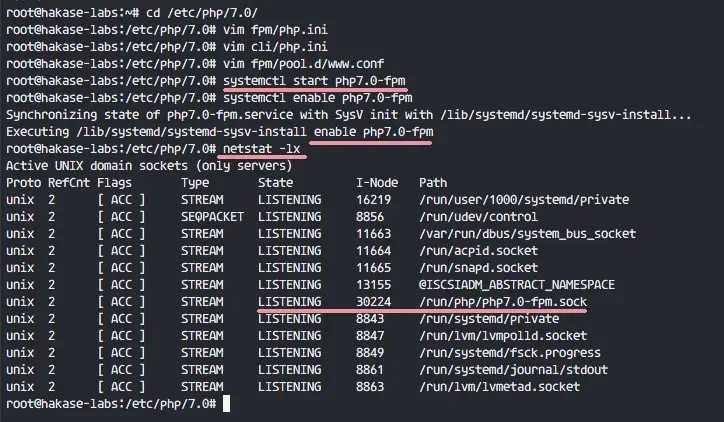
The PHP-FPM configuration is finished. Now we can start PHP-FPM and add it to start automatically at boot time.
systemctl enable php7.0-fpm
systemctl start php7.0-fpm
By default, PHP-FPM on ubuntu will provide a socket file for Nginx to connect to, make sure you have the results for the PHP socket file by using netstat command below.
netstat -lx
Step 3 - Install and Configure MySQL
We will use MySQL as the database system for Moodle (Moodle supports MySQL and PostgreSQL). We will use the latest MySQL version from the Ubuntu repository, which is MySQL 5.7 at the moment.
Install MySQL from Ubuntu repository with the apt command below.
apt-get install -y mysql-server mysql-client
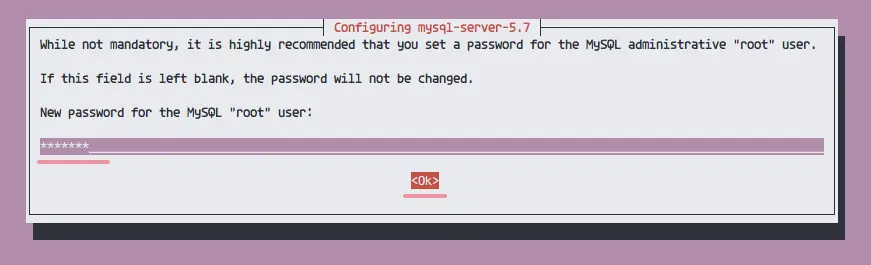
You will be asked about the MySQL root password, type in your desired MySQL root password. Ensure to use a complex and not too short password.
Type in the password again and press 'Enter'.
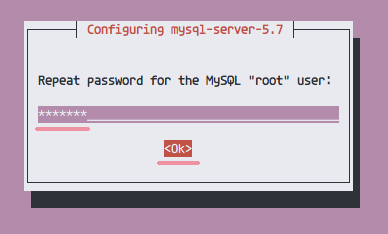
MySQL has been installed with your own root password now.
Now we need to add a new configuration for the Moodle installation. Edit the MySQL configuration file mysqld.cnf.
Go to the /etc/mysql/ configuration directory and edit the 'mysqld.cnf' file with vim.
cd /etc/mysql/mysql.conf.d/
vim mysqld.conf
Under '[mysqld]' line, paste configuration below.
default_storage_engine = innodb
innodb_file_per_table = 1
innodb_file_format = Barracuda
Save and exit, then restart and add MySQL to start automatically at boot time.
systemctl restart mysql
systemctl enable mysql
Now you can check if MySQL is running by checking the server port used by the service, port 3306.
netstat -plntu
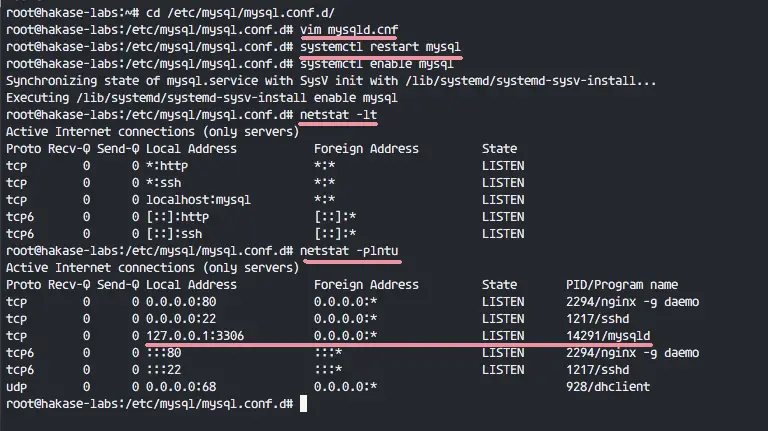
MySQL has been installed and started.
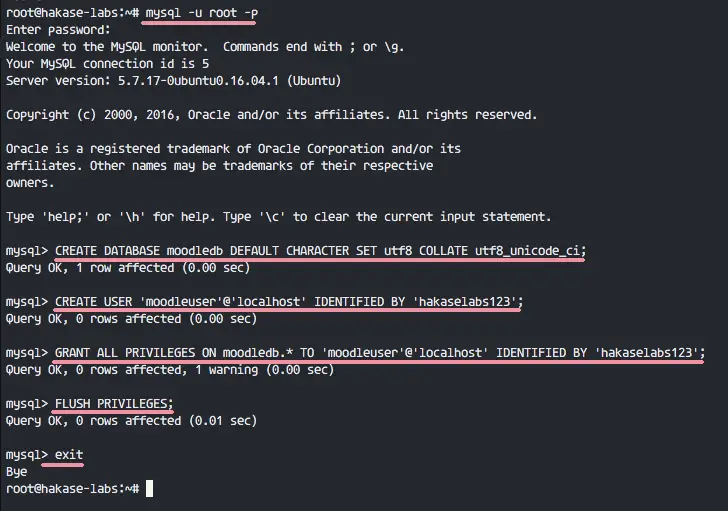
Next, we need to create a new database and a new database user for Moodle. Connect to the MySQL server with the 'mysql' command below.
mysql -u root -p
TYPE YOUR OWN ROOT PASSWORD
Create a new database named 'moodledb' and a new user 'moodleuser' with password 'hakaselabs123' for the moodle installation, then grant permissions to the database user. You should use a different and secure password in your installation of course :)
Run mysql query below.
CREATE DATABASE moodledb DEFAULT CHARACTER SET utf8 COLLATE utf8_unicode_ci;
CREATE USER 'moodleuser'@'localhost' IDENTIFIED BY 'hakaselabs123';
GRANT ALL PRIVILEGES ON moodledb.* TO 'moodleuser'@'localhost' IDENTIFIED BY 'hakaselabs123';
FLUSH PRIVILEGES;
A new user and database for moodle are created.
Step 4 - Download and Configure Moodle
We will download Moodle from the GitHub repository with git and choose the stable version branch.
Install git with the apt command below.
apt-get install -y git
Go to the '/var/www/' directory and clone the moodle repository.
cd /var/www/
git clone https://github.com/moodle/moodle.git
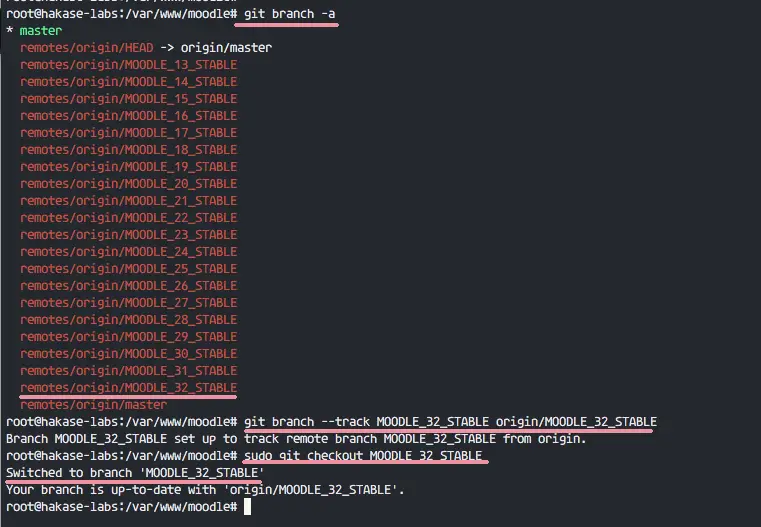
Go to the moodle directory and list all available branches.
cd moodle/
git branch -a
You will see a long moodle branch list, track the latest stable version branch with the command below.
git branch --track MOODLE_32_STABLE origin/MOODLE_32_STABLE
Now switch to latest stable branch with git checkout.
git checkout MOODLE_32_STABLE
Now you are in the latest stable branch, you can use the command below to check that.
git status
You will see results below.
On branch MOODLE_32_STABLE
Your branch is up-to-date with 'origin/MOODLE_32_STABLE'.
nothing to commit, working directory clean
Next, create a new directory for the Moodle data '/var/moodledata' and change the owner and permissionsof the directory.
mkdir /var/moodledata
chown -R www-data:www-data /var/moodledata
chmod 777 /var/moodledata
Change owner and permission of the moodle directory to 'www-data' user and group.
chown -R www-data:www-data /var/www/moodle
chmod 755 /var/www/moodle
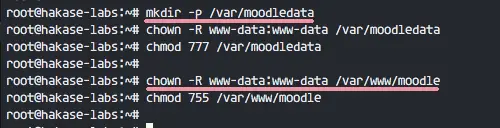
Moodle pre-configuration is done.
Step 5 - Generate SSL Certificate and Configure the Nginx Virtual Host
We will run Moodle with the Nginx web server under HTTPS connection. If you are on a live server, you can use your own certificate file or add your own free certificate from let's encrypt. I'm here on my local computer, so I just want to generate new self signed certificate file on my own.
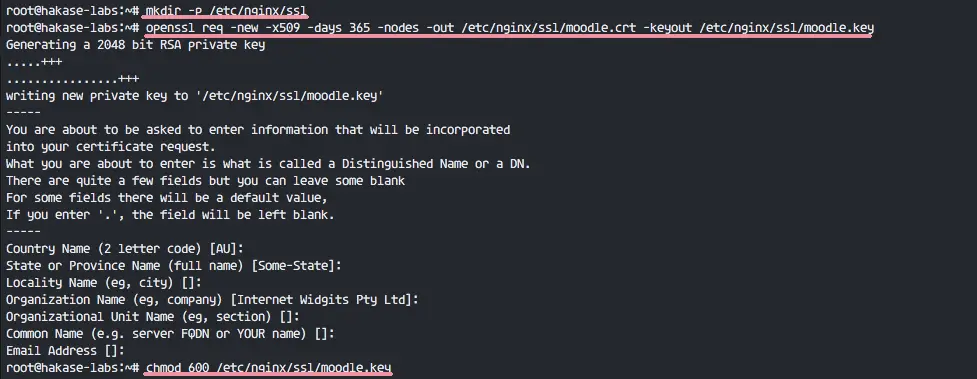
Create a new SSL directory and generate the self signed certificate files with the openssl command below.
mkdir -p /etc/nginx/ssl
openssl req -new -x509 -days 365 -nodes -out /etc/nginx/ssl/moodle.crt -keyout /etc/nginx/ssl/moodle.key
Change the permission of the private key.
chmod 600 /etc/nginx/ssl/moodle.key
Next, got the Nginx configuration directory and create a new virtual host file for Moodle in the 'sites-available' directory.
cd /etc/nginx/
vim sites-available/moodle-hakaselabs
Paste the Nginx virtual host configuration below.
# PHP Upstream Handler
upstream php-handler {
    server unix:/run/php/php7.0-fpm.sock;
}

# Nginx redirect HTTP to HTTPS - moodle.hakase-labs.com
server {
    listen 80;
    server_name moodle.hakase-labs.com;
    # enforce https
    return 301 https://$server_name$request_uri;
}

# HTTPS Configuration
server {
        server_name          moodle.hakase-labs.com;

        listen               *:443 ssl http2;
        listen               [::]:443 ssl http2;

        # SSL Configuration
        ssl  on;
        ssl_ciphers "EECDH+AESGCM:EDH+AESGCM:AES256+EECDH:AES256+EDH:ECDHE-RSA-AES128-GCM-SHA384:ECDHE-RSA-AES128-GCM-SHA256:ECDHE-RSA-AES128-GCM-SHA128:DHE-RSA-AES128-GCM-SHA384:DHE-RSA-AES128-GCM-SHA256:DHE-RSA-AES128-GCM-SHA128:ECDHE-RSA-AES128-SHA384:ECDHE-RSA-AES128-SHA128:ECDHE-RSA-AES128-SHA:ECDHE-RSA-AES128-SHA:DHE-RSA-AES128-SHA128:DHE-RSA-AES128-SHA128:DHE-RSA-AES128-SHA:DHE-RSA-AES128-SHA:ECDHE-RSA-DES-CBC3-SHA:EDH-RSA-DES-CBC3-SHA:AES128-GCM-SHA384:AES128-GCM-SHA128:AES128-SHA128:AES128-SHA128:AES128-SHA:AES128-SHA:DES-CBC3-SHA:HIGH:!aNULL:!eNULL:!EXPORT:!DES:!MD5:!PSK:!RC4";
        ssl_protocols TLSv1 TLSv1.1 TLSv1.2;
        ssl_prefer_server_ciphers on;
        ssl_session_cache shared:SSL:10m;
        add_header Strict-Transport-Security "max-age=63072000; includeSubdomains; preload";
        add_header X-Frame-Options DENY;
        add_header X-Content-Type-Options nosniff;
        ssl_session_tickets off;
        #ssl_stapling on;
        #ssl_stapling_verify on;
        resolver_timeout 5s;
        ssl_certificate /etc/nginx/ssl/moodle.crt;
        ssl_certificate_key /etc/nginx/ssl/moodle.key;

        # Root Moodle Data DIrectory
        root /var/www/moodle;
        rewrite ^/(.*\.php)(/)(.*)$ /$1?file=/$3 last;

        location ^~ / {
                try_files $uri $uri/ /index.php?q=$request_uri;
                index index.php index.html index.htm;

                location ~ \.php$ {
                        include snippets/fastcgi-php.conf;
                        fastcgi_pass php-handler;
                }
        }
}
Save the file and exit vim, then activate the virtual host and test the Nginx configuration file, make sure there is no error.
ln -s /etc/nginx/sites-available/moodle-hakaselabs /etc/nginx/sites-enabled/
nginx -t
Restart the Nginx web server.
systemctl restart nginx

SSL Certificate files have been created and the Nginx virtual host for Moodle is configured.
Step 6 - Installing Moodle
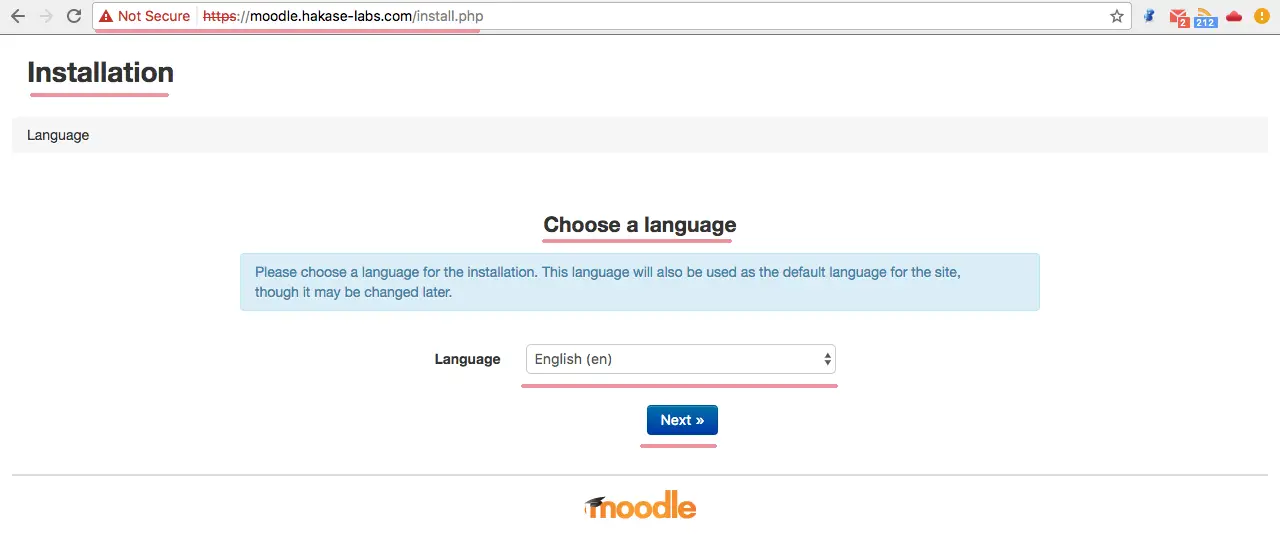
Open your web browser and type in the moodle URL of your server in the address bar and press 'Enter'. In this tutorial, I will use my own domain name: moodle.hakase-labs.com.
You will see the moodle installation page.
Choose a language, I will use 'English' and click 'Next'.
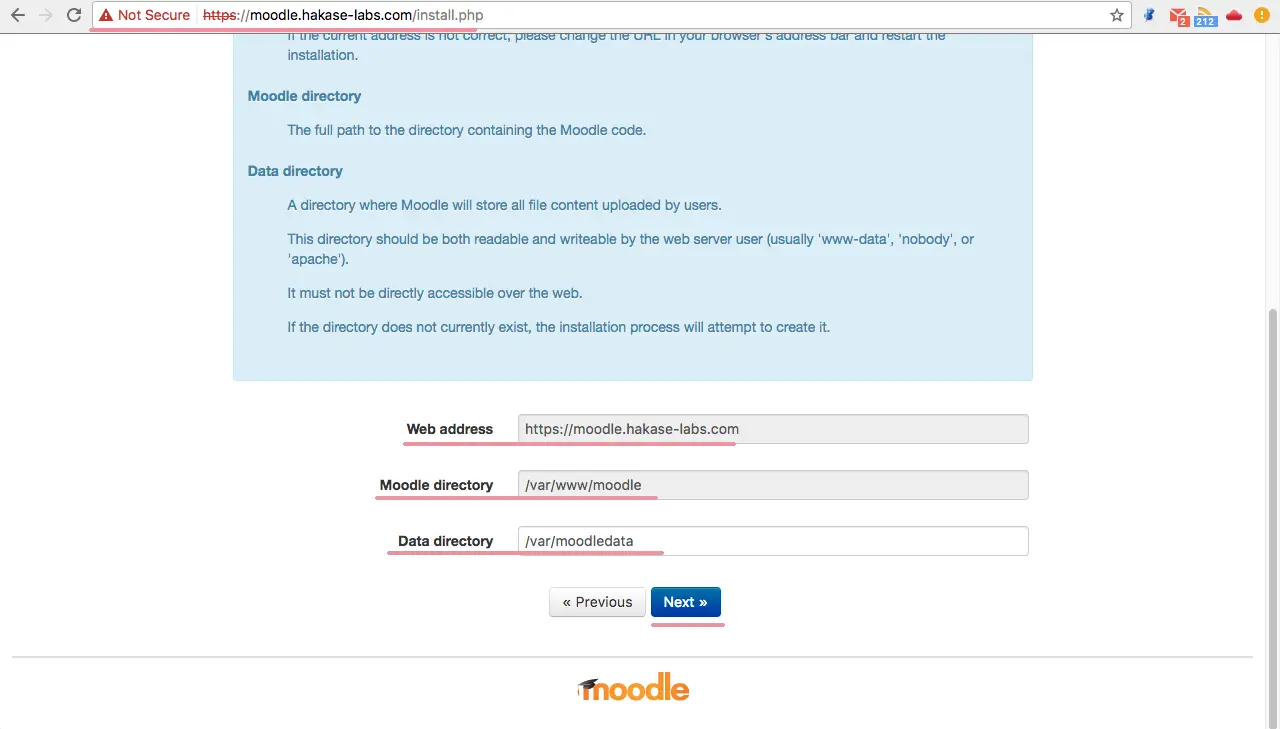
Configure the Moodle URL, in my case 'moodle.hakase-labs.com', moodle web root directory '/var/www/moodle' and moodle data directory '/var/moodledata'.
Then click 'Next'.
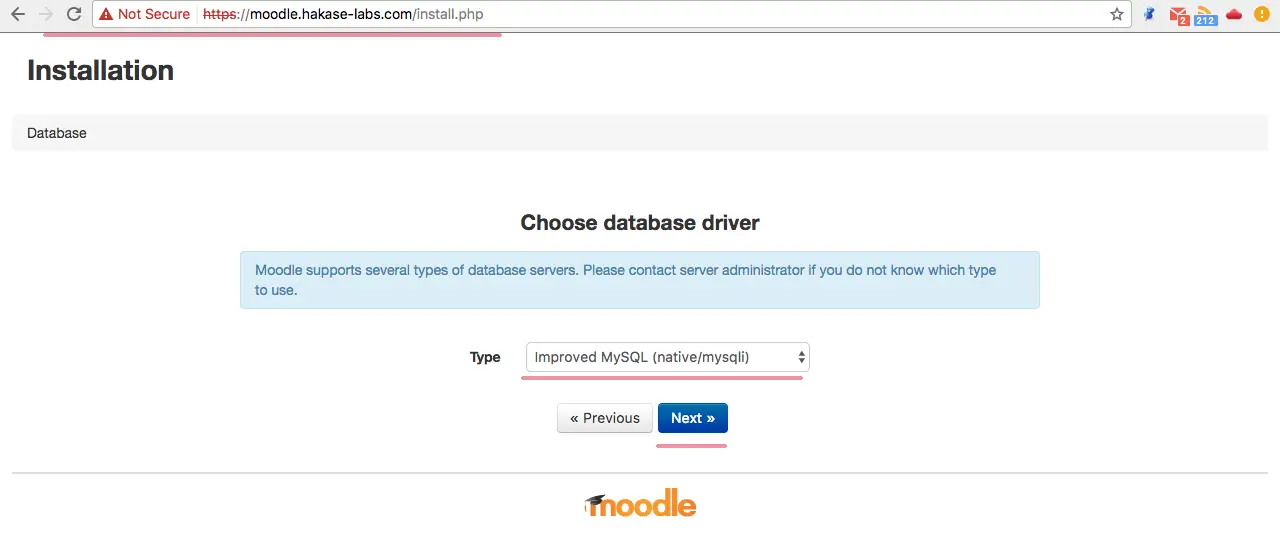
Configure 'Database driver', use mysql database server below and click 'Next'.
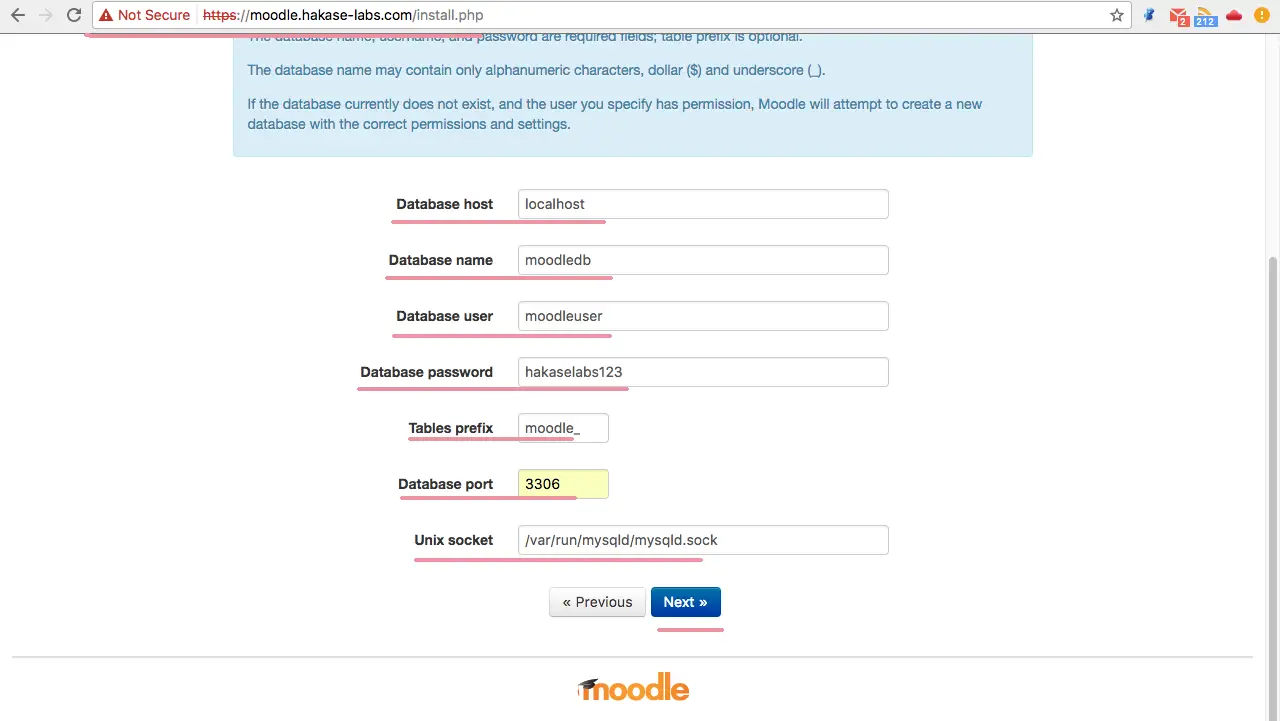
Type in the database information for Moodle.
- database host: localhost
- database name: moodledb
- database user: moodleuser
- database password: hakaselabs123
- tables prefix: moodle_
- database port: 3306
- Unix socket: /var/run/mysql/mysqld.sock
Click 'Next' to continue.
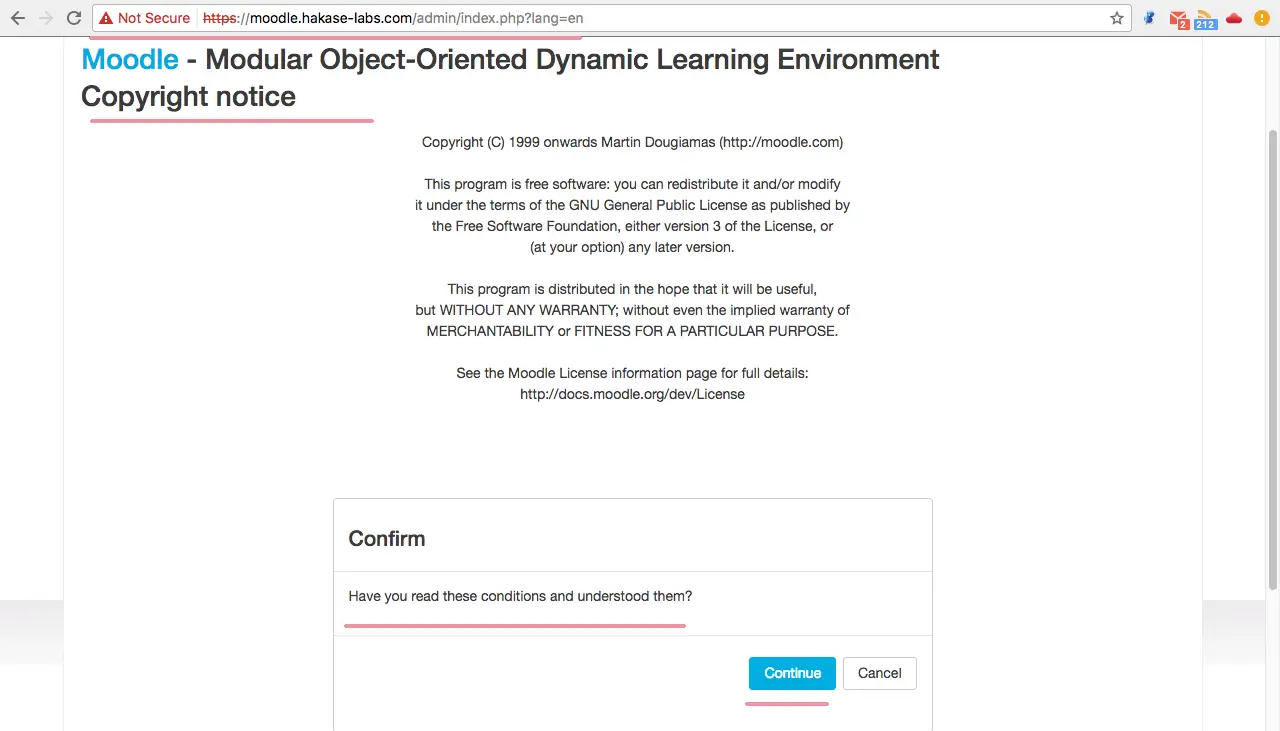
Accept the Copyright Agreement. Just click 'Continue'.
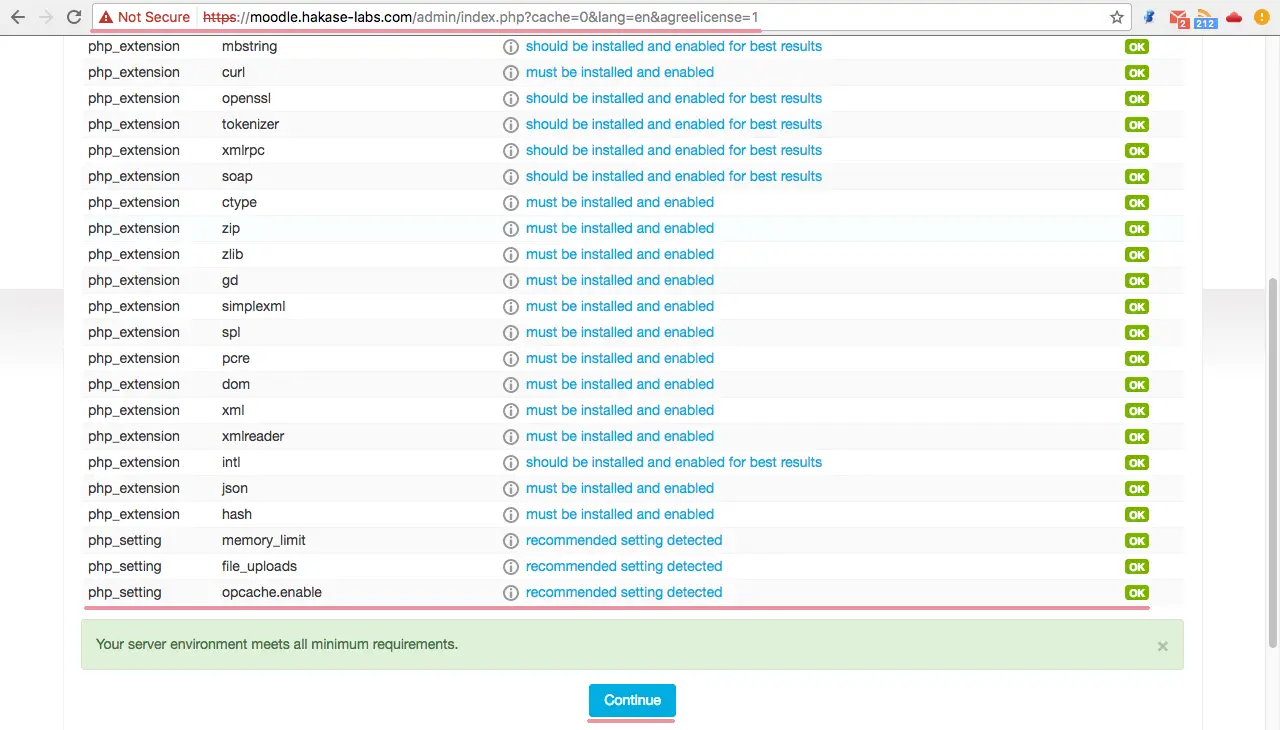
System Checking, checks the server configuration and all PHP extensions needed by moodle.
Make sure all results are 'OK' and then click 'Continue' to install.
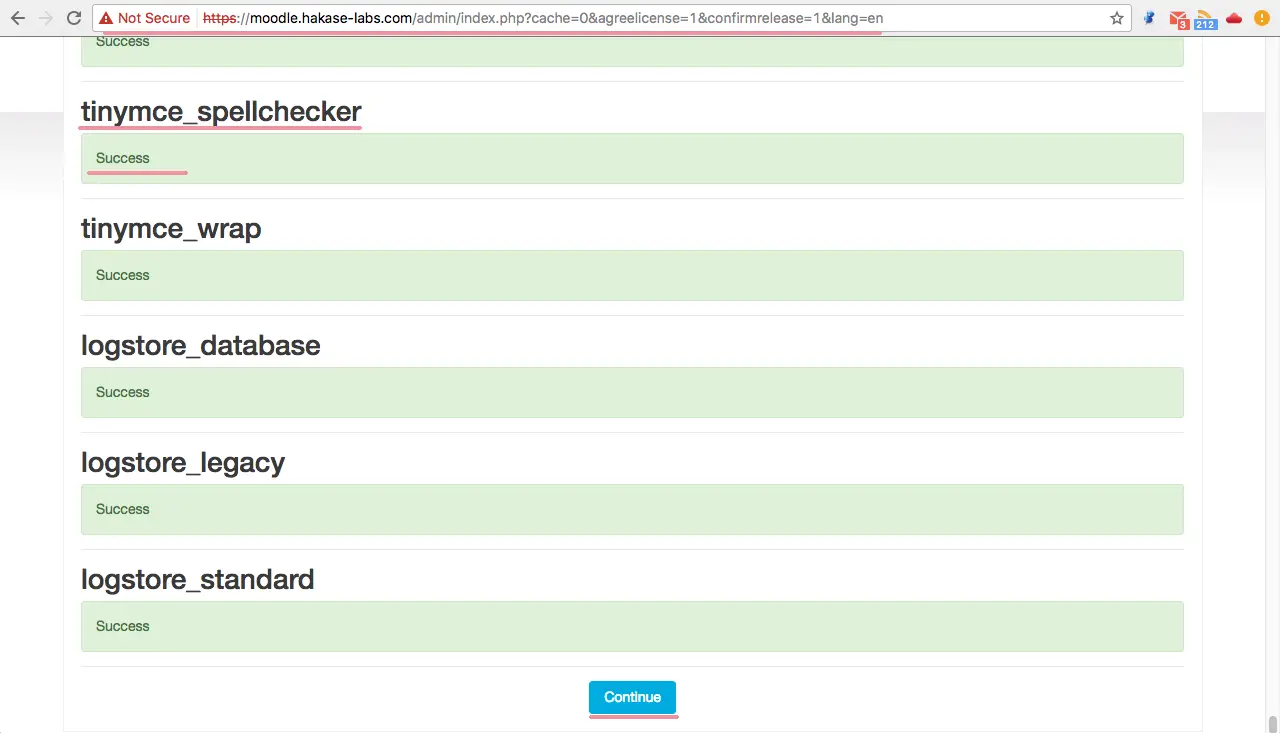
You will see a lot of modules getting installed, make sure all results are 'success'.
Click 'Continue' again.
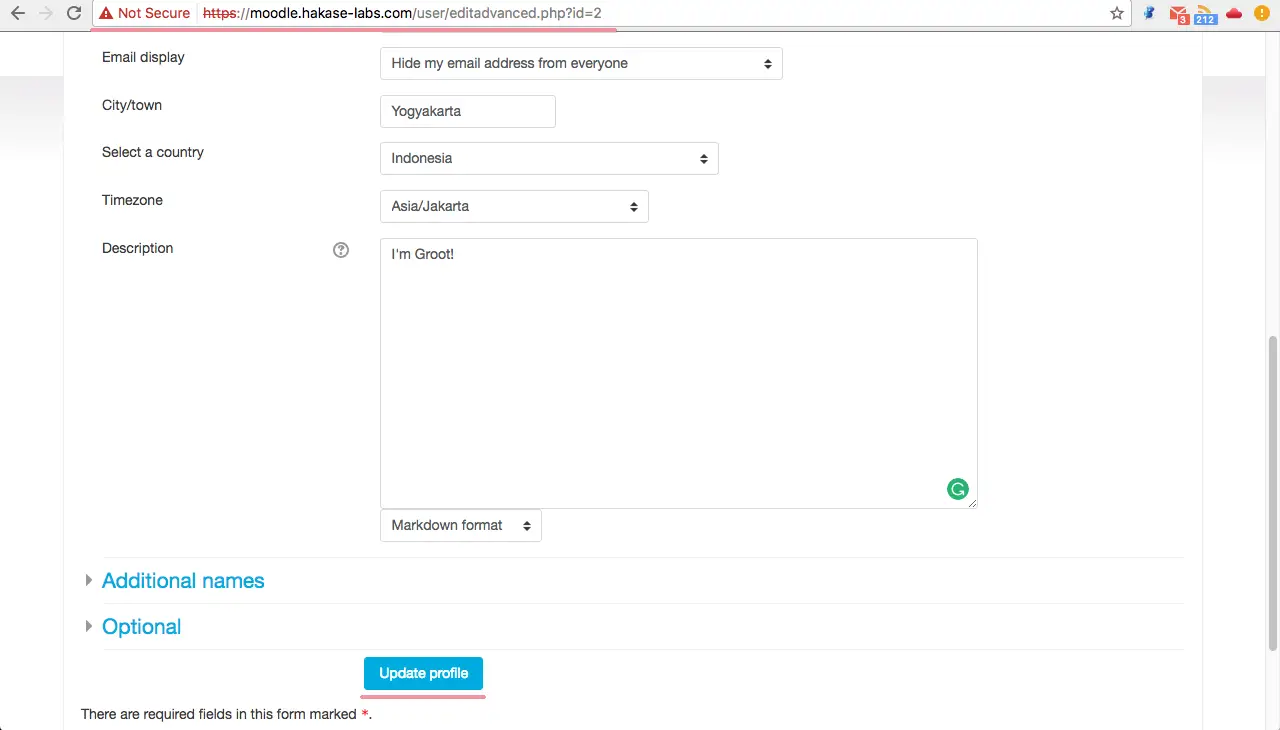
Next, we need to configure an admin user and password.
Fill in your admin info and click 'Update profile'.
For the 'Front Page Setting', fill in your own page info and click 'Save changes'.
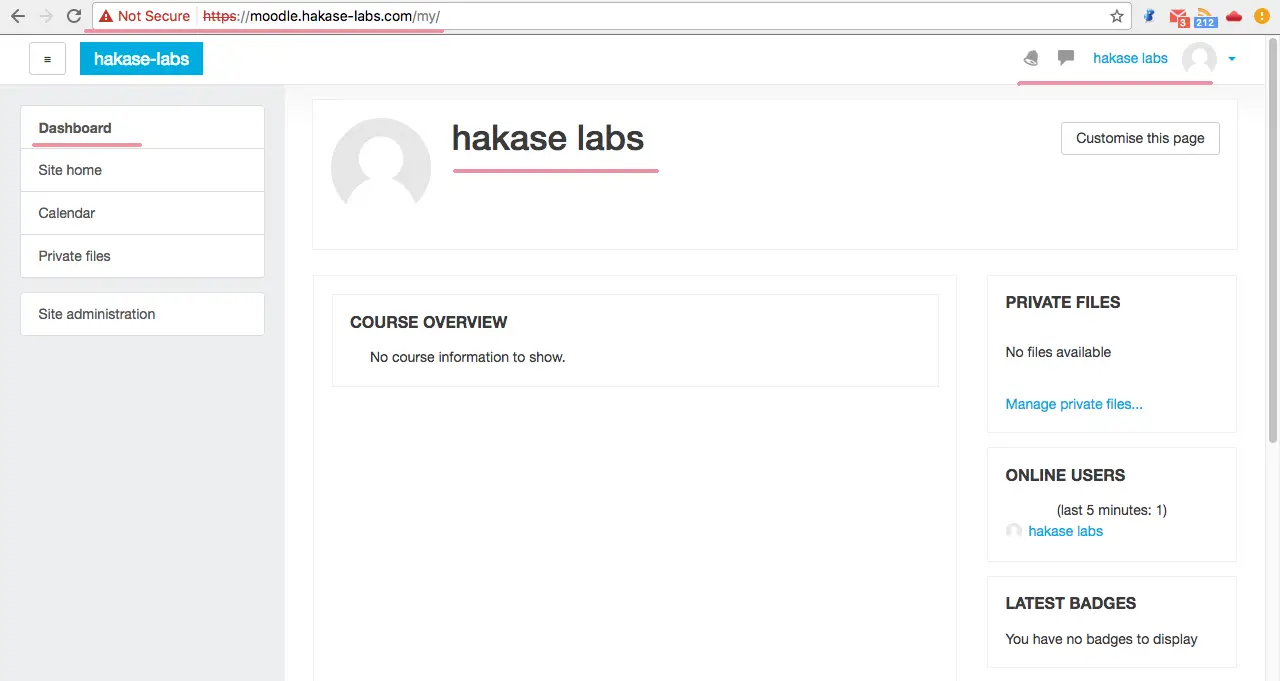
You will be redirected to the user admin 'Dashboard' below.
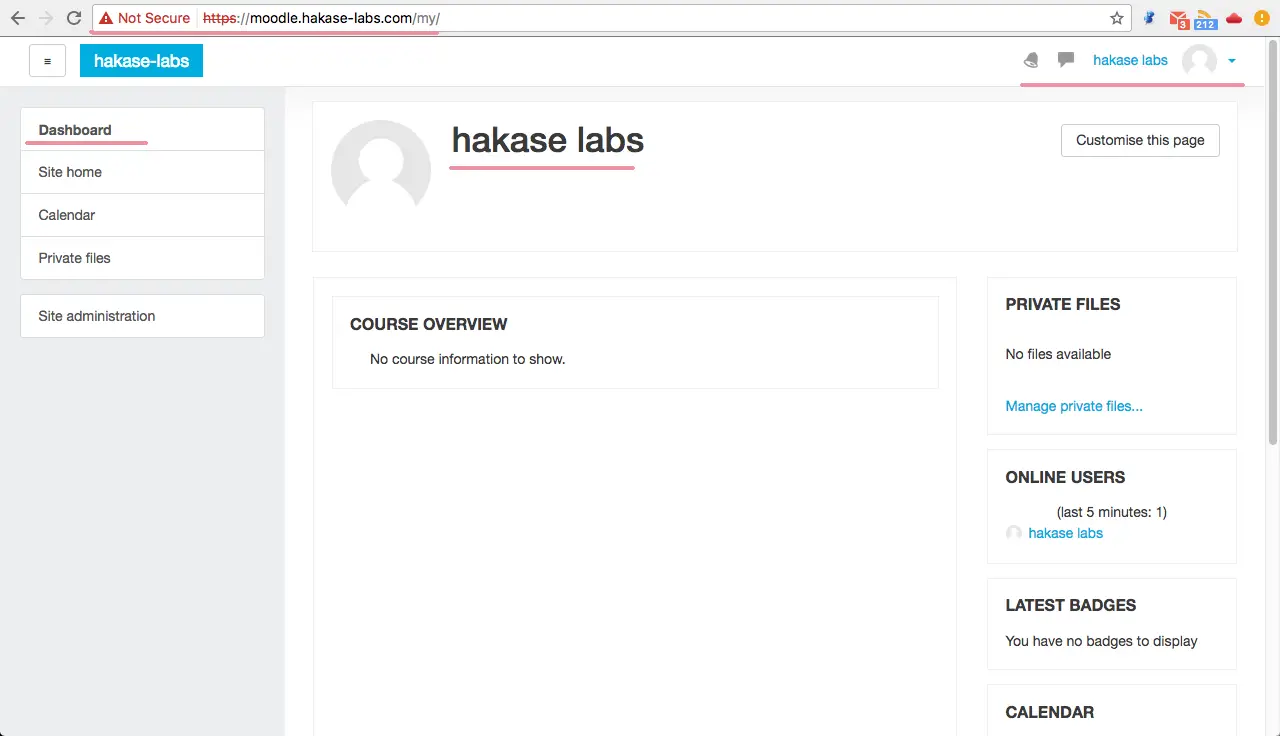
The Moodle Installation is finished.
Step 7 - Testing
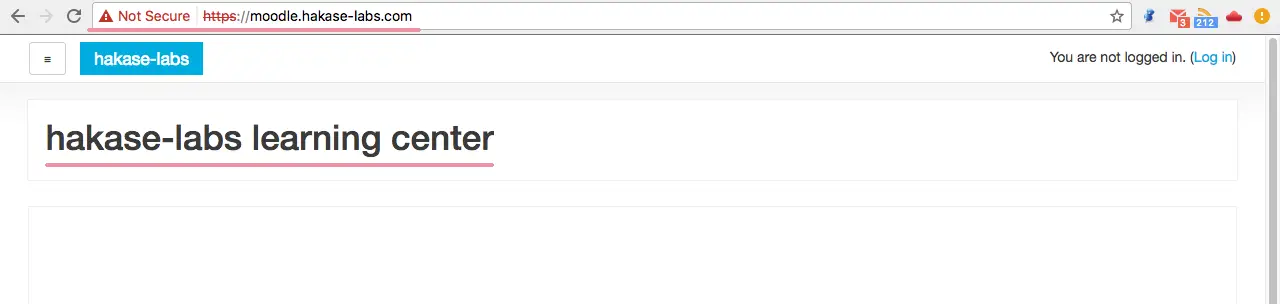
Test the moodle homepage - moodle.hakase-labs.com.
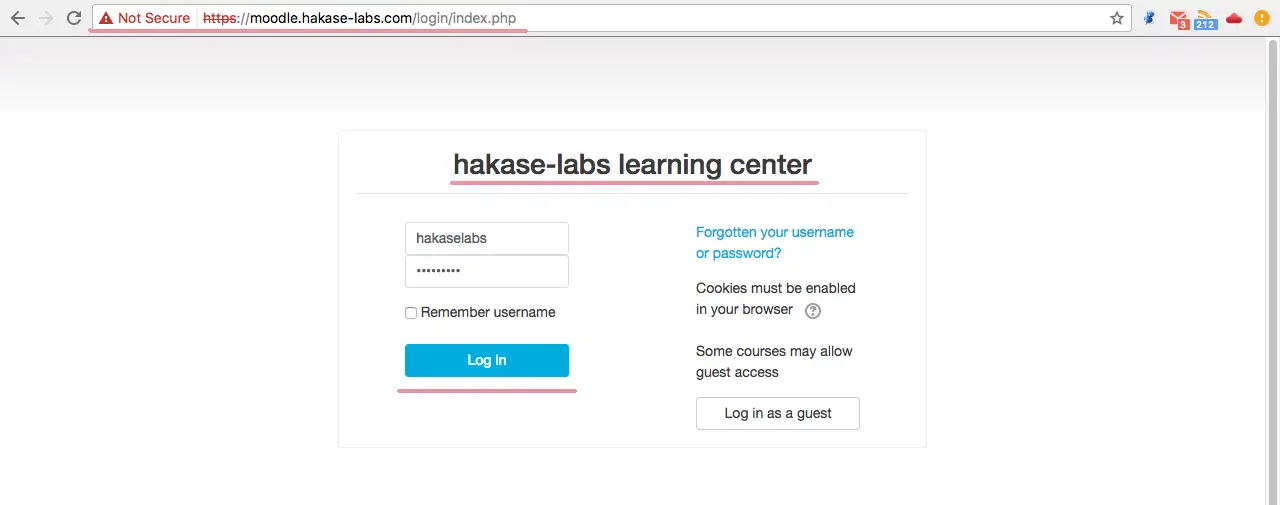
Moodle login page - moodle.hakase-labs.com/login.
Moodle User Admin Dashboard.
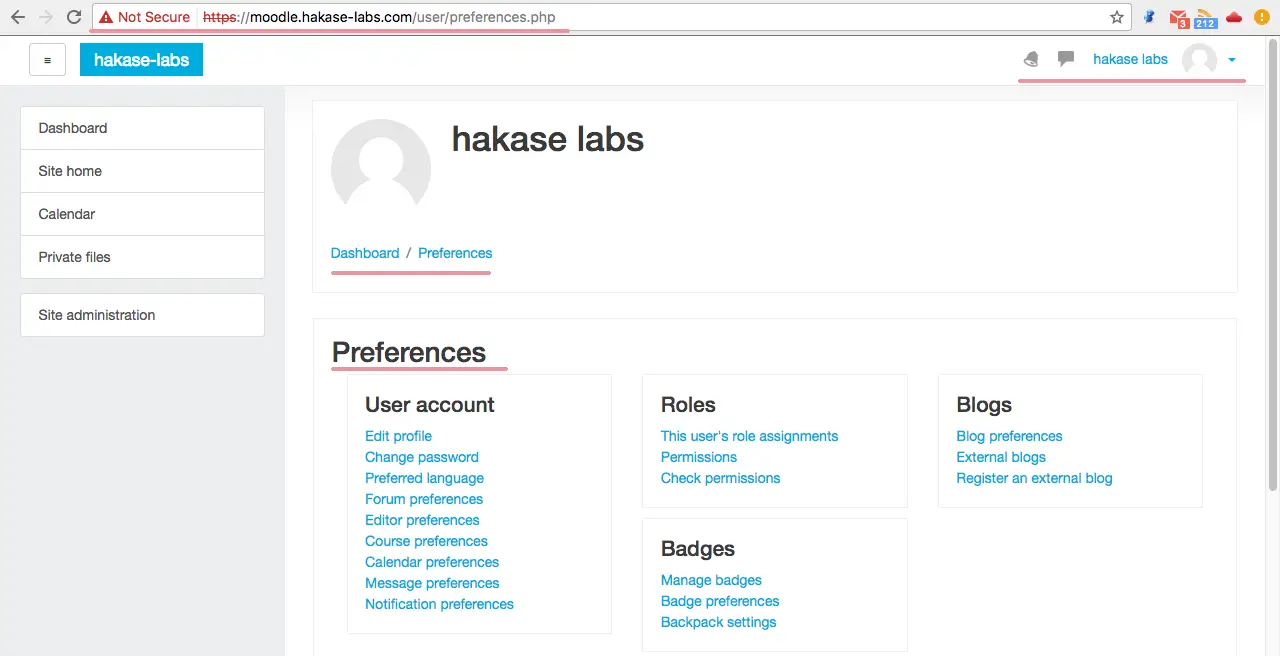
Moodle User Preferences page.
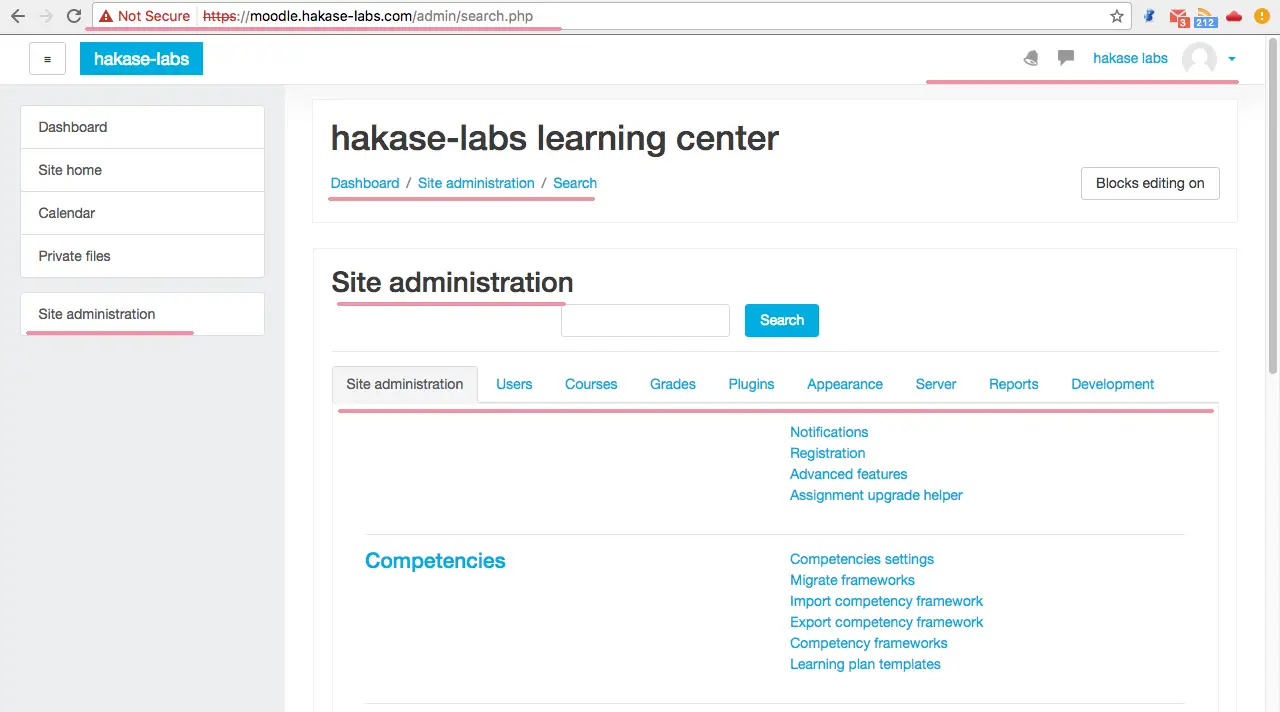
Moodle Site Administration page.
Moodle has been installed on Ubuntu 16.04 with Nginx, PHP-FPM 7 and MySQL 5.7 server, in other words "Moodle with LEMP Stack".

