
When last we met, we learned the basics of creating new virtual machines in Creating Virtual Machines in KVM: Part 1. Now we’re going to learn how to control Internet access for our virtual machines, network VMs with each other, and create new virtual networks.
Internet Access
Some Linux distributions, such as CentOS 7 and Red Hat Enterprise Linux 7, do not start networking by default, so you have to enable it. If you don’t have networking in a virtual machine, first check whether it is enabled.
The default network is NAT (network address transation) when you create a new virtual machine — assuming your particular Linux distribution has not mucked with this. This forwards network traffic through your host system; if the host is connected to the Internet, then your virtual machines have Internet access.
The virtual machine manager also creates an Ethernet bridge between the host and virtual network, so you can ping the IP addresses of your VMs from the host, and your VMs can ping the IP address of the host.
Confirm your virtual network type by opening the information tab on any running VM; this is the little white “i” in a blue circle on the top left of your virtual machine console (Figure 1).
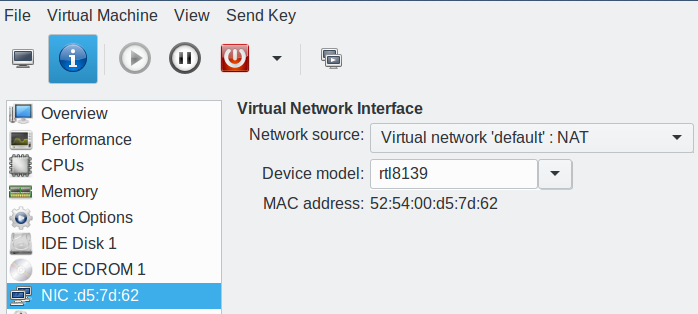
Your virtual machines have their own virtual network, which is on a different subnet than the host. Your VMs should be able to ping each other by IP address and by hostname, because your virtual network has its own name server. When your ping tests succeed, then you can set up services such as web, email, SSH, and so on, just like on any Linux machine.
Virtual Networks
Go to Edit > Connection Details > Virtual Networks in your virtual machine manager to view the details of your virtual network (Figure 2).
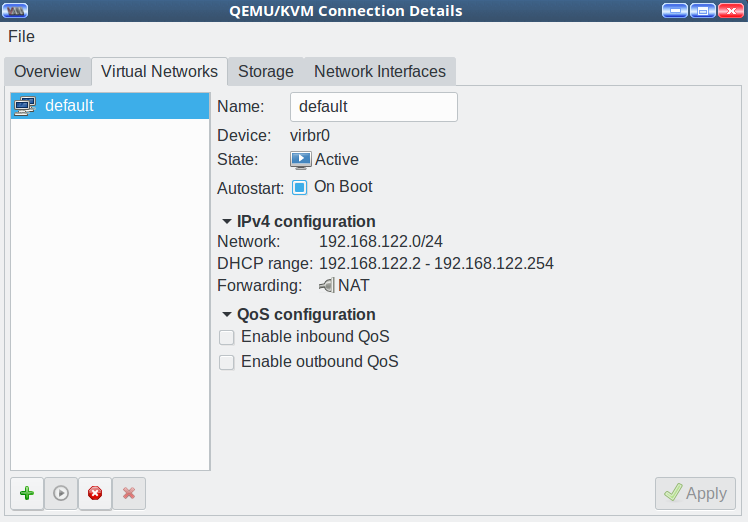
This shows the network name, Ethernet bridge name, the DHCP address range, and status. As your collection of VMs grows you may wish to give them separate subnets. How to do this? With ease. Click the little green “Add network” button at the bottom left of the Virtual Networks tab.
In step 1, enter your new network name, which is anything you want.
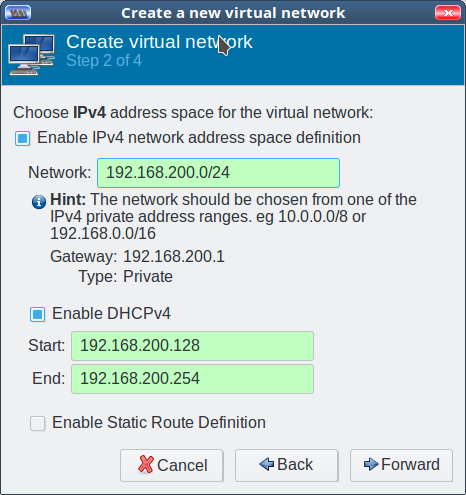
In step 2, enter your new network address. The field background changes to green when you enter a non-colliding address (Figure 3). Enable DHCP with a click. How easy is that?
In step 3, enable IPv6. Or not.
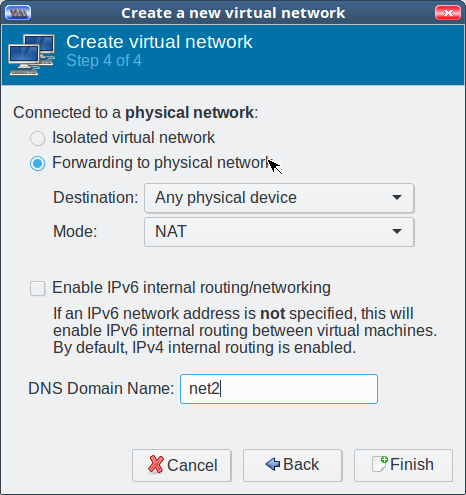
In step 4, you have the option to either create an isolated network with no external access or one with external access via NAT or routing. NAT is the easiest (Figure 4).
Using Your New Virtual Network
Open the information tab on a running VM and delete your existing network configuration. Look for the “NIC :[mac address]” entry in the left pane, where all of your hardware is listed, and right-click/Remove Hardware to remove it.
Next, click the Add Hardware button at the bottom. Select Network and choose your new network from the Network Source dropdown.
Distributions that use Network Manager should pick up the new assignment automatically. If you’re not using Network Manager, then renew your DHCP lease or reboot.
Useful Commands
The virtual machine manager is a nice tool, but it is complex. It is usually faster to run command-line queries to get answers. brctl, bridge control, lists your Ethernet bridges and their status:
$ brctl show
bridge name bridge id           STP enabled  interfaces
virbr0      8000.000000000000   yes
virbr1      8000.000000000000   yes
virbr2      8000.fe540075e883   yes           vnet0
                                              vnet1
The virsh command is very useful for querying and managing virtual machines. List all of your virtual networks and their status:
$ virsh net-list --all
 Name                 State      Autostart     Persistent
----------------------------------------------------------
 default              active     yes           yes
 net2                 inactive   no            yes
 net3                 active     yes           yes
List all of your virtual machines and their status:
$ virsh list --all
 Id    Name                           State
----------------------------------------------------
 1     Ubuntu-1604                    running
 2     centos7.0                      running
 -     opensuse-leap                  shut off
Get information on a single virtual network:
$ virsh net-info net3
Name:           net3
UUID:           b3b23db5-fc8e-4428-8913-1287a179ec68
Active:         yes
Persistent:     yes
Autostart:      yes
Bridge:         virbr2
Dump complete information about a virtual network in XML format:
$ virsh net-dumpxml  net3
<network connections='2'>
  <name>net3</name>
  <uuid>b3b23db5-fc8e-4428-8913-1287a179ec68</uuid>
  <forward mode='nat'>
    <nat>
      <port start='1024' end='65535'/>
    </nat>
  </forward>
  <bridge name='virbr2' stp='on' delay='0'/>
  <mac address='52:54:00:ca:b2:c3'/>
  <domain name='net3'/>
  <ip address='192.168.10.1' netmask='255.255.255.0'>
    <dhcp>
      <range start='192.168.10.128' end='192.168.10.254'/>
    </dhcp>
  </ip>
</network>
Domains vs. Hostnames
Domains and hostnames are not the same thing, although they can be the same if you desire. Virtual machine hostnames are the standard Linux hostnames, and you manage them just like any Linux.
The virsh list command returns a list of your virtual machine names, also called domains. These are the names that you configured at creation. Look on the information > Overview tab of a running VM to see its domain name. This has nothing to do with DNS domain names; they’re just arbitrary names for our VMs.
Learn more about Linux through the free “Introduction to Linux” course from The Linux Foundation and edX.


