How to Set up Nginx High Availability with Pacemaker, Corosync, and Crmsh on Ubuntu 16.04
In this tutorial, I will show you step by step how to create a High Availability Clustered Nginx Web Server with Pacemaker, Corosync, and Crmsh. We will create an Active-Passive Cluster or Failover-cluster Nginx web server using Pacemaker on Ubuntu 16.04.
Pacemaker is an open source cluster manager software that achieves maximum high availability of your services. It's an advanced and scalable HA cluster manager developed by ClusterLabs since 2007.
The Corosync Cluster Engine is an open source project derived from the OpenAIS project in 2008 and released under the BSD License. It's a group communication system with additional features for implementing High Availability within applications.
There are several applications available for the Pacemaker interface and Crmsh is one of them. It is a Pacemaker command line interface to manage the Pacemaker High Availability Stack. Crmsh is written in python. We can create, configure, and troubleshoot the Pacemaker HA stack with Crmsh command line tool.
Prerequisites
- Three Ubuntu 16.04 Servers
- web01 10.0.15.11
- web02 10.0.15.12
- web03 10.0.15.13
- A floating IP Address 10.0.15.15
- Root Privileges
What we will do?
- Mapping the Hosts File.
- Install and Configure Nginx.
- Install Pacemaker, Corosync, and Crmsh.
- Configure Corosync Key.
- Start All Services.
- Create and Configure a Cluster.
- Testing.
Step 1 - Mapping the Hosts File
Note:
Run step 1 - 3 on all three servers 'web01', 'web02', 'web03'.
In this tutorial, I will be using 3 Ubuntu 16.04 servers and each of them has a unique hostname: 'web01', 'web02' and 'web03'. Each server can connect to the other servers with the hostname of the server.
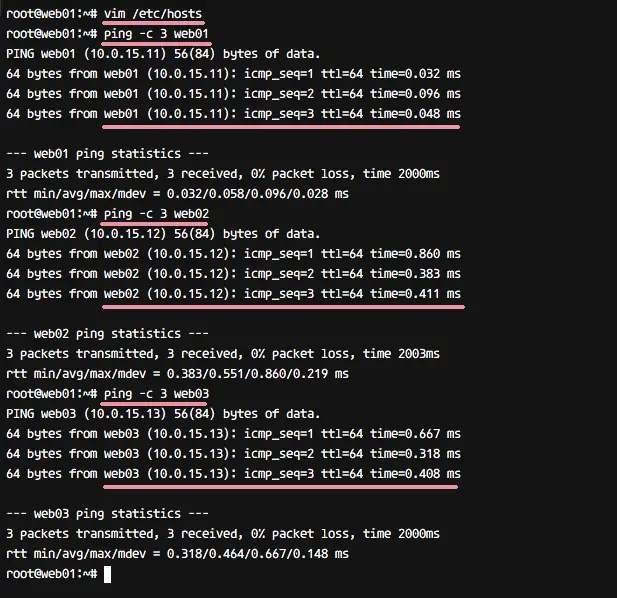
To achieve that, edit the'/etc/hosts' file on all servers with vim.
vim /etc/hosts
Paste the /etc/hosts configuration below.
10.0.15.11      web01
10.0.15.12      web02
10.0.15.13      web03
10.0.15.15      ha-web.co
Save the file and exit vim.
Next, test all servers by pinging the other servers through each hostname.
ping -c 3 web01
ping -c 3 web02
ping -c 3 web03
Step 2 - Install and Configure Nginx
Now we start to create the High Availability setup of the Nginx web server by creating the Failover cluster with Pacemaker. We need to install Nginx on each of the server nodes first.
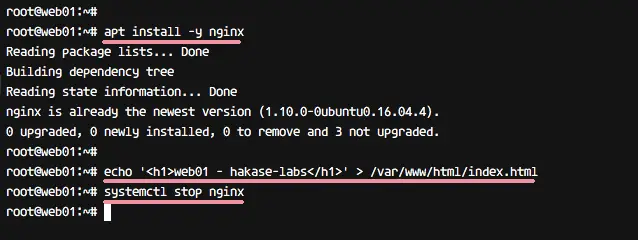
Install Nginx with the apt command below.
apt install -y nginx
When the installation finished, replace the default page of nginx with a unique page on each server by running commands below so we can later identify which server delivered a page.
#Run Command on 'web01'
echo '<h1>web01 - hakase-labs</h1>' > /var/www/html/index.html

#Run Command on 'web02'
echo '<h1>web02 - hakase-labs</h1>' > /var/www/html/index.html

#Run Command on 'web03'
echo '<h1>web03 - hakase-labs</h1>' > /var/www/html/index.html
Now stop the web server.
systemctl stop nginx
The Nginx installation and configuration has been completed.
Step 3 - Install Pacemaker, Corosync, and Crmsh
Pacemaker is an open source cluster manager app. Corosync is a Cluster Engine for Pacemaker, and Crmsh is a python based tool to managa a Pacemaker cluster. All these applications are available in Uubuntu repository.
Install Pacemaker, Corosync, and crmsh with the apt command below.
apt install -y pacemaker corosync crmsh
After the installation, all these services are running automatically on the system. Stop them with the systemctl commands below.
systemctl stop corosync
systemctl stop pacemaker
The software stack that provides the high availability for Nginx has been installed.

Step 4 - Configure Corosync
Note:
Run step 4 only on 'web01' server.
Since we're not using pcsd for Ubuntu, we need to configure Corosync manually. We will generate the Corosync key for the cluster authentication and create a new Corosync configuration file on 'web01' server, then copy the key and configuration to other servers 'web02' and 'web03'.
Before we generate the Corosync key, we need to install the new package 'haveged'. It's used for getting better random numbers for the Corosync key generation.
Install haveged from the repository with apt command.
apt install -y haveged
Now generate a new Corosync key with the command below.
corosync-keygen
When the key generation is complete, you can see the new key 'authkey' in the '/etc/corosync/' directory.
ls -lah /etc/corosync/

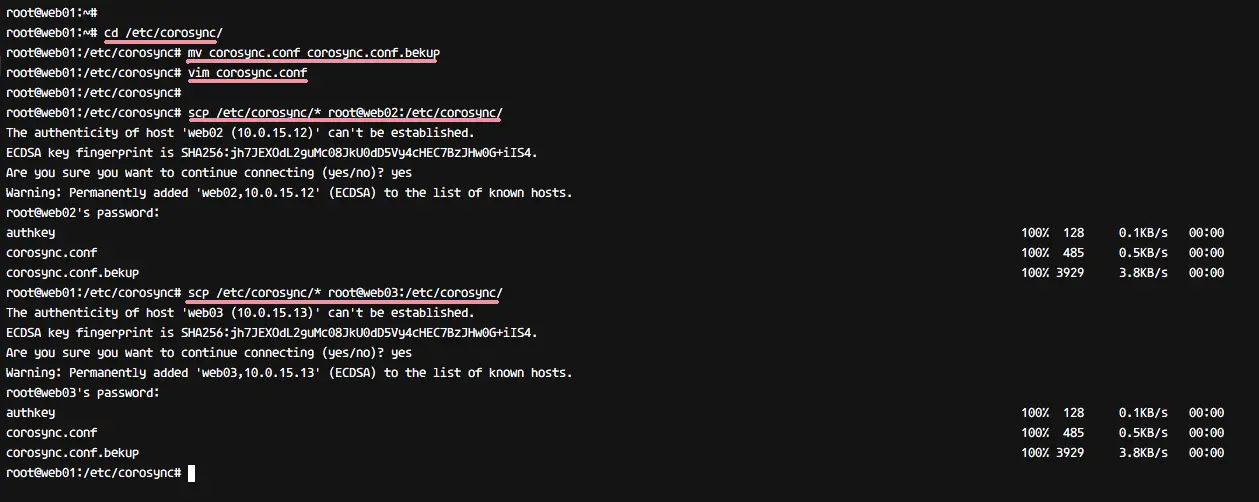
Next, go to the '/etc/corosync' directory and backup the default configuration file 'corosync.conf'.
cd /etc/corosync/
mv corosync.conf corosync.conf.bekup
Then create a new 'corosync.conf' configuration file with vim.
vim corosync.conf
Paste the configuration below into that file.
# Totem Protocol Configuration
totem {
  version: 2
  cluster_name: hakase-cluster
  transport: udpu

# Interface configuration for Corosync
  interface {
    ringnumber: 0
    bindnetaddr: 10.0.15.0
    broadcast: yes
    mcastport: 5407
  }
}

# Nodelist - Server List
nodelist {
  node {
    ring0_addr: web01
  }
  node {
    ring0_addr: web02
  }
  node {
    ring0_addr: web03
  }
}

# Quorum configuration
quorum {
  provider: corosync_votequorum
}

# Corosync Log configuration
logging {
  to_logfile: yes
  logfile: /var/log/corosync/corosync.log
  to_syslog: yes
  timestamp: on
}

service {
  name: pacemaker
  ver: 0
}
Save the file and exit the editor.
Next, copy the authentication key and the configuration file from 'web01' server to 'web02' and 'web03' server.
scp /etc/corosync/* root@web02:/etc/corosync/
scp /etc/corosync/* root@web03:/etc/corosync/
When all is complete, go to the 'web02' and 'web03' servers, then check the files.
ssh root@web02
cd /etc/corosync/
ls -lah
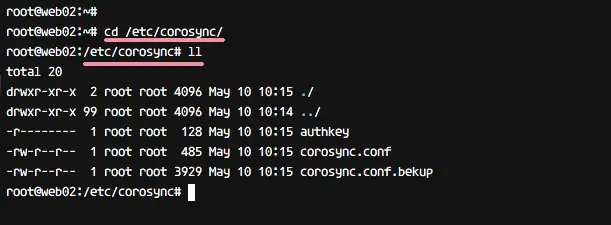
Corosync configuration has been completed.
Step 5 - Start All Cluster Services
Note:
Run step 5 on all servers.
Start the HA cluster software stack, pacemaker and corosync, on all servers. Then enable it to start automatically at boot time.
Start Corosync and add it to start automatically at boot.
systemctl start corosync
systemctl enable corosync
Now start pacemaker and enable it to start at boot.
systemctl start pacemaker
update-rc.d pacemaker defaults 20 01
systemctl enable pacemaker
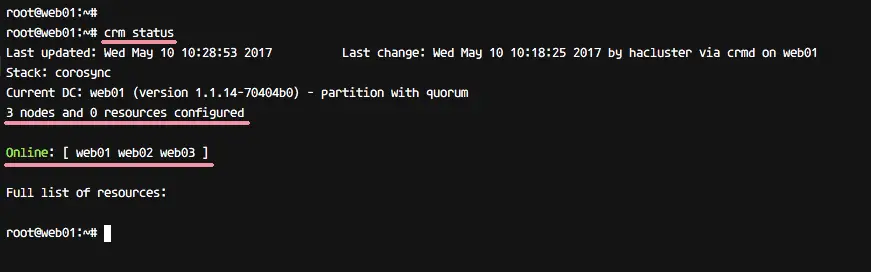
All services have been started, check all nodes and make sure the server status is 'Online' on all of them.
crm status
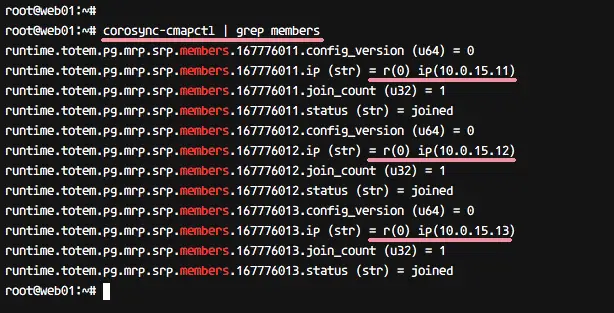
Or you can check the status by checking the Corosync members with the corosync-cmapctl command below.
corosync-cmapctl | grep members
You will see all server IP Addresses.
Step 6 - Create and Configure the Cluster
NOTE:
Run step 6 only on web01 server
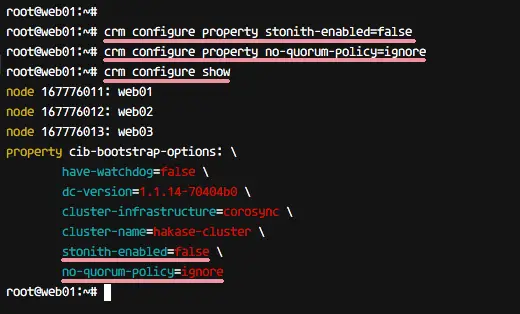
In this step, we will configure the Active-Passive Nginx Cluster using the crmsh command line tool. Since we are not using a STONITH device, we want to disable STONITH and ignore the Quorum policy on our cluster.
Run the crm commands below to disable 'STONITH' and Ignore the Quorum policy.
crm configure property stonith-enabled=false
crm configure property no-quorum-policy=ignore
Now check STONITH status and the quorum policy with the crm command below.
crm configure show
You will see the result as below.
Next, we need to create some new resources for the cluster. Pacemaker supports the following types of Resource Agents (RA).
- LSB (Linux Standard Based) - Provided by Linux distribution. ex: '/etc/init.d/service' script.
- OCF (Open Cluster Framework) - Set of tools for cluster computing. The project is part of the Linux Foundation.
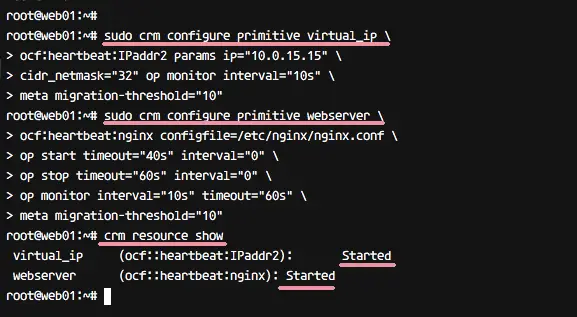
For our Nginx HA web server, we need to create two OCF resources: 'virtual_ip' for the floating IP and 'webserver' for nginx service.
Create a new 'virtual_ip' resource for the floating IP configuration with the crm command below.
sudo crm configure primitive virtual_ip \
ocf:heartbeat:IPaddr2 params ip="10.0.15.15" \
cidr_netmask="32" op monitor interval="10s" \
meta migration-threshold="10"
And for the nginx 'webserver', create the resource with the command below.
sudo crm configure primitive webserver \
ocf:heartbeat:nginx configfile=/etc/nginx/nginx.conf \
op start timeout="40s" interval="0" \
op stop timeout="60s" interval="0" \
op monitor interval="10s" timeout="60s" \
meta migration-threshold="10"
When this is done, check the new resources 'virtual_ip' and 'webserver' with the command below. Make sure all resources have the status 'started'.
crm resource status
Finally, we need to add a group for the new configuration of the Failover IP service. We want to migrate the 'Nginx' service on a 'webserver' resource with a floating IP on a 'virtual_ip' resource.
We created already the Floating IP and the Service, now add those resources to a new group named 'hakase_balancing' with the command below. You can choose your own group name of course here, just ensure to replace the name then wherever it is used.
sudo crm configure group hakase_balancing virtual_ip webserver
A new group of resources with the name 'hakase_balancing' has been defined. You can check it with the command below.
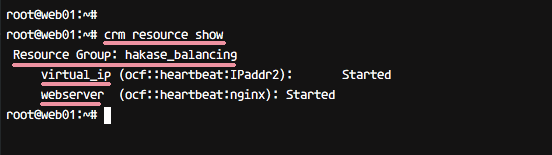
crm resource show
You will get a group named hakase_balancing with members 'virtual_ip' and 'webserver' resources.
The cluster configuration has been completed.
Step 7 - Testing
Testing node status and the cluster status.
crm status
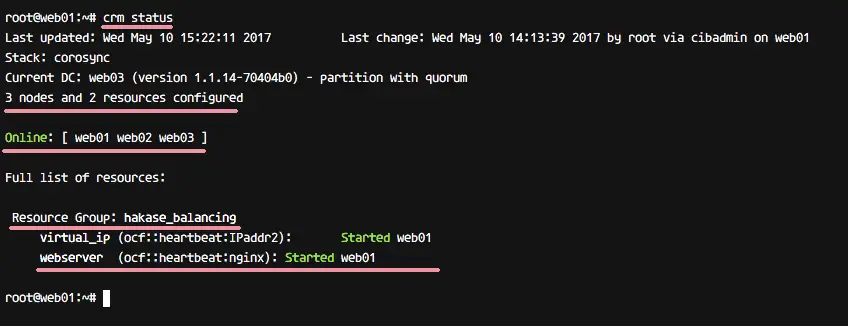
We've 3 Nodes with status 'Online'.
We have a resource group named 'hakase_balancing', and and it's now running on 'web01' node.
Testing Nginx web server from a web browser. Visit the floating IP address, the name of my test server is - ha-web.co. Use the name that you have chosen for your server here.

All resources are on 'web01' node.
Testing Active-Passive Cluster or Failover
Stop the cluster on 'web01' server by executing the command below on 'web01' node.
crm cluster stop
You will get the result 'INFO: Cluster services stopped'.
Now login to the 'web02' node and check the cluster status.
crm status
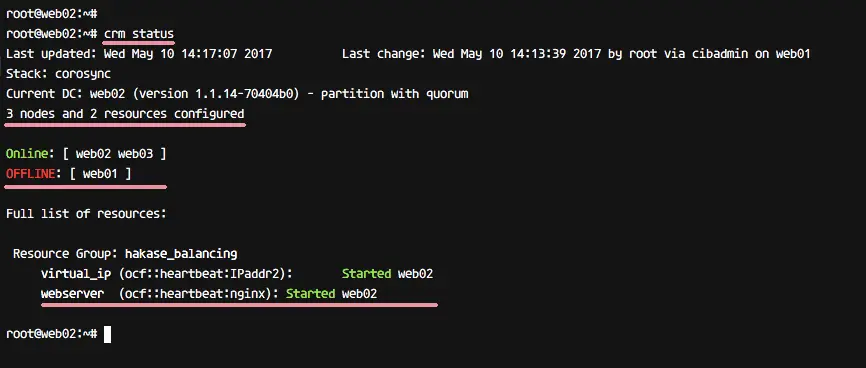
Now you get the result that 'web01' node is 'Offline', and the resources of virtual_ip and webserver are switched to node 'web02'.
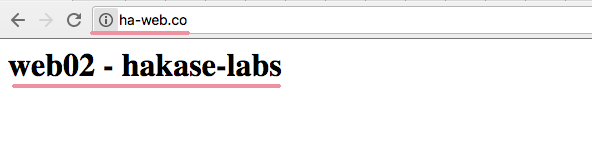
When you visiting again the floating IP 'ha-web.co', you will get the web02 page.
Nginx High Availability with Pacemaker, Corosync and Crmsh on Ubuntu 16.04 has been successfully installed and tested.

