Linux Csplit Command Explained for Beginners (6 Examples)
On this page
- Linux Csplit command
- Q1. How to split files based on number of lines?
- Q2. How to split files using regular expressions?
- Q3. How to have custom prefix instead of the default 'xx'?
- Q4. How to force csplit to not remove output files in case of error?
- Q5. How to suppress lines that match input pattern?
- Q6. How to use custom number of digits instead of the default 2?
- Conclusion
While working on the command line in Linux, you may find yourself in situations where-in you need to split a file into multiple parts. If you are already looking for a way to do this, or simply want to know how this can be done, you'll be glad to know there exists a tool - dubbed csplit - that's built for this purpose.
In this tutorial, we will discuss the basics of this tool as well as learn how it can be used. But before we do that, it's worth mentioning that all commands/instructions mentioned here have been tested on Ubuntu 16.04LTS.
Linux Csplit command
Here's how the command's man page defines it:
csplit - split a file into sections determined by context lines
Following is its generic syntax:
csplit [OPTION]... FILE PATTERN...
The individual small files created by csplit have names like xx00 and xx01. The following definition - taken from the command's man page - should make things more clear:
Output pieces of FILE separated by PATTERN(s) to files 'xx00', 'xx01', ..., and output byte
counts of each piece to standard output.
The following Q&A-type examples should give you a good idea about how the csplit command works.
Q1. How to split files based on number of lines?
Suppose your file contains 6 lines, and the requirement is split that file at the third line, then this can be done by passing '3' as a command line argument after the command and file name.
For example, in our case, file1 contained the following lines:
1       Asia
2      Africa
3      Europe
4   North America
5   South America
6     Australia
And here's the command we executed:
csplit file1 3

The numbers produced in the output are the byte count for the files the command produced. Needless to say, two files were produced in the output, namely xx00 and xx01.
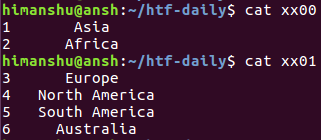
The contents of these files confirm the split happened at line number 3.
Q2. How to split files using regular expressions?
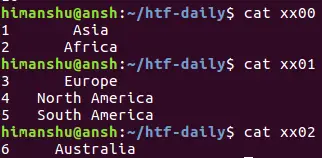
You can also use regular expressions with the csplit command. For example, in the previous case, if you want the tool to repeat the pattern one more time, then you can do this using the following command:
csplit file1 3 {1}
So in this case, three output files were produced:
Q3. How to have custom prefix instead of the default 'xx'?
By default, the files that csplit produces in output have 'xx' as the prefix. However, if you want, you can change the prefix using the -f command line option, which requires the new prefix as its input.
For example, the following command will produce files having 'htf' as prefix.
csplit file1 1 -f htf

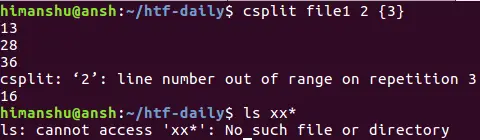
Q4. How to force csplit to not remove output files in case of error?
The csplit command, by default, removes output files (any, if created) as soon as it encounters an error situation. For example, the following screenshot confirms no output file was eventually produced:
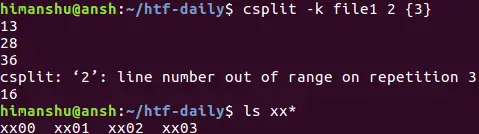
However, if you want, you can change this behavior by using the -k option in the command. For example, the same command was executed again, but with this option, and the output files were not deleted this time.
Q5. How to suppress lines that match input pattern?
The csplit command also provides an option to suppress lines that match the input pattern. The option in question is --suppress-matched.
For example, the following command splits the file (file1) at line 2 (xx00 will contain line 1, while xx11 will contain rest of the lines).
csplit file1 2
But if you want to suppress line 2, then you can run the following command:
csplit --suppress-matched file1 2
Q6. How to use custom number of digits instead of the default 2?
Just like the prefix itself, the number of digits that follow prefix in the output filenames is also customizable. So suppose you want to have names like xx000 and xx0001, you can do this using the -n command line option, which requires an input number signifying the new number of digits.
For example:
csplit -n 1 file1 2
The aforementioned command would produce file names like xx0, xx1, and so on.
Conclusion
An average Linux command line user may not require csplit on daily basis, but it's definitely an important utility that you should at-least know about. We've covered most of the basic examples and command line options here. Try them out, and then head to the tool's man page to learn more about it.

