How to Set-Up Master-Slave Replication for PostgreSQL 9.6 on Ubuntu 16.04
This tutorial exists for these OS versions
- Ubuntu 16.04 (Xenial Xerus)
- Ubuntu 15.04 (Vivid Vervet)
On this page
PostgreSQL or Postgres is an open source object-relational database management system (ORDBMS) with more than 15 years of active development. It's a powerful database server and can handle high workloads. PostgreSQL can be used on Linux, Unix, BSD, and Windows servers.
The master/slave database replication is a process of copying (syncing) data from a database on one server (the master) to a database on another server (the slaves). The main benefit of this process is to distribute databases to multiple machines, so when the master server has a problem, there is a backup machine with same data available for handling requests without interruption.
PostgreSQL provides several ways to replicate a database. It can be used for backup purposes and to provide a high availability database server. In this tutorial, we will show you how to install and configure PostgreSQL 9.6 Master-Slave Replication on Ubuntu 16.04 server. We will use Hot standby mode, and it's a very good starting point to learn PostgreSQL in depth.
What we will do:
- Install PostgreSQL 9.6.
- Configure UFW Firewall.
- Configure MASTER Server.
- Configure SLAVE Server.
- Copy PostgreSQL Data from MASTER to SLAVE.
- Testing.
Prerequisite:
- 1 Ubuntu 16.04 server
- MASTER - Allowing Read and Write - IP: 10.0.15.10
- 1 Ubuntu 16.04 server
- SLAVE - Only Read - IP: 10.0.15.11
- Root Privileges
Step 1 - Install PostgreSQL 9.6
In this tutorial, we will install the latest version of PostgreSQL 9.6. In the official Ubuntu repository, they provide PostgreSQL 9.5 only, so we need to install the latest version from the PostgreSQL repository directly.
Add the postgreSQL 9.6 repository to the sources.list.d directory.
echo 'deb http://apt.postgresql.org/pub/repos/apt/ xenial-pgdg main' | tee /etc/apt/sources.list.d/postgresql.list
And import the PostgreSQL signing key to the system.
wget -q https://www.postgresql.org/media/keys/ACCC4CF8.asc -O - | sudo apt-key add -
Now update the system repository with apt command.
apt-get update
Next, install the PosgreSQL 9.6 package with the apt command below.
apt-get install -y postgresql-9.6 postgresql-contrib-9.6
If the installation has been completed, add it to start automatically at boot time.
systemctl enable postgresql
By default, PostgreSQL is running on the localhost (127.0.0.1) IP address with port 5432 on Ubuntu, check it with netstat command.
netstat -plntu

PostgreSQL 9.6 is running on the system. In the next step, we have to configure a password for the postgres user.
From the root account, log in to the postgres user with the su command, then access the postgres front-end terminal psql.
su - postgres
psql
Please change the password for the postgres user and check the connection info with postgres queries below.
\password postgres
\conninfo

PostgreSQL 9.6 has been installed on the system, is running without error and the password for postgres user has been updated.
Step 2 - Configure UFW Firewall
UFW or Uncomplicated Firewall is an application to manage the iptables based firewall on Ubuntu. UFW is the default firewall configuration tool for Ubuntu Linux and provides a user-friendly way to configure the firewall.
We can install ufw from the main Ubuntu repository with the apt command.
apt-get install -y ufw
Add new services to the UFW firewall: add SSH and PostgreSQL services with commands below.
ufw allow ssh
ufw allow postgresql
Enable the UFW firewall and check the status.
ufw enable
ufw status
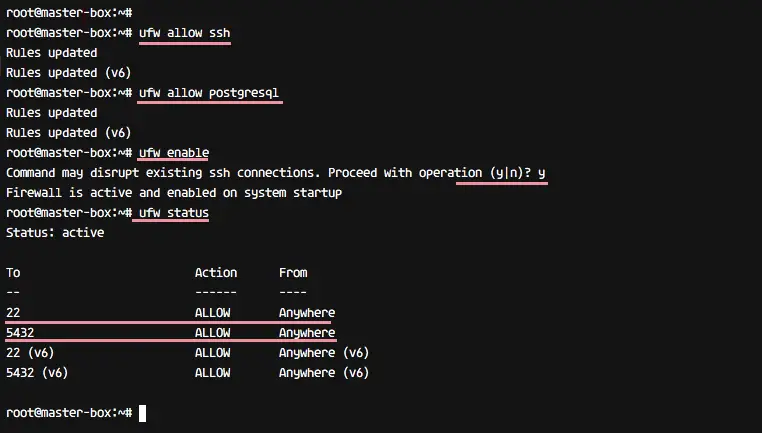
UFW firewall has been installed and the PostgreSQL service has been added.
NOTE:
Run step 1 and step 2 on the MASTER and SLAVE server.
Step 3 - Configure the PostgreSQL MASTER Server
The master server has the IP address 10.0.15.10, and the postgres service will run under that IP with default port. The master server will have permission for the READ and WRITE to the database, and perform streaming replication to the slave server.
Go to the postgres configuration directory '/etc/postgresql/9.6/main' and edit the postgresql.conf file with vim.
cd /etc/postgresql/9.6/main/
vim postgresql.conf
Uncomment 'listen_addresses' line and change the value to the master server IP address '10.0.15.10'.
listen_addresses = '10.0.15.10'
Uncomment 'wal_level' line and change value to the 'hot_standby'.
wal_level = hot_standby
For the synchronization level, we will use local sync. Uncomment and change value line as below.
synchronous_commit = local
Enable archiving mode and change the archive_command option to the command 'cp %p /var/lib/postgresql/9.6/main/archive/%f'.
archive_mode = on
archive_command = 'cp %p /var/lib/postgresql/9.6/main/archive/%f'
For the 'Replication' settings, in this tutorial we use 2 servers only, master and slave, uncomment the 'wal_sender' line and change value to 2, and for the 'wal_keep_segments' value is 10.
max_wal_senders = 2
wal_keep_segments = 10
For the application name, uncomment 'synchronous_standby_names' line and change the value to the name 'pgslave001'.
synchronous_standby_names = 'pgslave001'
Save the file and exit the editor.
In the postgresql.conf file, the archive mode is enabled, so we need to create a new directory for the archive. Create a new archive directory, change the permission and change the owner to the postgres user.
mkdir -p /var/lib/postgresql/9.6/main/archive/
chmod 700 /var/lib/postgresql/9.6/main/archive/
chown -R postgres:postgres /var/lib/postgresql/9.6/main/archive/
Next, edit pg_hba.conf file for authentication configuration.
vim pg_hba.conf
Paste configuration below to the end of the line.
# Localhost
host    replication     replica          127.0.0.1/32            md5

# PostgreSQL Master IP address
host    replication     replica          10.0.15.10/32            md5

# PostgreSQL SLave IP address
host    replication     replica          10.0.15.11/32            md5
Save and exit, then restart PostgreSQL.
systemctl restart postgresql
PostgreSQL is running under the IP address 10.0.15.10, check it with netstat command.
netstat -plntu

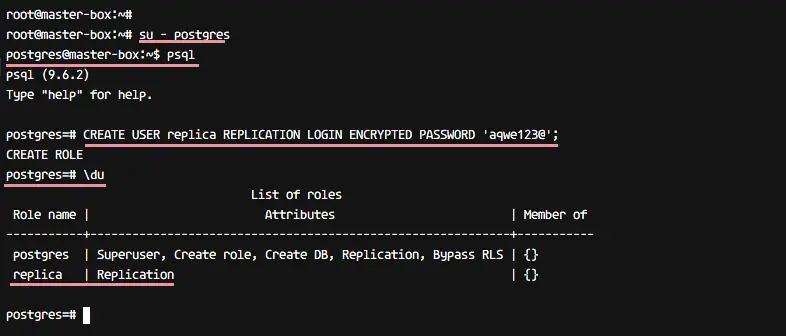
Next, create a new user for replication. We will create a new user named 'replica' with password 'aqwe123@'. Please choose a secure password here for your setup! Log in to the postgres user and access the postgres front-end terminal psql.
su - postgres
psql
Create new 'replica' user with password 'aqwe123@' with postgres query below.
CREATE USER replica REPLICATION LOGIN ENCRYPTED PASSWORD 'aqwe123@';
Now check the new user with 'du' query below, and you will see the replica user with replication privileges.
\du
MASTER server configuration has been completed.
Step 4 - Configure SLAVE Server
The SLAVE server has IP address 10.0.15.11. And this server will only have a READ permission to the database. The Postgres database server will run under the IP address of the server, not a localhost IP.
Stop the postgres service on the slave server with the systemctl command below.
systemctl stop postgresql
Go to the Postgres configuration directory '/etc/postgresql/9.6/main', then edit the configuration file 'postgresql.conf'.
cd /etc/postgresql/9.6/main/
vim postgresql.conf
Uncomment the listen_addresses line and replace the value with the slave server IP address 10.0.15.11.
listen_addresses = '10.0.15.11'
Uncomment 'wal_level' line and change the value to the 'hot_standby'.
wal_level = hot_standby
For the synchronization level, uncomment the synchronous_commit line and change the value as shown below.
synchronous_commit = local
For the replication setting, uncomment the max_wal_senders line and replace the value with '2' because just use 2 servers. And for the wal_keep_segments, change the value to '10'.
max_wal_senders = 2
wal_keep_segments = 10
Uncomment the 'synchronous_standby_names' line for the application name and change value to the name 'pgslave001'.
synchronous_standby_names = 'pgslave001'
Enable hot_standby for the slave server by uncommenting the following line and change value to 'on'.
hot_standby = on
Save the file and exit the editor.
Step 5 - Copy PostgreSQL Data from the MASTER to the SLAVE
Next, we want to replace the postgres main directory on the 'SLAVE' server with the main data directory from 'MASTER' server.
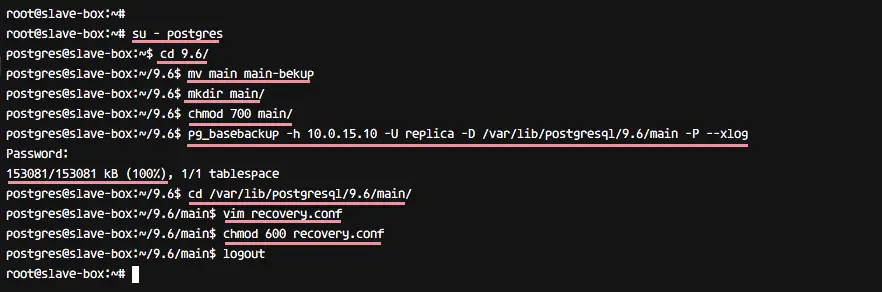
Log in to the SLAVE server and access postgres user.
su - postgres
Go to the postgres data directory 'main' and backup it by renaming the directory name.
cd 9.6/
mv main main-bekup
Create new 'main' directory as 'postgres' user and make sure have a permission like the main-bekup directory.
mkdir main/
chmod 700 main/
Next, copy the main directory from the MASTER server to the SLAVE server with pg_basebackup command, we will use replica user to perform this data copy.
pg_basebackup -h 10.0.15.10 -U replica -D /var/lib/postgresql/9.6/main -P --xlog
Password:
When the data transfer is complete, go to the main data directory and create a new recovery.conf file.
cd /var/lib/postgresql/9.6/main/
vim recovery.conf
Paste the configuration below:
standby_mode = 'on'
primary_conninfo = 'host=10.0.15.10 port=5432 user=replica password=aqwe123@ application_name=pgslave001'
restore_command = 'cp /var/lib/postgresql/9.6/main/archive/%f %p'
trigger_file = '/tmp/postgresql.trigger.5432'
Save and exit, then change the permissions of the file to 600 with chmod.
chmod 600 recovery.conf
Now start PostgreSQL 9.6 on the SLAVE server and make sure the postgres service is running on IP address 10.0.15.11 with netstat.
systemctl start postgresql
netstat -plntu

Data transfer and configuration for the SLAVE server has been completed.
Step 6 - Testing
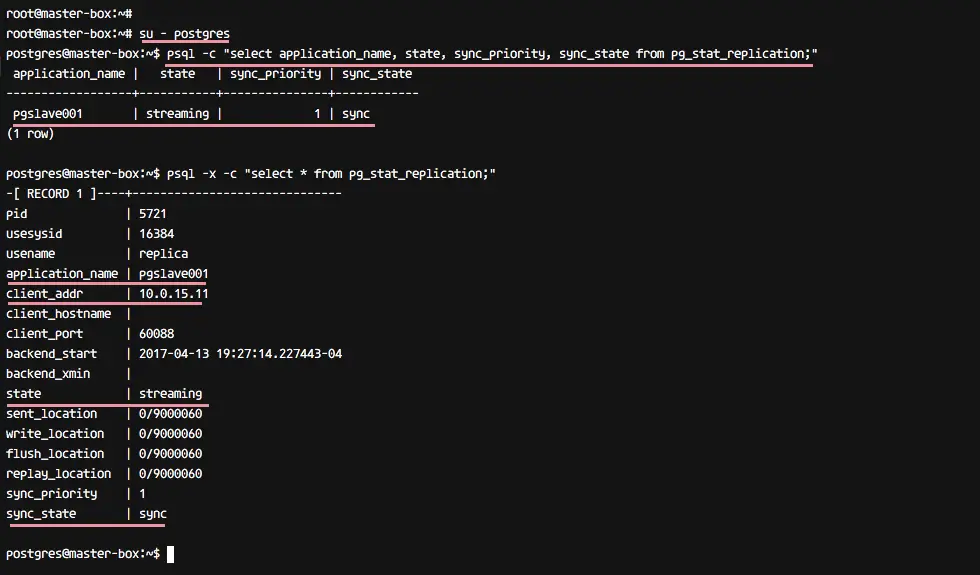
For testing, we will check the replication status of the PostgreSQL 9.6 and try to create a new table on the MASTER server, then check the replication by checking all data from the SLAVE server.
Log in to the MASTER server and log in to the postgres user.
su - postgres
Run psql commands below to see the replication status.
psql -c "select application_name, state, sync_priority, sync_state from pg_stat_replication;"
psql -x -c "select * from pg_stat_replication;"
You will get the results as below.
Next, try to create a new table from the MASTER server. Log in to the postgres user on the master server.
su - postgres
psql
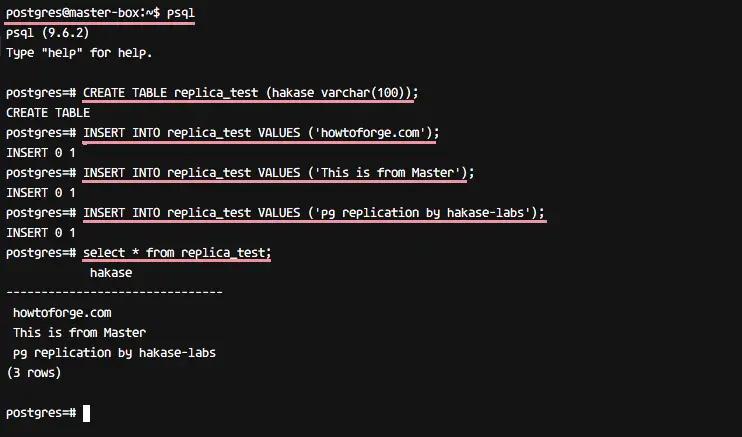
And create a new table named 'replica_test' and insert data to the table by running postgres queries below.
CREATE TABLE replica_test (hakase varchar(100));
INSERT INTO replica_test VALUES ('howtoforge.com');
INSERT INTO replica_test VALUES ('This is from Master');
INSERT INTO replica_test VALUES ('pg replication by hakase-labs');
Next, login to the postgres user on the SLAVE server and access the psql terminal.
su - postgres
psql
Check data on the 'replica_test' table with postgres query below.
select * from replica_test;
And you will get same data as on the MASTER, it's replicated from the MASTER server to the SLAVE server.

Additional test:
Test to write on the SLAVE server with the query below.
INSERT INTO replica_test VALUES ('this is SLAVE');
And you will get an error message about 'Cannot execute INSERT' query on the SLAVE server.
Installation and Configuration of the PostgreSQL 9.6 with Master-Slave Replication on Ubuntu 16.04 Xenial Xerus has been successful.

