How to Install Pimcore with Nginx on CentOS 7
Pimcore provides free and open source enterprise content management system. It is written in PHP and uses MySQL to store its database. Pimcore CMS is fully flexible and editable, you can personalize the site the way you want. Apart from all these, it has many enterprise class features which make it capable of supplying the demand of enterprise grade website.
In this tutorial, we will install Pimcore CMS on CentOS 7 server.
Prerequisite
- Minimal CentOS 7 server
- Root privileges
Step 1 - Installing Nginx
It is recommended to update the server before installing any package so that the existing packages and repositories are updated.
yum -y install epel-release
 yum -y update
Once you have your system updated, you can proceed to install the Nginx web server.
yum -y install nginx
Now start Nginx web server and enable it to start at boot time using the following command.
systemctl start nginx
systemctl enable nginx
Step 2 - Installing PHP
Pimcore supports all the version of PHP greater than 5.6. But in this tutorial, we will install PHP 7.1. Installing the latest version of PHP will ensure the maximum security and performance of the application.
The default YUM repository of CentOS does not have PHP 7.1 included, hence you will need to add the Webtatic repository in your system.
Type the commands to install Webtatic repository.
rpm -Uvh https://mirror.webtatic.com/yum/el7/webtatic-release.rpm
yum -y update
Type the following command to install PHP 7.1 along with all the required dependencies.
yum -y install php71w php71w-mysqli php71w-fpm php71w-gd php71w-cli php71w-iconv php71w-dom php71w-simplexml php71w-exif php71w-fileinfo php71w-mbstring php71w-zlib php71w-zip php71w-bz2 php71w-openssl php71w-opcache php71w-curl php71w-pecl-redis ImageMagick
To check if PHP is installed successfully, you can run:
php -v
You should get output similar to this.
[root@liptan-pc ~]# php -v
PHP 7.1.6 (cli) (built: Jun 10 2017 07:28:42) ( NTS )
Copyright (c) 1997-2017 The PHP Group
Zend Engine v3.1.0, Copyright (c) 1998-2017 Zend Technologies
    with Zend OPcache v7.1.6, Copyright (c) 1999-2017, by Zend Technologies
Now you will need to configure few configurations in PHP. Open the PHP configuration file, php.ini using your favourite text editor.
nano /etc/php.ini
Find the following line, uncomment the line and set the timezone according to your region. For example:
[Date]
; Defines the default timezone used by the date functions
; http://php.net/date.timezone
date.timezone = Asia/Kolkata
Further, search for the following line:
upload_max_filesize = 2M
Change the value from 2M to 100M and search for the following line:
post_max_size = 8M
Change the value from 8M to 100M. Save the file and exit from the editor.
Now, open PHP-FPM configuration file located at /etc/php-fpm.d/www.conf:
nano /etc/php-fpm.d/www.conf
Find the following lines:
user = apache
group = apache
Change user and group value from apache to nginx. Now find:
;listen.owner = nobody
;listen.group = nobody
;listen.mode = 0660
Uncomment the above lines and change nobody to nginx.
And, finally, find:
listen = 127.0.0.1:9000
Comment out the above line and add the following line below it.
listen = /var/run/php-fpm/php-fpm.sock
Now start PHP-FPM service and enable it to automatically start at boot time using:
systemctl start php-fpm
systemctl enable php-fpm
Step 3 - Installing MariaDB
MariaDB is a fork of MySQL database. To install MariaDB on your server, run:
yum -y install mariadb mariadb-server
Run the following commands to start MariaDB and enable it to start at boot time.
systemctl start mariadb
systemctl enable mariadb
Now run the following commands to secure your MariaDB installation.
mysql_secure_installation
The above command will run a script to secure fresh MariaDB installation. The script will ask for the existing root user password, we have just installed MariaDB, the root password is not set, just press enter to proceed further.
The script will ask you if you want to set a root password for your MariaDB installation, choose y and set a strong password for the installation. Most of the questions are self-explanatory and you should answer yes or y to all the questions. The output will look like shown below.
To create a database we will need to login to MySQL command line first. Run the following command for same.
mysql -u root -p
The above command will login to MySQL shell of the root user, it will prompt for the password of the root user. Provide the password to login. Now run the following query to create a new database for your Pimcore installation.
CREATE DATABASE pimcore_data CHARACTER SET UTF8;
The above query will create a new database named pimcore_data. Make sure that you use semicolon at the end of each query as the query always ends with a semicolon.
To create a new database user, run the following query.
CREATE USER 'pimcore_user'@'localhost' IDENTIFIED BY 'StrongPassword';
Now provide the all the privileges to your database user over the database you have created. Run the following command.
GRANT ALL PRIVILEGES ON pimcore_data.* TO 'pimcore_user'@'localhost';
Now run the following command to immediately apply the changes on the database privileges.
FLUSH PRIVILEGES;
Exit from MySQL prompt using the following command.
EXIT;
Step 4 - Installing Additional Server Software
Pimcore required additional server packages which are used to perform certain operations using Pimcore CMS. Few of the dependencies are only available in RPMFusion repository. Install RPM Fusion repository using the following command.
rpm -Uvh https://download1.rpmfusion.org/free/el/rpmfusion-free-release-7.noarch.rpm
Run the following command to install the additional server software.
yum -y install ffmpeg libreoffice libreoffice-math xorg-x11-fonts-75dpi poppler-utils inkscape libXrender ghostscript fontconfig wkhtmltopdf
The above command will install FFMPEG, LibreOffice, pdftotext, Inkscape and Wkhtmltoimage / Wkhtmltopdf.
Step 5 - Installing and Configuring Pimcore
As we have all the dependencies ready, we can now download the install package from Pimcore website.
cd /var/www
Pimcore provides three different types of installation archive. If you want to install Pimcore along with demo data which is suitable for beginners, you can use the following link to download Pimcore.
wget https://www.pimcore.org/download/pimcore-data.zip
If you want to install the Pimcore core package only, then you can use the following link to download.
wget https://www.pimcore.org/download/pimcore-latest.zip
The third option is to install nightly build, which is for development purpose only. The above command will always download the latest version of Pimcore. Extract the archive using the following command.
unzip pimcore*.zip -d pimcore
If you do not have unzip installed, you can run yum -y install unzip.
Step 6 - Configure Permissions and Firewall
Now you will need to provide the ownership of the application to web server user using the following command.
chown -R nginx:nginx /var/www/pimcore
You may also need to allow HTTP traffic on port 80 through the firewall if you are running one. Run the following commands for same.
firewall-cmd --zone=public --permanent --add-service=http
firewall-cmd --reload
To temporary disable SELinux without restarting the server, run the following command.
setenforce 0
To completely disable the SELinux you will need to edit /etc/selinux/config file.
nano /etc/selinux/config
Find the following line:
SELINUX=enforcing
Change it to:
SELINUX=disabled
Now create a virtual host or server block for the Pimcore application. Run the following command for same.
nano /etc/nginx/conf.d/cms.yourdomain.com.conf
Paste the following lines into the file.
server {
    root /var/www/pimcore;
    index index.php;
    server_name cms.yourdomain.com;
    listen 80;
    access_log  /var/www/pimcore/website/var/log/nginx_access.log;
    error_log   /var/www/pimcore/website/var/log/nginx_error.log error;

    set $getassets "";
    if ($uri ~* ^/website/var/assets)   { set $getassets "${getassets}A"; }
    if ($request_method = GET)      { set $getassets "${getassets}B"; }
    if ($getassets = "AB") {
        rewrite ^ $uri$args last;
    }

  location ~* ^(/plugins/(?!.*/static).*|^/pimcore/(?!(static|modules/3rdparty)).*|/website/var/(?!tmp|assets|areas)|/modules/(?!.*/static).*|^(vendor|tests|node_modules|phing)/.*|^(bower|package|composer|gulpfile)\.) {
        return 403;
    }

    location / {
        try_files $uri $uri/ /index.php$is_args$args;
        index index.php;
    }

    location ~ \.php$ {
        try_files $uri =404;
        fastcgi_pass   unix:/var/run/php-fpm/php-fpm.sock;
        fastcgi_index  index.php;
        fastcgi_split_path_info ^(.+\.php)(/.+)$;
        fastcgi_param  SCRIPT_FILENAME    $document_root$fastcgi_script_name;
        include        fastcgi_params;
        fastcgi_read_timeout 60;
    }

    location ~* \.(jpe?g|gif|png|bmp|ico|css|js|pdf|zip|htm|html|docx?|xlsx?|pptx?|txt|wav|swf|svg|avi|mp\d)$ {
        access_log off;
        log_not_found off;
        try_files $uri $uri/ /website/var/assets$uri /index.php$is_args$args;
        expires 1w;
    }


    rewrite ^\/cache-buster-\d+(.*) $1 break;

    location /fpm-ping {
        access_log off;
        include fastcgi_params;
        fastcgi_pass unix:/var/run/php-fpm/php-fpm.sock;
    }

    location /fpm-status {
        allow 127.0.0.1;
        deny all;
        access_log off;
        include fastcgi_params;
        fastcgi_pass unix:/var/run/php-fpm/php-fpm.sock;
    }
    location /nginx-status {
        allow 127.0.0.1;
        deny all;
        access_log off;
        stub_status;
    }
}
Replace cms.yourdomain.com with any domain or subdomain you want to use to access the application. Save the file and exit from the editor. Run the following command to restart your Nginx server.
systemctl restart nginx
Now complete the installation using a web browser, go to the following link.
http://cms.yourdomain.com
You will be welcomed by the following page.
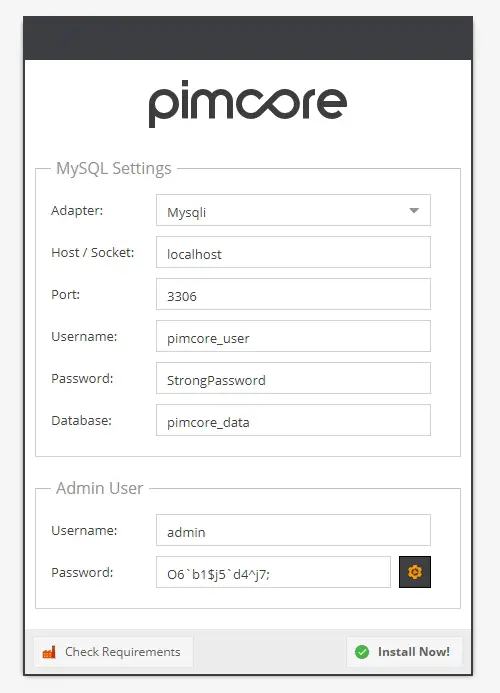
Choose mysqli as database adapter, provide the details of the database and new admin user. Click on Install Now! button once done. The installation will just take few seconds to complete.

Conclusion
Installation of Pimcore is now finished, you can use the Pimcore to easily create a beautiful website for personal or commercial purpose.

