Linux du Command Tutorial for Beginners (10 Examples)
On this page
- Linux du command
- Q1. How to know disk usage for one or more files using du?
- Q2. How to make du display usage information in human readable form?
- Q3. How to make du display count for all files in a directory?
- Q4. How to make du produce a grand total of usage?
- Q5. How to make du display inode information instead of block usage?
- Q6. How to make du accept input from file or STDIN?
- Q7. How to make du exclude size of sub-directories from parent directory size?
- Q8. How to make du show last modification time in output?
- Q9. How to make du exclude particular type of files?
- Q10. How to define directory-depth for du?
- Conclusion
Sometimes, while working on the Linux command line, you might want to quickly know disk usage for a set of files or for a complete directory. There's a specific command line tool that lets you do this, dubbed du. In this tutorial, we will discuss the basics of this tool as well as the features it provides using easy to understand examples.
But before that, it's worth sharing that all examples and instructions mentioned here have been tested on Ubuntu 16.04 LTS.
Linux du command
Here's the syntax of the du command:
du [OPTION]... [FILE]...
And following is how the tool's man page describes it:
du - estimate file space usage

Summarize disk usage of the set of FILEs, recursively for directories.
The following Q&A-type examples should give you a better idea on how du works.
Q1. How to know disk usage for one or more files using du?
So we're talking about the tool's basic usage here, and it's very easy. All you have to do is to pass the corresponding filenames as input to the command.
du [file1] [file2] ...
Following is an example:

So as you can see in the output, the number displayed in the first column represents the corresponding file's disk usage.
You can also do this for a directory:
![]()
In case of a directory, the output shows disk usage for sub-directories as well as the parent directory as a whole.
Q2. How to make du display usage information in human readable form?
One problem when you run du in default mode is that the usage figure produced in output doesn't make it clear what it represents. For examples, the output in the screenshots shown in the previous section doesn't say what '4' and '8' are - are they bytes, kilobytes, or what?
So to make the output better, you can use the -h command line option:
du -h [file1] [file2] ...
Following is an example of this:

So now it's clear from output that disk usage is in kilobytes.
Q3. How to make du display count for all files in a directory?
By default, whenever you pass a directory name as input to du, the tool only shows usage-related information for the input directory and subdirectories (if any).

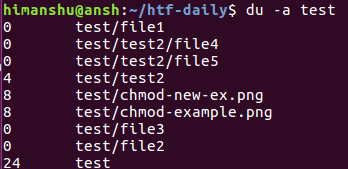
But if the requirement is to separately display disk usage information for all files as well, then you can do this using the -a command line option. Following is an example of this option:
Q4. How to make du produce a grand total of usage?
This can be done using the -c command line option. For example:

As clear from the screenshot above, a new row is added at the bottom of the output, showing the grand total of disk usage.
Q5. How to make du display inode information instead of block usage?
For this, you need to use the --inode option. Following is a screenshot for this option in action:

Q6. How to make du accept input from file or STDIN?
This can be done using the --files0-from command line option. Suppose the input file names are written in a file named inp_list, then you can use the du command in the following way:
du --files0-from=inp_list
For example, here's the option in action:

Please keep in mind that the names you type in the input file (inp_list in our case above) should be NUL terminated. For example, our inp_list file contained the following contents:
![]()
We did this through Vim. To know how you can do this through Vim, head here.
Moving on, you can also make du accept input from STDIN. For this, you need to pass a hyphen (-) as the value to the --files0-from option. In this case, after entering each file name on STDIN, you need to press Ctrl+d twice.

Q7. How to make du exclude size of sub-directories from parent directory size?
Towards the end of Q1 above, we discussed how you can use du to display disk usage for a directory. The output revealed that while size for sub-directories is displayed separately, the entry for the parent directory (the one passed in input) shows the combined size of everything.
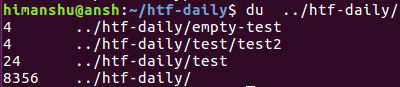
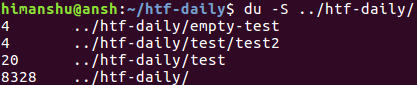
In case you want du to show size of parent - size of sub-directories in the last entry, you can use the -S command line option.
Q8. How to make du show last modification time in output?
For this, use the --time command line option. Here's an example:

Q9. How to make du exclude particular type of files?
Suppose your directory contains several type of files, and you want the du command to not include one or more of them while calculating disk usage for the directory. You can do this using --exclude option, which requires a pattern as input.
du --exclude=PATTERN [Dir-name]
For example, the following screenshot shows the above command in action for .png files.

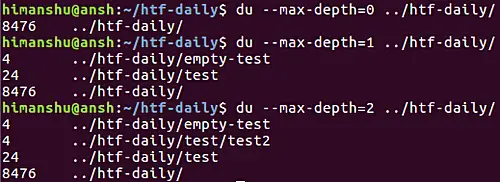
Q10. How to define directory-depth for du?
If you want, you can also restrict the du command to a particular directory depth. This way the tool will only print usage information for directories that it encounters to the level specified by user. The feature can be accessed using the --max-depth option.
So if you want to restrict du to top-level directory, pass '0' as value to this option.
du --max-depth=0 [dir-name]
Following are a some examples of this option:
Conclusion
du is a handy-little command line tool that may come to your rescue in may situations. Plus, it's not difficult to understand and use. We've discussed some of the basic command line options here. For more details, head to the tool's man page.

