
In the first post of our series, we outlined three components of a modern front-end stack. In the second post, we untangled the challenge of package management with Yarn. In this post, we’ll take a look at the next component in our stack: webpack™, a way of building and bundling assets for web apps.
Webpack is a robust and extensible tool that brings speed, parity between environments, and organized code to your application. It does its best work graphing a modular codebase, tying many graphed dependencies together into a few output files. For anything webpack doesn’t do readily, it can be taught to do with plugins. It can graph JavaScript modules naturally, and it can transform just about anything into a JavaScript module with a special kind of plugin called a loader.
It’s also growing rapidly. In May of 2017, the npm registry reported nearly 6.7 million downloads per month, up from 323,000 two years previously. That’s a 2000% increase. Just last year, the project established a core team, launched a much-improved documentation site, and joined the JS Foundation. So if you haven’t already, it’s probably time to consider whether you should be using webpack in your project.
Of course, every engineering choice comes with tradeoffs. To make the best investment decision, you need to know what each webpack feature gets you and what each one asks of you. With that in mind, we’ll do some accounting of the costs and benefits of four powerful features: “lean building”, code-splitting, tree-shaking, and hot module replacement. Along the way we’ll introduce the basic concepts vital for understanding how webpack works. When we’re done, we’ll take a look at the bottom line to help you decide if webpack should be your web app bundler of choice.
Build Lean
First let’s look at “lean building”. This is not a core feature of webpack so much as a powerful side benefit. Webpack reduces the overhead and friction associated with orchestrating the build of applications for local development and production. As such, it covers enough territory by itself to toss out the bulky tools we once depended on. Let’s start with its main function.
File Bundling
At its most basic level, webpack reads source files and then rewrites their contents into new, fewer, tightly-packed files. As a bundler, it knows how to read JavaScript that follows a module pattern. For example, some common patterns—like CommonJS and ES2015 (ES6)—divide chunks by file, with each describing an export to name what they provide.
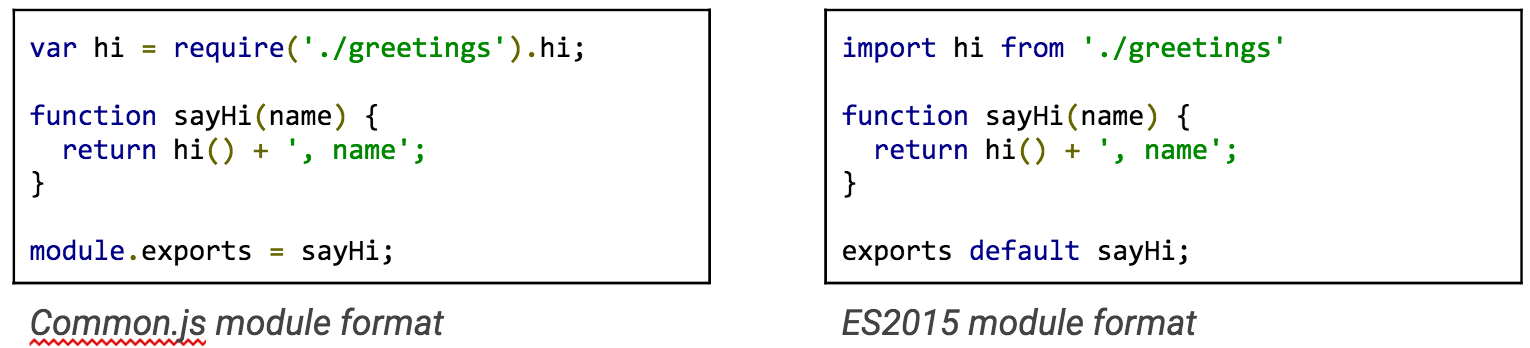
If you organize your JavaScript this way, you usually have one or a few “main” files that start the app (i.e. the “bootstrap”), a bit like the first tile in a line of dominoes. Webpack captures the file path from each import or require in this “main” file, reads each of those files, captures the file paths in those, and—like a digital version of Six Degrees of Kevin Bacon—learns how all the chunks connect to one another. Then it bundles all the chunks into a small set of files that’s easier to load than the myriad original parts.
It doesn’t have to be just JavaScript. You can extend your webpack configuration to read and connect any type of file you might require, including images, CSS, and more. It can even handle connections across types—for example, scripts can require CSS, and CSS in turn can require an image. For the price of a configuration for each type, you can pack together any of the files you need to deliver.
Command Automation
This egalitarian ability comes at a good time. If you’re installing webpack and related tools, that means you’re using a package manager like npm or Yarn, both of which natively support arbitrary package scripts.
In the past, many packages interfaced only with Node modules. Grunt™ and Gulp facilitated an ecosystem of plugins that shimmed these modules for the command line. But build configurations that used them for large projects lumbered and cracked under their own weight.
Today, Node packages offer a wide variety of packages usable from a CLI, even for “little” build tasks like recursive file removal or copying. With them, tasks may often be expressed in breezy one-liners. You can do all this with just the overhead of depending on npm, which you’ve already bought into.
Accounting
Let’s start tracking the costs and benefits of webpack.
The costs:
-
Configure webpack to handle multiple types
-
Include cross-type imports in modules
The benefits:
-
One toolset to cover the primary build concern
-
Maintainable automation CLI
Split Code
Next, let’s consider webpack’s code-splitting feature. Tobias Koppers (sokra on GitHub) originally wrote webpack to ensure that apps only load the code you need when you need it. Your app’s first page probably doesn’t need to load everything at once. If you split the sum total of your code up into parts—what shows up first and then what shows up later—the critical components of your app load more quickly.
Greater speed via webpack comes with a few costs. You’ll need to tell webpack where to split your code, and also where to put the bundled code. Let’s take a closer look.
Entry Point
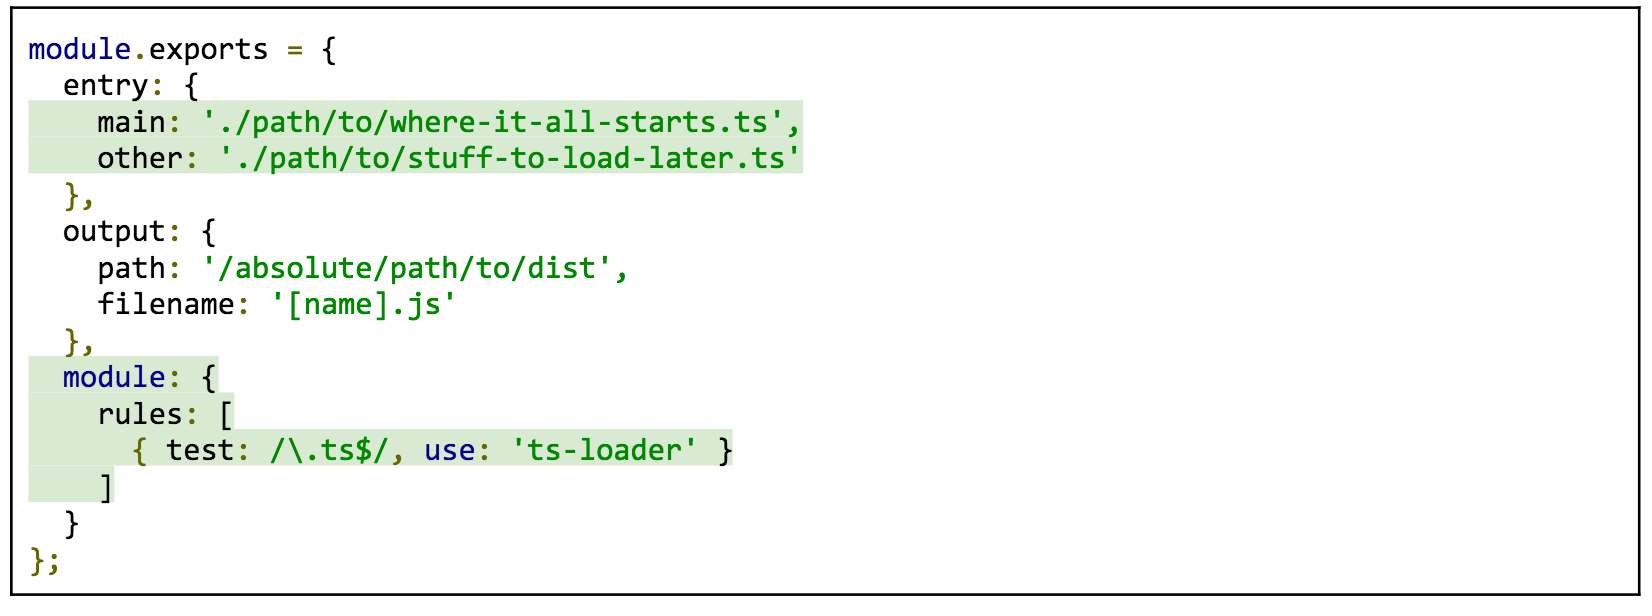
Before webpack can split your code, it needs to know your application’s entry point. In your webpack configuration, you don’t have to describe where to find every file—just the one where it all starts:

From there, webpack will dig down recursively (following every branch of the tree) to find all of the dependencies related to the entry point. You can have as many entry points as you want. If you add a second entry point, then this is the point at which webpack splits the code:

For simplicity’s sake we’ll assume that where-it-all-starts.js is our primary code that needs to load first, and a-library.js is an additional library that can load later. The two do not overlap. Refer to the guide on code-splitting libraries for greater detail on how to configure webpack if they do. (Also, stay tuned for the final post in our series, which will present a case study showing our modern stack in action, including webpack.)
Output
Now only one step remains. This next concept is the output. webpack needs to know where to put the new, bundled version of the code for all the entry points.

Here the [name] substitution is a placeholder for each of the property names for the entry configuration. When you execute webpack with this configuration, it will create (or overwrite) two new files in /absolute/path/to/dist: main.js and other.js. Again, for the sake of simplicity, this overview doesn’t mention how you load the right script on the right page. That’s a separate concern (but easy to implement). All you need to code split is multiple entry points and an output configuration.
Accounting
The costs:
-
Modular JavaScript
-
Knowing and creating the correct webpack configuration
-
Multiple script requests over HTTP
The benefits:
-
Faster startup speeds
-
Modular JavaScript
You probably noticed we listed “Modular JavaScript” as a cost and a benefit. Converting to modular code, if you aren’t already using it, could cost you some time, but it gives you the power to build discrete units of functionality without worrying when they might be loaded.
Shake Trees
Now let’s grab the tree and give it a shake to see what comes out. Webpack can find code that will never execute for the life of the application, otherwise known as “dead code”, and remove it for you. In other words, it shakes out the dead and loose parts of your dependency tree. You’re most likely to benefit from this if your application uses part, but not all of a third-party library. Without shaking, you force your users to spend time loading code that they’ll never use. With shaking, it’s like that code was never there.
Static Modules
To reap these benefits, you’ll have to use statically-structured modules, a new feature available via the import/export syntax in ES2015. While webpack can support many common module types, it cannot tree shake all of them. You have to provide it with a way to map the functions that you do and do not use, and it cannot do this reliably or efficiently if it’s possible for the modules to change dynamically.
Unfortunately, as of June 2017, native browsers only thinly support ES2015 modules, as shown in the graph below. Out of 15 common browsers, only Safari (on macOS and iOS) supports it by default as of June 2017.

“Can I Use” graph of ES2015 module support
If you want both static analysis and a wide audience today, you’ll need a transpilation step that takes your modern source and turns it into a form widely supported by browsers. In this scenario, the language you write in (for example, ES.Next or TypeScript) must be treated a little differently than typical JavaScript. We’ll need to explain to webpack how to handle that with a concept called loaders.
Loaders
Loaders for webpack often come in the form of Node packages that you add on to your installation as a development dependency. Which one you need depends on your source language. For example, if you’re using TypeScript, you need the ts-loader:

Next, configure webpack to include the loader in a list of rules. For each rule, you need to provide a filename pattern to look for and the name of the loader. If we build on the configuration from the previous section, and turn all of our imaginary JavaScript entry points into TypeScript, it might look like this (changes in green):
The added rule tells webpack to use the ts-loader on any file ending with .ts that’s part of an entry point dependency graph.
Production Option
We’re almost done. By default, webpack does not remove dead code from the bundle. When you run webpack with this configuration, it does not assume you want the output optimized for production (that is, minified and tree-shaken). To get all of those, run webpack with the production option—you just need to add a -p flag to the command:

That’s it. If you want more control, you can have it with additional configuration details. But for a minimum viable tree shake, this’ll do.
Accounting
The costs:
-
Use static modules
-
Transpile such modules into widely-supported code with loaders
-
Add a mode for running webpack in production
The benefits:
-
No dead code, which again means speed
-
Less costly third-party libraries in terms of page weight
Replace Modules at Runtime
Like the previous features, hot module replacement (HMR) buys you speed. Unlike the previous features, it speeds up development, not production. Webpack can watch the files related to your entry points to see when they change during development. Each time they do, it can replace just the things you changed while the application keeps running. What’s more, it does this quickly enough that it feels immediate. Sound good? Let’s go over what it takes to set up.
Development Server
Hot module replacement requires webpack’s development server. Up until now, we have only considered webpack in terms of reading files and writing them out again. To get webpack involved in swapping modules at runtime, it’s going to have to be involved in the serving process. While developing your application, you can create the HTTP static asset server quickly by installing webpack-dev-server and running it.

To include HMR with the server, add the –hot flag.

At this point, you have a development server that can update your application as you change your files. While the app is running, if you change anything in the where-it-all-starts.ts file from earlier, you will see output from the dev server showing that webpack recompiled.
App State
While instant recompiles on the fly are nice, you won’t see how different HMR feels until your development process has to contend with state. Let’s take form validations as an example. Imagine that your app has a signup form that includes a field for email address. If form validation detects a badly-formatted email, it stops the form from being submitted and displays an error.
Now let’s say you want to change the messaging in that error. If you use a typical HTTP server for development, then you will have to retrace those steps every time you make a change to your source: refresh the page, go to the form, fill out the email field with a bad address, and check the message. Depending on your application, any scenario with a lot of state could easily take more steps than that.
So how does this look with hot module replacement? With HMR, webpack can load the module that provides the error message without forcing you to recreate all the circumstances from scratch. However, to do its best, your application must be able to reload what you’ve changed without affecting state. This means you need to write your application in a way that separates state from the view, or that offers a way to restore state. How exactly that happens depends on your app. You might find an existing loader that can determine the means of replacement. Or, if you have to make your own way, HMR offers an API to help.
Accounting
The costs:
-
Serve in development through webpack-dev-server
-
Loaders that support HMR
-
A way for each asset module to separate or restore runtime state
The benefits:
-
Quick runtime feedback from source changes in development
Bottom Line
It’s time to make a decision. Let’s look at the bottom line. We’ve checked out four features webpack offers and the minimum effort it takes to realize them. In sum, these features offer an economy of opportunities—each one is optional, but they build on one another.
The broad community of webpack plugins and tools offers even more opportunities. Just keep in mind that each addition has a cost and steepens the learning curve. Maximizing the abilities of webpack involves considerable configuration, so expect to put in a decent time investment before you’re comfortable with it (especially if modular codebases are new to you and your team). Don’t let that daunt you. Take on the costs one at a time and you’ll soon find yourself enjoying all the benefits. We encourage you to read our case study article (part 5 of this series) and its accompanying repositories to see a full webpack build in action. Also, be sure to crack open the concepts and guides documentation.
At Kenzan, we’ve found that webpack gives us all the basics we expect from task runners like Grunt and Gulp, but it brings so much more to both the user and developer experience with leaner code, faster page loads, and the power to swap modules on the fly while developing. It’s our default choice for building applications. But the best choice is always one that suits the situation. Understanding your options in terms of the benefits and trade-offs gives you a basis for comparison to any alternatives.
Stay tuned for the next post in this series, where we’ll look at the last core component of our modern front-end stack: TypeScript.
Kenzan is a software engineering and full service consulting firm that provides customized, end-to-end solutions that drive change through digital transformation. Combining leadership with technical expertise, Kenzan works with partners and clients to craft solutions that leverage cutting-edge technology, from ideation to development and delivery. Specializing in application and platform development, architecture consulting, and digital transformation, Kenzan empowers companies to put technology first.
Grunt and webpack are trademarks of the JS Foundation.


