How to Create a Fully Featured Mail Server using Postal
Postal is a free and open source complete mail server for sending and receiving emails. It is written in Ruby and JavaScript. You can easily install Postal on your own server. It also helps you in providing correct DNS information required to reducing spam emails. Postal is used by many organizations to send and receive mails on daily basis.
In this tutorial, we will install Postal Mail Server on Ubuntu 17.04.
Prerequisite
- Minimal Ubuntu 17.04 server. 8 GB RAM recommended.
- Root privileges. This guide is written as the root user, if you are logged in as sudo user, run sudo -i.
- a domain name pointed towards your server.
Update Base System
Before installing any package it is recommended that you update the packages and repository using the following command.
apt update && apt -y upgrade
shutdown -r now
Once your system is updated, proceed further to install Ruby.
Install Ruby
Postal is written in Ruby, hence it is required to install Ruby 2.3 or greater on your system. In this tutorial, we will install the latest version of Ruby using RVM. Run the following command to add the GPG key of RVM on your server.
gpg --keyserver hkp://keys.gnupg.net --recv-keys 409B6B1796C275462A1703113804BB82D39DC0E3
Now install RVM using following command.
curl -sSL https://get.rvm.io | bash -s stable
To use RVM immediately, you will need to run the following command.
source /etc/profile.d/rvm.sh
Now fetch the list of Ruby using following command.
rvm list known
You will see following output:
# MRI Rubies
[ruby-]1.8.6[-p420]
[ruby-]1.8.7[-head] # security released on head
[ruby-]1.9.1[-p431]
[ruby-]1.9.2[-p330]
[ruby-]1.9.3[-p551]
[ruby-]2.0.0[-p648]
[ruby-]2.1[.10]
[ruby-]2.2[.6]
[ruby-]2.3[.3]
[ruby-]2.4[.0]
ruby-head
Now install the latest version of Ruby in the list using the following command.
rvm install 2.4
Use the Ruby version using the following command.
rvm use 2.4
You can verify the version of Ruby using following command.
ruby -v
You should see the following output if Ruby is installed successfully.
root@ubuntu:~# ruby -v
ruby 2.4.0p0 (2016-12-24 revision 57164) [x86_64-linux]
Install Ruby Gems
To run Postel on your server, you will need to install bundler and procodile on your server. bundler is a dependency manager for Ruby gem applications. procodile is a process management tool for Ruby applications. Install both the applications using following commands.
gem install bundler
gem install procodile
Install MariaDB Database Server
MariaDB is a fork of MySQL database server. MySQL is a relational database management system software used to store data in tabular format. To install MariaDB on your server, run:
apt -y install mariadb-client mariadb-server libmysqlclient-dev
Run the following commands to start MariaDB and enable it to start at boot time.
systemctl start mariadb
systemctl enable mariadb
Now run the following commands to secure your MariaDB installation.
mysql_secure_installation
The above command will run a script to secure fresh MariaDB installation. The script will ask for the existing root user password, we have just installed MariaDB, the root password is not set, just press enter to proceed further.
The script will ask you if you want to set a root password for your MariaDB installation, choose y and set a strong password for the installation. Most of the questions are self-explanatory and you should answer yes or y to all the questions.
Setup Database for Postal
To create a database for Postal, we will need to login to MySQL command line first. Run the following command for same.
mysql -u root -p
The above command will log in to MySQL shell of the root user, it will prompt for the password of the root user. Provide the password to log in. Now run the following query to create a new database for your Postal installation.
CREATE DATABASE postal CHARSET utf8mb4 COLLATE utf8mb4_unicode_ci;
The above query will create a new database named postal. Make sure that you use semicolon at the end of each query as the query always ends with a semicolon.
Now provide the all the privileges to your database user over the database you have created. Run the following command.
GRANT ALL ON `postal`.* TO `postal`@`127.0.0.1` IDENTIFIED BY "StrongPassword";
Replace StrongPassword with a very strong and secure password.
The database will be automatically written by Postal, but for that, we will need to provide appropriate permissions to Postal users. Run the following command to provide privilege to all the users which start with postal-.
GRANT ALL PRIVILEGES ON `postal-%` . * to `postal`@`127.0.0.1` IDENTIFIED BY "StrongPassword";
Now run the following command to immediately apply the changes on the database privileges.
FLUSH PRIVILEGES;
Exit from MySQL prompt using the following command.
EXIT;
Install RabbitMQ
RabbitMQ is written in Erlang Language, in this tutorial we will install the latest version of Erlang into the server. Install Erlang using following command.
apt -y install erlang
Import the GPG key by running:
curl -sL https://www.rabbitmq.com/rabbitmq-release-signing-key.asc | sudo apt-key add -
Now add the RabbitMQ repository by running the following command:
add-apt-repository 'deb http://www.rabbitmq.com/debian/ testing main'
Update the repository index by running the following command.
apt update
Now you can install RabbitMQ by running the following command.
apt -y install rabbitmq-server
RabbitMQ is now installed on your system.
Setup RabbitMQ
You can start RabbitMQ server process by running the following command.
systemctl start rabbitmq-server
To automatically start RabbitMQ at boot time, run the following command.
systemctl enable rabbitmq-server
Now run the following command to create a virtual host for Postal in RabbitMQ server.
rabbitmqctl add_vhost /postal
Now add a RabbitMQ user for Postal by running the following command.
rabbitmqctl add_user postal StrongPassword
Replace StrongPassword is very strong password.
Now set appropriate permission on RabbitMQ virtual host to RabbitMQ user.
rabbitmqctl set_permissions -p /postal postal ".*" ".*" ".*"
Install Git and Node.js
Git will be used to retrieve the installer package and few dependencies. Run the following command to install Git on your system.
apt -y install git
You can check if Git is installed successfully by check the version using the following command.
git --version
You should get following output.
root@ubuntu:~# git --version
git version 2.11.0
Node.js will be used to compile JavaScript library. Install the software using the following command.
apt -y install nodejs
You can check if Node.js is installed successfully by running the following command.
nodejs -v
You should get following output.
root@ubuntu:~# nodejs -v
v4.7.2
Now that we have all the dependencies ready, you can install the Postal.
Install Postal
Postal should run as its own isolated user. Run the following command to create a new user.
useradd -r -m -d /opt/postal -s /bin/bash postal
The above command will create a new user with username postal and the home directory is set to /opt/postal.
Allow Ruby to listen to privileged ports by running the following command.
setcap 'cap_net_bind_service=+ep' /usr/local/rvm/rubies/ruby-2.4.0/bin/ruby
Now that everything is ready, download the latest Postal archive and extract the archive as the Postal user using the following command.
wget https://postal.atech.media/packages/stable/latest.tgz -O - | sudo -u postal tar zxpv -C /opt/postal
Now create a symbolic link to the Postal binary file by running the following command.
ln -s /opt/postal/bin/postal /usr/bin/postal
Now you can interact with your Postal server from any directory. For running next commands you will need to login to shell as postal user.
su - postal
Now you will need to install all the ruby dependencies required to run the application.
postal bundle /opt/postal/vendor/bundle
Once the dependencies have been installed, you will need to generate the default configuration files.
postal initialize-config
The above command will generate the required configuration for your Postal installation including various keys and certificates. This will also generate the default postal.yml configuration file. You should get following output.
postal@ubuntu:~$ postal initialize-config
Created example config file at /opt/postal/config/postal.yml
Created new private key for Let's Encrypt
Created new signing key for DKIM & HTTP requests
Created new private key for default fast server TLS connections
Created new self signed certificate for default fast server TLS connections
Now you will need to configure few options in postal.yml configuration.
nano /opt/postal/config/postal.yml
Find the following line:
web:
  # The host that the management interface will be available on
  host: postal.example.com
Change the hostname to your actual domain name. Further, find the following lines.
main_db:
  # Specify the connection details for your MySQL database
  host: 127.0.0.1
  username: postal
  password: p0stalpassw0rd
  database: postal

message_db:
  # Specify the connection details for your MySQL server that will be house the
  # message databases for mail servers.
  host: 127.0.0.1
  username: postal
  password: p0stalpassw0rd
  prefix: postal
Change the username, password and database name according to the database you have created. Further, find these lines:
rabbitmq:
  # Specify the connection details for your RabbitMQ server.
  host: 127.0.0.1
  username: postal
  password: StrongPassword
  vhost: /postal
Change the above configuration according to the vhost and user created for RabbitMQ. Next, find the DNS configurations.
dns:
  # Specifies the DNS record that you have configured. Refer to the documentation at
  # https://github.com/atech/postal/wiki/Domains-&-DNS-Configuration for further
  # information about these.
  mx_records:
    - mx.postal.example.com
  smtp_server_hostname: postal.example.com
  spf_include: spf.postal.example.com
  return_path: rp.postal.example.com
  route_domain: routes.postal.example.com
  track_domain: track.postal.example.com
Change the domains above with the actual domains you wish to use with the mail server.
Save the file and exit from the editor. Now, Initialize the database and other assets by running:
postal initialize
Create the Postal Administrator user by running the following command.
postal make-user
The above command will ask you for the email address, username and password. The above command will generate the following output.
postal@ubuntu:~$ postal make-user
Postal User Creator
Enter the information required to create a new Postal user.
This tool is usually only used to create your initial admin user.

E-Mail Address      : [email protected]
First Name          : Liptan
Last Name           : Biswas
Initial Password:   : **************

User has been created with e-mail address [email protected]
The command line setup of Postal is now finished, you can start the server using the following command.
postal start
To check if the services are started correctly, run the following command.
postal status
You should get following output.
postal@ubuntu:~$ postal status
Procodile Version   1.0.17
Application Root    /opt/postal
Supervisor PID      5319
Started             2017-07-21 07:26:19 +0000

|| web
|| Quantity            1
|| Command             bundle exec puma -C config/puma.rb
|| Respawning          5 every 3600 seconds
|| Restart mode        usr1
|| Log path            none specified
|| Address/Port        none
|| => web.1            Running      07:26        pid:5325     respawns:0      port:-        tag:-

|| worker
|| Quantity            1
|| Command             bundle exec ruby script/worker.rb
|| Respawning          5 every 3600 seconds
|| Restart mode        start-term
|| Log path            none specified
|| Address/Port        none
|| => worker.1         Running      07:26        pid:5327     respawns:0      port:-        tag:-

|| cron
|| Quantity            1
|| Command             bundle exec rake postal:cron
|| Respawning          5 every 3600 seconds
|| Restart mode        term-start
|| Log path            none specified
|| Address/Port        none
|| => cron.1           Running      07:26        pid:5329     respawns:0      port:-        tag:-

|| smtp
|| Quantity            1
|| Command             bundle exec rake postal:smtp_server
|| Respawning          5 every 3600 seconds
|| Restart mode        usr1
|| Log path            none specified
|| Address/Port        none
|| => smtp.1           Running      07:26        pid:5332     respawns:0      port:-        tag:-

|| requeuer
|| Quantity            1
|| Command             bundle exec rake postal:requeuer
|| Respawning          5 every 3600 seconds
|| Restart mode        term-start
|| Log path            none specified
|| Address/Port        none
|| => requeuer.1       Running      07:26        pid:5334     respawns:0      port:-        tag:-
To stop Postal, you can always run the following command.
postal stop
Configuring Nginx as Reverse Proxy
For security reasons, Postal web interface and API should be behind any production web server such as Apache or Nginx. In this tutorial, we will install and configure Nginx as a reverse proxy.
Install Nginx web server by running the following command.
apt -y install nginx
It is recommended to use SSL to access Nginx. You can either use a self-signed certificate or Let’s Encrypt free SSL certificate or a commercial certificate. In this tutorial, we will use Let’s Encrypt free SSL.
Install Let’s Encrypt client also known as certbot by running the following command.
apt -y install certbot
Once the installation finishes, run the following command to obtain certificates from Let’s Encrypt certificate authority. Make sure that the domain name is pointed towards your server as certbot will check the domain authority before providing the certificates. Replace mail.example.com with your actual domain name.
certbot certonly --standalone -d mail.example.com
Once certificates are generated, they will be stored in the /etc/letsencrypt/live/mail.example.com.
Let’s Encrypt SSL expires in 90 days, so it is recommended to set an automatic renewal for your certificates. Run the following command to open your crontab file.
crontab -e
Enter the following line into the crontab file.
30 1 * * 1 /usr/bin/certbot renew >> /var/log/le-renew.log
The above cron job will automatically run every Monday at 1:30 AM and if your certificates are due for expiry, it will automatically renew them.
Now create a new server block for your website by running the following command.
nano /etc/nginx/conf.d/mail.example.com.conf
Populate the file with the following content.
server {
    listen [::]:80;
    listen 0.0.0.0:80;
    server_name mail.example.com;
    return 301 https://$host$request_uri;
}

server {
    listen [::]:443 ssl;
    listen 0.0.0.0:443 ssl;
    root /opt/postal/public;
    server_name mail.example.com;
    ssl_certificate      /etc/letsencrypt/live/mail.example.com/fullchain.pem;
    ssl_certificate_key  /etc/letsencrypt/live/mail.example.com/privkey.pem;
    ssl_protocols TLSv1.2 TLSv1.1 TLSv1;
    ssl_prefer_server_ciphers on;
    ssl_ciphers EECDH+ECDSA+AESGCM:EECDH+aRSA+AESGCM:EECDH+ECDSA+SHA512:EECDH+ECDSA+SHA384:EECDH+ECDSA+SHA256:ECDH+AESGCM:ECDH+AES256:DH+AESGCM:DH+AES256:RSA+AESGCM:!aNULL:!eNULL:!LOW:!RC4:!3DES:!MD5:!EXP:!PSK:!SRP:!DSS;

    location / {
       client_max_body_size 50M;
       try_files $uri $uri/index.html $uri.html @puma;
    }

    location /assets {
       add_header Cache-Control max-age=3600;
    }

    location @puma {
        proxy_set_header X-Real-IP  $remote_addr;
        proxy_set_header Host $host;
        proxy_set_header X-Forwarded-For $proxy_add_x_forwarded_for;
        proxy_set_header X-Forwarded-Proto https;
        proxy_pass http://127.0.0.1:5000;
    }
}
Save the file and exit from the editor. Now restart nginx web server by running.
systemctl restart nginx
To enable nginx to automatically start at boot time, run the following command.
systemctl enable nginx
You can now access Postal on by browsing the following web site through your favorite web browser.
https://mail.example.com
Configuring Postal
Once you browse the above site, you will see the following interface.
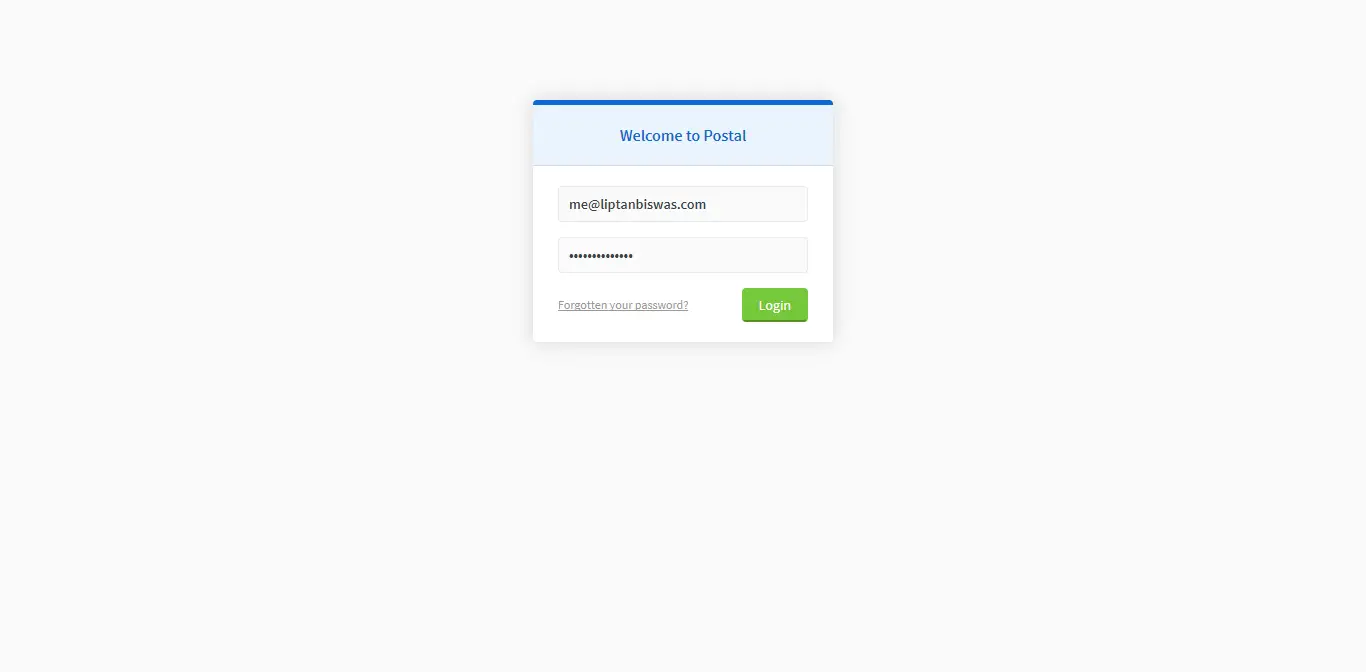
Enter the email address and password of the user which you have created earlier. Once you are logged in, you will be asked to create a new organization.
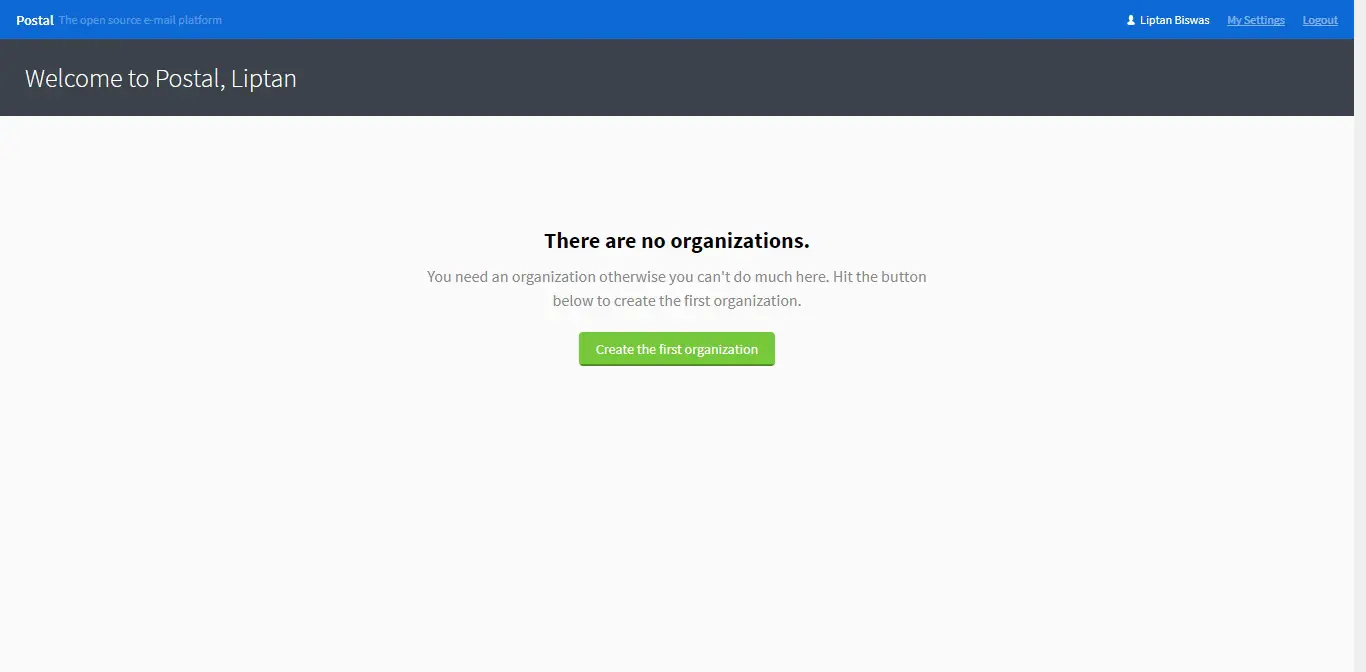
Provide the name of the organization. You can choose to use the auto generated short name, or you could specify one yourself. The short names are used as username while authenticating with SMTP server. It should only contain letters, numbers, and hyphen.

Once the organization is created, you will be asked to create a new mail server.
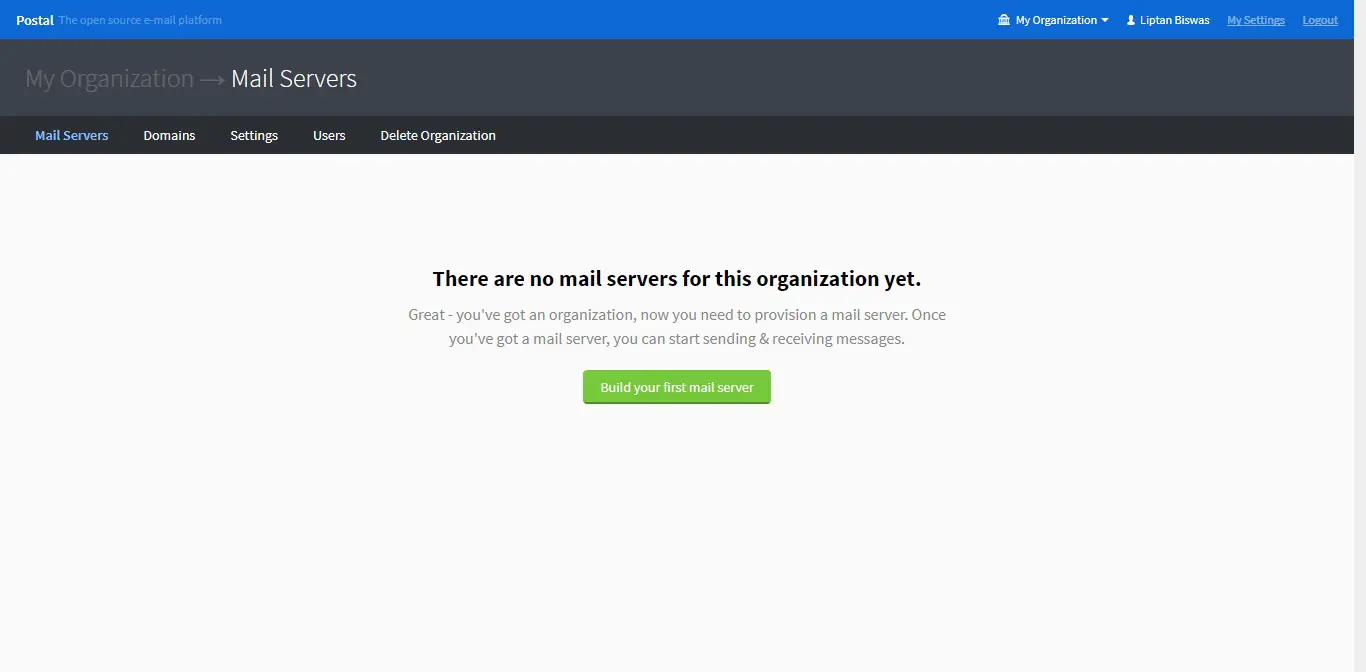
Provide the name, short name, and mode of the email server. In Live mode, all emails are routed and delivered normally but in development mode, they are only visible in the web interface.

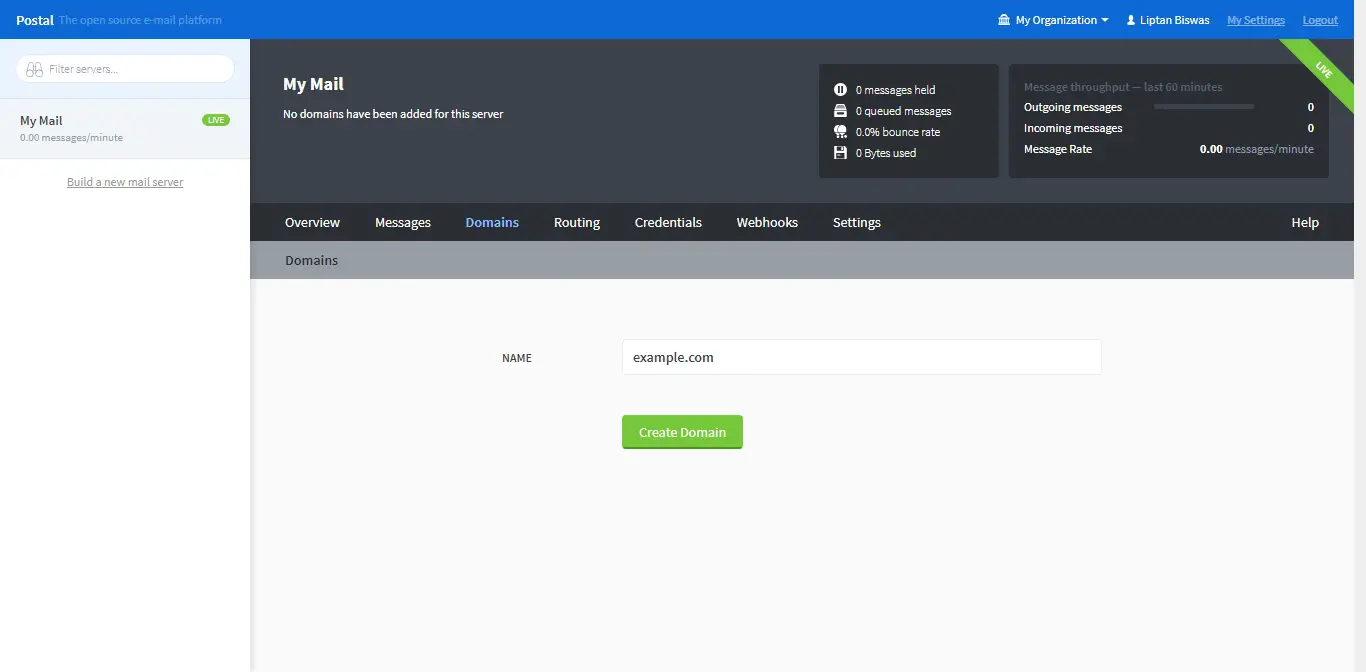
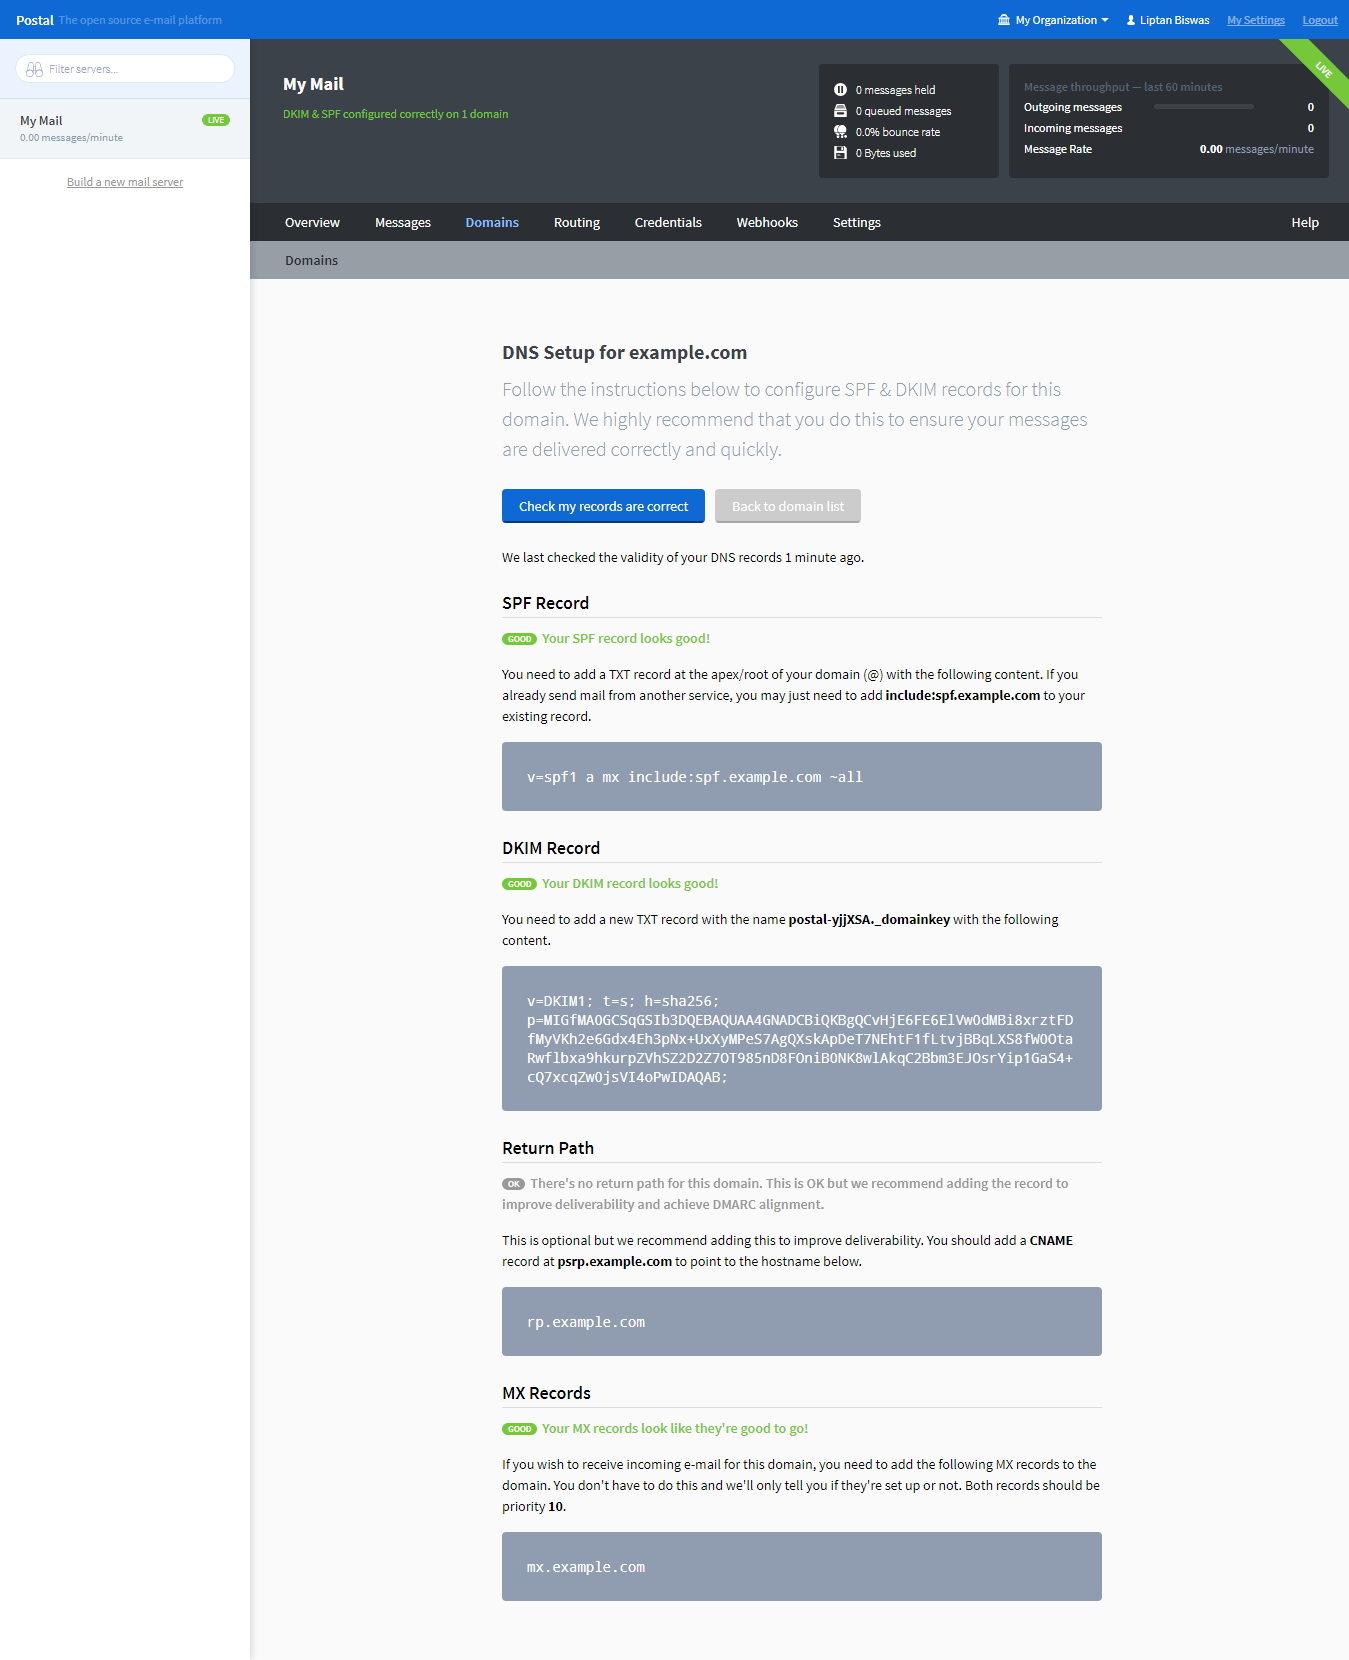
Once you have added the mail server, you will need to add a new domain in the mail server. Click on Domains tab and create a new domain name.
Once you have added the domain name, you will need to configure the DNS for the domain. You will need to add two TXT records for SPF and DKIM. You will also need to add a CNAME record and MX record for return path and mail delivery. Once you configure the DNS, click Check my records are correct button to verify the DNS configuration.
Now you will need to create an SMTP credentials for sending and receiving emails.
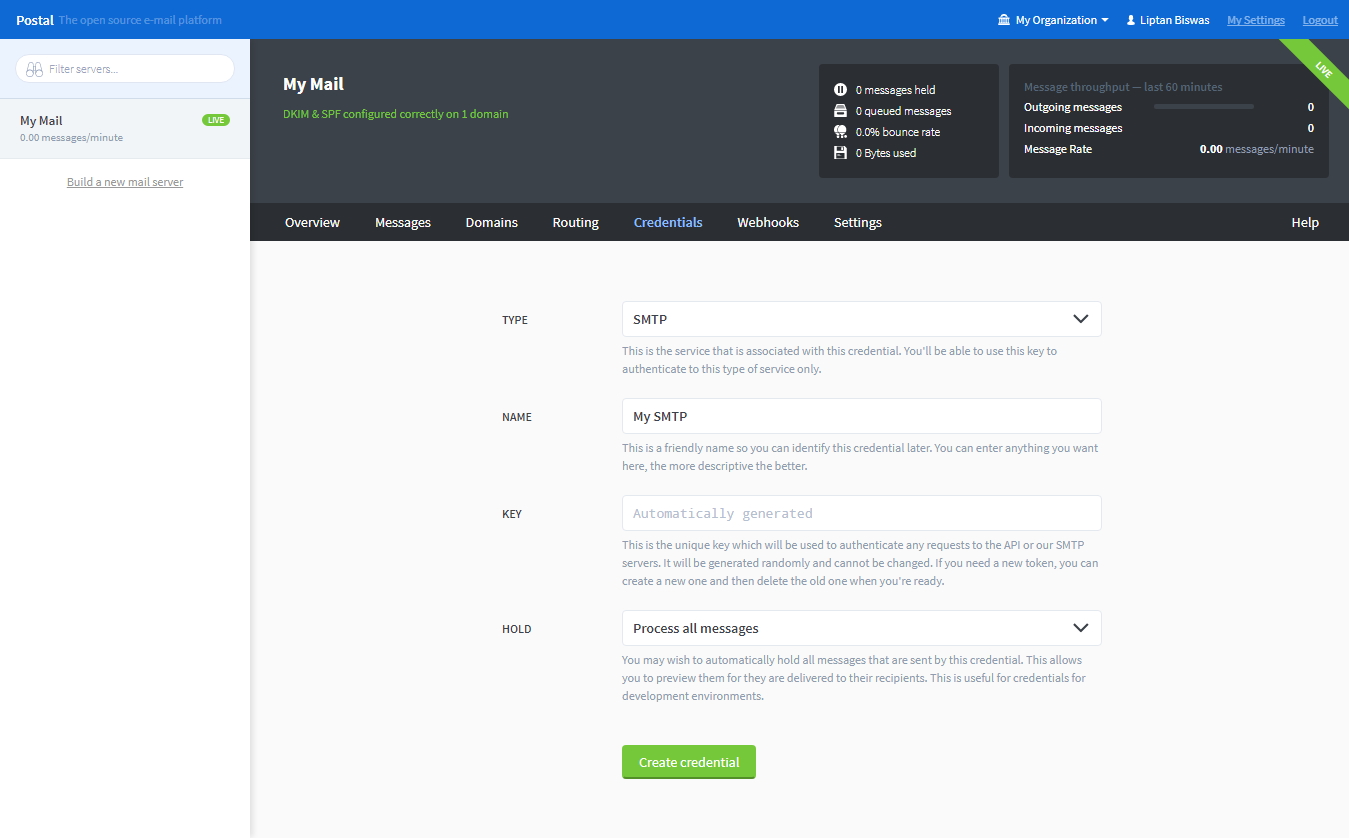
Choose the type as SMTP or API. Provide the name for SMTP credentials, choose how you wish to handle the email address.
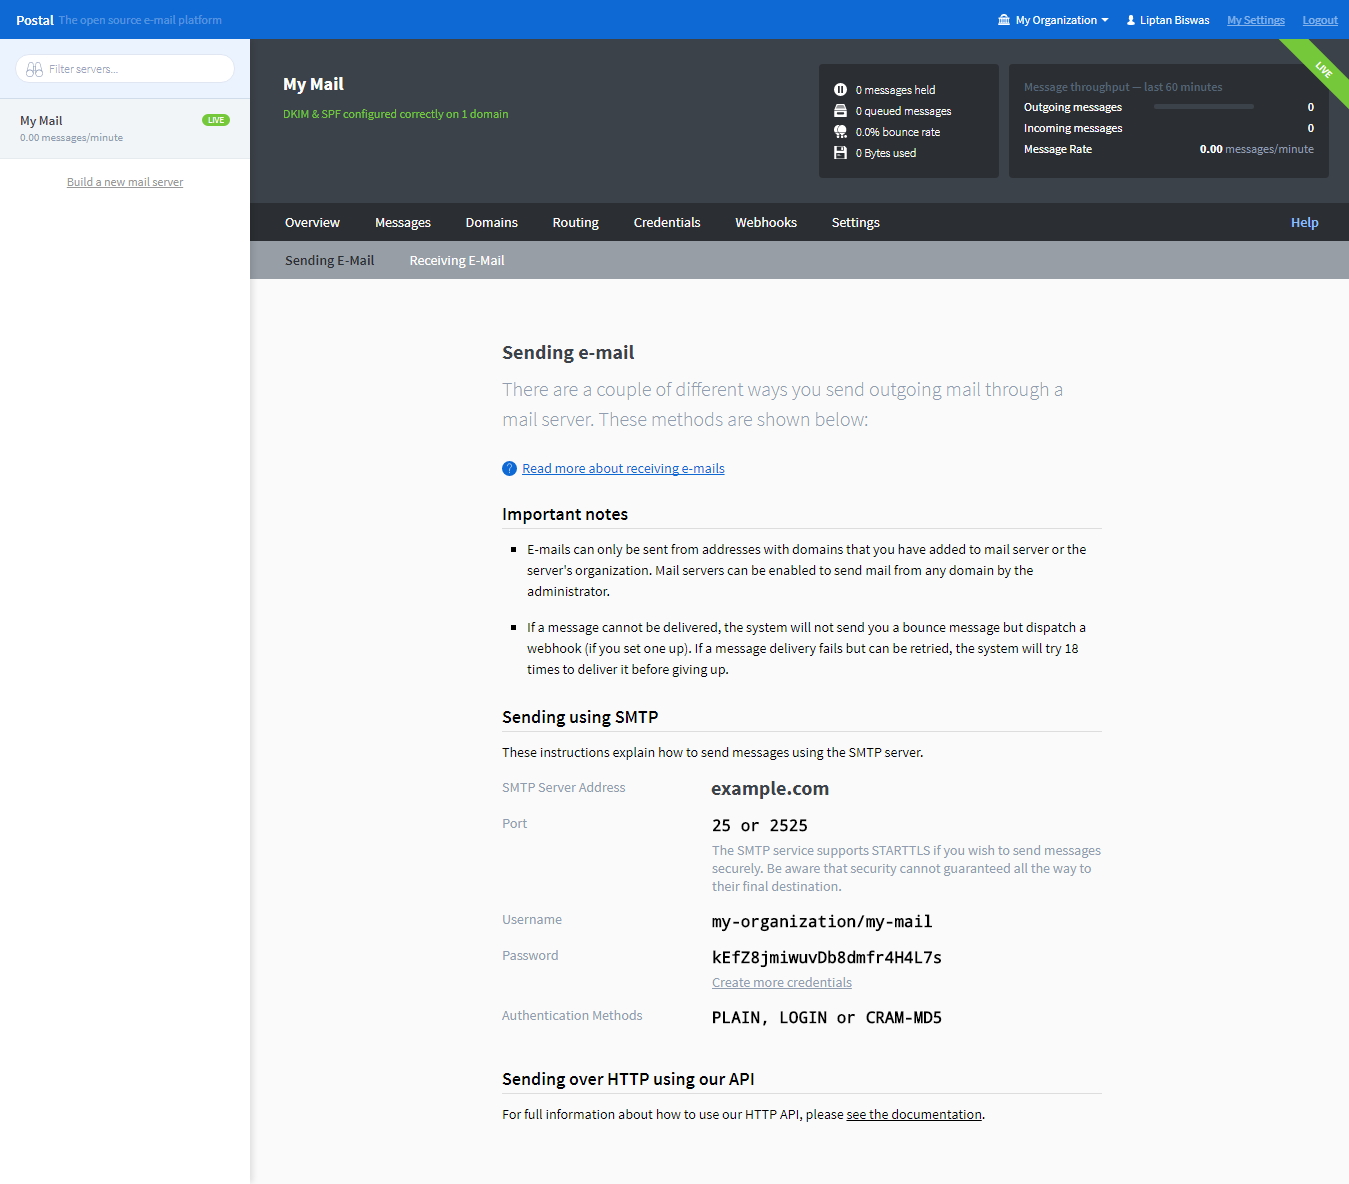
Once done, you can come back to Overview tab and you will see the information needed to send or receive the email address.
Conclusion
In this tutorial, we have successfully setup a full featured mail server using Postal on Ubuntu 17.04. You can use the mail server to send and receive the emails of your organization.

