Install Wordpress on LAMP in Debian 9
This tutorial will show you on how to install and configure the latest version WordPress on top of a LAMP stack in Debian 9 - Stretch. Wordpress, without a doubt, is one of the most popular open-source Content Management System or CMS used in these days for internet publishing, which powers more than 60 million websites worldwide, whether small blogging sites or notable huge name brands. Based on PHP and MySQL engine, Wordpress is often associated with LAMP collection, either installed on dedicated servers or virtual private servers or on shared web-hosting providers. LAMP acronym describes a collection of software, aka software bundle, which usually consists of Linux Open Source kernel, regardless of the chosen distribution, Apache HTTP server, which is one of the most popular open-source web server in internet due to its stability, flexibility and performance, PHP server-side interpreted programming language and MariaDB relational database management system (RDBMS), which one of the most popular database software, forked and simultaneously developed by the open-source community from original MySQL.
REQUIREMENTS:
- A clean installation of Debian 9 operating system on a virtual private server or a virtual machine or directly on self-dedicated bare-metal machine.
- SSH remote access in case of a VPS or a remote server or direct console access
- At least a static IP Address for a network interface configured on the server
- In case the webpage should be publicly available in internet you would need a registered public domain name with proper DNS records configured. During this tutorial, we’ll be using the linuxbox.ml as the example domain and a static IP address from private space, in NAT, behind the main router. The domain will be accessible from the internet by port forwarding the Apache 80 and 443 ports from the router side to internal self-hosted virtual machine LAN.
Part One – Install LAMP software bundle
- The first thing you want to do before starting to install all LAMP components is to login to Debian 9 server and perform an up-to-date procedure for all system components, such as kernel upgrades, package updates or security patches, by issuing the following commands with root privileges.
apt-get update
apt-get upgrade
apt-get dist-upgrade
- On the next step, you should setup the name of your machine by replacing the hostname variable with your own descriptive name by running the below command. Be aware that you might need to reboot the system in order to apply the new hostname accordingly.
hostnamectl set-hostname hostname.yourdomain.com
- You should also install the following utilities which will come in handy later for various troubleshooting problems.
apt install net-tools sudo wget curl bash-completion
- After the machine hostname has been applied, login again with root privileges and install Apache HTTP server, which is, by default, pre-compiled into a binary package and provided by Debian 9 repositories.
apt install apache2
- Next, install the latest version of PHP language interpreter and all required modules needed for Apache web server in order to deploy Wordpress CMS by issuing the following command.
apt install libapache-mod-php7.0 php7.0 php7.0-gd php7.0-xml php7.0-curl php7.0-mbstring php7.0-mcrypt php7.0-xmlrpc
- The last component missing now in order for LAMP stack to be complete is MariaDB database server. Execute the following command to install MariaDB server alongside with PHP module required to access the database from Apache HTTP server.
apt install php7.0-mysql mariadb-server mariadb-client
After MariaDB database has been installed, start the daemon and secure the database my running mysql_secure_installation script as illustrated in the below excerpt. Mainly answer with yes on all question the script prompts you. Also, make sure you choose a strong password for root account. Be aware that MySQL root account is not identical will Linux root account. The first is used only to manage MariaDB database and the second is the superuser account in every Linux system. These accounts never overlap in a system.
systemctl start mariadb
mysql_secure_installation
NOTE: RUNNING ALL PARTS OF THIS SCRIPT IS RECOMMENDED FOR ALL MariaDB
      SERVERS IN PRODUCTION USE!  PLEASE READ EACH STEP CAREFULLY!

In order to log into MariaDB to secure it, we'll need the current
password for the root user.  If you've just installed MariaDB, and
you haven't set the root password yet, the password will be blank,
so you should just press enter here.

Enter current password for root (enter for none):
OK, successfully used password, moving on...

Setting the root password ensures that nobody can log into the MariaDB
root user without the proper authorisation.
Set root password? [Y/n] y
New password:
Re-enter new password:
Password updated successfully!
Reloading privilege tables..
 ... Success!
By default, a MariaDB installation has an anonymous user, allowing anyone
to log into MariaDB without having to have a user account created for
them.  This is intended only for testing, and to make the installation
go a bit smoother.  You should remove them before moving into a
production environment.
Remove anonymous users? [Y/n] y
 ... Success!
Normally, root should only be allowed to connect from 'localhost'.  This
ensures that someone cannot guess at the root password from the network.
Disallow root login remotely? [Y/n] y
 ... Success!
By default, MariaDB comes with a database named 'test' that anyone can
access.  This is also intended only for testing, and should be removed
before moving into a production environment.
Remove test database and access to it? [Y/n] y
 - Dropping test database...
 ... Success!
 - Removing privileges on test database...
 ... Success!
Reloading the privilege tables will ensure that all changes made so far
will take effect immediately.
Reload privilege tables now? [Y/n] y
 ... Success!
Cleaning up...
All done!  If you've completed all of the above steps, your MariaDB
installation should now be secure.
Thanks for using MariaDB!
- We’re not done with securing MariaDB database yet. By default, you can log in to MariaDB from localhost with the database root account without being asked for a password. To prevent possible security issues, login to the database with root user and issue the following commands.
mysql –u root
MariaDB> use mysql;
MariaDB> update user set plugin='' where User='root';
MariaDB> flush privileges;
MariaDB> quit
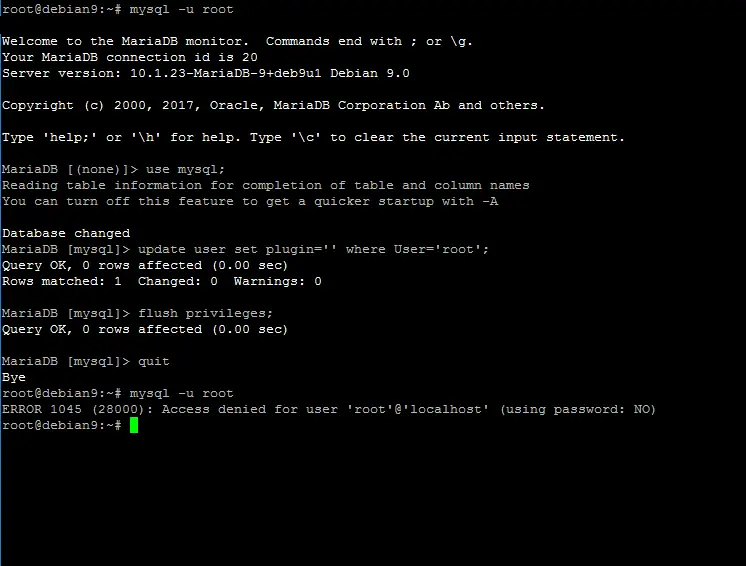
Now, test the database by trying to login with root account without the password. You should be denied access to MariaDB database.
- On the next step, we’ll enable and configure TLS and rewrite modules for Apache web server, which by default are disabled. Run the below commands to enable both modules.
a2enmod rewrite ssl
a2ensite default-ssl.conf
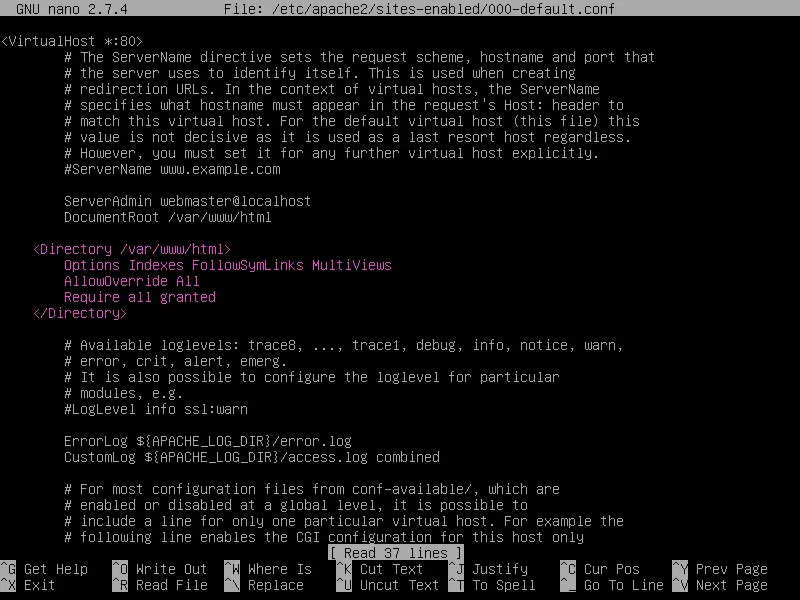
- Then, open Apache configuration files for both enabled sites and add the following block below the DocumentRoot directive as illustrated in the following screenshot.
nano /etc/apache2/sites-enabled/000-default.conf
nano /etc/apache2/sites-enabled/default-ssl.conf
On both configuration file edited one at a time add the following block of code:
    <Directory /var/www/html>
       Options Indexes FollowSymLinks MultiViews
       AllowOverride All
       Require all granted
    </Directory>
- In apache default-ssl.conf TLS configuration file you can also add the below content, if not existing, in order to forge the security of Apache SSL protocol. These lines of code should fix common SSL vulnerabilities.
SSLProtocol all -SSLv2 -SSLv3
# Add SSL Cipher in one long line
SSLCipherSuite          ECDHE-RSA-AES128-GCM-SHA256:ECDHE-ECDSA-AES128-GCM-SHA256:ECDHE-RSA-AES256-GCM-SHA384:ECDHE-ECDSA-AES256-GCM-SHA384:DHE-RSA-AES128-GCM-SHA256:DHE-DSS-AES128-GCM-SHA256:kEDH+AESGCM:ECDHE-RSA-AES128-SHA256:ECDHE-ECDSA-AES128-SHA256:ECDHE-RSA-AES128-SHA:ECDHE-ECDSA-AES128-SHA:ECDHE-RSA-AES256-SHA384:ECDHE-ECDSA-AES256-SHA384:ECDHE-RSA-AES256-SHA:ECDHE-ECDSA-AES256-SHA:DHE-RSA-AES128-SHA256:DHE-RSA-AES128-SHA:DHE-DSS-AES128-SHA256:DHE-RSA-AES256-SHA256:DHE-DSS-AES256-SHA:DHE-RSA-AES256-SHA:AES128-GCM-SHA256:AES256-GCM-SHA384:AES128-SHA256:AES256-SHA256:AES128-SHA:AES256-SHA:AES:CAMELLIA:DES-CBC3-SHA:!aNULL:!eNULL:!EXPORT:!DES:!RC4:!MD5:!PSK:!aECDH:!EDH-DSS-DES-CBC3-SHA:!EDH-RSA-DES-CBC3-SHA:!KRB5-DES-CBC3-SHA
SSLHonorCipherOrder     on
SSLOptions +StrictRequire

Header always set Strict-Transport-Security "max-age=63072000; includeSubdomains"
Header always set X-Frame-Options DENY
Header always set X-Content-Type-Options nosniff
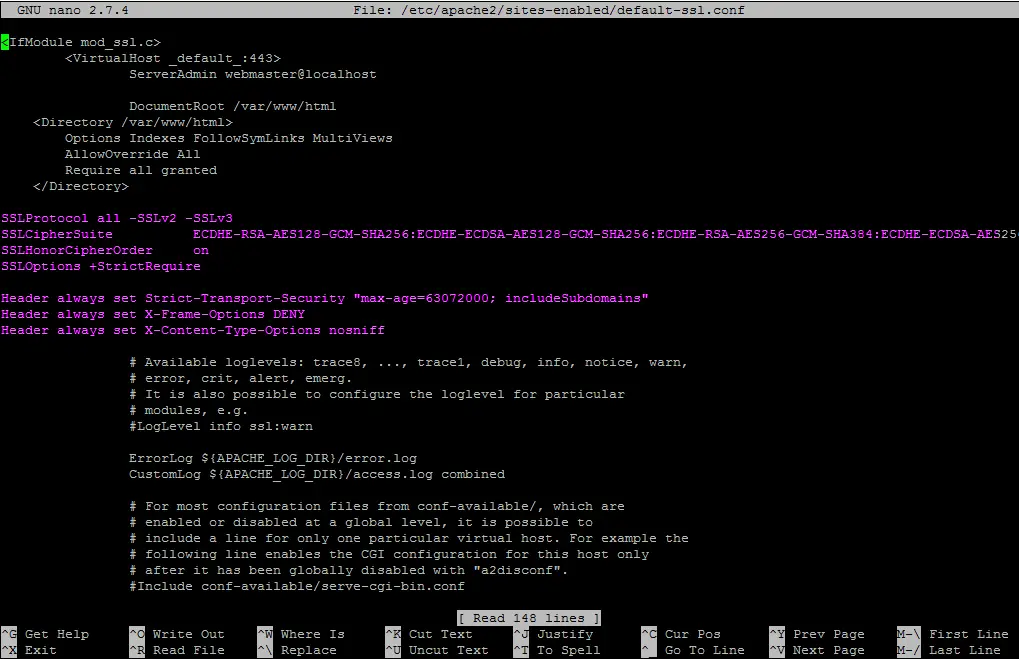
If the lines illustrated in the above excerpt already exist in Apache SSL configuration file, make sure you modify them to look as described above. In order to apply these settings, enable Apache headers module and restart the service by executing the following commands:
a2enmod headers
systemctl restart apache2.service
For a production website it should be mandatory to enable Apache TLS module because WordPress CMS generates mostly dynamic content via PHP gateway and also handles the authentication process for its internal users. Using TLS technology guarantees that the transferred information is encrypted at both ends and that the connection is secured. A third-party or a man-in-the-middle can intercept traffic but can not decrypt the content, because the information is not delivered in plain text.
- After you’ve made all the above changes, test Apache configuration in order to detect potential syntax errors and if everything is ok restart LAMP daemons in order to reflect all changes made so far and enable the services system-wide by issuing the following commands.
apachectl –t
systemctl restart apache2.service mariadb.service
systemctl enable apache2.service mariadb.service
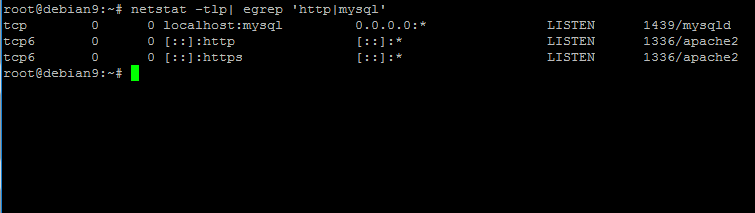
- Finally, check if Apache and MariaDB services have opened ports in listening state by issuing netstat command and filter the output using egrep By now, Apache web server should have ports 80 and 443 (corresponding to http and https protocols) generally exposed and MariaDB should be only binding on localhost:3306 socket. Use the -n flag against netstat command to supress displaying service names.
netstat -tlp| egrep 'http|mysql'
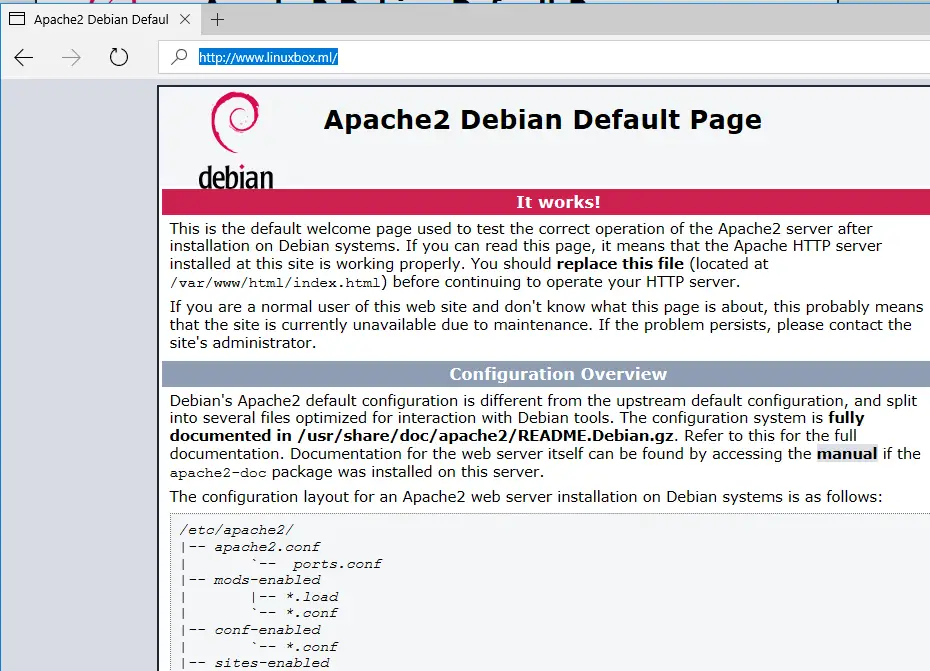
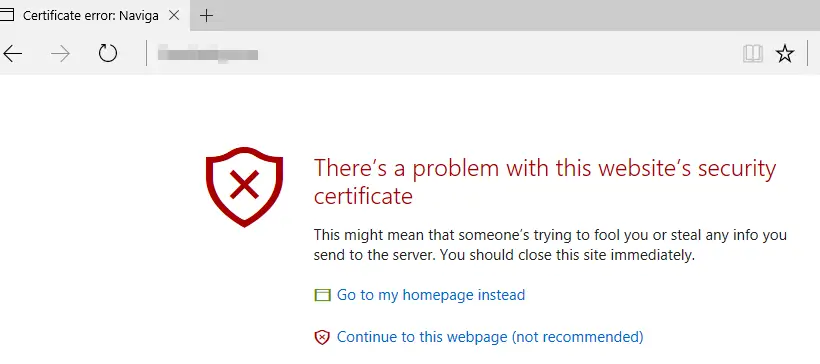
- To make sure your web server is accessible from internet via HTTP and HTTPS protocols open a browser and navigate to your domain name. Browsing via HTTPS protocol, a certificate error will be displayed in the browser. This is because Apache default TLS configuration file is configured to use Self-Signed Certificates. You should accept the TLS error and continue navigating to the default web page as illustrated below.
In case you cannot visit your domain default web page from internet you should first verify if some firewall rules in the system are blocking the requests or make sure the proper ports on the router are forwarded into your internal LAN in case the server sits behind an NAT-ed network. You might also want to check the DNS records in your domain registrar panel and make sure they point to your WAN IP and if the records finished propagating on the internet.
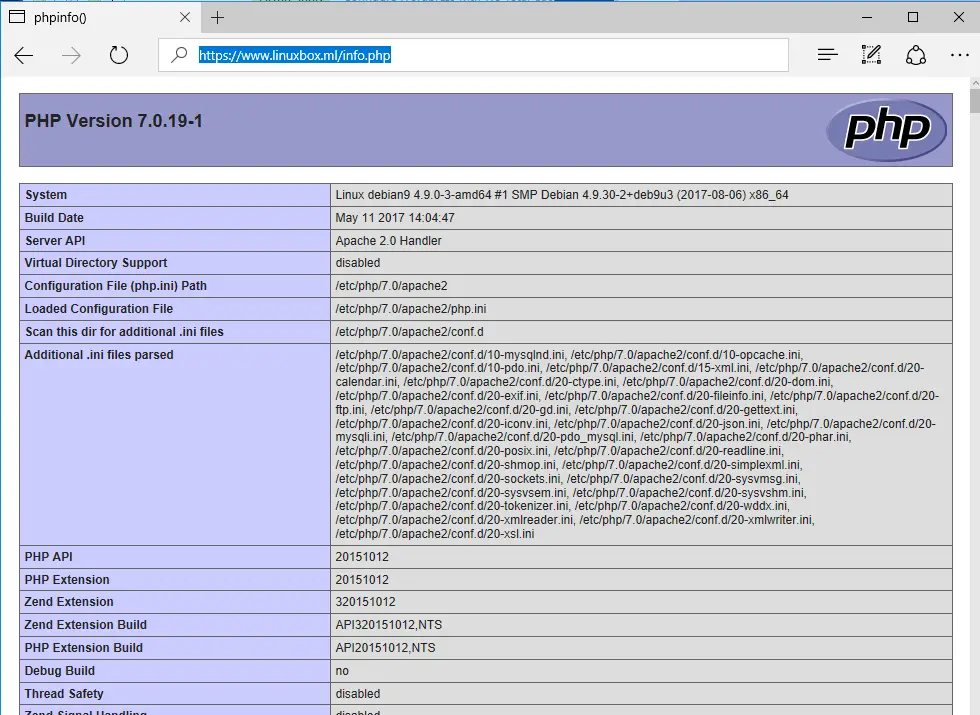
- In order to test if PHP is working as expected on the server side, create a PHP php in /var/www/html/ system path, which is the default web document root path of Apache web server, issuing the below command and navigate to the following URI from browser to get the result: http://www.yourdomain.com/info.php
echo '<?php phpinfo(); ?>' > /var/www/html/info.php
PART TWO – Install Wordpress
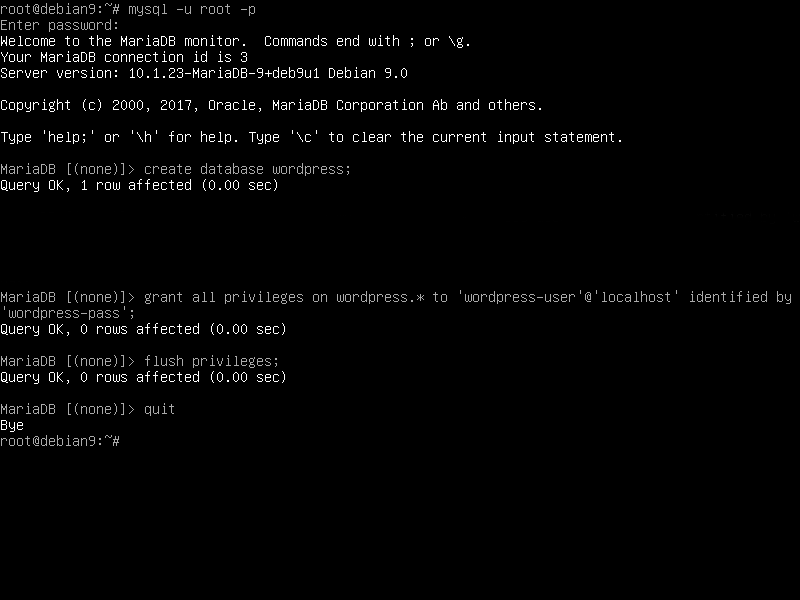
- Now that the LAMP stack is fully configured, the installation of Wordpress CMS is relatively straightforward. First, login to MariaDB database and create an installation database for Wordpress and a user with the proper password for installing and managing Wordpress CMS, by issuing the below commands. Feel free to replace the database name and database credentials to match your own requirements.
mysql –u root -p
CREATE DATABASE wordpress;
GRANT ALL PRIVILEGES ON wordpress.* TO 'wordpress-user'@'localhost' IDENTIFIED BY 'wordpress-pass';
FLUSH PRIVILEGES;
- Next, download the latest Wordpress tarball from the official website using wget utility and extract the compressed archive with tar utility. Copy the installation files to Apache web server document root path by issuing the below commands. Also, make sure you remove the default index.html webpage.
wget http://wordpress.org/latest.tar.gz
tar xfz latest.tar.gz
cp -rf wordpress/* /var/www/html/
rm /var/www/html/index.html

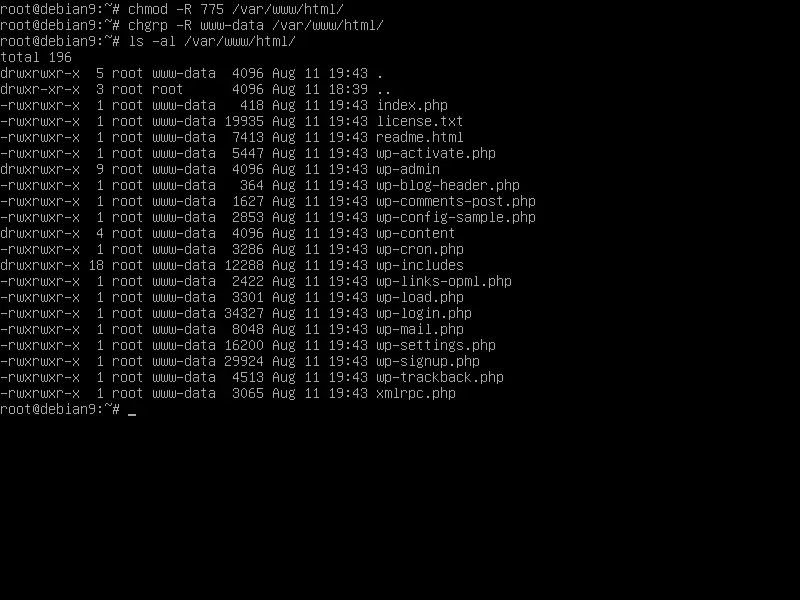
- Modify the permissions of Apache webroot path as described below in order to grant web server www-data group full write permissions to the installation directory. This configuration will allow Apache web server to create or modify files and directories under this specific system path. The most important ones would be uploads directory and .htaccess file, which can be used to control and extend Apache functionality.
chmod –R 775 /var/www/html/
chgrp –R www-data /var/www/html/
ls –al /var/www/html
- Now, that everything is in place, let's start to install Wordpress.The installation process will be performed from the browser. Open a browser and visit your domain via HTTPS protocol. On the first screen of the installation hit on Let’s go button to start the installation.

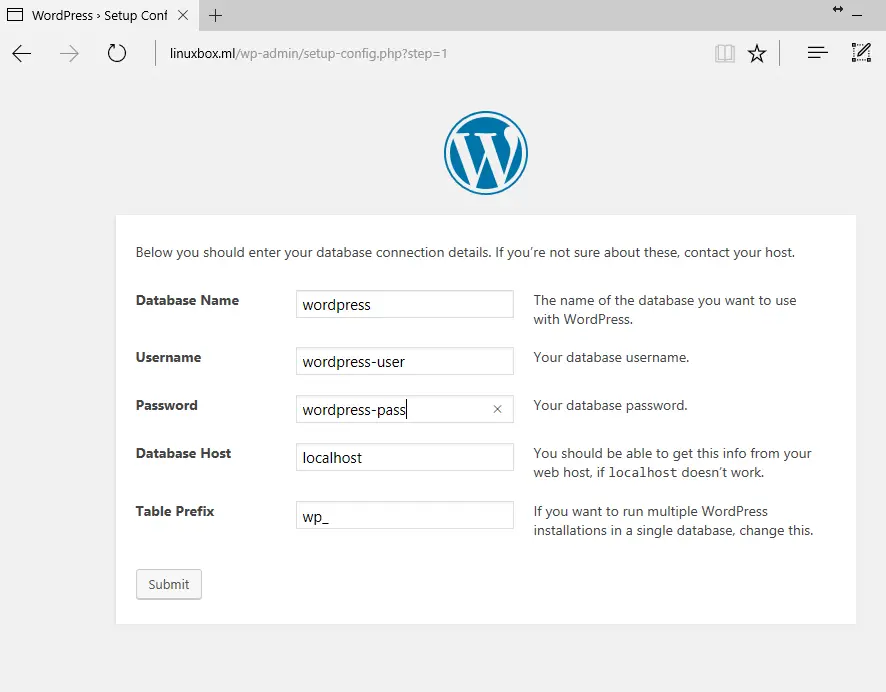
- In the next installation screen, add the name of the database, the database access credentials and the database host you’ve created earlier for Wordpress installation and hit Submit button to continue. The configuration of the database will be saved in /var/www/html/wp-config.php You can manually modify the file at a later date for special Wordpress purposes.
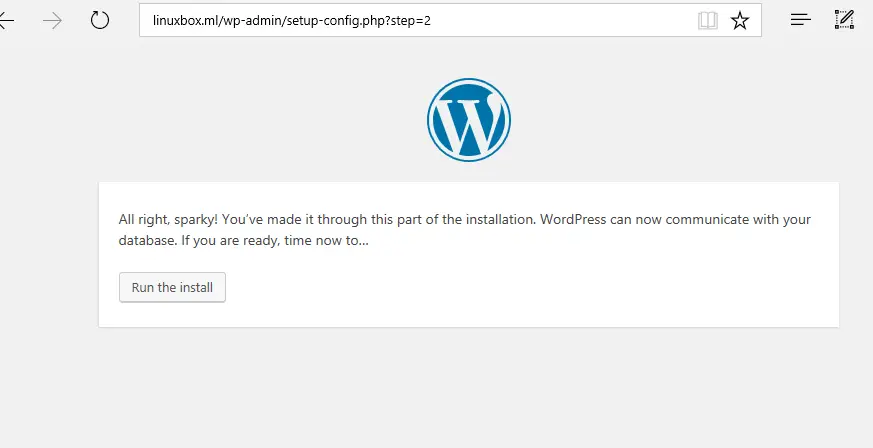
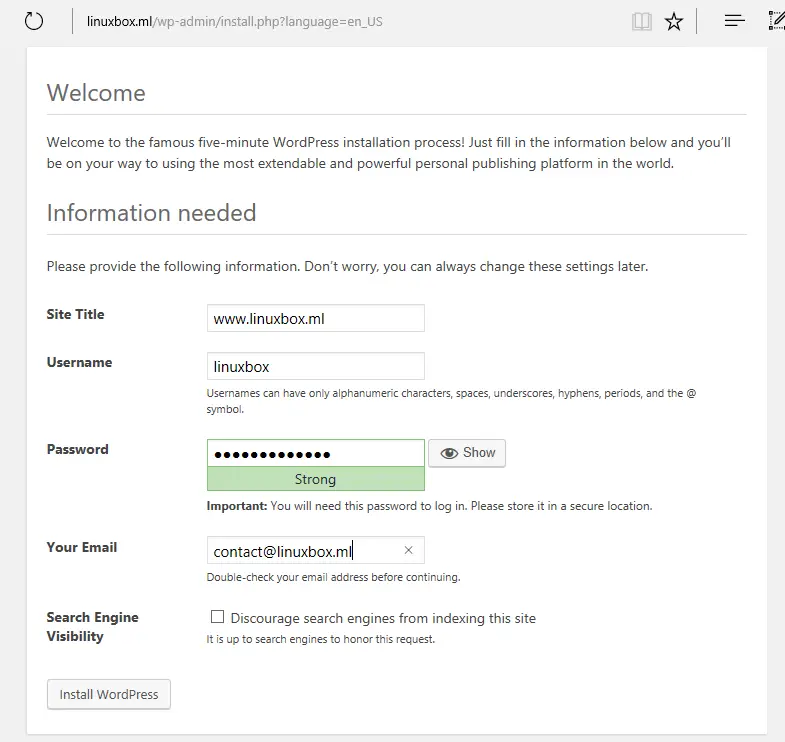
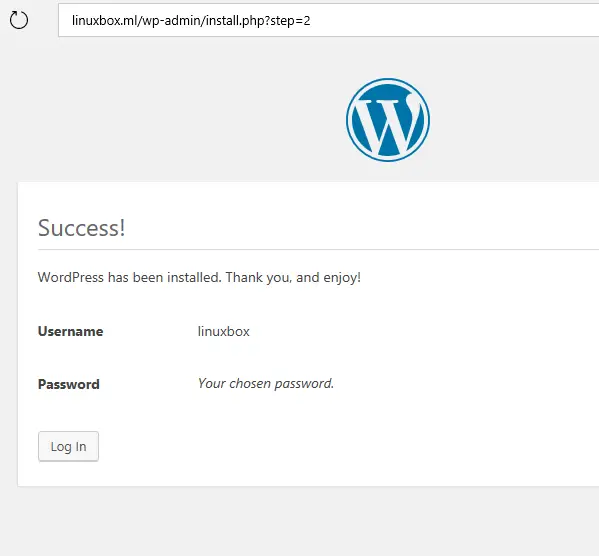
- On the next screen click on Run the install button and fill your website title, the website admin credentials and email address. A strong password should be automatically generated by the installation scripts. You can choose to save this password or provide your own strong password. When you’ve finished, hit Install Wordpress button to complete the installation process.
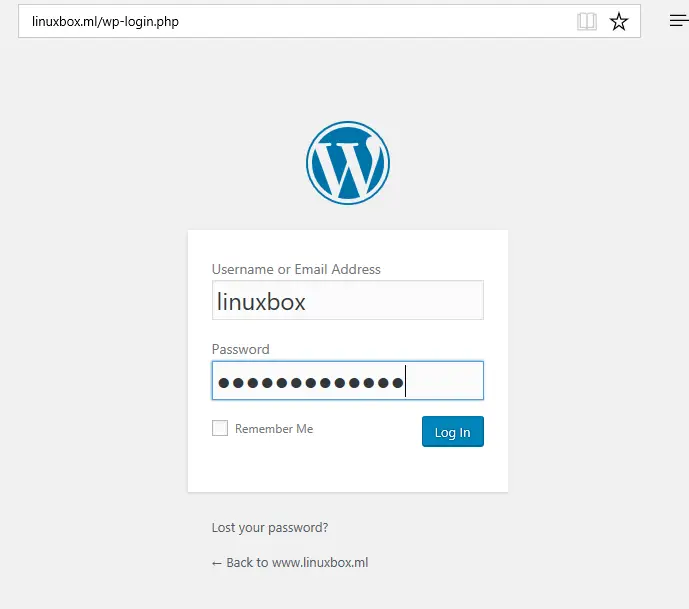
- Finally, after the installation successfully completes, log in to Wordpress dashboard with the credentials created during the installation process and start managing your own website.
Congratulations! You’ve successfully installed the latest version of Wordpress CMS on top of LAMP software bundle in Debian 9, codename Stretch.

