Installing a VPN with Tinc on Ubuntu 16.04 LTS
This tutorial exists for these OS versions
- Ubuntu 22.04 (Jammy Jellyfish)
- Ubuntu 16.04 (Xenial Xerus)
On this page
A Virtual Private Network (VPN) is a secure private network that operates over a larger public network such as the internet. VPNs have become increasingly popular in recent years, largely because they offer increased security and privacy without the need for setting up expensive and complex new hardware. They also offer several other advantages, including reduced networking and support costs.
VPNs work by creating an encrypted tunnel through a public network, and using this to securely send data between servers and terminals. These connections can be encrypted in a variety of ways, and there are many different VPN clients and daemons to suit your architecture, budget, and level of experience.
Tinc is one such solution (1). An open-source VPN daemon, it is now available for a wide range of platforms, and has several advantages over similar VPN clients. It offers secure and reliable encryption, optional compression, and is easily expandable as your network grows. The automatic full mesh routing means that VPN traffic is always (whenever possible) sent directly to the destination machine, without undergoing intermediate transfers, and this greatly improves security by limiting the possibility of data theft (3). In addition, because the Tinc VPN appears to the IP level network code as a normal network device, after setting up a Tinc VPN there is no need to adapt existing software. This makes the Tinc VPN inherently scalable.
The only minor issue with Tinc is that some people have found it a little tricky to set up. If that sounds like you, never fear – today I’ll take you through a (more or less) hassle-free way of getting a Tinc VPN up and running on your servers.
Pre-Requisites
To follow this tutorial fully, you are going to need at least three Ubuntu 16.04 servers, and root access on each machine. If you don’t have this or are not sure what this means, this tutorial is not for you – you should first check out how to set up a server using Ubuntu (2).
If you are building a server system from scratch, you first need to think about how your machines are going to communicate with each other. In this tutorial, I’m going to use the variable names that I think most people would choose, but be aware that you might need to adapt some of the variable names to suit your own setup.
If you want to follow this tutorial exactly, you are going to first need to set up two VPSs in the same datacenter, and then make a third VPS in a second data center. My data centers are called NYC2, which has the two VPSs, and AMS2, which has the third one. These VPSs are called the following:
externalnyc – All of our VPN nodes are going to connect to this server, which means that it must stay connected and available to ensure the network functions properly. If you eventually want to add extra servers to your set up, they will need to be set up in the same way as externalnyc.
internalnyc – This VPS connects to the externalnyc VPN node using a private network interface.
ams1 – This is our public VPN connection. It connects to externalnyc using the public internet.
Goal
What we want to achieve is the following:
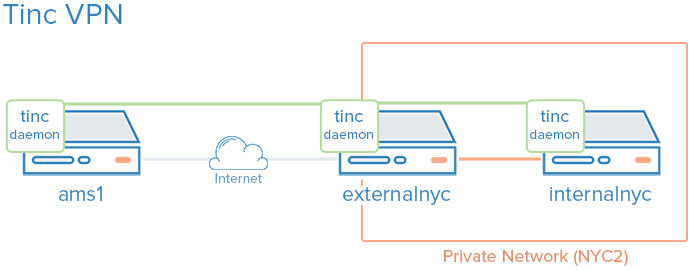
Our private network is represented by the green line, and connects all three servers. The orange is our private network, linking together the two NYC2 servers. All three servers can connect through the VPN, though the private network is not accessible to AMS1.
To do this, follow these steps:
Install Tinc
First up, we need to install Tinc. As ever, make sure all your apt repositories are up to date by running:
sudo apt-get update
Then install Tinc in the standard way through apt:
sudo apt-get install tinc
And that’s it! Your machine will now download Tinc, plus any prerequisites you need. We now need to have a look at the configuration.
Configuration
Configuring Tinc may be a little different from other VPNs you are used to. It uses a “netname” to distinguish one VPN from another, This becomes very useful when you have multiple VPNs running through Tinc, but is a little counter-intuitive at first. Since this is our first Tinc network, let’s keep it simple and call our VPN “netname”.
Now for each of our servers. Each will need three configuration components:
The configuration files: tinc.conf, tinc-up, tinc-down, and an optional number of other files.
Public and private key pairs: these are for encryption and authentication.
Host configuration files: These contain public keys, and other VPN configuration elements.
Let’s now configure each of our servers in turn. First up, externalnyc.
Configure externalnyc
OK, now to the nuts and bolts. On externalnyc, start by creating the configuration directory structure for the VPN netname. Run:
sudo mkdir -p /etc/tinc/netname/hosts
Now open tinc.conf in your chosen text editor:
sudo vi /etc/tinc/netname/tinc.conf
Once you have the file in front of you, add the following to the bottom of the file:
Name = externalnyc
AddressFamily = ipv4
Interface = tun0
All you are doing here is to configure a node called externalnyc, and telling the server that it’s network interface will use ipv4 and be called “tun0”. Save the file, and close it.
Next up, we need to create a host configuration file for externalnyc. To do this, open the hosts configuration file in a text editor:
sudo vi /etc/tinc/netname/hosts/externalnyc
Again, add some lines to the bottom of this file, substituting the public IP address of your VPS in the first line:
Address = externalnyc_public_IP
Subnet = 10.0.0.1/32
This is the file that other servers will use to connect to externalnyc. The address tells other nodes how and where to connect to this server, and the subnet address is the subnet that this daemon will operate on. Again, save your changes to this file and close it.
Now we need to generate the public / private key pair for this host. This is easy enough, just run:
sudo tincd -n netname -K4096
This makes a private RSA key, and adds a public key pair to the end of the configuration file that we just created. You can open it again to see that this has been done, if you like.
Now, we need to make tinc-up, a small script that will run when our VPN is started. Open the following file for editing:
sudo vi /etc/tinc/netname/tinc-up
And add:
#!/bin/sh
ifconfig $INTERFACE 10.0.0.1 netmask 255.255.255.0
Whenever the VPN netname is started, this script will run. It will make a network interface to be used by our VPN, and on this VPN externalnyc will have an IP of 10.0.0.1.
But when the VPN is stopped, we want this network interface to disappear, so we need one more script. This should be appended to tinc-down. Open:
sudo vi /etc/tinc/netname/tinc-down
And then add:
#!/bin/sh
ifconfig $INTERFACE down
And again save and quit. We now have our scripts, but in order for them to work they need to be flagged as executable. This is easy enough, using the command line:
sudo chmod 755 /etc/tinc/netname/tinc-*
Save and quit, and you are done configuring this server. Next up, internalnyc and ams1.
Configure internalnyc and ams1
To configure the two remaining servers, you need to run the same commands on each machine. There are a few minor variations, which I’ll point out, but the process is basically the same.
As we did with externalnyc above, we first need to make the directory structure for our configuration files. On each server, run the following, and then open the Tinc configuration file for editing:
 sudo mkdir -p /etc/tinc/netname/hosts
sudo vi /etc/tinc/netname/tinc.conf
Then add a few lines to the bottom of this file, substituting “node_name” with the name of each node:
Name = node_name
AddressFamily = ipv4
Interface = tun0
ConnectTo = externalnyc
You can see that both of our servers are now configured to attempt to connect to externalnyc. Save this file, and close it.
Now we need to make the hosts configuration file. Run:
sudo vi /etc/tinc/netname/hosts/node_name
Then for internalnyc, add this line:
Subnet = 10.0.0.2/32
And for ams1, add this line:
Subnet = 10.0.0.3/32
The only difference here is that the addresses differ, so we can tell our servers apart. Save this file, and close it.
Now, just like before, we need to generate our public / private key pairs, and create the network interface start up script. On each server, run:
sudo tincd -n netname -K4096
And then:
sudo vi /etc/tinc/netname/tinc-up
Now. For each server, we need to use the addresses we specified earlier. If you are following me precisely, for internalnyc you need to add:
ifconfig $INTERFACE 10.0.0.2 netmask 255.255.255.0
And for ams1:
ifconfig $INTERFACE 10.0.0.3 netmask 255.255.255.0
But, if you specified different addresses above, change them here as well. Save these files, and quit. We are almost there.
We just need to make the network interface stop script, just like before:
sudo vi /etc/tinc/netname/tinc-down
And then add this line on both servers:
ifconfig $INTERFACE down
And the very last bit of configuration is to make our new scripts executable:
sudo chmod 755 /etc/tinc/netname/tinc-*
Save and quit. Phew. If everything went well, all three servers are now configured. Now for implementing the cryptography.
Distributing Keys
If you are already using a config management system, you are in luck. In an ideal world, each node that we have now made needs to be able to talk directly with another node using a public / private key interface. The keys, as we saw above, are now in the hosts configuration files for each server. In the simple network we are making here, actually only externalnyc needs to exchange keys with the other nodes.
And so, the easiest way to do this is simply to copy each public key to all members of the various nodes. This is actually pretty easy, just be careful to change the “address” value in externalnyc’s configuration file to it’s own private IP address when you copy it. That way, the connection will be established over the private network.
If you followed me and called your VPN “netname”, the hosts configuration files are here: /etc/tinc/netname/hosts
Exchange Keys Between externalnyc and internalnyc
This is straightforward. On internalnyc, find the hosts configuration file and copy it to externalnyc:
scp /etc/tinc/netname/hosts/internalnyc user@externalnyc_private_IP:/tmp
Then, on externalnyc, copy the same file to the proper location:
cd /etc/tinc/netname/hosts; sudo cp /tmp/internalnyc .
Now we do the opposite procedure. On externalnyc, copy the hosts configuration file to internalnyc:
scp /etc/tinc/netname/hosts/externalnyc user@internalnyc_private_IP:/tmp
And then on internalnyc copy the file so it is in the right place:
cd /etc/tinc/netname/hosts; sudo cp /tmp/externalnyc .
Now we need to edit externalnyc’s hosts configuration file on internalnyc so the address is correct. This is so the nodes will connect to the VPN via the private network. So, on internalnyc, open the hosts configuration file for externalnyc:
sudo vi /etc/tinc/netname/hosts/externalnyc
And change the address value to externalnyc’s private IP address, like this:
Address = externalnyc_private_IP
Save the file, and quit. That’s these two keys done. Now we just need to exchange keys with our one remaining node.
Exchange Keys Between externalnyc and ams1
The process here is pretty similar. Using ams1, copy the hosts configuration file to externalnyc:
scp /etc/tinc/netname/hosts/ams1 user@externalnyc_public_IP:/tmp
And then again copy it to the right place, using externalnyc:
cd /etc/tinc/netname/hosts; sudo cp /tmp/ams1 .
Staying on externalnyc, copy the file the other way, across to ams1:
scp /etc/tinc/netname/hosts/externalnyc user@ams1_public_IP:/tmp
And once more, on ams1, copy this file so it is in the right place:
cd /etc/tinc/netname/hosts; sudo cp /tmp/externalnyc .
And you’re done with key exchange. In theory, you’ve now got a working, encrypted VPN through Tinc. If you’ve followed this tutorial to the letter, you can move on to testing your set up. If, however, you’ve also taken the opportunity to add extra nodes, now is a good time to exchange all the keys you will need.
Remember that if you are using a central node, like I’m doing here, you do not need to copy all keys to all servers. However, if you want nodes to be able to talk to each other directly, they will need to exchange keys. The process for doing this is the same as I’ve described above – just do as many iterations as you need to achieve your desired connectivity.
Testing
You should now be ready to test. To do this, it’s a good idea to start Tinc in debug mode, so we can catch any errors and get some more information if anything goes wrong. Remember that a poorly configured VPN can actually be a security risk, so make sure everything works properly before you start using your VPN for anything important.
To start Tinc in debug mode, on each node, starting with externalnyc, run:
sudo tincd -n netname -D -d3
If you’ve called your VPN something different, of course, change the “netname” variable to the appropriate name.
After the daemon starts on each node, it should return output giving you the name of each node as they connect. If this doesn’t happen, you’ve made a mistake somewhere.
Now, we can test the VPN. In a new window on ams1, ping internalnyc using its IP address. We assigned this to 10.0.0.2 earlier, so type:
ping 10.0.0.2
Hopefully, your ping will work. You should also see some debugging output in the other windows, describing the connections you’ve just made. Ams1 is now connected, through your new VPN, to externalnyc, and can connect to internalnyc through it. Hit CTRL-C and the ping will stop.
Now you’ve got a secure VPN connection, you can use it for any other type of network communication – application connections, copying files, SSH, or anything else you like.
If your ping didn’t work, but you think you did everything right, it might be that a firewall got in the way. Check your firewall settings, and try again.
Tinc On Boot
Just one last thing. If you’re now going to use your Tinc VPN for all your networking, you might want to set it to startup on boot. You will need to do this on each node, by editing the nets.boot configuration file. Open the file using:
sudo vi /etc/tinc/nets.boot
And then add the name of your new VPN to this file. If you chose “netname” like me, this will look like the following:
# This file contains all names of the networks to be started on system 	startup.
netname
Save and quit, and you’re done. Tinc is now working, and will start on boot. Well done you.
If you need to control Tinc, you can now run the “service” command to do so. On each node, just run:
sudo service tinc start
And have a play around. Most basic control can be achieved through this command.
Conclusion
You should now have a secure VPN connection running through Tinc on all your machines. This VPN can be used as a base to build up further network functionality.
If you want to add further nodes in the future, or combine Tinc with other VPNs, Tinc will allow you to do this. The process for each extra node is the same as I’ve described above, and you should be able to easily see which variables and addresses need changing. Just remember that if you want nodes to be able to connect to each other directly, you will need to swap keys between them directly. Like this, Tinc operates as a mesh VPN, which is a bit more secure than my approach. Otherwise, you can just set up your network like I have done, and have everything going through a central node.
Either way, you are now free to play around. Good luck!
Resources
(2) https://www.howtoforge.com/tutorial/ubuntu-lts-minimal-server/

