Linux Free Command Explained for Beginners (6 Examples)
On this page
- Linux free command
- Q1. How to view used and available memory using free command?
- Q2. How to change the display metric?
- Q3. How to display memory figures in human readable form?
- Q4. How to make free display results continuously with time gap?
- Q5. How to make free use power of 1000 (not 1024) while displaying memory figures?
- Q6. How to make free display total of columns?
- Conclusion
Sometimes, while working on the command line in Linux, you might want to quickly take a look at the total available as well as used memory in the system. If you're a Linux newbie, you'll be glad to know there exists a built-in command - dubbed free - that displays this kind of information.
In this tutorial, we will discuss the basics of the free command as well as some of the important features it provides. But before we do that, it's worth sharing that all commands/instructions mentioned here have been tested on Ubuntu 16.04LTS.
Linux free command
Here's the syntax of the free command:
free [options]
And following is how the tool's man page describes it:
free displays the total amount of free and used physical and swap memory in the system, as well as
the buffers and caches used by  the  kernel. The  information  is  gathered by parsing
/proc/meminfo.
Following are some Q&A-styled examples that should give you a good idea about how the free command works.
Q1. How to view used and available memory using free command?
This is very easy. All you have to do is to run the free command without any options.
free
Here's the output the free command produced on my system:
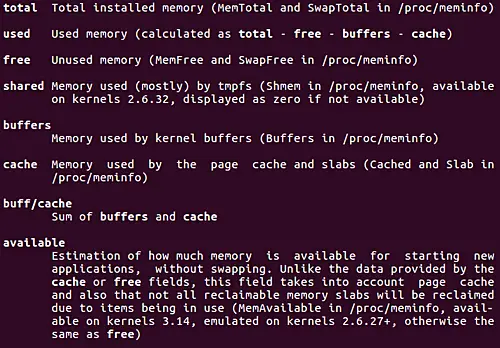
And here's what these columns mean:
Q2. How to change the display metric?
If you want, you can change the display metric of memory figures that the free command produces in output. For example, if you want to display memory in megabytes, you can use the -m command line option.
free -m
Similarly, you can use -b for bytes, -k for kilobytes, -m for megabytes, -g for gigabytes, --tera for terabytes.
Q3. How to display memory figures in human readable form?
The free command also offers an option -h through which you can ask the tool to display memory figures in human-readable form.
free -h
With this option turned on, the command decides for itself which display metric to use for individual memory figures. For example, here's how the -h option worked in our case:
Q4. How to make free display results continuously with time gap?
If you want, you can also have the free command executed in a way that it continuously displays output after a set time gap. For this, use the -s command line option. This option requires user to pass a numeric value that will be treated as the number of seconds after which output will be displayed.
For example, to keep a gap of 3 seconds, run the command in the following way:
free -s 3
In this setup, if you want free to run only a set number of times, you can use the -c command option, which requires a count value to be passed to it. For example:
free -s 3 -c 5
The aforementioned command will make sure the tool runs 5 times, with a 3 second time gap between each of the tries.
Note: This functionality is currently buggy, so we couldn't test it at our end.
Q5. How to make free use power of 1000 (not 1024) while displaying memory figures?
If you change the display metric to say megabytes (using -m option), but want the figures to be calculated based on power of 1,000 (not 1024), then this can be done using the --si option. For example, the following screenshot shows the difference in output with and without this option:
Q6. How to make free display total of columns?
If you want free to display a total of all memory figures in each column, then you can use the -t command line option.
free -t
Following screenshot shows this command line option in action:
Note the new 'Total' row that's displayed in this case.
Conclusion
The free command can prove to be an extremely useful tool if you're into system administration. It's easy to understand and use, with many options to customize output. We've covered many useful options in this tutorial. After you're done practicing these, head to the command's man page for more.


