How to Install LibreNMS Monitoring Tool with Nginx on CentOS 7
On this page
LibreNMS is an open source monitoring tool based on PHP/MYSQL/SNMP. It's a fully featured network monitoring system that provides support for wide range of network hardware and operating systems including, FreeBSD, Cisco, Linux, HP, and more.
In this tutorial, we will show you how to install and configure LibreNMS using Nginx as the web server and MariaDB as the database. We'll be using CentOS 7 server as our main server.
What we will do
- Install required packages
- Install Nginx Web server
- Install and configure PHP-FPM
- Install and configure MariaDB
- Download and configure LibreNMS
- LibreNMS web based Installation
- Final configuration
Prerequisite
- CentOS 7 Server
- Root privileges
Step 1 - Install required packages
Before installing LibreNMS on the server, we need to install some packages, including ImageMagick, rrdtool, SNMP, git, and more. The following command should do the needful:
yum -y install net-snmp ImageMagick jwhois nmap mtr rrdtool MySQL-python net-snmp-utils cronie fping git
If everything goes fine, proceed to the next step.
Step 2 - Install Nginx Web server
In this step, we will install epel-repository for nginx web server installation. The EPEL (Extra Packages for Enterprise Linux) repository is an additional repository for rpm based OS' including CentOS 7.
Install the EPEL repository using the yum command below.
yum -y install epel-release
Now install nginx.
yum -y install nginx
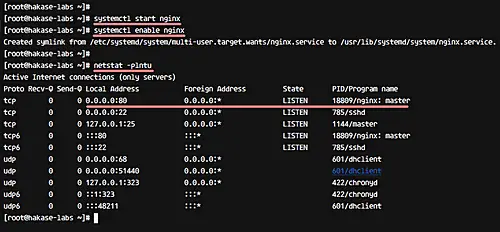
After nginx installation, start the service and enable it to run automatically at boot time using the following systemctl commands.
systemctl start nginx
systemctl enable nginx
So the Nginx web server has been installed on the system from the EPEL repository.
Step 3 - Install and configure PHP-FPM
Before we proceed, here is some information worth sharing:
We will be using PHP-FPM version 7 for the LibreNMS installation. All PHP 7 packages for CentOS 7 are available on third-party repository, and we will be using the PHP 7 version from the 'webtatic' repository.
So let's begin.
Add PHP 7 webtatic repository to the system using the following rpm command.
rpm -Uvh https://mirror.webtatic.com/yum/el7/webtatic-release.rpm
Install PHP 7 and all the extensions needed from the wetatic repository using yum.
yum -y install php70w php70w-cli php70w-gd php70w-mysql php70w-snmp php70w-pear php70w-curl php70w-common php70w-fpm php70w-mcrypt
Now update the PEAR repository and install some PEAR (PHP Extension and Application Repository) extensions using the pear command.
pear channel-update pear.php.net
pear install Net_IPv4-1.3.4
pear install Net_IPv6-1.2.2b2
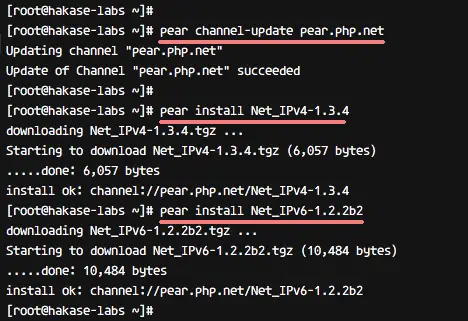
So this way you can install all the required PHP packages.
Next, configure PHP-FPM for LibreNMS installation. We need to define the default timezone in the php.ini file and make sure the timezone matches with the current timezone used by the system. You can check the current timezone used by your system through the following command.
timedatectl
The following screenshot shows the above command in action:

So we're using 'Europe/Paris' timezone.
Now, edit the '/etc/php.ini' file using vim.
vim /etc/php.ini
Next, uncomment the 'date.timezone' line and give a value with the server timezone 'Europe/Paris'.
data.timezone = Europe/Paris
Similarly, uncomment the cgi line and change the value to '0'.
cgi.fix_pathinfo=0
That's it. Now save the changes and exit the editor.
Next up, we need to define how the PHP-FPM is running on the system. In our case, PHP-FPM will be running under the 'sock' file instead of the server port.
Edit the 'www.conf' file with vim to configure the PHP-FPM.
vim /etc/php-fpm.d/www.conf
Change the 'listen' port line to the sock file as below.
listen = /var/run/php-fpm/php7.0-fpm.sock
Uncomment the 'listen' line for owner, group and the permission of the sock file as configuration below.
listen.owner = nginx
listen.group = nginx
listen.mode = 0660
That's it. Now save the changes and exit the editor.
So PHP-FPM configuration is now complete. Start the service and enable it to run automatically at the boot time using the following commands.
systemctl start php-fpm
systemctl enable php-fpm
Now PHP-FPM is running under the sock file. You can check it with the netstat command.
netstat -pl | grep php
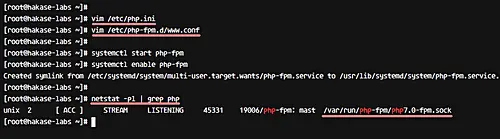
Make sure you have the result of the '/var/run/php-fpm/php7.0-fpm.sock' file.
Step 4 - Install and configure MariaDB
LibreNMS is using the MySQL database to store all data. For this guide, we will be using MariaDB database version. It's available in the repository, and we need to install and add some configuration for LibreNMS installation, including adding the database and user for LibreNMS.
Install MariaDB using yum command below.
yum -y install mariadb mariadb-server
Start MariaDB service and enable it to start automatically at the boot time.
systemctl start mariadb
systemctl enable mariadb

Now configure the MariaDB root password using the 'mysql_secure_installation' command below.
mysql_secure_installation
You will be asked about the new root password for MariaDB database along with some other questions.
Type 'Y' and press Enter to confirm.
Set root password? [Y/n] Y
 Remove anonymous users? [Y/n] Y
 Disallow root login remotely? [Y/n] Y
 Remove test database and access to it? [Y/n] Y
 Reload privilege tables now? [Y/n] Y
So MariaDB has been installed. Now we need to create a new database and a new user for LibreNMS. Login to the mysql shell command-line using mysql client and with your new password.
mysql -u root -p
Create a new database named 'librenms', a new user 'librenms' with password 'hakase-labs123'.
Create all of it using MySQL queries below.
CREATE DATABASE librenms CHARACTER SET utf8 COLLATE utf8_unicode_ci;
CREATE USER 'librenms'@'localhost' IDENTIFIED BY 'hakase-labs123';
GRANT ALL PRIVILEGES ON librenms.* TO 'librenms'@'localhost';
FLUSH PRIVILEGES;
A new user and database for LibreNMS installation have been created.

Now you need to edit the my.cnf file to add new mysql configuration. Edit the '/etc/my.cnf' file using vim.
vim /etc/my.cnf
Paste following additional configuration under the '[mysqld]' section.
innodb_file_per_table=1
 sql-mode=""
 lower_case_table_names=0
Save and exit vim, and then restart the mariadb server.
systemctl restart mariadb

Step 5 - Download and configure LibreNMS
In this step, we will configure the system for LibreNMS installation.
- Add user and download LibreNMS source code
Create a new system user named 'librenms', then define the home directory for the user on '/opt/librenms' directory, and finally add the 'librenms' user to 'nginx' group.
useradd librenms -d /opt/librenms -M -r
usermod -a -G librenms nginx
Go to the '/opt/' directory and download the LibreNMS source code using git clone command as below.
cd /opt/
git clone https://github.com/librenms/librenms.git librenms

Create a new directory for LibreNMS logs and rrd files.
mkdir -p /opt/librenms/logs/
mkdir -p /opt/librenms/rrd/
chmod 775 /opt/librenms/rrd/
Now change the ownership of all files and directories under '/opt/librenms' directory to the 'librenms' user and group.
chown -R librenms:librenms /opt/librenms/

- Configure LibreNMS virtual host
LibreNMS is a Web-based application and we are using a Nginx web server to host it.
Create a new virtual host file 'librenms.conf' under nginx 'conf.d' directory.
vim /etc/nginx/conf.d/librenms.conf
Paste configuration below.
server {

     # Add your own domain name
     listen      80;
     server_name librenms.irsyadf.me;

     # LibreNMS Webroot directory
     root        /opt/librenms/html;
     index       index.php;

     # LibreNMS logs
     access_log  /opt/librenms/logs/access_log;
     error_log   /opt/librenms/logs/error_log;

     # Enabling Gzip compression on Nginx
     charset utf-8;
     gzip on;
     gzip_types text/css application/javascript text/javascript application/x-javascript image/svg+xml text/plain text/xsd text/xsl text/xml image/x-icon;

     location / {
         try_files $uri $uri/ /index.php?$query_string;
     }

     location /api/v0 {
         try_files $uri $uri/ /api_v0.php?$query_string;
     }

     # PHP-FPM handle all .php files requests
     location ~ \.php {
         include fastcgi.conf;
         fastcgi_split_path_info ^(.+\.php)(/.+)$;
         fastcgi_pass unix:/var/run/php-fpm/php7.0-fpm.sock;
     }

     location ~ /\.ht {
         deny all;
     }
 }
That's it. Now save and exit Vim.
Test nginx configuration and make sure there is no error. Then restart the webserver.
nginx -t
systemctl restart nginx
- Firewalld configuration
Make sure the firewalld packages are installed on your system. If not, you can install firewalld using the following yum command.
yum -y install firewalld
Start firewalld and enable it to run at boot time using the following systemctl commands.
systemctl start firewalld
systemctl enable firewalld
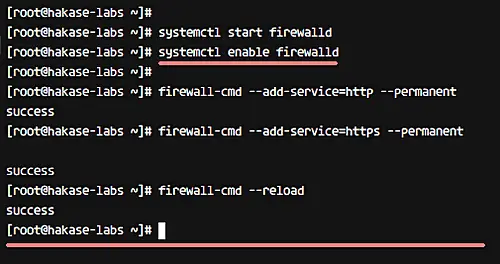
Open new HTTP, HTTPS and the SNMP port 161/udp using the firewall-cmd command as shown below.
firewall-cmd --add-service=http --permanent
firewall-cmd --add-service=https --permanent
firewall-cmd --add-port=161/udp --permanent
Apply the configuration by reloading firewalld, and check all services.
firewall-cmd --reload
firewall-cmd --list-all
Make sure HTTP and HTTPS services are on the list.
Step 6 - LibreNMS web-based installation
Open your web browser and type LibreNMS URL on the address bar.
http://librenms.hakase-labs.me/
You will be redirected to the installation page 'install.php'.
- Check PHP Module support
Make sure all required php modules and extensions are installed on the system.
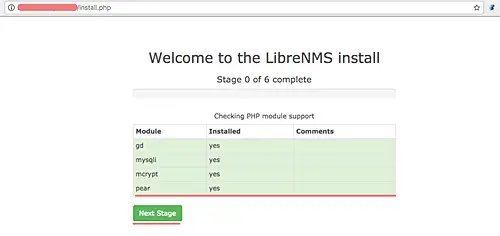
Then click 'Next Stage' to continue.
- Database Configuration
Type the database details below:
- DB User: 'librenms'
- DB Name: 'librenms'
- DB Pass: 'hakase-labs123'
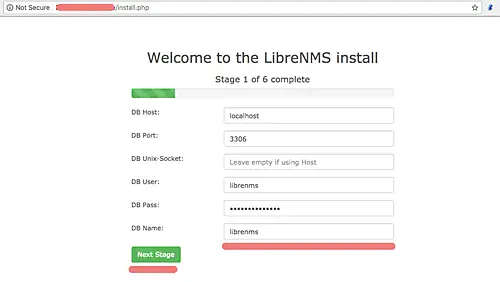
And click 'Next Stage' to continue.
- Import MySQL Database
Do not close the installation page as it'll be displaying database import. Make sure there are no errors.
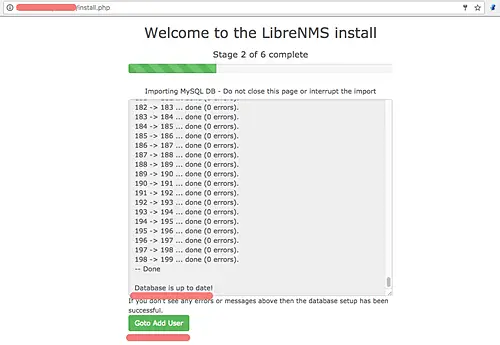
When the process is complete, click 'Goto Add User' to add new admin user.
- Add Admin User
Type your admin user, email, and password.

Click 'Add User' to continue with the installation.
- Generate config file
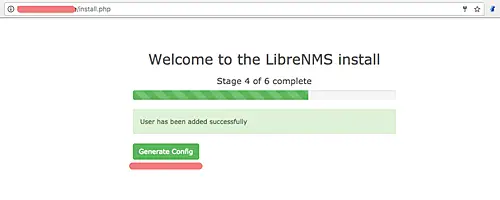
Click the 'Generate Config' button, and you will see a page similar to the following.

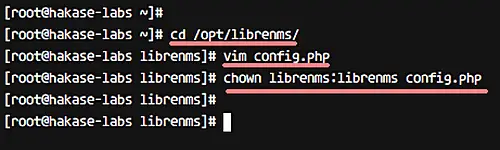
Copy the php code that's there in the box, and create a new 'config.php' file in the '/opt/librenms/' directory.
cd /opt/librenms/
vim config.php
Paste in the new file the code you just copied, and then save and and exit the editor. Now change the ownership permissions of the config.php file to the 'librenms' user and group.
chown librenms:librenms config.php
Come back to your browser and click the 'Finish Install' button present on the bottom of the page. You will get to see a welcome message similar to the following.
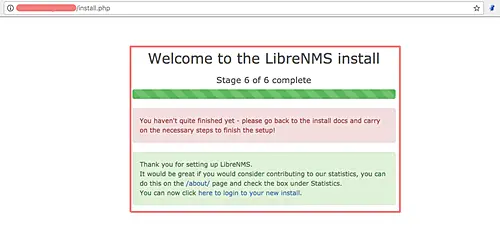
At this stage, we are done with the web based installation. Back to the terminal/shell and add more configuration.
Step 7 - Final configuration
At this step, we will add some configuration for our LibreNMS installation.
- Define fping Command
Define the 'fping' command by editing the LibreNMS config file. Goto the '/opt/librenms/' directory and edit the config.php file using the vim editor.
cd /opt/librenms/
vim config.php
Add the following line to the bottom of the file.
$config['fping'] = "/usr/sbin/fping";
Save and exit the editor.
- SNMP Configuration
Backup default snmp.conf file on the '/etc/snmp/' directory and copy new one from the librenms directory.
mv /etc/snmp/snmpd.conf /etc/snmp/snmpd.conf.asli
cp /opt/librenms/snmpd.conf.example /etc/snmp/snmpd.conf
Edit the new configuration.
vim /etc/snmp/snmpd.conf
Change the text 'RANDOMSTRINGGOESHERE' with your own community name as below.
com2sec readonly default hakaselabs
That's it. Save and exit Vim.

Next, download the librenms-agent script for detecting which operating system you have added. If you add Linux OS, the script will detect the specific Linux distribution as well.
Download the script using curl and make it executable.
curl -o /usr/bin/distro https://raw.githubusercontent.com/librenms/librenms-agent/master/snmp/distro
chmod +x /usr/bin/distro
Now restart the SNMP service using the following systemctl command.
systemctl restart snmpd
- Configure Logrotate for LibreNMS
LibreNMS provides configuration for the logrotate configuration, and it's in the '/opt/librenms/misc' directory.
Copy the sample of configuration to the '/etc/logrotate.d' directory.
cp misc/librenms.logrotate /etc/logrotate.d/librenms
- LibreNMS cronjob configuration
Go to the 'opt/librenms' directory and copy the crontab script 'librenms.nonroot.cron' file to the 'cron.d' directory.
cd /opt/librenms/
cp librenms.nonroot.cron /etc/cron.d/librenms
Wait a few minutes for the script to run automatically.
- Validate LibreNMS Configuration
To verify the installation, use the validate.php script. Go to the '/opt/librenms/' directory and run the script.
cd /opt/librenms/
./validate.php
Assuming you encounter no errors, you should see an output similar to the following:

So this completes LibreNMS Installation with Nginx web server on CentOS 7.

