How to Install and Configure Master-Slave Replication with PostgreSQL 9.6 on CentOS 7
PostgreSQL or Postgres is an open source object-relational database management system (ORDBMS) with more than 15 years of active development. It's a powerful database server that can handle high workloads. PostgreSQL can be used on Linux, Unix, BSD, and Windows servers.
The master/slave database replication is a process of copying (syncing) data from a database on one server (the master) to a database on another server (the slave). The main benefit of this process is to distribute databases to multiple machines, so when the master server has a problem, there is a backup machine with same data available for handling requests without interruption.
PostgreSQL provides several ways to replicate a database. It can be used for backup purposes and to provide a high availability database server. In this tutorial, we will show you how to install and configure PostgreSQL 9.6 Master-Slave replication on a CentOS 7 server. We will use Hot standby mode, and it's a very good starting point to learn PostgreSQL in depth.
What we will do
- Install PostgreSQL 9.6
- Start and configure PostgreSQL 9.6
- Configure Firewalld
- Configure Master server
- Configure Slave server
- Testing
Prerequisite
- 1 CentOS 7 server
- Master - Read and Write Permission - IP: 10.0.15.10
- 1 CentOS 7 server
- Slave - Only Read Permission- IP: 10.0.15.11
- Root Privileges
Step 1 - Install PostgreSQL 9.6
In this tutorial, we will discuss how to install the latest PostgreSQL version 9.6 on the CentOS 7 server. By default, the CentOS official repository offers an older version, so we need to install PostgreSQL from the official repository.
Add new PostgreSQL 9.6 repository to the system.
yum -y install https://yum.postgresql.org/9.6/redhat/rhel-7-x86_64/pgdg-centos96-9.6-3.noarch.rpm
Now install PostgreSQL 9.6 using the following yum command.
yum -y install postgresql96-server postgresql96-contrib
So this way, you can install PostgreSQL 9.6.
Step 2 - Start and configure PostgreSQL 9.6
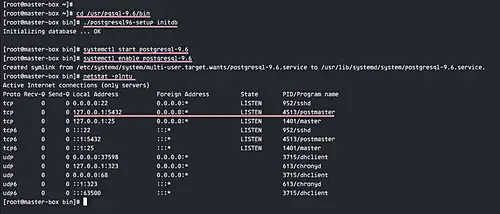
Before starting the postgres service, we need to initialize the database. For this, go to the '/usr/pgsql-9.6/bin' directory and initialize the database with postgres setup 'postgresql96-setup'.
cd /usr/pgsql-9.6/bin
./postgresql96-setup initdb
Next, start postgres service and enable it to start automatically at system boot.
systemctl start postgresql-9.6
systemctl enable postgresql-9.6
By default, postgres runs on port 5432. So make sure port 5432 state is 'LISTEN' by executing the netstat command in the following way.
netstat -plntu
If you do not have a netstat command, install net-tools. It's part from the net-tools.
yum -y install net-tools
So PostgreSQL 9.6 has been started. But we still need to configure the password for postgres user. Login as 'postgres' user, and then access the postgres 'psql' shell.
su - postgres
psql
Give the 'postgres' user new password with the query below.
\password postgres
Enter new password:
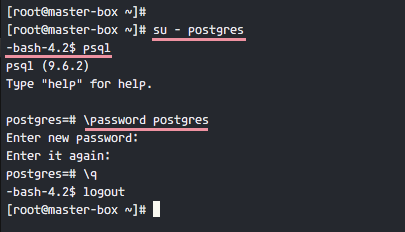
So PostgreSQL 9.6 has been started and a new password for postgres user has been configured.
Step 3 - Configure Firewalld
Firewalld is default a firewall management tool on CentOS 7. We will start this service and open the port for PostgreSQL connection.
Start firewalld and enable it to start automatically at system boot using the following commands:
systemctl start firewalld
systemctl enable firewalld
Next, add new postgres service to firewalld with the following commands.
firewall-cmd --add-service=postgresql --permanent
firewall-cmd --reload
Now check the open port of the service.
firewall-cmd --list-all
And you will see the PostgreSQL service has been added to the firewalld.

NOTE: Run the Step 1, Step 2 and Step 3 on all Master and Slaves.
Step 4 - Configure Master server
In this step, we will configure a master server for the replication. This is the main server, allowing read and write process from applications running on it. PostgreSQL on the master runs only on the '10.0.15.10' IP address, and performs streaming replication to the slave server.
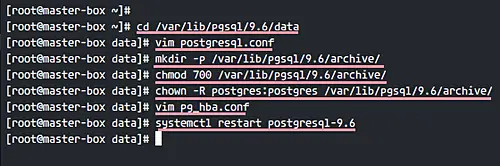
Go to the pgsql data directory '/var/lib/pgsql/9.6/data' and edit the configuration file 'postgresql.conf'.
cd /var/lib/pgsql/9.6/data
vim postgresql.conf
Uncomment the 'listen_addresses' line and change value of the server IP address to '10.0.15.10'.
listen_addresses = '10.0.15.10'
Uncomment 'wal_level' line and change the value to 'hot_standby'.
wal_level = hot_standby
For the synchronization level, we will use local sync. Uncomment and change value line as below.
synchronous_commit = local
Enable archiving mode and give the archive_command variable a command as value.
archive_mode = on
 archive_command = 'cp %p /var/lib/pgsql/9.6/archive/%f'
For the 'Replication' settings, uncomment the 'wal_sender' line and change value to 2 (in this tutorial, we use only 2 servers master and slave), and for the 'wal_keep_segments' value is 10.
max_wal_senders = 2
 wal_keep_segments = 10
For the application name, uncomment 'synchronous_standby_names' line and change value to 'pgslave01'.
synchronous_standby_names = 'pgslave01'
That's it. Save these changes and exit the editor.
Moving on, in the postgresql.conf file, the archive mode is enabled, so we need to create a new directory for archiving purposes.
Create a new directory, change its permission, and change the owner to the postgres user.
mkdir -p /var/lib/pgsql/9.6/archive/
chmod 700 /var/lib/pgsql/9.6/archive/
chown -R postgres:postgres /var/lib/pgsql/9.6/archive/
Now edit the pg_hba.conf file.
vim pg_hba.conf
Paste configuration below to the end of the line.
# Localhost
 host    replication     replica          127.0.0.1/32            md5

 # PostgreSQL Master IP address
 host    replication     replica          10.0.15.10/32            md5

 # PostgreSQL SLave IP address
 host    replication     replica          10.0.15.11/32            md5
Save and exit. All configuration is complete. Now, restart PostgreSQL 9.6 using the following command.
systemctl restart postgresql-9.6
Next, we need to create a new user with replication privileges. We will create a new user named 'replica'.
Login as postgres user, and create a new 'replica' user with password 'aqwe123@'.
su - postgres
createuser --replication -P replica
Enter New Password:
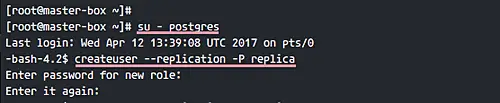
So with this, PostgreSQL 9.6 Master configuration has been completed, and the user for replication is created.
Step 5 - Configure Slave server
In this step, we will configure the Slave server. We want to replace postgres data directory on the slave server with the postgres data from the master server, and then configure slave server to run under the IP address '10.0.15.11', and finally enable hot_standby on it for allowing only read without write.
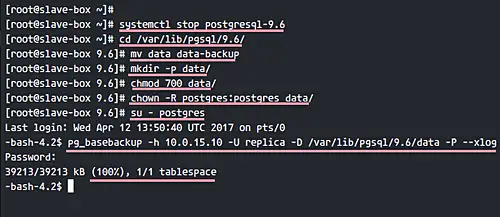
Before we start to configure the slave server, stop the postgres service using the systemctl command below.
systemctl stop postgresql-9.6
Then go to the postgres directory, and backup data directory.
cd /var/lib/pgsql/9.6/
mv data data-backup
Create new data directory and change the ownership permissions of the directory to the postgres user.
mkdir -p data/
chmod 700 data/
chown -R postgres:postgres data/
Next, login as the postgres user and copy all data directory from the 'Master' server to the 'Slave' server as replica user.
su - postgres
pg_basebackup -h 10.0.15.10 -U replica -D /var/lib/pgsql/9.6/data -P --xlog
Password:
Type your password and wait for data transfer from the master to the slave server.
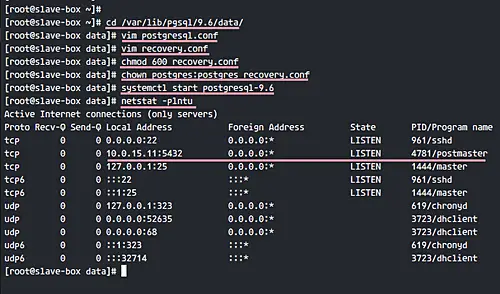
After the transfer is complete, go to the postgres data directory and edit postgresql.conf file on the slave server.
cd /var/lib/pgsql/9.6/data/
vim postgresql.conf
Change the value of 'listen_addresses' to the slave server ip address '10.0.15.11'.
listen_addresses = '10.0.15.11'
Enable 'hot_standby' on the slave server by uncommenting the following line and change the value to 'on'.
hot_standby = on
That's it. Save the changes and exit the editor.
Then create new 'recovery.conf' file with vim.
vim recovery.conf
Paste the following configuration in it.
standby_mode = 'on'
primary_conninfo = 'host=10.0.15.10 port=5432 user=replica password=aqwe123@ application_name=pgslave01'
trigger_file = '/tmp/postgresql.trigger.5432'
Save the changes and exit the file.
Note: On the primary_conninfo, input your own server details.
Change the ownership permissions of the recovery.conf file to that of the 'postgres' user.
chmod 600 recovery.conf
chown postgres:postgres recovery.conf
And start PostgreSQL 9.6 on the slave server.
systemctl start postgresql-9.6
The slave server configuration has been completed.
Now when you check the Slave server, you will see that PostgreSQL 9.6 is running on the server with IP address '10.0.15.11'.
netstat -plntu
Step 6 - Testing
Installation and configuration for PostgreSQL 9.6 Master-Slave replication are complete. To test the setup, check the state stream of the replication and test for data replication from the Master to the Slave.
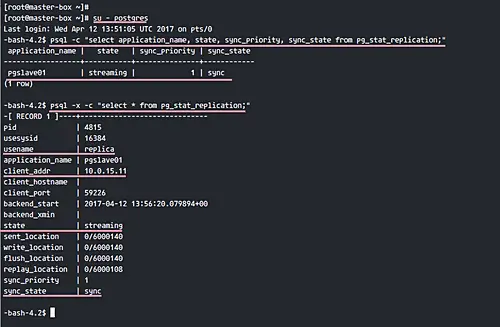
Log in to the Master server and switch to the postgres user.
su - postgres
Next, check the streaming state replication of PostgreSQL with the following commands.
psql -c "select application_name, state, sync_priority, sync_state from pg_stat_replication;"
psql -x -c "select * from pg_stat_replication;"
You should see the state value is 'streaming', and the sync_state is 'sync'.
Next, test by inserting data from the master and then check all data on the slave server.
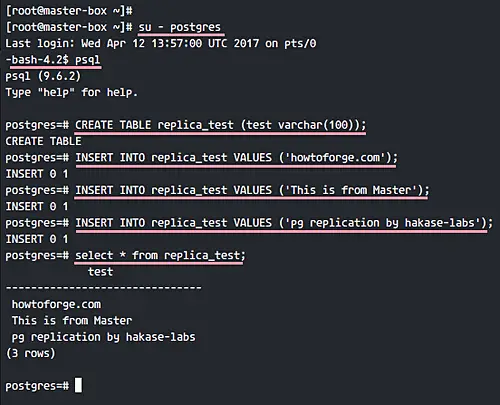
Log in as the postgres user and access the PostgreSQL shell on the 'MASTER' server.
su - postgres
psql
Create new table 'replica_test' and insert some data into it with the following insert queries.
CREATE TABLE replica_test (test varchar(100));
INSERT INTO replica_test VALUES ('howtoforge.com');
INSERT INTO replica_test VALUES ('This is from Master');
INSERT INTO replica_test VALUES ('pg replication by hakase-labs');
And now login to the 'SLAVE' server similar to the way you did on the master.
su - postgres
psql
Check all data from the table 'replica_test' using the query below.
select * from replica_test;

So you'll see that all the data is replicated from the 'MASTER' server to the 'SLAVE' server.
Additional test
Test to perform the 'WRITE' action from the 'SLAVE' server.
INSERT INTO replica_test VALUES ('this is SLAVE');
And the result should be 'Cannot execute INSERT'.
So the installation and configuration of the PostgreSQL 9.6 Master-Slave Replication on CentOS 7 is successful.

