How to Install Varnish Cache with Apache on CentOS 7
Varnish is a proxy server focused on HTTP caching. It's designed as an HTTP accelerator and can act as reverse proxy for your web server Apache or Nginx. Varnish has been used for high-profile and high-traffic websites, including Wikipedia, The Guardian, and the New York Times.
In this tutorial, we will show you how to install and configure varnish HTTP accelerator as a reverse proxy for Apache web server. The real web server Apache will run under non-standard HTTP port (running on port 8080). And Varnish will be running as the reverse proxy on HTTP port 80. For this guide, we will be using CentOS 7 server.
What we will do
- Install Apache on CentOS 7
- Configure Apache on port 8080
- Install Varnish on CentOS 7
- Configure Varnish as a reverse proxy for Apache
- Configure Firewalld
- Testing
Prerequisite
- CentOS 7 server
- Root privileges
Step 1 - Install and configure Apache on CentOS 7
We will install Apache/httpd web server from the CentOS 7 repository, and then configure the server that will be running on port 8080.
Install Apache/httpd using the yum command below.
yum -y install httpd
After the installation is complete, start the httpd service and enable it to run at system boot using the commands below.
systemctl start httpd
systemctl enable httpd
So the httpd service is now running. Check it using netstat or curl command as shown below.
netstat -plntu
curl -I localhost
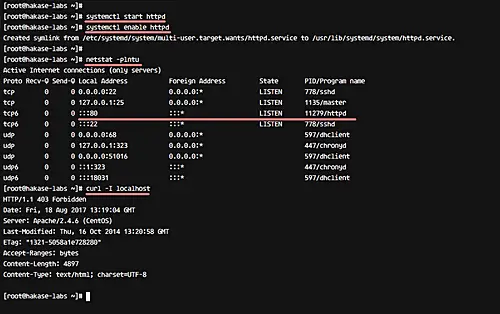
So with this, the Apache/httpd web server has been installed.
Step 2 - Configure Apache on port 8080
In this step, we will configure the Apache/httpd web server to run on port 8080. For this purpose, we must first edit the configuration file 'httpd.conf'.
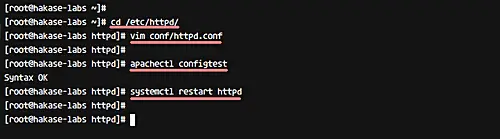
Go to the Apache configuration directory and edit httpd.conf file.
cd /etc/httpd/
vim conf/httpd.conf
Change the default port 80 to 8080 on the 'Listen' line.
Listen 8080
Save and exit.
Now test the configuration and make sure there is no error. Then restart the apache/httpd service.
apachectl configtest
systemctl restart httpd
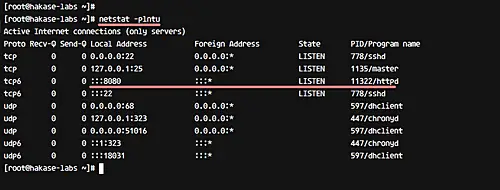
Now check again using netstat, and make sure the web server is running on port 8080.
netstat -plntu
Step 3 - Install Varnish on CentOS 7
In this step, we will install Varnish high-performance HTTP accelerator. It's available on the EPEL (Extra Packages for Enterprise Linux) repository, so we need to install the repo before installing Varnish.
Install EPEL repository using the following command.
yum -y install epel-release
Now install Varnish from the EPEL repository using yum command below.
yum -y install varnish
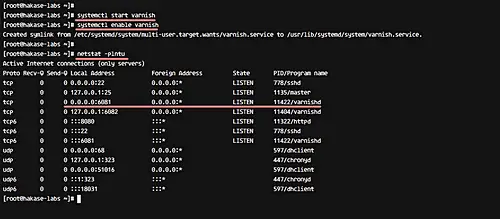
After the installation is complete, start Varnish and add it to launch at system boot using the systemctl commands below.
systemctl start varnish
systemctl enable varnish
By default, Varnish will use port 6081 and 6082. Check it using the netstat command below.
netstat -plntu
And make sure we get the default Varnish port as below.
Step 4 - Configure Varnish as a reverse proxy for Apache
So Varnish is installed, and now we will configure it as a reverse proxy for the Apache web server. Varnish will run on HTTP port 80 by default.
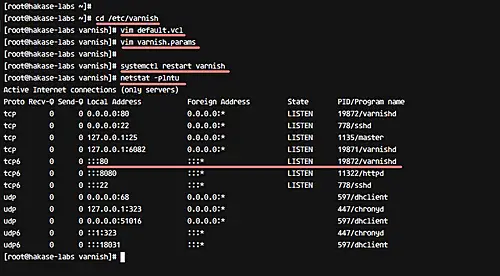
Go to the Varnish configuration directory and edit the default configuration in 'default.vcl'.
cd /etc/varnish
vim default.vcl
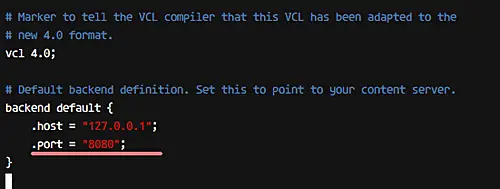
Define the default backend section. We are using Apache web server running on port 8080, so the configuration as below.
backend default {
     .host = "127.0.0.1";
     .port = "8080";
 }
Save and exit.
Next, configure Varnish to run with HTTP port 80. Edit the 'varnish.params' file present in the Varnish configuration directory.
vim varnish.params
In this file, change the value of the 'VARNISH_LISTEN_PORT' line to HTTP port 80.
VARNISH_LISTEN_PORT=80
Save and exit.
Now restart Varnish and check stats using the netstat command.
systemctl restart varnish
netstat -plntu
Make sure you have the result similar to the one shown below.
Varnish HTTP Accelerator has been installed, and it now acts as a reverse proxy for Apache web server.
Step 5 - Configure Firewalld
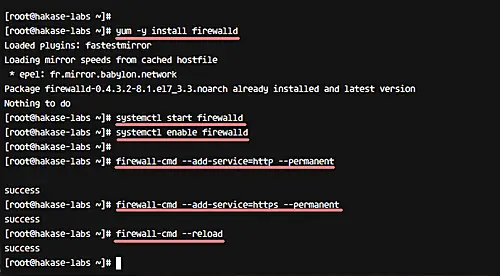
In this step, we will install Firewalld and open new HTTP and HTTPS ports.
Install Firewalld using the following yum command.
yum -y install firewalld
Now start the service and enable it to run automatically at system boot.
systemctl start firewalld
systemctl enable firewalld
Next, open new port for HTTP and HTTPS requests using the firewalld-cmd command, as shown below.
firewall-cmd --add-service=http --permanent
firewall-cmd --add-service=https --permanent
Reload the firewall configuration.
That's it. The Firewalld configuration has been completed.
Step 6 - Testing
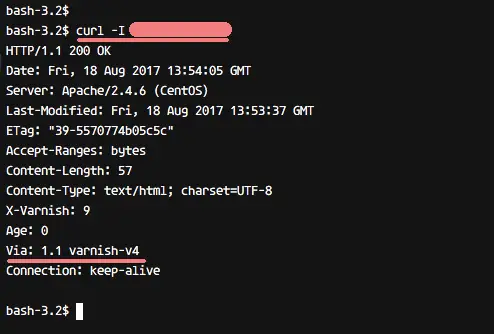
To test Varnish, first execute the following curl command.
curl -I hakase-labs.co
And in output, make sure you get an HTTP header similar to the one shown in the following screenshot.
Next, test Varnish from the browser. For this, open your web browser and type the server URL or address.
http://hakase-labs.co
Make sure it works as below.
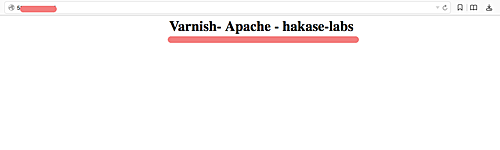
Note: If you get '403' Forbidden, you need to create an 'index.html' file on the '/var/www/html' directory.
cd /var/www/html/
echo '<h1><center> Varnish- Apache - hakase-labs</center></h1>' > index.html
Moving on, test the varnish log using the command below.
varnishncsa
And you will get the access log for varnish.

That's it. Varnish HTTP accelerator has been installed, and it's now running as a reverse proxy for the Apache web server.

