Install Debian 9 (Stretch) via PXE Network Boot Server
In this tutorial, we’ll guide you on how to install the latest version of Debian 9 server via a PXE server with internet remote HTTP mirror sources offered by Debian archive mirrors. The DHCP server that we’ll use in this tutorial to setup PXE environment will be ISC-DHCP Server and the netboot Debian files will be served on the local network by TFTPD-HPA server. Installing a system via PXE can improve the installation speed and in case of deploying multiple installations of Debian in a short period of time or in cases when the machines are not equipped with a CD/DVD ROM unit.
Requirements
- Debian 9 installed on a bare-metal machine or on a virtual machine.
- A network interface configured with Static IP address for the network segment that will be used to dynamically allocate IP address and other related DHCP and PXE settings.
- A local or a remote account with root privileges to the Debian server or direct access to root account via server’s console or remote access via SSH.
- An internet connection needed for installing Debian via network.
Initial Configuration
In the first step, you need to assure that the Debian system that we will use to install new servers from has the network interface that will be used to bind to a DHCP server, configured with a static IP address.
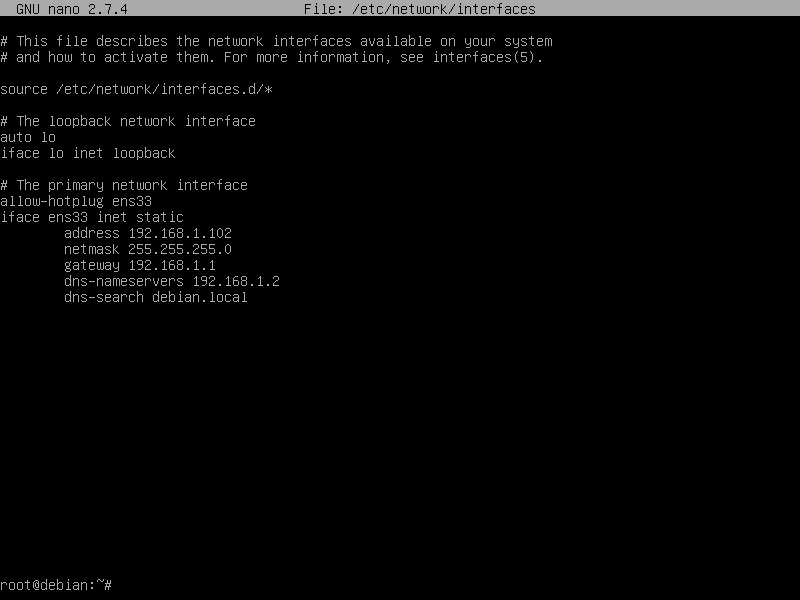
In order to manually configure your network interface card, open network interfaces file and edit the following lines using your preferred text editor, such as nano. Replace the IP settings lines described below to match your own network configurations.
sudo nano /etc/network/interfaces
Interfaces file excerpt:
auto ens33
iface ens33 inet static
  address 192.168.1.102
  netmask 255.255.255.0
  network 192.168.1.0
  broadcast 192.168.1.255
  gateway 192.168.1.1
  dns-nameservers 192.168.1.2 8.8.4.4
  dns-search debian.local
After you’ve edited the network interfaces file, save and close the file and bring down the network interface, then up, to apply the settings, by issuing the below commands. Assuming that your network interface card is named ens33, issue the below commands to disable and enable the NIC.
ifdown ens33
ifup ens33
To check if the new IP address has been configured for the network interface, issue the following command.
ip a
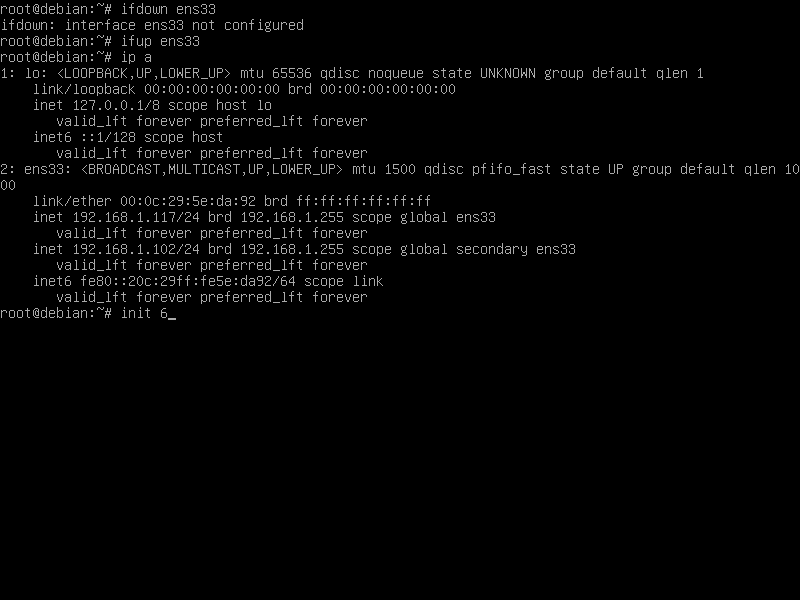
Sometimes the IP settings won’t apply by simply restarting the networking daemon or disabling and enabling the interface. In this case you should restart the system with the below command.
init 6
Or
systemctl reboot
You should also perform a full system update by issuing the below commands:
apt update
apt upgrade
In the next step, execute the following command in order to install some required utilities that will be used to further manage your system from command line.
apt install wget bash-completion unzip
Install and configure ISC-DHCP Server
In order to setup a DHCP server and PXE configuration, log in to the system with the root account or an account with root privileges and install isc-dhcp-server package provided by Debian 9 repository by issuing the following command.
apt install isc-dhcp-server
Now backup the ISC-DHCP server main configuration file and edit the dhcpc server configuration file to contain the following settings.
mv /etc/dhcp/dhcpd.conf /etc/dhcp/dhcpd.conf.backup
nano /etc/dhcp/dhcpd.conf
dhcpcd.conf file excerpt:
ddns-update-style none;
       option option-128 code 128 = string;
       option option-129 code 129 = text;
authoritative;
log-facility local7;
option arch code 93 = unsigned integer 16;

subnet 192.168.1.0 netmask 255.255.255.0 {
  range 192.168.1.50 192.168.1.100;
  option routers 192.168.1.1;
  option broadcast-address 192.168.1.255;
  option subnet-mask 255.255.255.0;
  option ntp-servers 192.168.1.102;
  option time-servers 192.168.1.102;

  option domain-name "debian.local";
  option domain-name-servers 192.168.1.1, 192.168.1.2;
        allow booting;
       allow bootp;
if option arch = 00:07 or option arch = 00:09 {
      filename "bootnetx64.efi";
} else {
      filename "pxelinux.0";
}
        next-server 192.168.1.102;

#default lease 4H, max  lease 8H
default-lease-time 14400;
max-lease-time 28800;

  }

  host nas {
  hardware ethernet 00:17:a4:f6:b2:2e;
  fixed-address 192.168.1.105;
}
In the above configuration file, replace the following lines accordingly.
subnet {..
range 192.168.1.50 192.168.1.100;
To define your own network range for DHCP to allocate IPs to this network segment
option routers = setup your Gateway IP
option broadcast-address = setup your network broadcast address
option subnet-mask = setup your network subnet mask address
option ntp-servers
option time-servers = setup your network NTP server IP address
option domain-name = setup your network domain name, if any
option domain-name-servers = setup your network DNS server IP addresses
if option arch = 00:07 or option arch = 00:09 = if the end device is an UEFI based machine, boot-up the deice using the bootnetx64.efi file or boot-up any other machines which are not UEFI based using the pxelinux.0 file. These machines typically are older BIOS systems.
next-server 192.168.1.102 = This is the IP address of the TFTP server, where the file pxelinux.0 or bootnetx64.efi can be found in your network. In this case the TFTP server is located in the same machine.
default-lease-time = default time in seconds granted to a IP address before it expires.
max-lease-time = maximum time in seconds granted to a IP address before it expires.
host nas {
  hardware ethernet 00:17:a4:f6:b2:2e;
  fixed-address 192.168.1.105;
}
This is how a static IP address is declared in DHCP server. The device with the MAC address defined by hardware ethernet statement will always get the same IP address. The hostname declared has no importance. You can use any arbitrary string for the hostname.
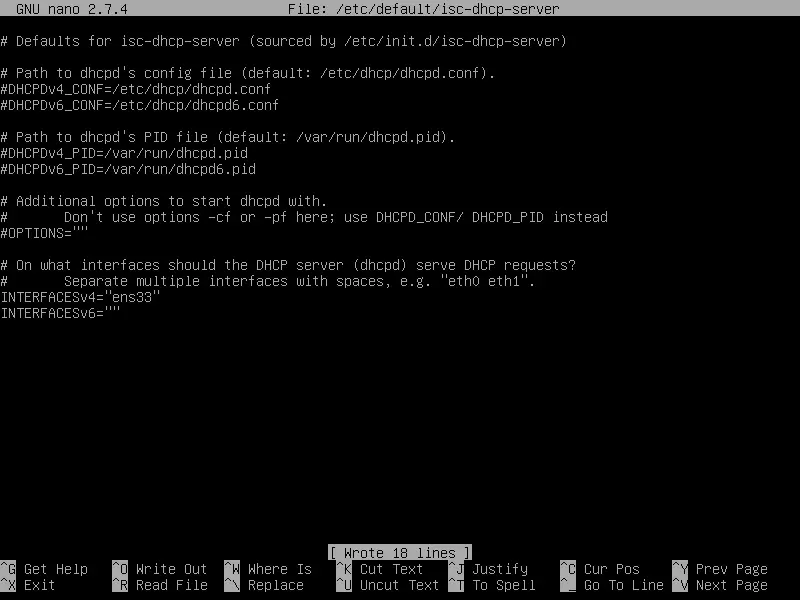
Then open isc-dhcp-server file in the /etc/default/ directory for editing, navigate to the end of the file and add your network interface card configured with a static IP address to IPv4 Interfaces line as described in the below sample. Make sure you add the appropriate network interface card name. Use ip or ifconfig commands to list your machine network interfaces and find the correct name.
nano /etc/default/isc-dhcp-server
isc-dhcp-server default file excerpt:
INTERFACESv4=”ens33”
Finally, restart the DHCP daemon to apply the changes. Check DHCP service status by issuing the below command in order to verify if the service has been started.
systemctl restart isc-dhcp-server.service
systemctl status isc-dhcp-server.service

Also, execute ss or netstat command to list all open sockets by DHCP server.
netstat –tulpn
ss –tulpn
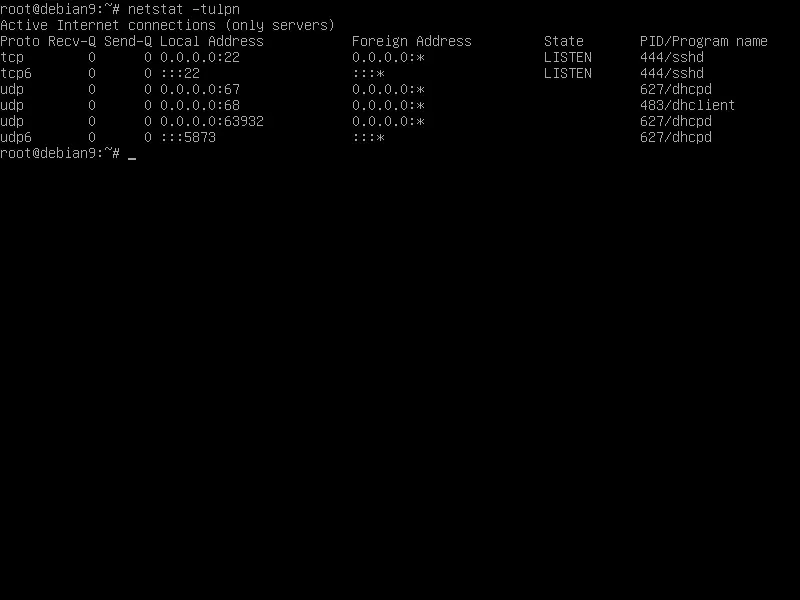
If netstat utility is not installed in your system, issue the below command to install it.
apt install net-tools
Install TFTP Server
In order to serve the netboot files required by clients to boot Debian remotely via PXE and TFTP, you also need to install a TFTP server in your system. One of the most common and secured TFTP servers available for LANs is the tftpd-hpa server. The TFTP-HPA packages can be installed from official repositories offered by Debian 9. Execute the below command to install the tftpd-hpa server in Debian 9.
apt install tftpd-hpa
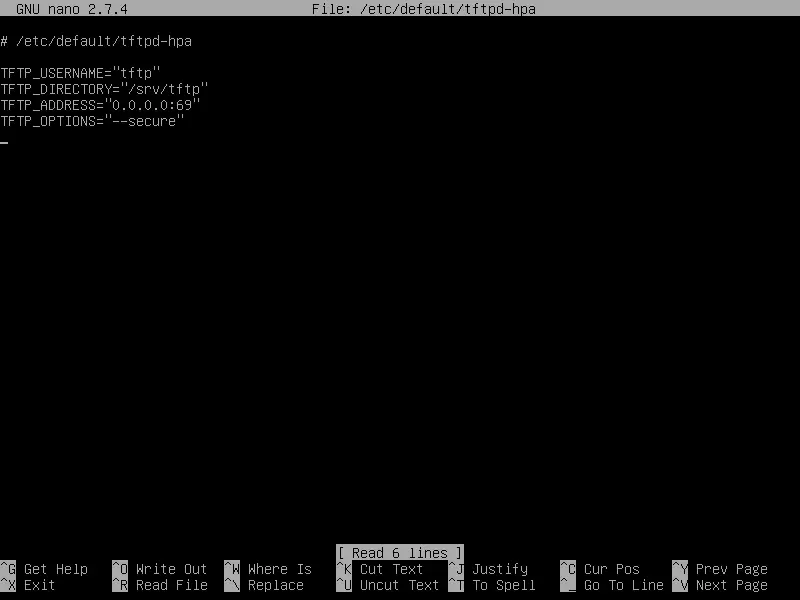
After the package has been installed, open TFTPD-HPA default configuration file and assure that the file has the below content.
nano /etc/default/tftpd-hpa
tftpd-hpa file excerpt:
TFTP_USERNAME="tftp"
TFTP_DIRECTORY="/srv/tftp"
TFTP_ADDRESS="0.0.0.0:69"
TFTP_OPTIONS="--secure"
If the line TFTP_OPTIONS has the below content, make sure you remove the --create flag in order to secure the TFTP server.
TFTP_OPTIONS="--secure --create"
The create flag allows remote clients to upload files to the tftp server. This option is dangerous because arbitrary users can upload or delete files from TFTP server root path.
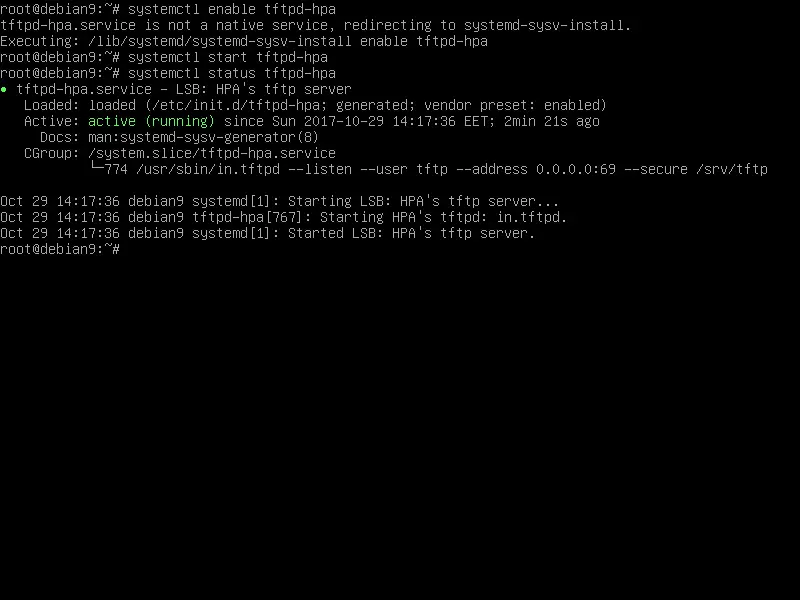
Finally, enable the service system-wide and start the TFTP server and check tftp daemon status by issuing the below series of commands:
systemctl enable tftpd-hpa
systemctl start tftpd-hpa
systemctl status tftpd-hpa
You should also execute netstat or ss command in order to list all open network sockets in listening state in your system. The following UDP ports required by DHCP and TFTP servers should be opened in your network stack: 67 and 69. You should open these ports in your firewall, by issuing the following commands:
ufw allow 67/udp
ufw allow 69/udp
If you’re using iptables raw rules to manage Firewall policy in your Debian server, add the following rules to allow ports 67 and 69 UDP inbound traffic to pass the firewall so that clients can access the DHCP and TFTP servers.
apt-get install iptables-persistent
iptables -A INPUT -p udp --dport 67 -j ACCEPT
iptables -A INPUT -p udp --dport 69 -j ACCEPT
systemctl iptables-persistent save
systemctl iptables-persistent reload
In the next step, we'll install the Syslinux bootloader utilities by issuing the following command.
apt install syslinux-utils syslinux
Deploy Debian 9 Netboot Files
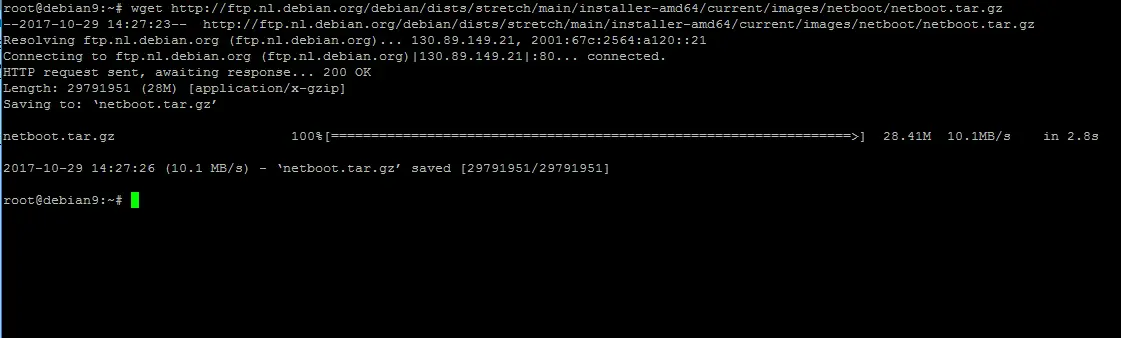
Next, go to Debian netinstall web page at the following address https://www.debian.org/distrib/netinst and download the latest version of Debian netboot archive tarball using the wget command line utility.
wget http://ftp.nl.debian.org/debian/dists/stretch/main/installer-amd64/current/images/netboot/netboot.tar.gz
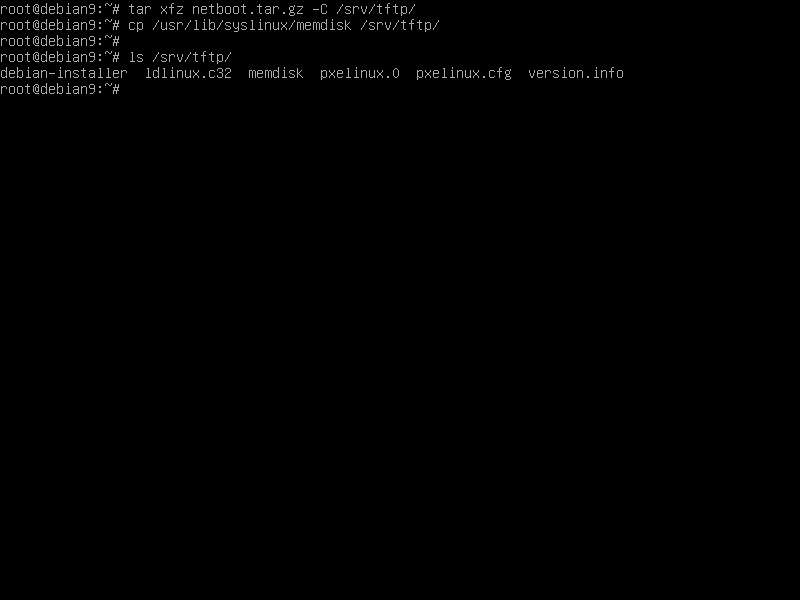
After Debian netinstall tarball has been downloaded, extract the archive content directly to TFTP root path by running the below command.
tar xfz netboot.tar.gz -C /srv/tftp/
Also copy the memdisk file provided by Syslinux package to TFTP root path and list the content of the TFTP directory by issuing the below commands. The /srv/tftp directory should have the content as displayed in the below screenshot.
cp /usr/lib/syslinux/memdisk /srv/tftp/
ls /srv/tftp/
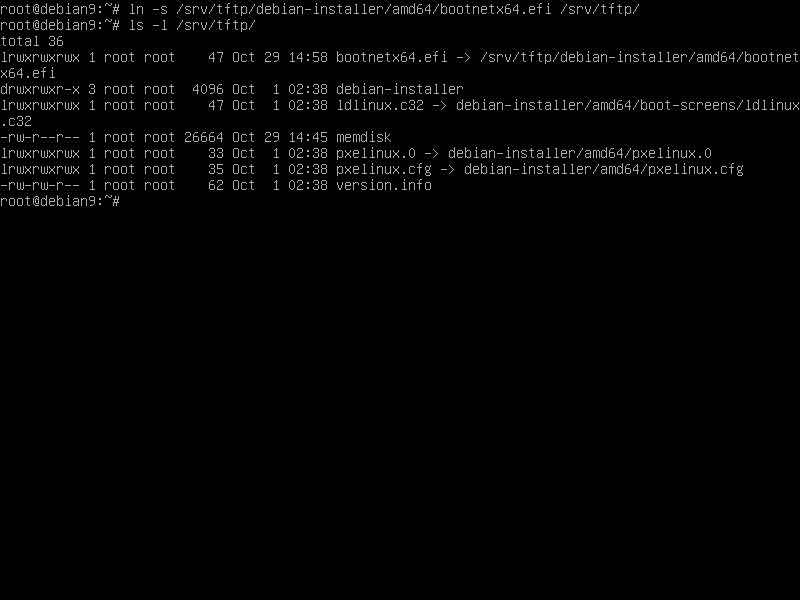
Next, create a symlink for the UEFI bootloader file provided by Debian netinstall package to TFTP root path by issuing the below command. Also, do a long listing of the TFTP directory to see if the soft link correctly points to UEFI netboot file.
ln -s /srv/tftp/debian-installer/amd64/bootnetx64.efi /srv/tftp/
ls -l /srv/tftp/
The PXE server reads and executes configuration files located in pxelinux.cfg directory from TFTP root path in this order: GUID files, MAC files and default file. The directory pxelinux.cfg has been already created and populated with the required PXE default configuration file because we’ve earlier extracted the required netboot files from Debian netinstall archive to /srv/tftp sirectory. There’s no need to further modify the PXE default configuration file from pxelinux.cfg directory. However, the file that actually controls the initial boot menu for Debian is named txt.cfg and is located in /srv/tftp/debian-installer/amd64/boot-screens/ directory. The default pxe configuration file from pxelinux.cfg directory is actually a soft link that points to txt.cfg file. In order to change or add other options to be passed to kernel during the net boot process or add other entries or boot-up other Linux distributions via PXE server, you should open the default txt.cfg PXE configuration file with the below command and make the appropriate changes.
nano /srv/tftp/debian-installer/amd64/boot-screens/txt.cfg
txt.cfg file excerpt:
label install
menu label ^Install
kernel debian-installer/amd64/linux
append vga=788 initrd=debian-installer/amd64/initrd.gz --- quiet
In case you want to use Debian rescue mode via PXE, add an entry to this file with the below configurations.
label rescue
menu label ^Rescue mode
kernel debian-installer/amd64/linux
append vga=788 initrd=debian-installer/amd64/initrd.gz rescue/enable=true --- quiet
To add the entries required to boot Debian over the network in expert mode or use the automated install mode, add the further configurations to txt.cfg file as shown in the below excerpts.
Expert Install:
label expert
menu label ^Expert install
kernel debian-installer/amd64/linux
append priority=low vga=788 initrd=debian-installer/amd64/initrd.gz ---
include debian-installer/amd64/boot-screens/rqtxt.cfg
Automated Install:
label auto
menu label ^Automated install
kernel debian-installer/amd64/linux
append auto=true priority=critical vga=788 initrd=debian-installer/amd64/initrd.gz --- quiet
Also, by inspecting the content of this file, you’ll see that the kernel and initrd.gz images, which are loaded to client’s RAM memory via TFTP network protocol, after the initial PXE menu, are located in /srv/tftp/debian-installer/amd64/ directory. You can change only these two files for future updates of the Debian kernel and initrd.gz.
That’s all! Now have the possibility to boot a client machine via network, use all the entries that are normally displayed when booting Debian via the DVD image and start to install Debian 9 via a PXE server.
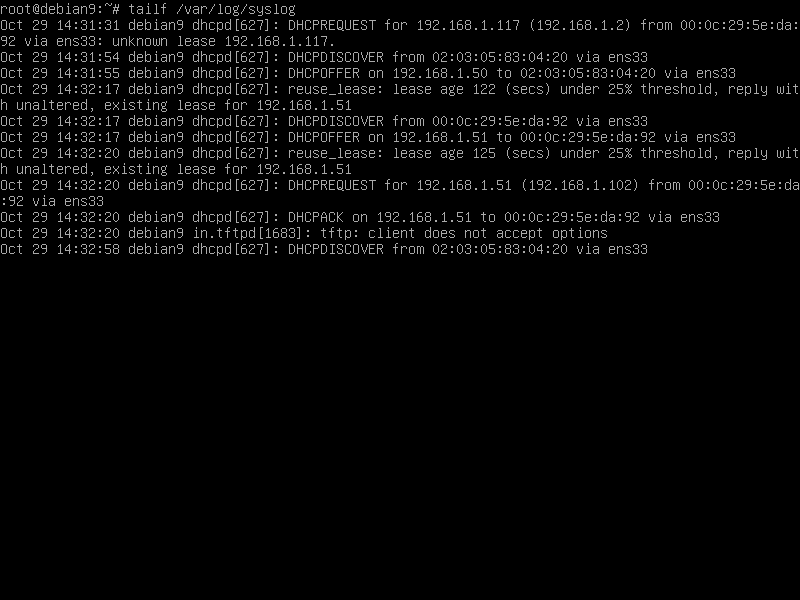
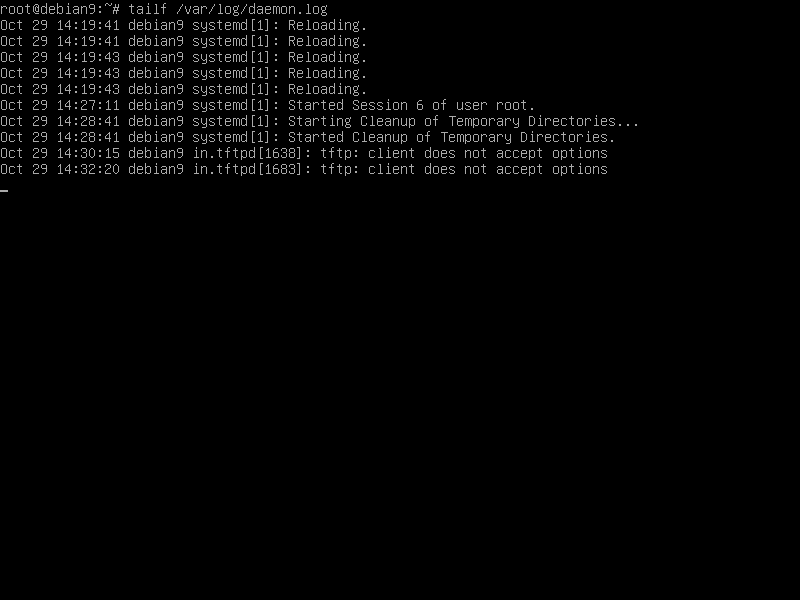
In order to see DHCP log messages that are exchanged between the clients and the server in real time, use tail command against system syslog file. DHCP server discards all its log messages to syslog file. TFTP server log messages can be observed via daemon.log file. The below screenshots illustrates a excerpt of log messages issued by both DHCP and TFTP servers.
tailf /var/log/syslog
tailf /var/log/daemon.log
You can also execute the below command in order to view log messages generated by TFTP server.
journalctl -fu tftpd-hpa
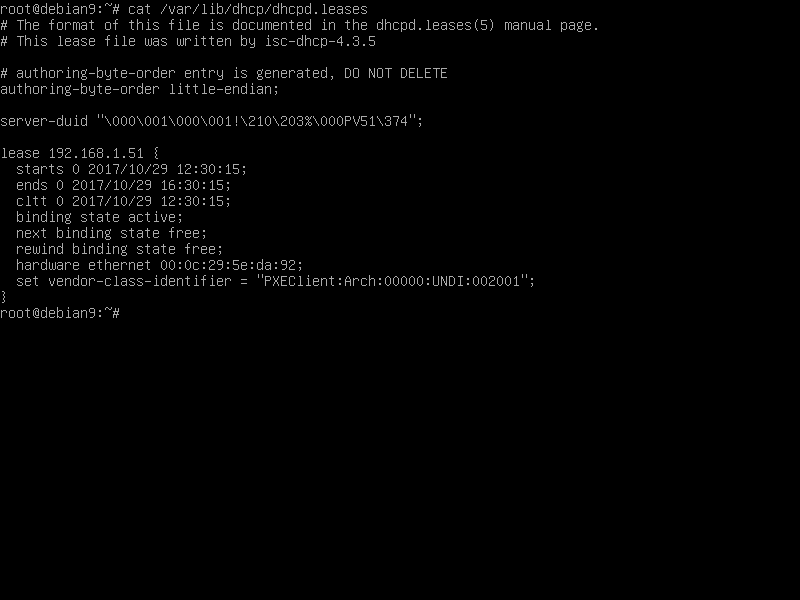
To reveal extended information about the leases granted by the DHCP server to its clients, display the content of the dhcpd.leases file using the cat command, as illustrated in the below example.
cat /var/lib/dhcp/dhcpd.leases
That’s all! You have successfully deployed a PXE server in your network. You can now start installing Debian over the network by instructing the client machine to boot-up via PXE. You can network boot a client machine by pressing a special function key during machine POST initialization. Consult your machine motherboard vendor documentation in order to find out the proper netboot key.
The process of installing Debian over the network is very similar (only a few small differences) with the process of installing the system via a DVD ISO image or using a bootable USB flash drive.

