Install WebMail Lite PHP based Webmail Client on Debian 9.1
On this page
In this guide, we’ll show you how to install the latest version of WebMail Lite PHP in Debian 9.1 and show you how to configure the application to fetch e-mails from a popular mail service Yahoo! Mail. We’ll use Yahoo! Mail services only for demonstration purposes, but feel free to use your own domain for mail handling with WebMail Lite, because the procedure to add the domain settings is mostly the same as for configuring Yahoo! Mail services. We’ll use the WebMail Lite client as an interface to IMAP and SMTP services provided by a Yahoo! account and all e-mails will be handled locally on our own private web server.
WebMail Lite is a free Open-source mail user agent or web client written in PHP and deployed on Linux under Apache/Nginx, PHP and MySQL/MariaDB components that make the LEMP/LAMP stack. WebMail Lite can be used to access mail via IMAP/S and/or SMTP/S protocols in order to sync mail files and/or send mail messages.
Requirements
- Debian 9 minimal installation on a bare-metal machine or on a virtual private server.
- A static IP address configured for one of your system network interfaces cards.
- sudo root privileges for a local or remote account or direct access to root account.
- A domain name, private or public, depending on your deployment, with the proper DNS records configured.
- A mail service properly configured at your premises with remote access to its IMAP and SMTP services.
Initial Configuration
Before starting to install and configure WebMail Lite from source on your own server, first assure the system meets all the software requirements for compiling and installing the application. In the first step, update your system repositories and software packages by issuing the below command.
apt update
apt upgrade
In the next step, execute the following command in order to install some utilities that will be used to further manage your system from the command line.
apt install wget bash-completion unzip
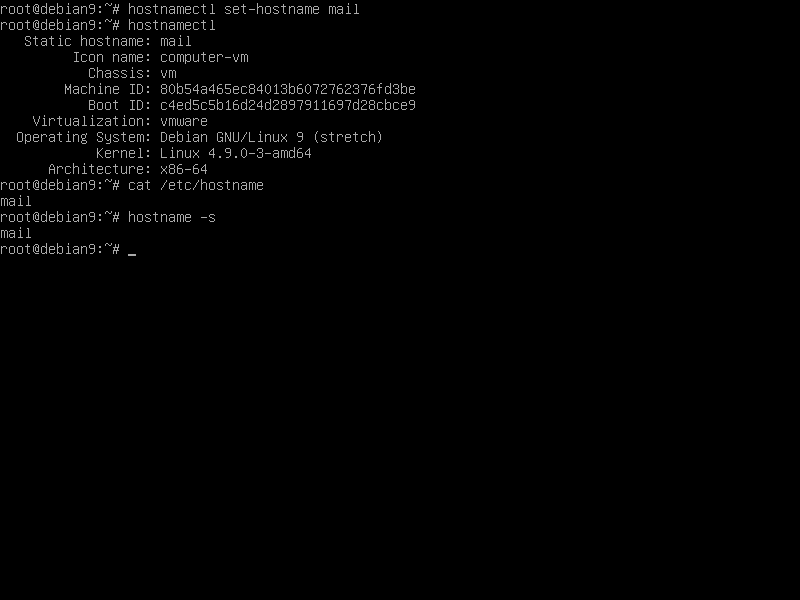
Next, set up the name for your system by executing the following command. Replace your hostname variable accordingly.
hostnamectl set-hostname mail
Verify machine hostname and hosts file by issuing the below commands.
hostnamectl
cat /etc/hostname
hostname –s
hostname –f
Finally, reboot Debian server in order to apply kernel updates and the hostname changes properly.
systemctl reboot
WebMail Lite is a webmail client written mostly in PHP server-side programming language. In order to execute WebMail Lite PHP file scripts, a web server, such as Apache HTTP server, and a PHP processing gateway must be installed and operational in the system. In order to install Apache web server and the PHP interpreter alongside with all required PHP modules needed by the application to run properly, issue the following command in your server console.
apt install apache2 libapache2-mod-php7.0 php7.0 php7.0-xml php7.0-mcrypt php7.0-opcache php7.0-mbstring php7.0-curl
After Apache and PHP have been installed, test if the web server is up and running and listening for network connections on port 80 by issuing the following command with root privileges.
netstat –tlpn
In case netstat network utility is not installed by default on your Debian system, execute the below command to install it.
apt install net-tools
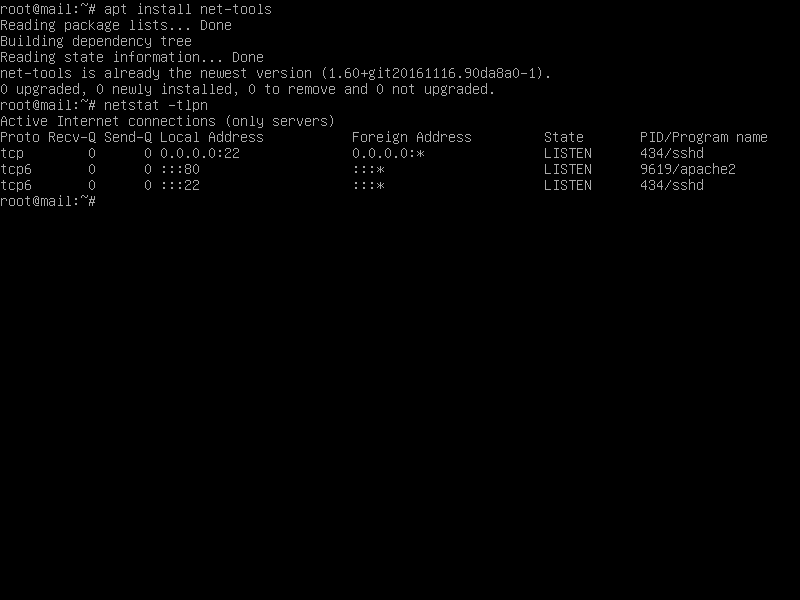
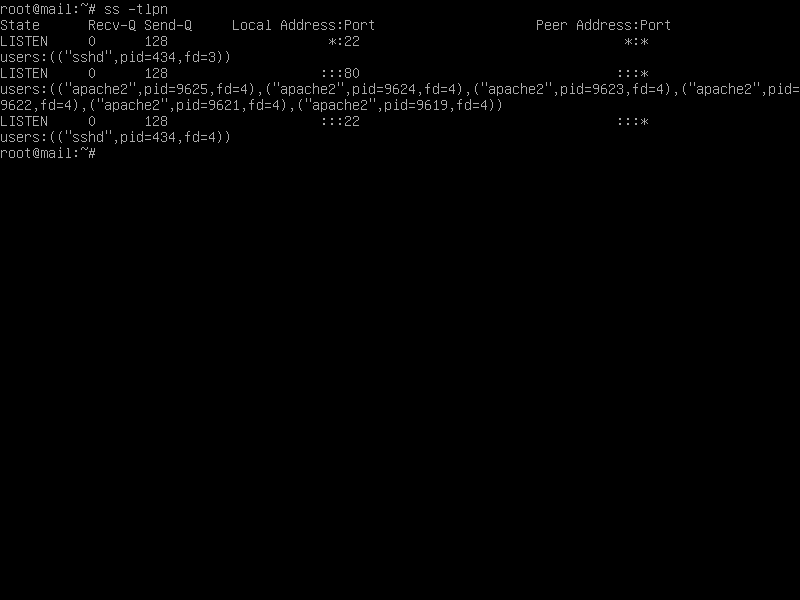
By inspecting the netstat command output you can see that Apache web server is listening for incoming network connections on port 80. For the same task, you can also use the ss command, which is automatically installed by default in Debian 9.
ss- tlpn
In case you have a firewall enabled in your system, such as UFW firewall application, you should add a new rule to allow HTTP traffic to pass through firewall by issuing the following command.
ufw allow WWW
or
ufw allow 80/tcp
If you’re using iptables raw rules to manage Firewall rules in your Debian server, add the following rule to allow port 80 inbound traffic on the firewall so that visitors can browse the online application.
apt-get install -y iptables-persistent
iptables -I INPUT -p tcp --destination-port 80 -j ACCEPT
systemctl iptables-persistent save
systemctl iptables-persistent reload
Next, enable the following Apache modules which will be used to secure some parts of WebMail Lite application, by issuing the below command.
a2enmod rewrite
systemctl restart apache2
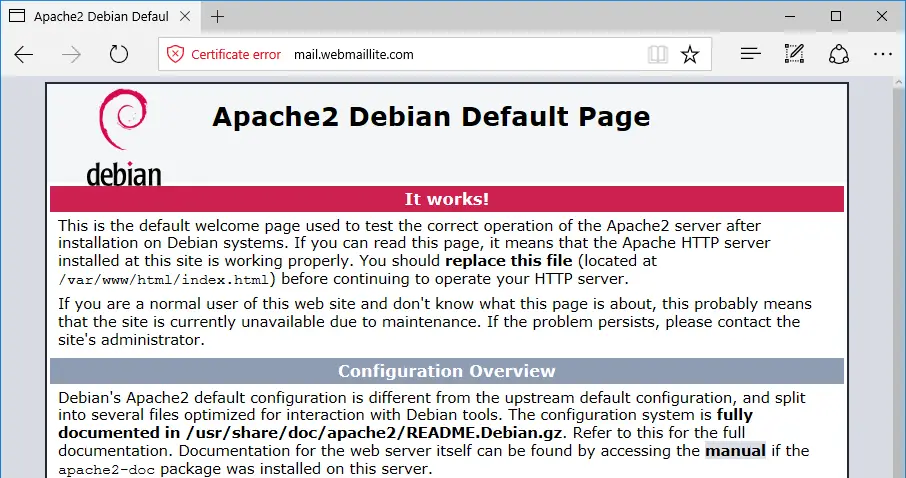
Finally, test if Apache web server default web page can be displayed in your clients browsers by visiting your Debian machine IP address or your domain name or server FQDN via HTTP protocol. If you don’t know your machine IP address, execute ifconfig or ip a commands to reveal the IP address of your server. The default Apache page for Debian will be displayed in your browser.
http://your_domain.tld
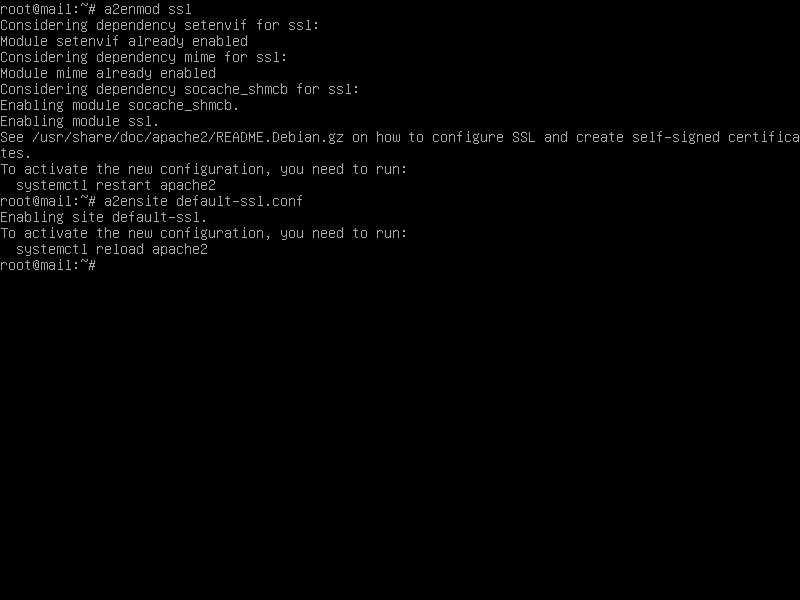
In order to install and access WebMail Lite application via HTTPS protocol that will secure the traffic for your clients, issue the following command to enable Apache web server SSL module and SSL site configuration file.
a2enmod ssl
a2ensite default-ssl.conf
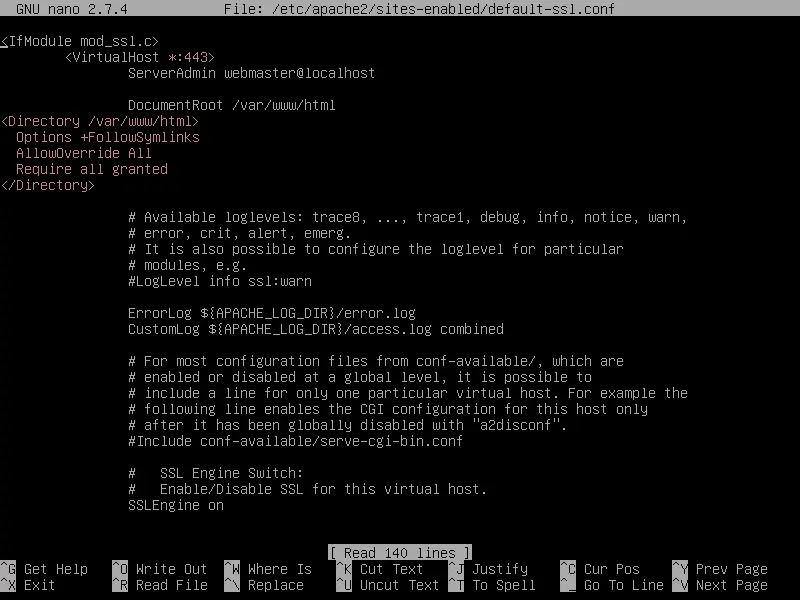
Next, open Apache default SSL site configuration file with a text editor and enable URL rewrite rules by adding the following lines of code after DocumentRoot directive, as shown in the below sample:
nano /etc/apache2/sites-enabled/default-ssl.conf
SSL site configuration file excerpt:
<Directory /var/www/html>
  Options +FollowSymlinks
  AllowOverride All
  Require all granted
</Directory>
Also, make the following change to VirtualHost line to look like shown in the below excerpt:
<VirtualHost *:443>
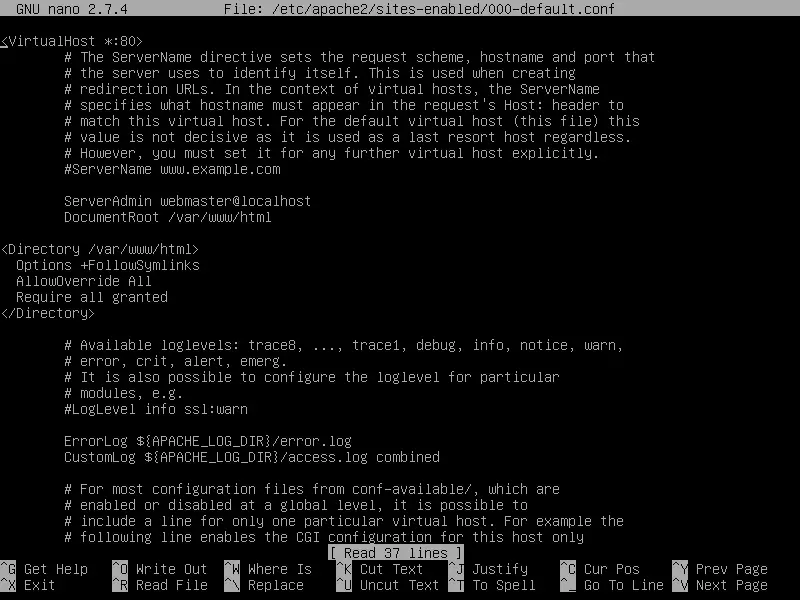
Close the SSL Apache file and open /etc/apache2/sites-enabled/000-default.conf file for editing and add the same URL rewrite rules as for SSL configuration file. Insert the lines of code after DocumentRoot statement as shown in the below example.
<Directory /var/www/html>
  Options +FollowSymlinks
  AllowOverride All
  Require all granted
</Directory>
Finally, restart Apache daemon to apply all rules configured so far and visit your domain via HTTP protocol. Because you’re using the automatically Self-Signed certificates pairs issued by Apache at installation, an error warning should be displayed in the browser, as shown in the below screenshot.
systemctl restart apache2
https://yourdomain.tld
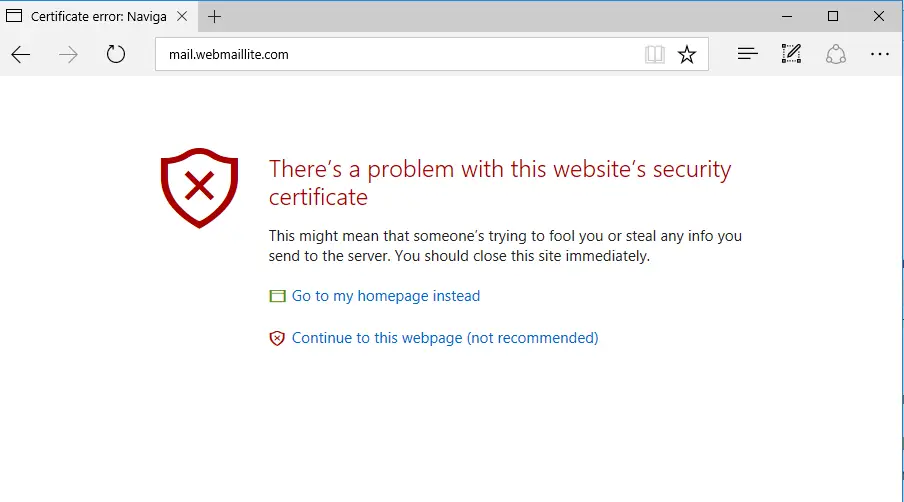
Accept the warning in order to continue and be redirected to Apache default webpage via HTTPS.
In case the UFW firewall application blocks incoming network connections to HTTPS port, you should add a new rule to allow HTTPS traffic to pass through firewall by issuing the following command.
ufw allow 'WWW Full'
or
ufw allow 443/tcp
If iptables is the default firewall application installed to protect your Debian system at the network level. Add the following rule to allow port 443 inbound traffic in the firewall so that visitors can browse your domain name.
iptables -I INPUT -p tcp --destination-port 443 -j ACCEPT
systemctl iptables-persistent save
systemctl iptables-persistent reload
In the next step, we need to make some further changes to PHP default configuration file in order to assure that the following PHP variables are enabled and the PHP timezone setting is correctly configured and matches your system geographical location. Open /etc/php/7.0/apache2/php.ini file for editing and assure that the following lines are setup as follows. Also, initially, make a backup of PHP configuration file.
cp /etc/php/7.0/apache2/php.ini{,.backup}
nano /etc/php/7.0/apache2/php.ini
Search, edit and change the following variables in php.ini configuration file:
file_uploads = On
allow_url_fopen = On
memory_limit = 128 M
upload_max_file_size = 64M
date.timezone = Europe/London
Increase memory_limit variable as suitable to support large file attachments and replace the time.zone variable accordingly to your physical time by consulting the list of time zones provided by PHP docs at the following link http://php.net/manual/en/timezones.php
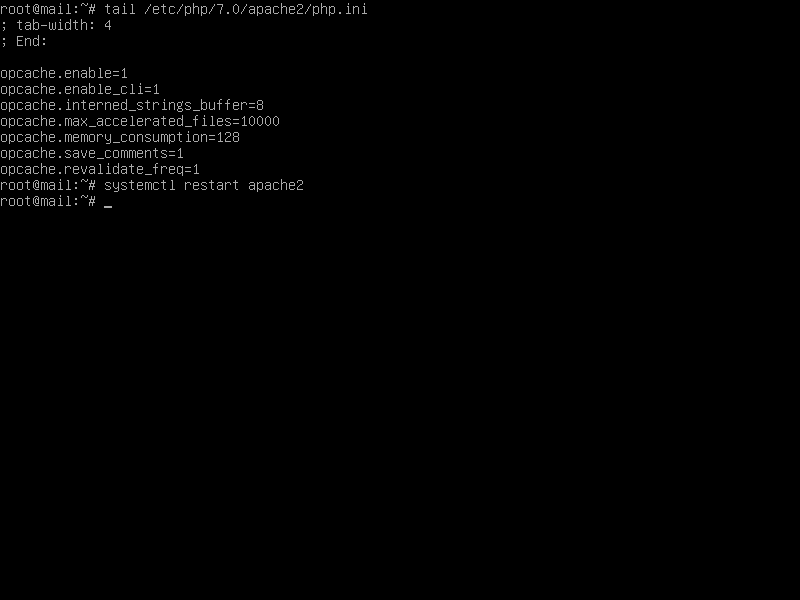
If you want to increase the load speed of your website pages via OPCache plugin available for PHP7, append the following OPCache settings at the bottom of the PHP interpreter configuration file, as detailed below:
opcache.enable=1
opcache.enable_cli=1
opcache.interned_strings_buffer=8
opcache.max_accelerated_files=10000
opcache.memory_consumption=128
opcache.save_comments=1
opcache.revalidate_freq=1
Close the php.ini configuration file and check if the verify the end of PHP configuration file to check if the variables had been correctly added by issuing the below command.
tail /etc/php/7.0/apache2/php.ini
After you’ve made all changes explained above, restart apache daemon to apply the new changes by issuing the following command.
systemctl restart apache2
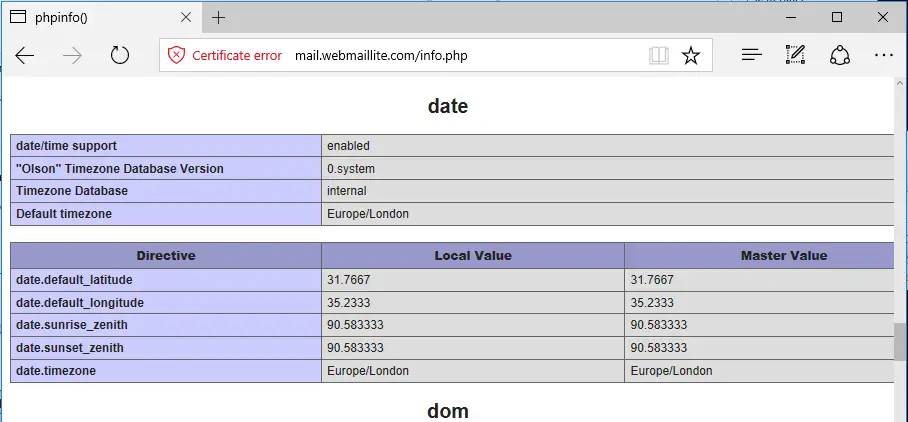
Finally, create a PHP info file by executing the following command and check if the PHP time zone has been correctly configured by visiting the PHP info script file from a browser at the following URL, as illustrated in the below image. Scroll down to date setting to check php time zone configuration.
echo '<?php phpinfo(); ?>'| tee /var/www/html/info.php
https://domain.tld/info.php
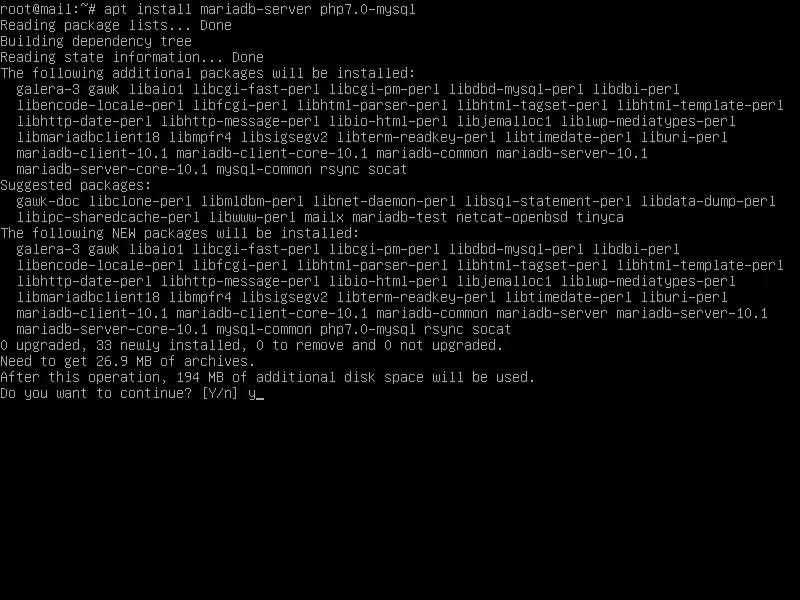
WebMail Lite webmail client stores different configurations, such as users, sessions, contacts, and others, in an RDBMS database. In this guide, we’ll configure WebMail Lite to use MariaDB database as backend. Issue the below command to install MariaDB database and the PHP module needed to access mysql database.
apt install mariadb-server php7.0-mysql
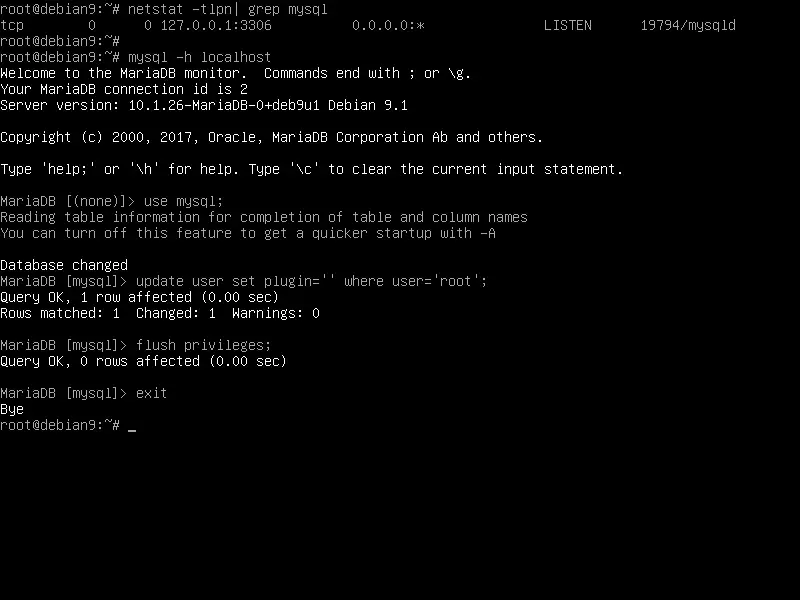
After you’ve installed MariaDB, verify that the daemon is running and listening for connections on localhost, port 3306, by running netstat or ss command.
netstat –tlpn | grep mysql
Then, log in to MySQL console and secure MariaDB root account by issuing the following commands.
mysql -h localhost
use mysql;
update user set plugin='' where user='root';
flush privileges;
exit
In the next step, secure MariaDB by executing the script mysql_secure_installation. While running the script will ask a series of questions designed to secure MariaDB database, such as: to change MySQL root password, to remove anonymous users, to disable remote root logins and delete the test database. Execute the script by issuing the below command and assure you type yes to all questions asked in order to fully secure MySQL daemon. Use the below script output except as a guide.
sudo mysql_secure_installation
NOTE: RUNNING ALL PARTS OF THIS SCRIPT IS RECOMMENDED FOR ALL MariaDB
SERVERS IN PRODUCTION USE! PLEASE READ EACH STEP CAREFULLY!
In order to log into MariaDB to secure it, we'll need the current
password for the root user. If you've just installed MariaDB, and
you haven't set the root password yet, the password will be blank,
so you should just press enter here.
Enter current password for root (enter for none):
OK, successfully used password, moving on...
Setting the root password ensures that nobody can log into the MariaDB
root user without the proper authorisation.
You already have a root password set, so you can safely answer 'n'.
Change the root password? [Y/n] y
New password:
Re-enter new password:
Password updated successfully!
Reloading privilege tables..
... Success!
By default, a MariaDB installation has an anonymous user, allowing anyone
to log into MariaDB without having to have a user account created for
them. This is intended only for testing, and to make the installation
go a bit smoother. You should remove them before moving into a
production environment.
Remove anonymous users? [Y/n] y
... Success!
Normally, root should only be allowed to connect from 'localhost'. This
ensures that someone cannot guess at the root password from the network.
Disallow root login remotely? [Y/n] y
... Success!
By default, MariaDB comes with a database named 'test' that anyone can
access. This is also intended only for testing, and should be removed
before moving into a production environment.
Remove test database and access to it? [Y/n] y
- Dropping test database...
... Success!
- Removing privileges on test database...
... Success!
Reloading the privilege tables will ensure that all changes made so far
will take effect immediately.
Reload privilege tables now? [Y/n] y
... Success!
Cleaning up...
All done! If you've completed all of the above steps, your MariaDB
installation should now be secure.
Thanks for using MariaDB!
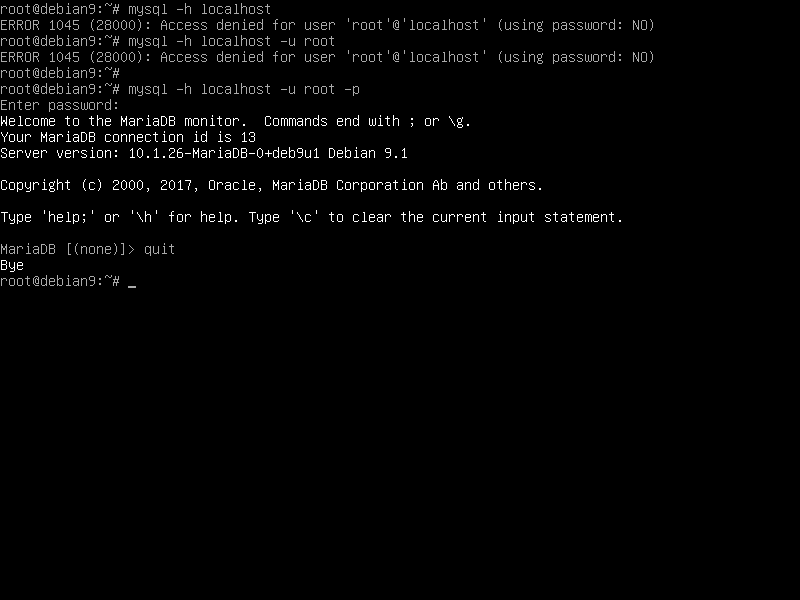
In order to test MariaDB security, try login to the database from console with no root password. The access to the database should be denied if no password is provided for the root account. If the password is supplied, the login process should be granted to MySQL console, as shown in the below screenshot.
mysql -h localhost -u root
mysql -h localhost -u root –p
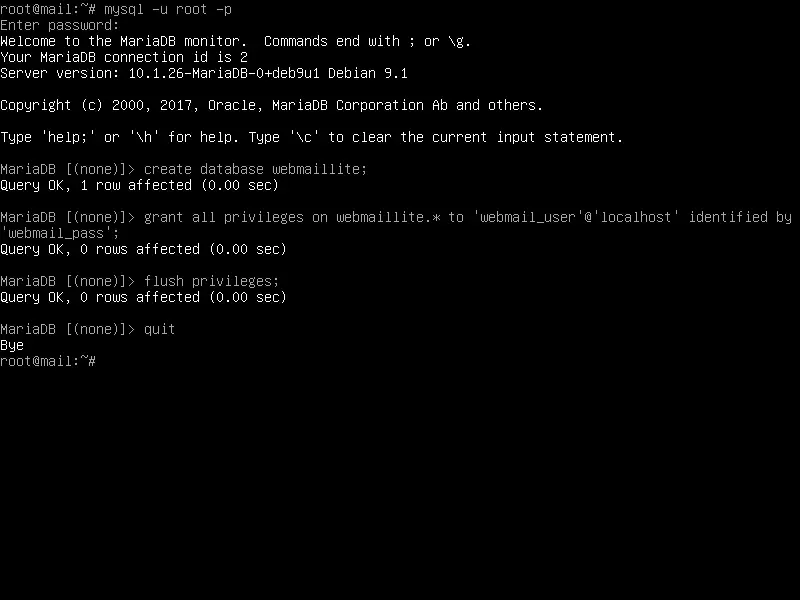
Next, log into the MariaDB database console, create a database to use it for WebMail Lite and a user with a password that will be used to manage this database, by issuing the following commands. Replace the WebMail Lite database name, user, and password accordingly.
mysql –u root -p
create database webmaillite;
grant all privileges on webmaillite.* to 'webmail_user'@'localhost' identified by 'webmail_pass';
flush privileges;
exit
In order to apply all changes made so far, restart MySQL and Apache daemons and verify if daemons are running by issuing the following commands.
systemctl restart mysql apache2
systemctl status mysql apache2
Install WebMail Lite
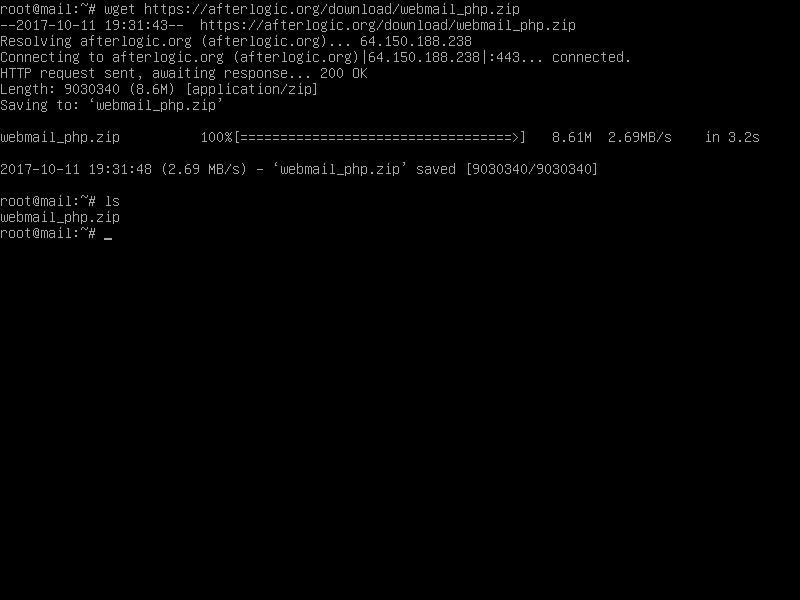
After all system requirements are met, visit WebMail Lite webpage at https://afterlogic.org/download/webmail-lite-php and download the latest zip package compressed archive by issuing the wget utility, as illustrated in the following sample.
wget https://afterlogic.org/download/webmail_php.zip
After the zip archive download finished, extract WebMail Lite zip compressed archive and list the extracted files by issuing the below commands. Also, remove the default index.html file installed by Apache web server to webroot path and also delete the info.php file created earlier.
rm /var/www/html/index.html
rm /var/www/html/info.php
unzip webmail_php.zip
ls
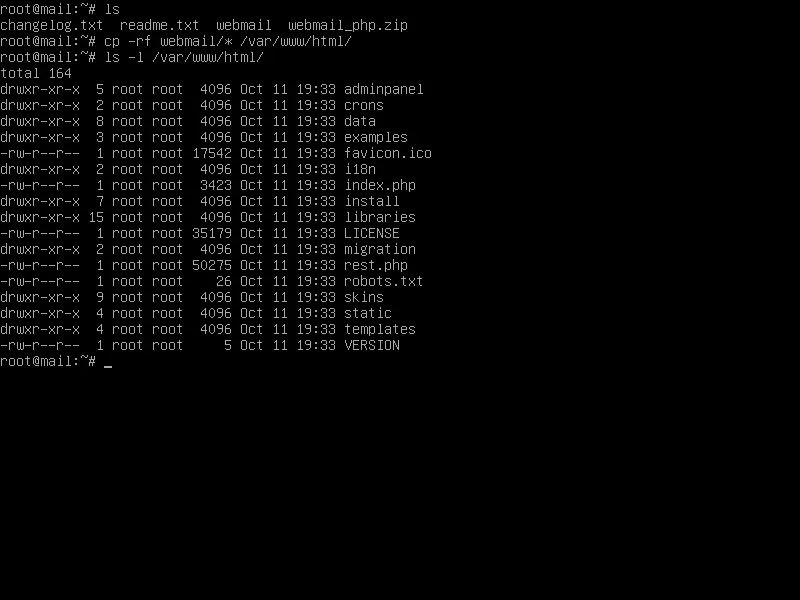
Then, recursively copy the extracted files of the webmail directory to your domain webroot path by issuing the below command. Also, you can list the webroot path to see if all files from webmail directory are completely transferred to webroot.
ls webmail
cp -rf webmail/* /var/www/html/
ls -l /var/www/html/
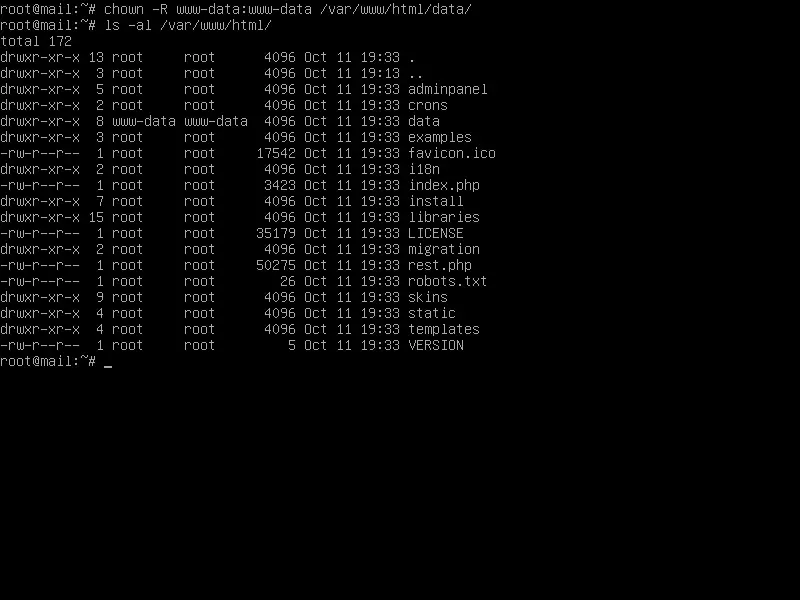
Next, execute the below commands in order to grant Apache runtime user with full write permissions to the web root path. Use ls command to list permissions for Prestashop installation files located in /var/www/html/ directory.
chown -R www-data:www-data /var/www/html/
ls –al /var/www/html/
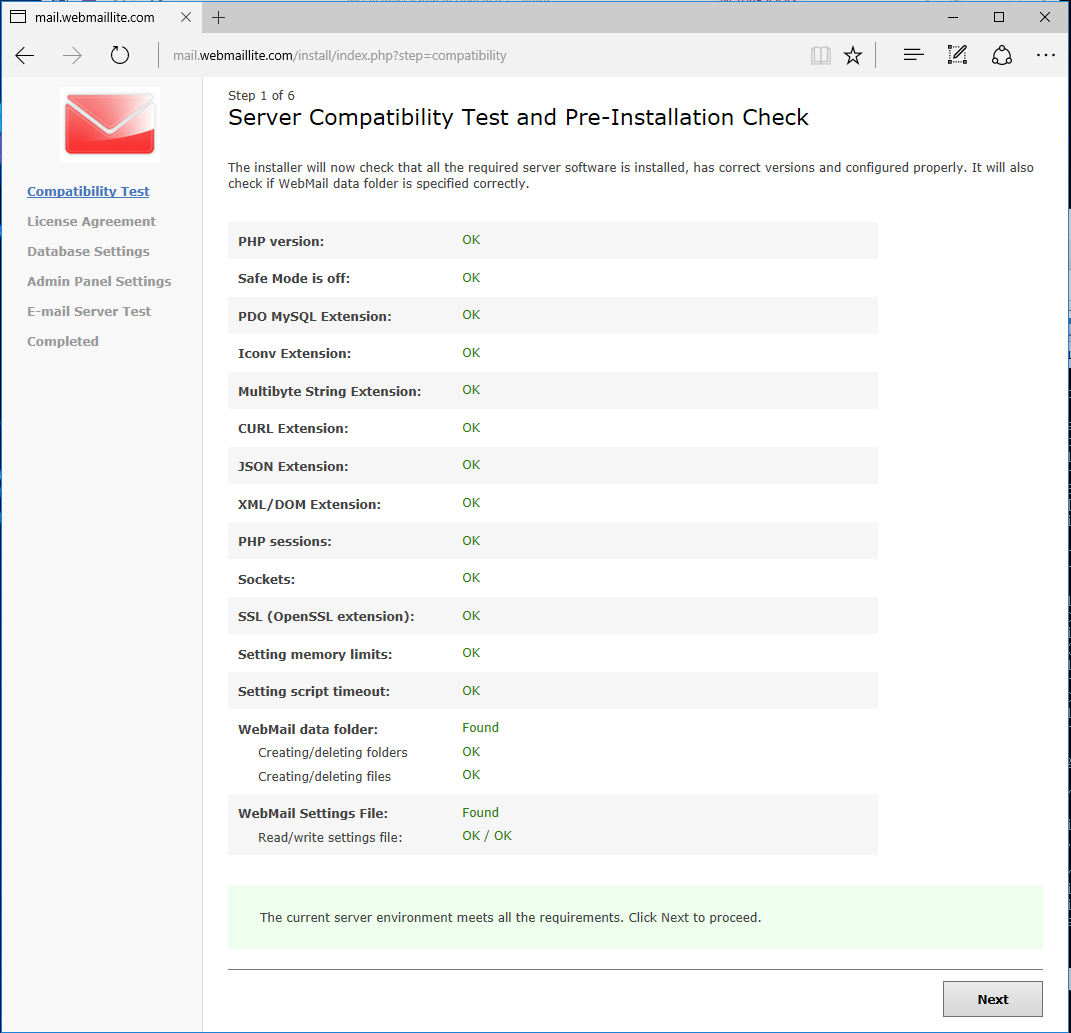
Proceed with WebMail Lite installation process by opening a browser and navigate your server’s IP address or domain name via HTTPS protocol to the /install directory. On the first installation screen, WebMail Lite installer script will make a series of system checks in order to determine if all required PHP extensions and modules are installed on your server and if the apache user has write permissions to data directory and to the configuration file, as shown in the below image. If all server requirements are passed, hit on Next button to move to the next installation screen.
https://yourdomain.tld/install
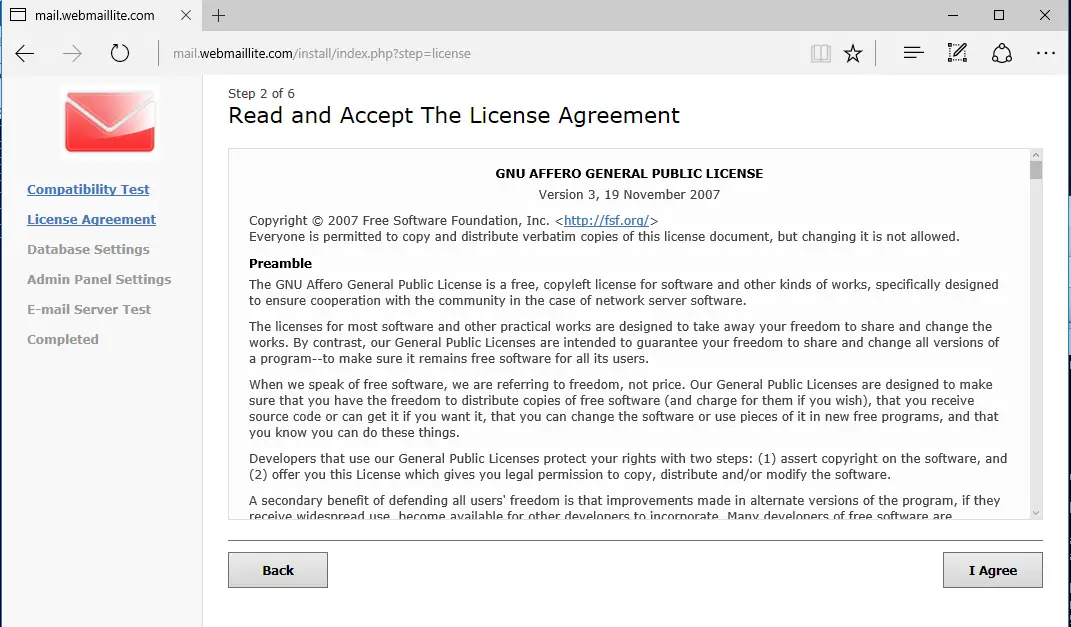
On the next installation screen, read and accept the license agreement terms and hit on I Agree button to continue, as illustrated in the below image.
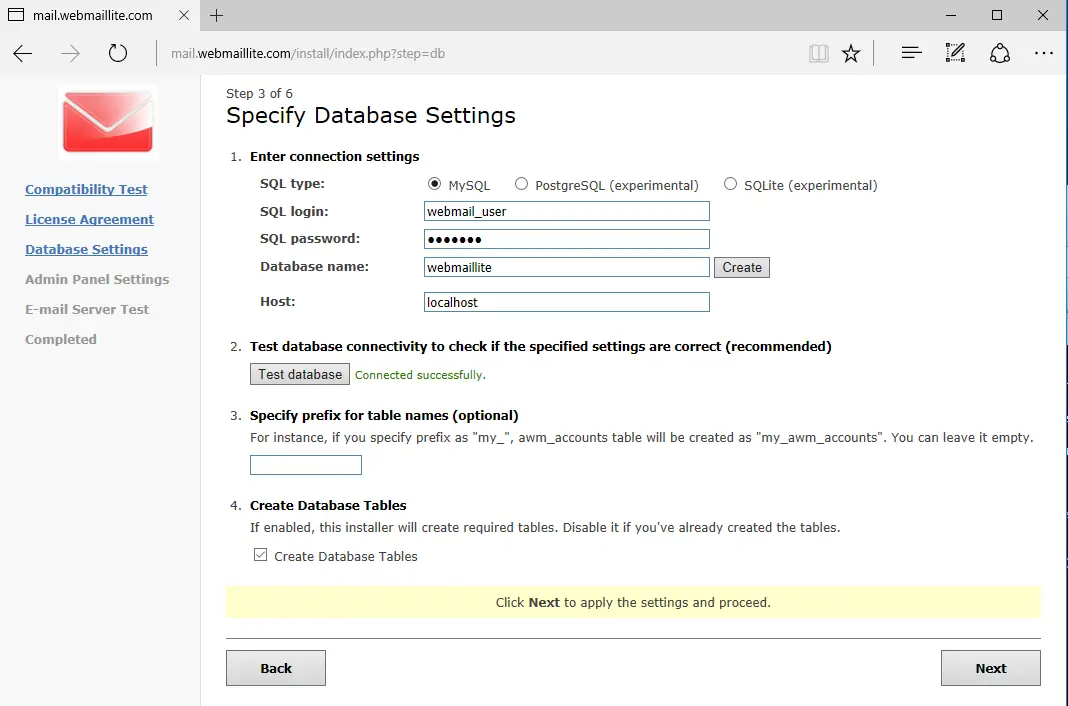
On the next installation screen, choose database type MySQL and specify MySQL database host address, the name of the database and credentials created earlier for accessing WebMail Lite database. Test your database connection by hitting on Test database button and if the connection to MySQL database is successful, check Create database Tables in order for the installer to create the required tables and hit on Next button to move to the next installation screen.
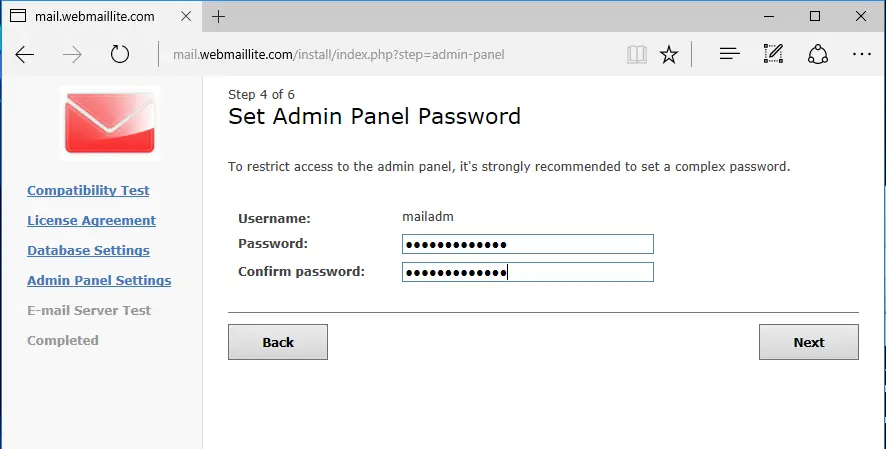
On the next installation screen, supply a strong password for mailadm user and hit on next button to continue. This user will be used to manage different aspects of WebMail Lite via the admin panel.
Now we’ll check if the connection to a mail server is working as expected via IMAP and SMP protocols. For demonstration purposes, we’ll configure and test the connection to the mail services provided by Yahoo! Mail. You can change the mail services domain accordingly. To test the SMTP connection of Yahoo! Mail servers, write the following address to E-mail server host field, smtp.mail.yahoo.com, check SMTP checkbox and hit test connection button. If the connection to Yahoo! SMTP server is successfully established, a green message will inform you that you can send outgoing e-mails via SMTP from Yahoo! Mail.

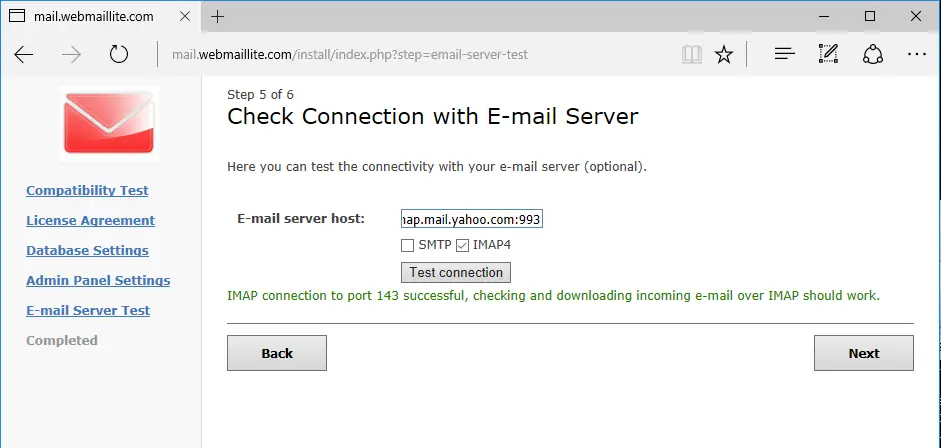
To test if encrypted IMAP connections are allowed for Yahoo! Mail server, enter imap.mail.yahoo.com:993 in E-mail server host field, check IMAP4 checkbox and press Test Connection button. If the connection to Yahoo! IMAP server is successfully established, a green message will inform you that you can check and download incoming e-mails over IMAPS from Yahoo! Mail. When you finish hit on next button to move to the last installation step.
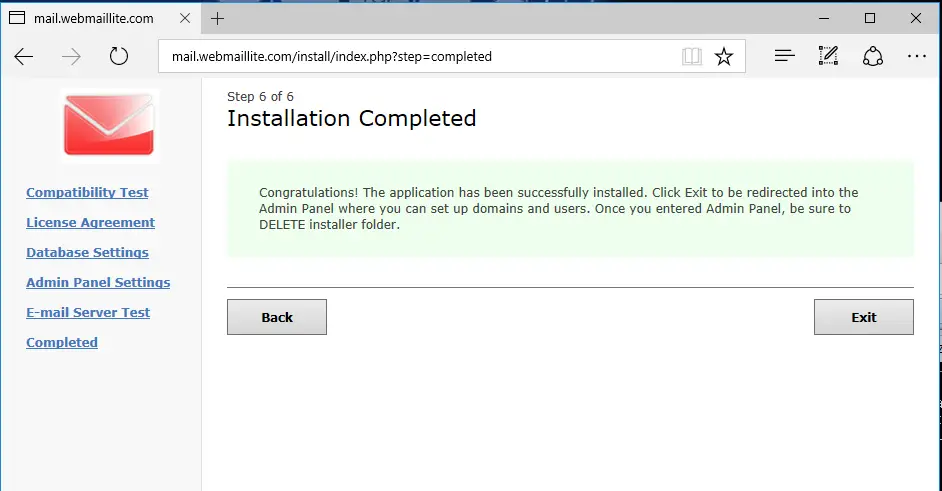
After the installation process completed, the installer will inform you that WebMail Lite web application has been successfully installed and you should delete the installer directory from your domain webroot. Hit on Exit button to leave the screen and go to the WebMail Lite admin panel.
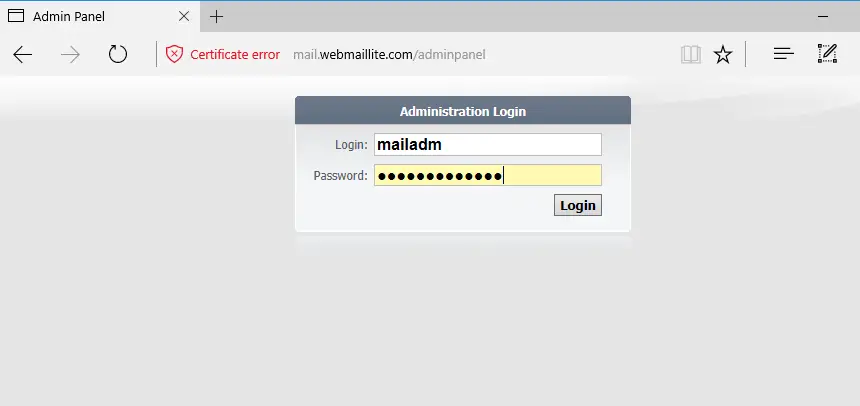
Navigate to the following address in order to access WebMail Lite Admin Panel. Replace the domain name or IP address accordingly.
https://yourdomain.tld/adminpanel
Login to the admin panel with the mailadm username and the password setup for this user during the installation process, as illustrated in the below screenshot.
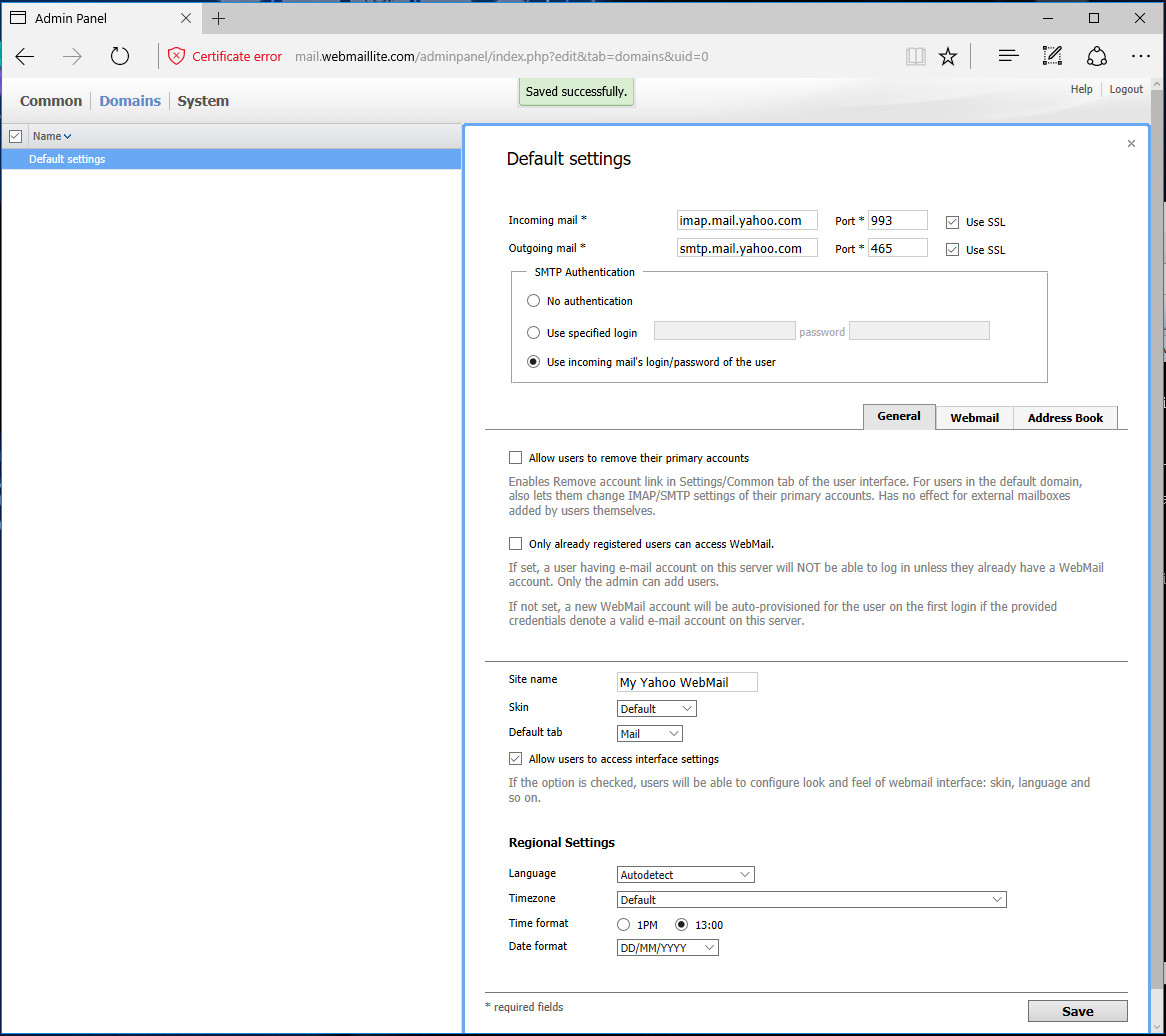
In order to setup your domain mail services for WebMail Lite, navigate to Domains -> Default settings. For demonstration purposes, in this guide, we’ll setup WebMail Lite to manage e-mails for a Yahoo! Mail account, but feel free to configure your own domain by adding the required settings.
In incoming mail field, add the IMAP address of Yahoo! Mail server: imap.mail.yahoo.com and the port 993. Also, check Use SSL checkbox to retrieve emails via a secured connection.
In outgoing mail field, add the SMTP address of Yahoo! Mail server: smtp.mail.yahoo.com and port 465. Also, check Use SSL checkbox to send emails via a secured connection.
In SMTP Authentication, check 'Use incoming mail’s login/password of the user' in order to authenticate to Yahoo! Mail SMTP servers.
Finally, you can also have the options to add a name for your site, change the theme of WebMail Lite application and allow users to access interface settings. Also, you can change your application regional settings, as illustrated in the below screenshot. To save and apply settings hit on Save button.
WebMail Lite admin panel offers other options which can be used to modify your application settings, such as enable logging, change mailadm account name and password or integrate the webmail interface with other external services. When you finish setup your custom settings hit on Logout button.
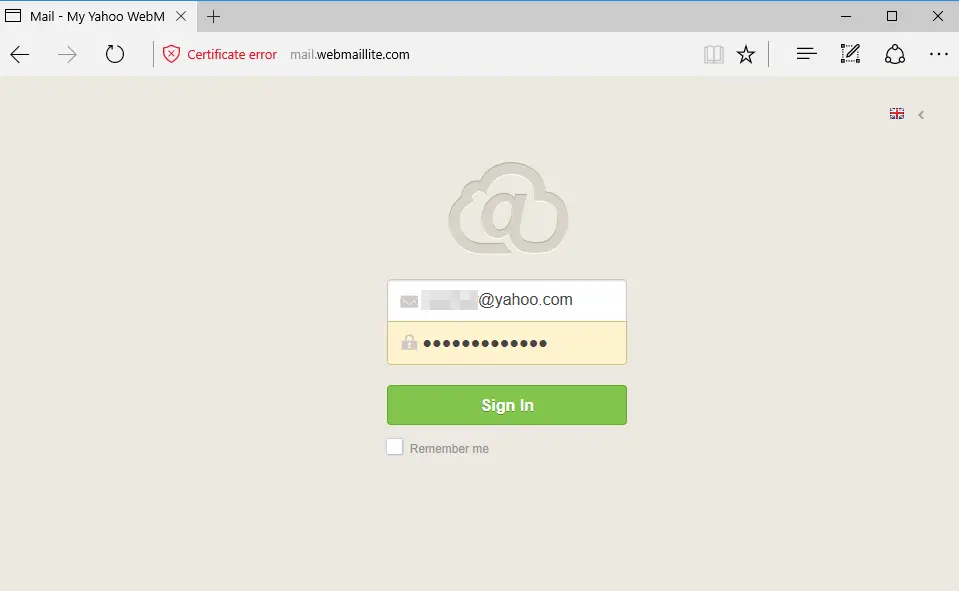
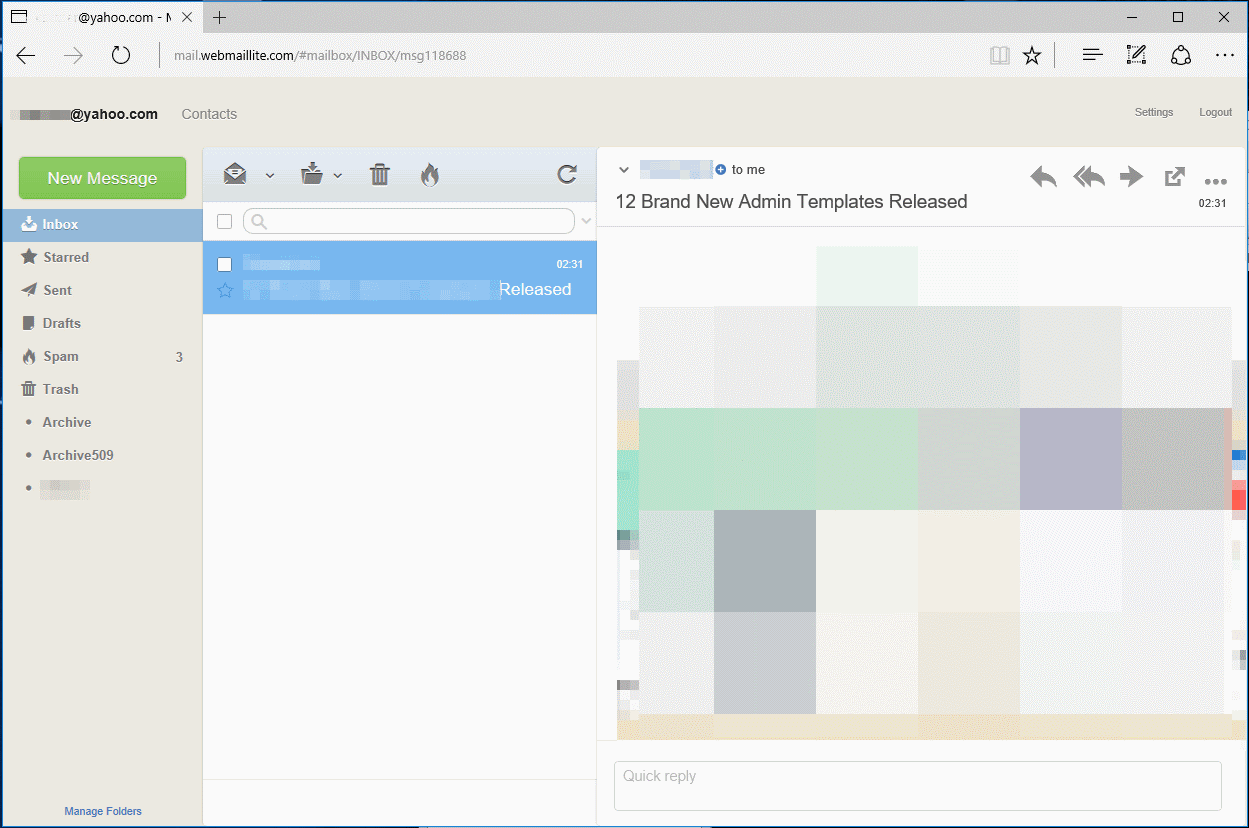
To log in to WebMail Lite application with a Yahoo! Mail account, navigate to your domain name via HTTP protocol and supply your Yahoo! Mail credentials as shown in the below image. The emails of your Yahoo! account will be listed in WebMail Lite interface.
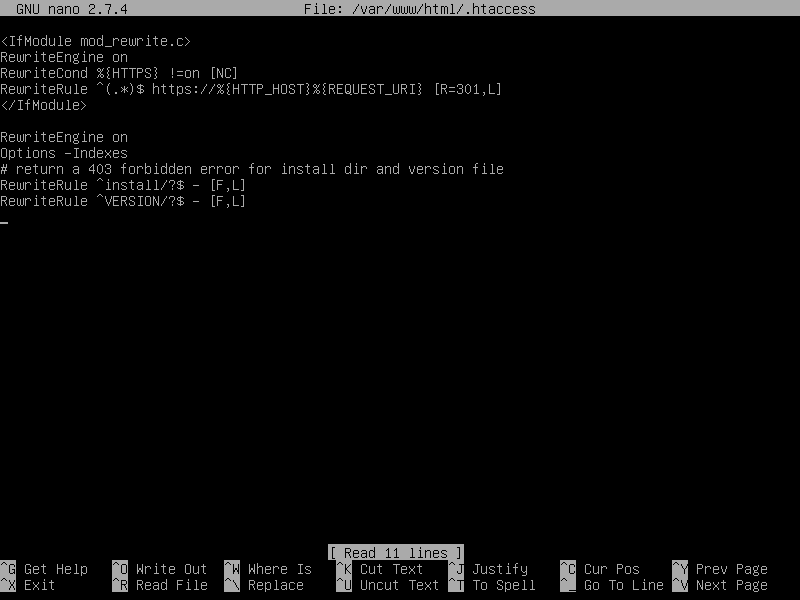
In order to force visitors to browse WebMail Lite interface via HTTPS protocol and protect the installation directory and version file, go to your server console and create a new .htaccess file in your web server document root path with the following content.
nano /var/www/html/.htaccess
.htaccess file excerpt:
<IfModule mod_rewrite.c>
RewriteEngine on
RewriteCond %{HTTPS} !=on [NC]
RewriteRule ^(.*)$ https://%{HTTP_HOST}%{REQUEST_URI} [R=301,L]
</IfModule>

RewriteEngine on
Options -Indexes
# return a 403 forbidden error for install dir and version file
RewriteRule ^install/?$ - [F,L]
RewriteRule ^VERSION/?$ - [F,L]
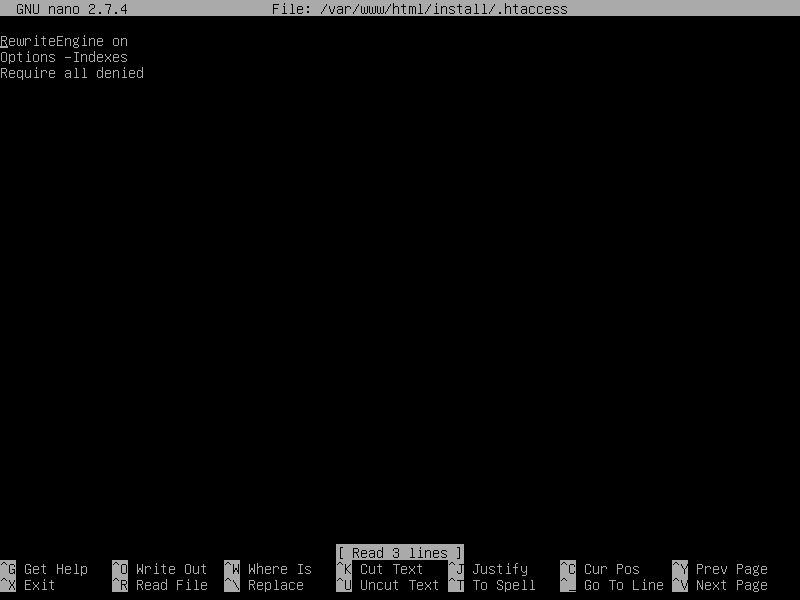
Create a new .haccess file in the install directory with the below content:
nano /var/www/html/install/.htaccess
.htaccess file excerpt:
RewriteEngine on
Options -Indexes
Require all denied
That’s all! You have successfully installed and configured WebMail Lite in Debian 9.1. However, because your Apache HTTP server uses Self-Signed certificates to encrypt the traffic between the server and visitor’s browsers, a warning message will always be generated and displayed in your browser. In this case, you should buy a certificate issued by a trusted Certificate Authority or get a free certificate pair from Let’s Encrypt CA. For other custom configurations regarding WebMail Lite, visit the documentation page at the following address: https://afterlogic.com/docs/webmail-lite

