How to Install a MongoDB Sharded Cluster on CentOS 7
On this page
- Sharding and Replication
- Three Sharding Components
- Step 1 - Disable SELinux and Configure Hosts
- Step 2 - Install MongoDB on All Instances
- Step 3 - Create Config Server Replica Set
- Step 4 - Create Shard Replica Sets
- Step 5 - Configure mongos/Query Router
- Step 6 - Add shards to mongos/Query Router
- Step 7 - Testing
- Reference
Sharding is a MongoDB process to store data-set across different machines. It allows you to do a horizontal scale of data, partition data across independent instances, and it can be 'Replica Sets'. Data-set partitioning on 'Sharding' uses shard key. Sharding allows you to add more machines based on data growth on your stack.
Sharding and Replication
Let's make it simple. When you have collections of music, 'Sharding' will save and keep your music collections into a different folder. 'Replication,' on the other hand, is just syncing your music collections to other instances.
Three Sharding Components
Shard - Used to store all data, and in a production environment, each shard is replica sets. Provides high-availability and data consistency.
Config Server - Used to store cluster metadata, contains a mapping of cluster data set and shards. This data is used by mongos/query server to deliver operations. It's recommended to use more than 3 instances in production.
Mongos/Query Router - This is just mongo instances running as application interfaces. The application will make requests to mongos instances, and then mongos will deliver the requests using shard key to the shards replica sets.
Prerequisites
- 2 centOS 7 server as Config Replica Sets
- 10.0.15.31 configsvr1
- 10.0.15.32 configsvr2
- 4 CentOS 7 server as Shard Replica Sets
- 10.0.15.21 shardsvr1
- 10.0.15.22 shardsvr2
- 10.0.15.23 shardsvr3
- 10.0.15.24 shardsvr4
- 1 CentOS 7 server as mongos/Query Router
- 10.0.15.11 mongos
- Root privileges
- Each server connected to another server
Step 1 - Disable SELinux and Configure Hosts
For this tutorial, we will disable SELinux. Change SELinux configuration from 'enforcing' to 'disabled'.
Connect to all nodes through OpenSSH.
ssh root@SERVERIP
Disable SELinux by editing the configuration file.
vim /etc/sysconfig/selinux
Change SELinux value to 'disabled'.
SELINUX=disabled
Save and exit.
Next, edit the hosts file on each server.
vim /etc/hosts
Paste the following hosts configuration:
    10.0.15.31      configsvr1
     10.0.15.32      configsvr2
     10.0.15.11      mongos
     10.0.15.21      shardsvr1
     10.0.15.22      shardsvr2
     10.0.15.23      shardsvr3
     10.0.15.24      shardsvr4
Save and exit.
Now restart all servers:
reboot
Step 2 - Install MongoDB on All Instances
We will use latest MongoDB (MongoDB 3.4) for all instances. Add new MongoDB repository by executing the following commands:
cat <<'EOF' >> /etc/yum.repos.d/mongodb.repo
[mongodb-org-3.4]
name=MongoDB Repository
baseurl=https://repo.mongodb.org/yum/redhat/$releasever/mongodb-org/3.4/x86_64/
gpgcheck=1
enabled=1
gpgkey=https://www.mongodb.org/static/pgp/server-3.4.asc
EOF
Now install mongodb 3.4 from mongodb repository using the yum command below.
sudo yum -y install mongodb-org
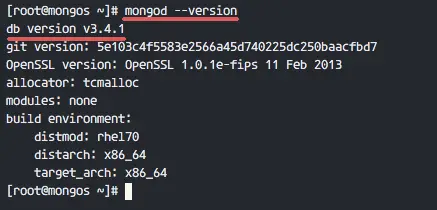
After mongodb is installed, use 'mongo' or 'mongod' command in the following way to check version details.
mongod --version
Step 3 - Create Config Server Replica Set
In the prerequisites section, we've already defined config server with 2 machines 'configsvr1' and 'configsvr2'. And in this step, we will configure it to be a replica set.
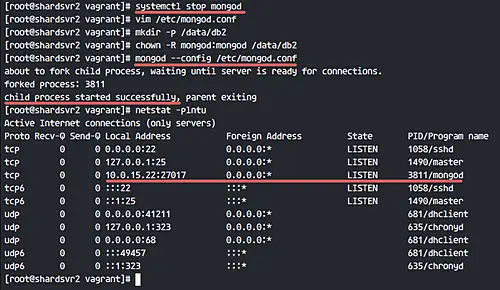
If there is mongod service running on the server, stop it with the following systemctl command.
systemctl stop mongod
Edit the default mongodb configuration 'mongod.conf'.
vim /etc/mongod.conf
Change DB storage path to your own directory. We will use '/data/db1' for the first server, and '/data/db2' directory for second config server.
storage:
   dbPath: /data/db1
Change the value of the line 'bindIP' to your internal network address. 'configsvr1' with IP address 10.0.15.31, and the second server with 10.0.15.32.
bindIP: 10.0.15.31
In the replication section, set a replication name.
replication:
   replSetName: "replconfig01"
And under sharding section, define a role of the instances. We will use these two instances as 'configsvr'.
sharding:
   clusterRole: configsvr
Save and exit.
Next, we must create a new directory for MongoDB data, and then change the ownership permissions of that directory to the 'mongod' user.
mkdir -p /data/db1
chown -R mongod:mongod /data/db1
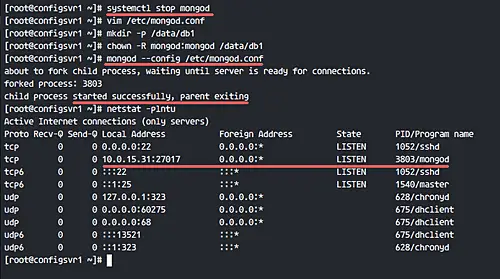
Next, start the mongod service with the following command.
mongod --config /etc/mongod.conf
You can check mongod service is running on port 27017 with the netstat command.
netstat -plntu
Configsvr1 and Configsvr2 are ready for the replica set. Connect to the 'configsvr1' server and access the mongo shell.
ssh root@configsvr1
mongo --host configsvr1 --port 27017
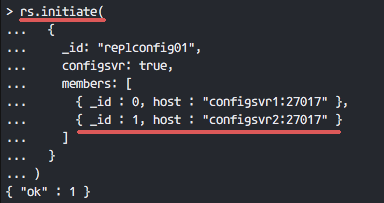
Initiate the replica set name with all configsvr members using the query below.
rs.initiate(
  {
    _id: "replconfig01",
    configsvr: true,
    members: [
      { _id : 0, host : "configsvr1:27017" },
      { _id : 1, host : "configsvr2:27017" }
    ]
  }
)
If you get a results '{ "ok" : 1 }', it means the configsvr is already configured with the replica set.
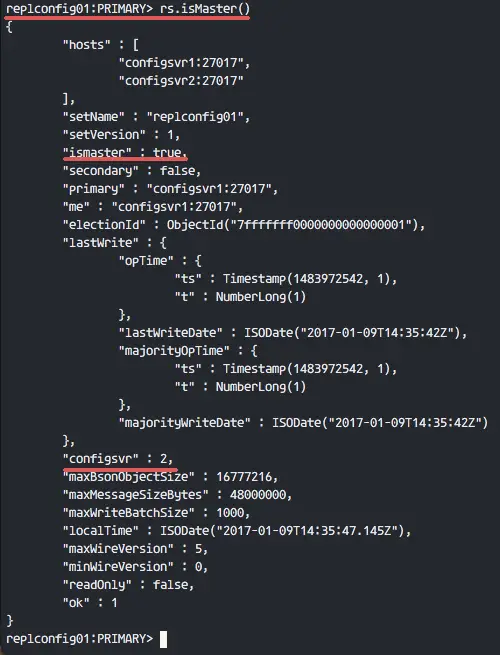
and you will be able to see which node is master and which node is secondary.
rs.isMaster()
rs.status()
The configuration of Config Server Replica Set is done.
Step 4 - Create Shard Replica Sets
In this step, we will configure 4 centos 7 servers as 'Shard' server with 2 'Replica Set'.
- 2 server - 'shardsvr1' and 'shardsvr2' with replica set name: 'shardreplica01'
- 2 server - 'shardsvr3' and 'shardsvr4' with replica set name: 'shardreplica02'
Connect to each server and stop the mongod service (If the service is running), and edit the MongoDB configuration file.
systemctl stop mongod
vim /etc/mongod.conf
Change default storage to your specific directory.
storage:
   dbPath: /data/db1
In the 'bindIP' line, change the value to your internal network address.
bindIP: 10.0.15.21
In the replication section, you can use 'shardreplica01' for the first and second instances. And use 'shardreplica02' for third and fourth shard server.
replication:
   replSetName: "shardreplica01"
Next, define the role of the server. We will use all this as shardsvr instances.
sharding:
   clusterRole: shardsvr
Save and exit.
Now create a new directory for MongoDB data.
mkdir -p /data/db1
chown -R mongod:mongod /data/db1
Start the mongod service.
mongod --config /etc/mongod.conf
Check whether MongoDB is running with the command below:
netstat -plntu
You will see MongoDB is running on the local network address.
Next, create a new replica set for these 2 shard instances. Connect to 'shardsvr1' and access the mongo shell.
ssh root@shardsvr1
mongo --host shardsvr1 --port 27017
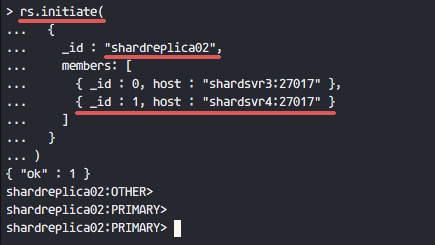
Initiate the replica set with the name 'shardreplica01', and the members are 'shardsvr1' and 'shardsvr2'.
rs.initiate(
   {
     _id : "shardreplica01",
     members: [
       { _id : 0, host : "shardsvr1:27017" },
       { _id : 1, host : "shardsvr2:27017" }
     ]
   }
 )
If there is no error, you will see results as shown below.
Results from shardsvr3 and shardsvr4 with replica set name 'shardreplica02'.
Redo this step on shardsvr3 and shardsvr4 servers with different replica set name 'shardreplica02'.
Now we've created 2 replica sets as the shard - 'shardreplica01' and 'shardreplica02'.
Step 5 - Configure mongos/Query Router
The 'Query Router' or mongos is just instances that are running 'mongos'. You can run mongos with the configuration file, or run it with just a command line.
Login to the mongos server and stop the MongoDB service.
ssh root@mongos
systemctl stop mongod
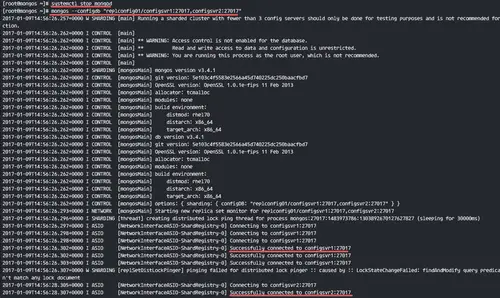
Run mongos with the command below.
mongos --configdb "replconfig01/configsvr1:27017,configsvr2:27017"
use the '--configdb' option to define the config server. If you are on production, use at least 3 config servers.
You will see results below.
Successfully connected to configsvr1:27017
 Successfully connected to configsvr2:27017
mongos instances are running.
Step 6 - Add shards to mongos/Query Router
Open another shell from step 5, connect to the mongos server again and access the mongo shell.
ssh root@mongos
mongo --host mongos --port 27017
Add shard server with sh mongodb query.
For 'shardreplica01' instances.
sh.addShard( "shardreplica01/shardsvr1:27017")
sh.addShard( "shardreplica01/shardsvr2:27017")
For 'shardreplica02' instances.
sh.addShard( "shardreplica02/shardsvr3:27017")
sh.addShard( "shardreplica02/shardsvr4:27017")
Make sure there is no error and check the shard status.
sh.status()
You will sharding status as shown in the screenshot below.
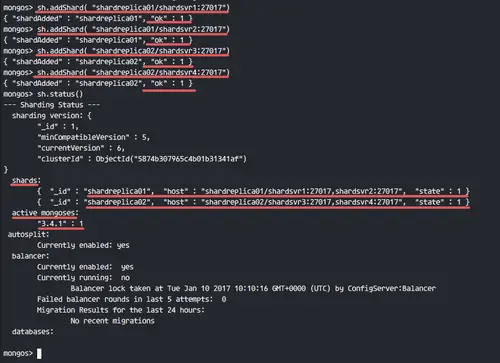
We have 2 shard replica set and 1 mongos instance running on our stack.
Step 7 - Testing
Now we'll test the MongoDB server by enabling sharding and then add documents.
Access the mongos server mongo shell.
ssh root@mongos
mongo --host mongos --port 27017
Enable Sharding for a Database
Create a new database and enable sharding for the new database.
use lemp
sh.enableSharding("lemp")
sh.status()
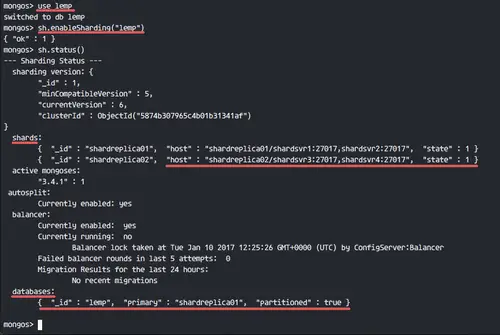
Now see the status of the database - it has been partitioned to the replica set 'shardreplica01'.
Enable Sharding for Collections
Next, add new collections to the database with sharding support. We will add new collection named 'stack' with shard collection 'name', and then see database and collections status.
sh.shardCollection("lemp.stack", {"name":1})
sh.status()
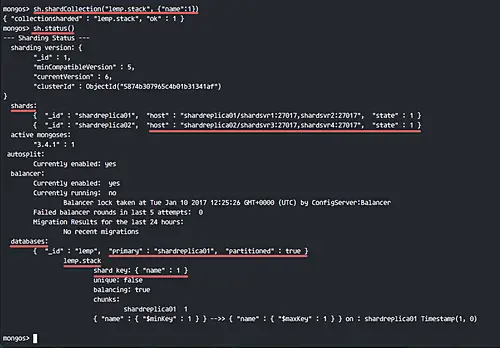
New collections 'stack' with shard collection 'name' has been added.
Add documents to collections 'stack'.
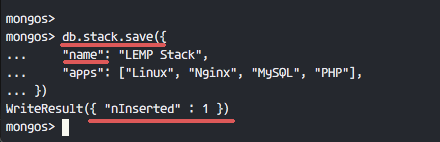
Now insert the documents to the collections. When we add documents to the collection on sharded cluster, we must include the 'shard key'.
You can use an example below. We are using shard key 'name', as we added when enabling sharding for collections.
db.stack.save({
    "name": "LEMP Stack",
    "apps": ["Linux", "Nginx", "MySQL", "PHP"],
})
Documents in successfully added to the collection, as shown in the following screenshot.
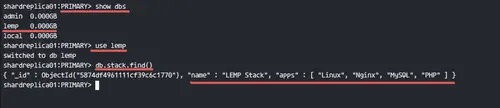
If you want to test the database, you can connect to the replica set 'shardreplica01' PRIMARY server and open the mongo shell. I am logging in to the 'shardsvr2' PRIMARY server.
ssh root@shardsvr2
mongo --host shardsvr2 --port 27017
Check database available on the replica set.
show dbs
use lemp
db.stack.find()
You will see the database, collections, and documents are available in the replica set.
MongoDB sharded cluster on CentOS 7 successfully installed and deployed.

