Linux mkfifo Command Tutorial for Beginners (with Examples)
If you're even a moderate Linux command line user, you must be aware of pipes, a fundamental command line feature that allows processes to communicate. Then there's a concept of named pipes (yeah, pipes with names, so that you can do more with pipes). The mkfifo command lets you create such named pipes.
In this tutorial, we will discuss the basics of mkfifo using some easy to understand examples. But before we do that, it's worth mentioning all examples here have been tested on Ubuntu 22.04 LTS.

Linux mkfifo command
The mkfifo command basically lets you create FIFOs (a.k.a named pipes). Following is the syntax of the command:
mkfifo [OPTION]... NAME...
And here's how the tool's man page explains it:
Create named pipes (FIFOs) with the given NAMEs.
Following are some Q&A-styled examples that should give you a good idea on how mkfifo works.
Q1. What exactly are named pipes?
To understand this, you should first be aware of the concept of basic pipes. You'd have seen commands that contain a vertical bar (|) in them. This bar is called a pipe. What it does is, it creates a channel of communication between the two processes (when the complete command is executed).
For example:
ls | grep .txt
The command mentioned above consists of two programs: ls and grep. Both these programs are separated by a pipe (|). So what pipe does here is, it creates a channel of communication between these programs - when the aforementioned command is executed, the output of ls is fed as input to grep. So finally, the output that gets displayed on the terminal consists of only those entries that have '.txt' string in them.
So that was a quick refresher of normal pipes. Now comes the concept of named pipes. As the name itself suggests, these are pipes with names. You can create a named pipe using the mkfifo command. For example:
mkfifo pipe2
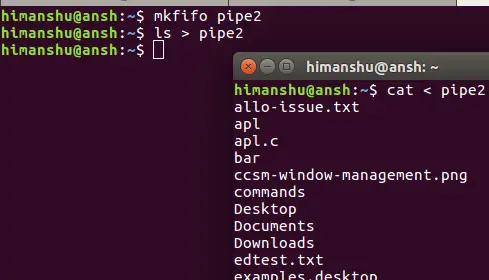
So 'pipe2' is now a named pipe. Now comes the question how named pipes are more useful? Well, consider the case where you have a process running in a terminal and producing output, and what you want is to channelize that output on to a different terminal. So here, a named pipe could of great help.
For example, suppose ls is the process running in the first terminal, and you want to see its output in a different terminal.. So here's what you can do:
ls > pipe2
and here's what you can do in the second terminal:
cat < pipe2
Q2. How to identify named pipes?
Named pipes can be accessed normally like files. So that means you can use the ls command to access them. If you see the access permissions for a named pipe, you'll see a 'p' in the beginning. This signifies the file in question is a named pipe. Here's an example:
![]()
Q3. How to set custom access permissions?
As you can see in the previous Q&A, the default access permissions for named pipes is 'rw', 'rw', and 'r' (for user, group, and others, respectively). However, if you want, you can set custom permissions as well, something which you can do using the -m option.
For example:
mkfifo pipe3 -m700
The following screenshot confirms custom permissions were set:
![]()
To know more about mkfifo, you can use the --help and --version options.
Conclusion
So depending upon what kind of work you do on the Linux command line, the mkfifo command can prove to be very useful to you. Once you're done with the basic usage we've discussed here, you can learn more about the tool by heading to its man page.

