How to Install Plex Media Server on CentOS 8
Plex is a free, open-source and full-featured media server that allows you to stream your photos, video and audio files on your PC, tablet, phone from anywhere around the world. Plex supports most operating systems including, Linux, Windows, Mac, and FreeBSD. Plex also supports several plugins that allow you to watch content from Comedy Central and MTV.
Plex is a client-server media player system. You just install the Plex server on the server where you keep your media and then install a Plex application of your Phone, Tablet or other devices to access your media over the internet.
Features Support multiple users. Display Movies/TV show recommendations. Create a playlist for your favorite music and movies. Sync and access media files for offline use. Parental control allows you to install the Plex application on a kid's device and restrict them to watch specific content only. Ability to stream your local television channels to your device and watch live television.
In this tutorial, we will show you how to install Plex Media Server on a CentOS 8 system with Nginx as a reverse proxy.
Prerequisites
- A server running CentOS 8 with a minimum of 2 GB of RAM.
- A valid domain name is pointed with your server IP.
- A root password is configured on your server.
Update the System
First, it is recommended to update your server with the latest version. You can update it using the following command:
dnf update -y
Once your server is updated, restart it to implement the changes.
Install Plex Media Server
By default, the Plex media server package is not available in the CentOS 8 default repository. So you will need to create a repository for the Plex media server. You can create it with the following command:
nano /etc/yum.repos.d/plex.repo
Add the following lines:
[Plex]
name=Plex
baseurl=https://downloads.plex.tv/repo/rpm/$basearch/
enabled=1
gpgkey=https://downloads.plex.tv/plex-keys/PlexSign.key
gpgcheck=1
Save and close the file when you are finished. Then install the Plex media server using the following command:
dnf install plexmediaserver -y
Once the installation is completed, start the Plex media service and enable it to start after system reboot with the following command:
systemctl enable plexmediaserver
 systemctl start plexmediaserver
You can also verify the status of the Plex media server with the following command:
systemctl status plexmediaserver
You should see the following output:
? plexmediaserver.service - Plex Media Server
   Loaded: loaded (/usr/lib/systemd/system/plexmediaserver.service; enabled; vendor preset: disabled)
   Active: active (running) since Mon 2020-01-06 02:45:40 EST; 41s ago
 Main PID: 1009 (Plex Media Serv)
    Tasks: 113 (limit: 12552)
   Memory: 268.1M
   CGroup: /system.slice/plexmediaserver.service
           ??1009 /usr/lib/plexmediaserver/Plex Media Server
           ??1033 Plex Plug-in [com.plexapp.system] /usr/lib/plexmediaserver/Resources/Plug-ins-349e9837e/Framework.bundle/Contents/Resources/>
           ??1077 /usr/lib/plexmediaserver/Plex Tuner Service /usr/lib/plexmediaserver/Resources/Tuner/Private /usr/lib/plexmediaserver/Resour>
           ??1246 Plex Plug-in [org.musicbrainz.agents.music] /usr/lib/plexmediaserver/Resources/Plug-ins-349e9837e/Framework.bundle/Contents/>
           ??1356 Plex Plug-in [com.plexapp.agents.plexthememusic] /usr/lib/plexmediaserver/Resources/Plug-ins-349e9837e/Framework.bundle/Cont>
           ??1364 Plex Plug-in [com.plexapp.agents.themoviedb] /usr/lib/plexmediaserver/Resources/Plug-ins-349e9837e/Framework.bundle/Contents>
           ??1365 Plex Plug-in [tv.plex.agents.music] /usr/lib/plexmediaserver/Resources/Plug-ins-349e9837e/Framework.bundle/Contents/Resource>
           ??1389 Plex Plug-in [com.plexapp.agents.thetvdb] /usr/lib/plexmediaserver/Resources/Plug-ins-349e9837e/Framework.bundle/Contents/Re>
           ??1450 Plex Plug-in [com.plexapp.agents.imdb] /usr/lib/plexmediaserver/Resources/Plug-ins-349e9837e/Framework.bundle/Contents/Resou>

Jan 06 02:45:40 plex systemd[1]: Starting Plex Media Server...
Jan 06 02:45:40 plex systemd[1]: Started Plex Media Server.
At this point, the Plex media server is installed and running. You can now proceed to the next step.
Configure Firewall and SELinux for Plex Media Server
Next, you will need to configure firewalld to allow Plex media server specific ports. You can do it by running the following commands:
firewall-cmd --zone=public --add-port=32400/tcp --permanent
 firewall-cmd --zone=public --add-port=32469/tcp --permanent
 firewall-cmd --zone=public --add-port=8324/tcp --permanent
 firewall-cmd --zone=public --add-port=3005/tcp --permanent
 firewall-cmd --zone=public --add-port=32412/udp --permanent
 firewall-cmd --zone=public --add-port=32413/udp --permanent
 firewall-cmd --zone=public --add-port=32414/udp --permanent
 firewall-cmd --zone=public --add-port=32410/udp --permanent
 firewall-cmd --zone=public --add-port=1900/udp --permanent
 firewall-cmd --zone=public --add-port=5353/udp --permanent
 firewall-cmd --zone=public --add-port=80/tcp --permanent
Next, reload the firewalld service to implement the changes:
firewall-cmd --reload
By default, SELinux is enabled on CentOS 8 server. So, you will need to configure SELinux to access the Plex Media Server over the internet. You can configure SELinux using the following command:
setsebool httpd_can_network_connect on -P
At this point, the Plex media server can be accessible over the internet. You can now proceed to the next step.
Access Plex Media Server
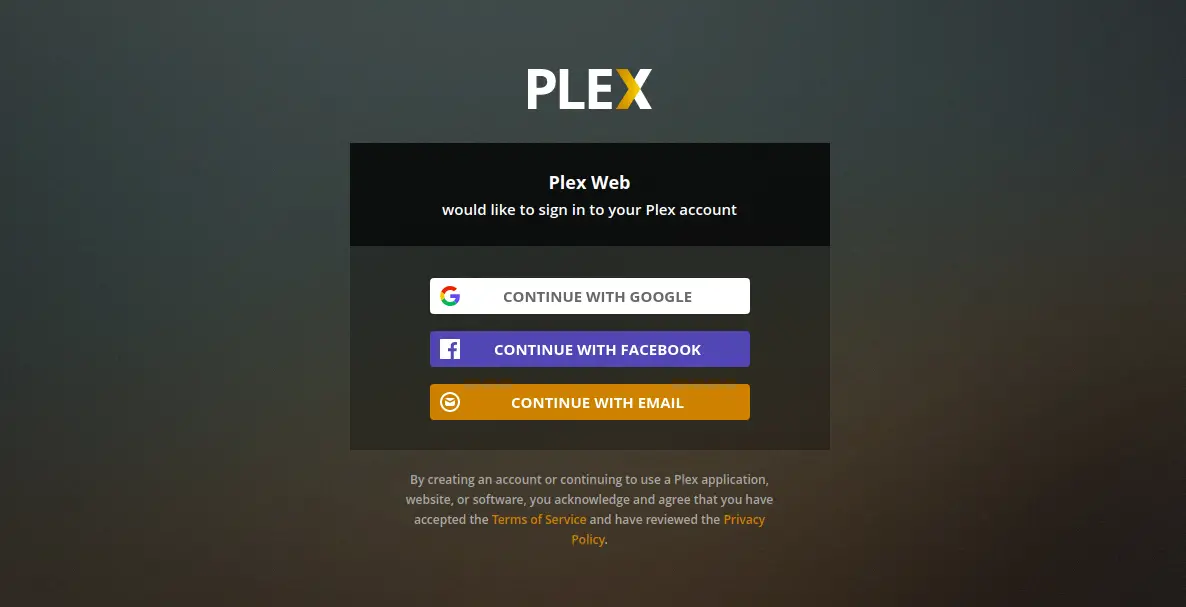
You can now access the Plex media server using the URL http://your-server-ip:32400. You should see the following page:
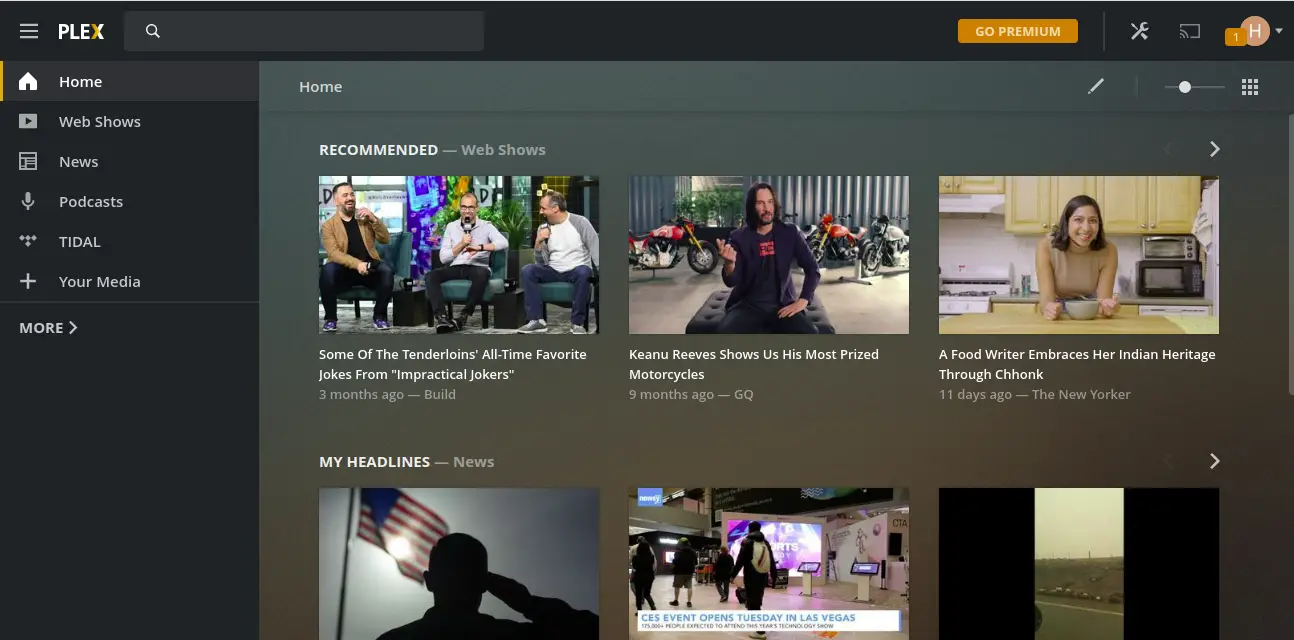
Next, you will need to sign up with a valid e-mail address to use the service. After successful sign-up. You will be redirected to the Plex media server dashboard as shown below:
Setup Nginx as a Reverse Proxy
Next, you will need to set up an Nginx as a reverse proxy so that you can access it with Domain name without providing the IP address and port number.
To do so, first install the Nginx web server with the following command:
dnf install nginx
Once the installation has been completed, start the Nginx service and enable it to start after system reboot with the following command:
systemctl start nginx
 systemctl enable nginx
Next, create an Nginx virtual host configuration file for Plex using the following command:
nano /etc/nginx/conf.d/plex.conf
Add the following lines:
upstream plex_backend {
        server 127.0.0.1:32400;
        keepalive 32;
}

server {
        listen 80;
        server_name plex.example.com;

        send_timeout 100m; #Some players don't reopen a socket and playback stops totally instead of resuming after an extended pause (e.g. Ch$

       	#Plex has A LOT of javascript, xml and html. This helps a lot, but if it causes playback issues with devices turn it off. (Haven't enc$
        gzip on;
        gzip_vary on;
        gzip_min_length 1000;
        gzip_proxied any;
        gzip_types text/plain text/css text/xml application/xml text/javascript application/x-javascript image/svg+xml;
        gzip_disable "MSIE [1-6]\.";

       	#Nginx default client_max_body_size is 1MB, which breaks Camera Upload feature from the phones.
       	#Increasing the limit fixes the issue. Anyhow, if 4K videos are expected to be uploaded, the size might need to be increased even more
        client_max_body_size 100M;

       	#Forward real ip and host to Plex
        proxy_set_header Host $host;
        proxy_set_header X-Real-IP $remote_addr;
        proxy_set_header X-Forwarded-For $proxy_add_x_forwarded_for;
        proxy_set_header X-Forwarded-Proto $scheme;
        proxy_set_header Sec-WebSocket-Extensions $http_sec_websocket_extensions;
        proxy_set_header Sec-WebSocket-Key $http_sec_websocket_key;
        proxy_set_header Sec-WebSocket-Version $http_sec_websocket_version;
       	#Websockets
        proxy_http_version 1.1;
        proxy_set_header Upgrade $http_upgrade;
        proxy_set_header Connection "Upgrade";

       	#Buffering off send to the client as soon as the data is received from Plex.
        proxy_redirect off;
        proxy_buffering off;

        location / {
                proxy_pass http://plex_backend;
        }
}
Save and close the file when you are finished. Next, you will need to define the Nginx server hash bucket size. You can do it by editing the Nginx configuration file:
nano /etc/nginx/nginx.conf
Add the following line just above the last line:
server_names_hash_bucket_size 64;
Save and close the file when you are finished. Then, check the Nginx for any syntax error with the following command:
nginx -t
You should see the following output:
nginx: the configuration file /etc/nginx/nginx.conf syntax is ok
nginx: configuration file /etc/nginx/nginx.conf test is successful
Finally, restart the Nginx service to implement the changes.
systemctl restart nginx
To check the status of the Nginx service run the following command:
systemctl status nginx
If everything is fine you should get the following output:
? nginx.service - The nginx HTTP and reverse proxy server
   Loaded: loaded (/usr/lib/systemd/system/nginx.service; disabled; vendor preset: disabled)
  Drop-In: /usr/lib/systemd/system/nginx.service.d
           ??php-fpm.conf
   Active: active (running) since Thu 2020-01-09 05:17:27 EST; 48s ago
  Process: 1230 ExecStart=/usr/sbin/nginx (code=exited, status=0/SUCCESS)
  Process: 1229 ExecStartPre=/usr/sbin/nginx -t (code=exited, status=0/SUCCESS)
  Process: 1227 ExecStartPre=/usr/bin/rm -f /run/nginx.pid (code=exited, status=0/SUCCESS)
 Main PID: 1232 (nginx)
    Tasks: 2 (limit: 5060)
   Memory: 13.1M
   CGroup: /system.slice/nginx.service
           ??1232 nginx: master process /usr/sbin/nginx
           ??1233 nginx: worker process

Jan 09 05:17:25 centos8 systemd[1]: Starting The nginx HTTP and reverse proxy server...
Jan 09 05:17:27 centos8 nginx[1229]: nginx: the configuration file /etc/nginx/nginx.conf syntax is ok
Jan 09 05:17:27 centos8 nginx[1229]: nginx: configuration file /etc/nginx/nginx.conf test is successful
You can now access your Plex media server using the URL http://plex.example.com.
Conclusion
Congratulations! you have successfully installed the Plex media server on CentOS 8 with Nginx as a reverse proxy. You can now explore the Plex media server for more options and setup your own media library. Then, you can install the Plex application from your phone's play store and access your media. You can also allow your friends and family to access your Photos, Music and Movies from a web browser or a Plex application. Feel free to ask me if you have any questions.

