Linux tail Command Tutorial for Beginners (5 Examples)
Sometimes you want to monitor what new information is being written to a file (think of log files), or for whatever reasons, want to access the last few lines of a file. Well, there's a command line utility that lets you do this in Linux, and it's call tail.
In this tutorial, we will discuss the basics of the tail command using some easy to understand examples. But before we do that, it's worth mentioning that all examples included in this article have been tested on Ubuntu 16.04 LTS.
Linux tail command
As already mentioned, the tail command outputs the last part of files supplied to it as input. Following is its syntax:
tail [OPTION]... [FILE]...
And here's what the tool's man page says about it:
Print the last 10 lines of each FILE to standard output. With more than one FILE, precede each with
a header giving the file name. With no FILE, or when FILE is -, read standard input.
Following are some Q&A-styled examples that should give you a better idea on how the tail command works.
Q1. How to use tail?
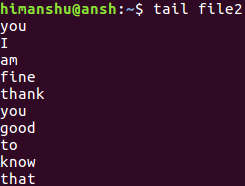
Basic usage is very easy - all you have to do is to pass the name of the file whose last 10 lines you want the tool to display. For example:
tail file1
Following were the last 10 lines in file2 on my system:
Q2. How to change number of lines tail prints?
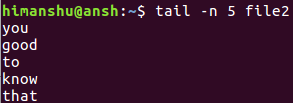
As you know by now, the tail command prints 10 lines by default. However, you can change this number using the -n command line option.
tail -n [num] [filename]
For example:
tail -n 5 file2
Q3. How to make tail output a set number of bytes?
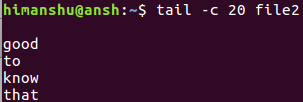
What if instead of lines, you want tail to deal in bytes. I mean, what if the requirement is to print 20 bytes? Well, this can be done using the -c command line option.
tail -c [num] [filename]
For example:
tail -c 20 file2
Q4. How to make tail follow log files?
If you want to use tail to follow updates to a file (say a log file) in real-time, use the -F or --follow command line option.
tail -F [filename]
For example:
tail -F file2
Note that -f is equal to '--follow=name --retry'.
Here's some information the man page lists about the -f/-F/--follow options:
With --follow (-f), tail defaults to following the file descriptor, which means that even if a
tail'ed file is  renamed,  tail  will continue  to  track  its end.  This default behavior is not
desirable when you really want to track the actual name of the file, not the file descriptor
(e.g., log rotation).  Use --follow=name in that case. That causes tail to track the named file in
a way that accommodates renaming, removal and creation.
Q5. How to force tail to keep trying accessing input file?
Sometimes a file may be temporarily inaccessible, something which can happen due to a variety of reasons. To make sure tail keeps trying opening the file, use the --retry option.
tail --retry [filename]
Conclusion
So that's how the tail command works. Hope you'd have enjoyed the tutorial, as well as learned useful stuff from it. We suggest you try out these examples on your Linux PC, and then head to the tool's man page for more info.

