How to Setup Puppet Master and Agent on CentOS 8
Puppet is an open-source configuration management tool and server automation framework. Puppet can run on Unix-like operating systems, as well as on the Microsoft Windows systems. It allows you to manage and perform administrative tasks and the configuration of hundreds of systems from one master server.
In this tutorial, I will you how to install Puppet on CentOS 8. I will install and configure a CentOS 8 server as a puppet 'master', and the other one as an 'agent'.
Prerequisites
- 2 or more CentOS 8 Server
- Root privileges
What we will do:
- Puppet Pre-Installation
- Install and Configure Puppet server
- Install and Configure Puppet Agent
- Verify Puppet Agent Configuration
- Create First Puppet Manifest
Step 1 - Puppet Pre-Installation
In this first step, we're going to prepare both master and agent servers for the puppet installation. We're going to set up hosts and FQDN of the server, setup the NTP server and add the puppet repository for CentOS 8 server.
Setup Hostnames
Firstly, we're going to set up hosts and FQDN for both servers. The puppet master will have a hostname 'master' with the FQDN 'master.hakase-labs.io', and the agent will have the hostname 'agent01' with the FQDN 'agent01.hakase-labs.io'.
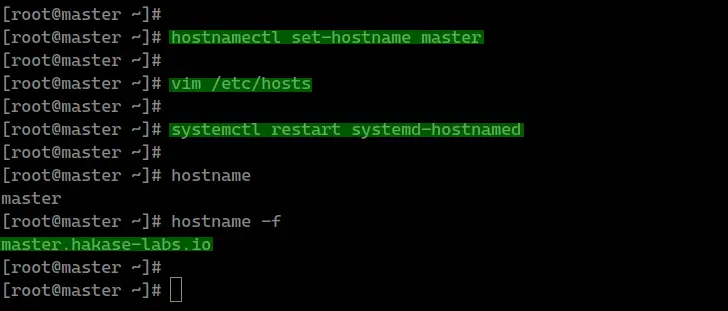
Set up the hostname using the 'hostnamectl' command below.
hostnamectl set-hostname hostname
After that, edit the '/etc/hosts' file to configure the FQDN server.
vim /etc/hosts
Change the IP address and the domain name with your own and paste into it.
10.5.5.21   master.hakase-labs.io   master
10.5.5.22   agent01.hakase-labs.io  agent01
Save and close.
Now restart the hostnamed service to apply a new hostname and FQDN.
systemctl restart systemd-hostnamed
And after that, check the hostname and the FQDN using the following command.
hostname
hostname -f
And you will get a new hostname and FQDN has been configured and applied to the system.
Setup NTP Server
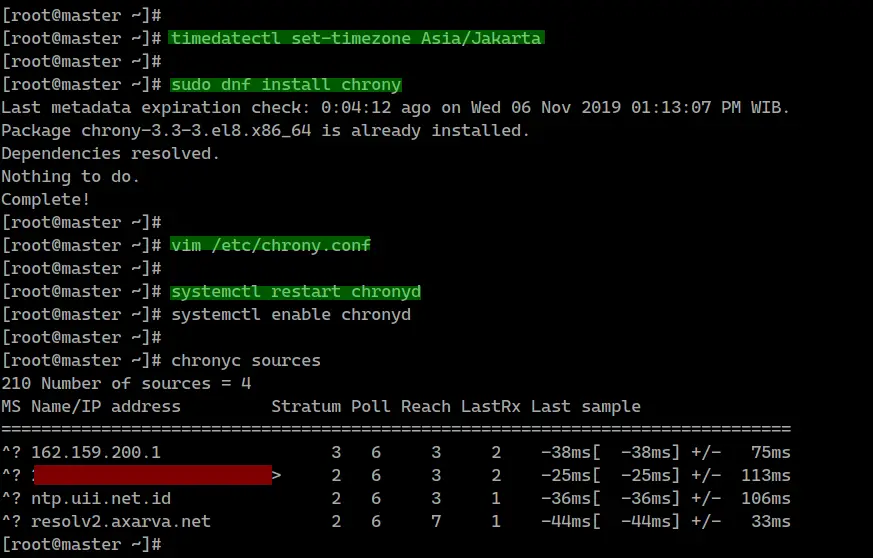
For the NTP server, we're going to use "chrony" for our servers.
Install chrony using the dnf command below.
dnf install chrony
After that, edit the chrony configuration '/etc/chrony.conf' using vim editor.
vim /etc/chrony.conf
Now change the pool server with the nearest pool of your country. You can check available pool NTP using the 'https://www.pool.ntp.org/zone/COUNTRYID'.
Copy all available NTP server of your country and paste into the 'chrony.conf' file as below.
server 0.id.pool.ntp.org iburst
server 1.id.pool.ntp.org iburst
server 2.id.pool.ntp.org iburst
server 3.id.pool.ntp.org iburst
Save and close.
Now start the chronyd service and add it to startup boot time.
systemctl start chronyd
systemctl enable chronyd
The NTP server configuration has been completed.
Add Puppet Repository for CentOS 8
For the puppet repository CentOS 8 server, you can install it manually using the rpm command as below.
sudo rpm -Uvh https://yum.puppet.com/puppet6-release-el-8.noarch.rpm
After that, check all available repository on the system using the dnf command below.
dnf repolist
And you will get the puppet repository has been added to the CentOS 8 system.

Disable SELinux
To disable the SELinux, you can edit the '/etc/sysconfig/selinux' configuration using vim editor.
vim /etc/sysconfig/selinux
Now change the 'SELINUX' value configuration to "disabled".
SELINUX=disabled
Save and close, then reboot the server.
sudo reboot
Once you've logged in again, check the SELinux status using the following command.
sestatus
And you will get the SELinux disabled status.
Step 2 - Install and Configure Puppetserver
In this step, we're going to install and configure the puppetserver on the master node.
Install the puppetserver using the dnf command below.
sudo dnf install puppetserver
After that, we need to edit the 'init settings' for puppetserver and change the memory allocation depending on the RAM that we have.
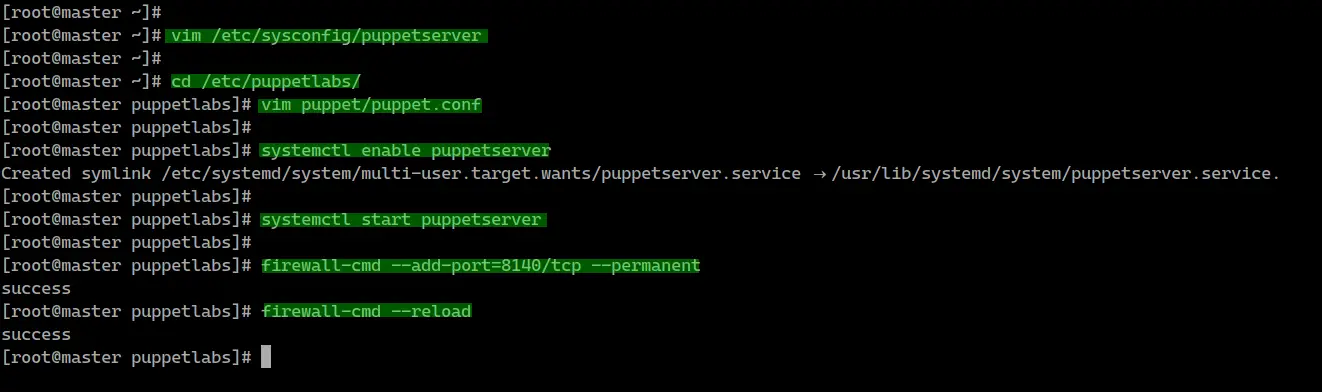
Edit the puppetserver init setting that located at the '/etc/sysconfig/puppetserver' using vim editor.
vim /etc/sysconfig/puppetserver
Now change the 'JAVA_ARGS' configuration for memory allocation depending on your RAM.
JAVA_ARGS="-Xms1g -Xmx1g ...."
Save and close.
Next, go to the '/etc/puppetlabs' directory and edit the puppet configuration file 'puppet.conf'.
cd /etc/puppetlabs/
vim puppet/puppet.conf
Under the master configuration, define the DNS alternative names with the FQDN of the master server.
[master]
....
dns_alt_names=master.hakase-labs.io,puppet
....
After that, define the puppet main server configuration as below.
[main]
certname = master.hakase-labs.io
server = master.hakase-labs.io
environment = production
runinterval = 1h
Save and close.
Now add the puppetserver service to the startup boot time and start the service.
systemctl enable puppetserver
systemctl start puppetserver
The puppetserver is up and running on CentOS 8 server with the default TCP port '8140'.
Add the puppetserver port '8140' to the firewalld using the following command.
firewall-cmd --add-port=8140/tcp --permanent
firewall-cmd --reload
And as a result, the puppet master installation and configuration has been completed successfully.
Step 3 - Install and Configure Puppet Agent
After installing the Puppet master server 'master.hakase-labs.io', we're going to install a puppet agent on the 'agent01' server.
Log in to the 'agent01' server and install the puppet-agent package using the dnf command below.
sudo dnf install puppet-agent
After that, go to the '/etc/puppetlabs' directory and edit the configuration file 'puppet.conf' using vim editor.
cd /etc/puppetlabs/
vim puppet/puppet.conf
Change the 'certname' and 'server' configuration with your own and paste to the configuration.
[main]
certname = agent01.hakase-labs.io
server = master.hakase-labs.io
environment = production
runinterval = 1h
Save and close.
Next, start puppet service and register the Puppet agent to the master server using the following command.
/opt/puppetlabs/bin/puppet resource service puppet ensure=running enable=true
And you will get the result as below.
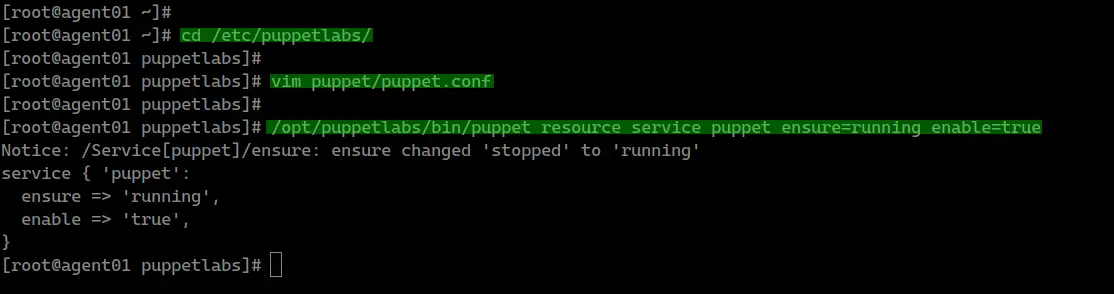
The puppet agent is now up and running, it's attempting to register to the Puppet master server.
Now back to the Puppet master server and check of pending certificate requests.
/opt/puppetlabs/bin/puppetserver ca list
And you will get the 'agent01.hakase-labs.io' certificate on the list.
Now sign the 'agent01' certificate using the command below.
/opt/puppetlabs/bin/puppetserver ca sign --certname agent01.hakase-labs.io
And the puppet agent is now has been registered to the master server.

Step 4 - Verify Puppet Agent Configuration
Now verify the Puppet agent configuration and test the connection between the puppet agent and master using the following command.
/opt/puppetlabs/bin/puppet agent --test
And you will get the result as below.
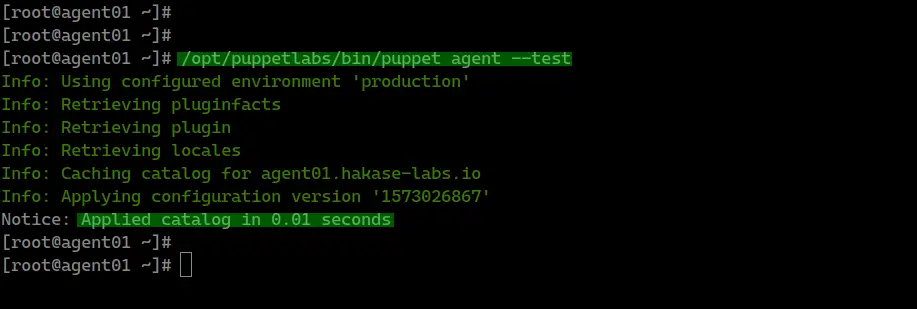
As a result, the Puppet agent pulled the configuration from the puppet master and applied it to the server without any error.
Step 5 - Create First Manifest
At this stage, the installation and configuration of Puppet for master and agent have been completed.
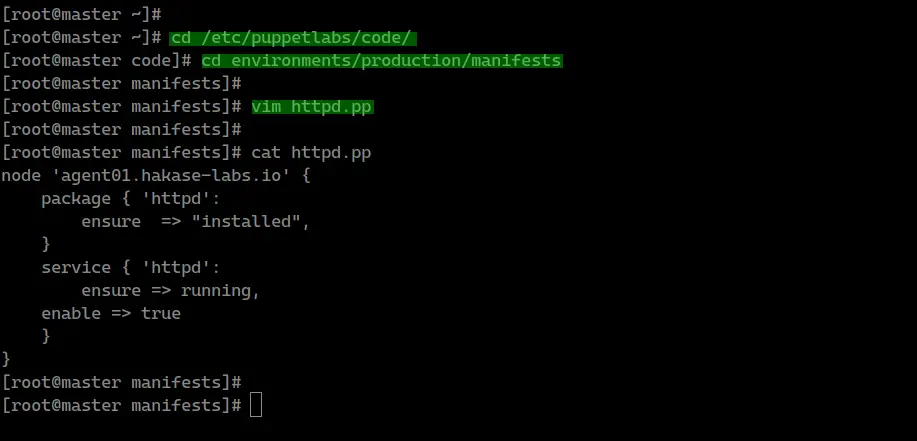
And for this step, we're going to test our setup by creating the first puppet manifest for installing the httpd package.
Go to the '/etc/puppetlabs/code/environments/production/manifests' directory and create the first puppet manifest file 'httpd.pp'.
cd /etc/puppetlabs/code/
cd environments/production/manifests

vim httpd.pp
Paste the following configuration.
node 'agent01.hakase-labs.io' {
    package { 'httpd':
        ensure  => "installed",
    }
    service { 'httpd':
        ensure => running,
    enable => true
    }
}
Save and close.
Now go to the Puppet agent node 'agento01' and run the following command.
/opt/puppetlabs/bin/puppet agent --test
And you will be shown the result as below.
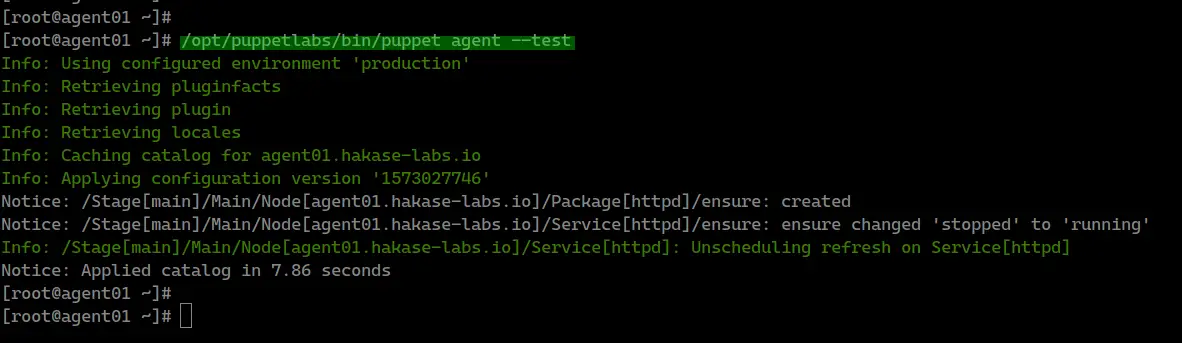
The Puppet agent pulled a new configuration from the Puppet master for installing the httpd package and start the httpd service.
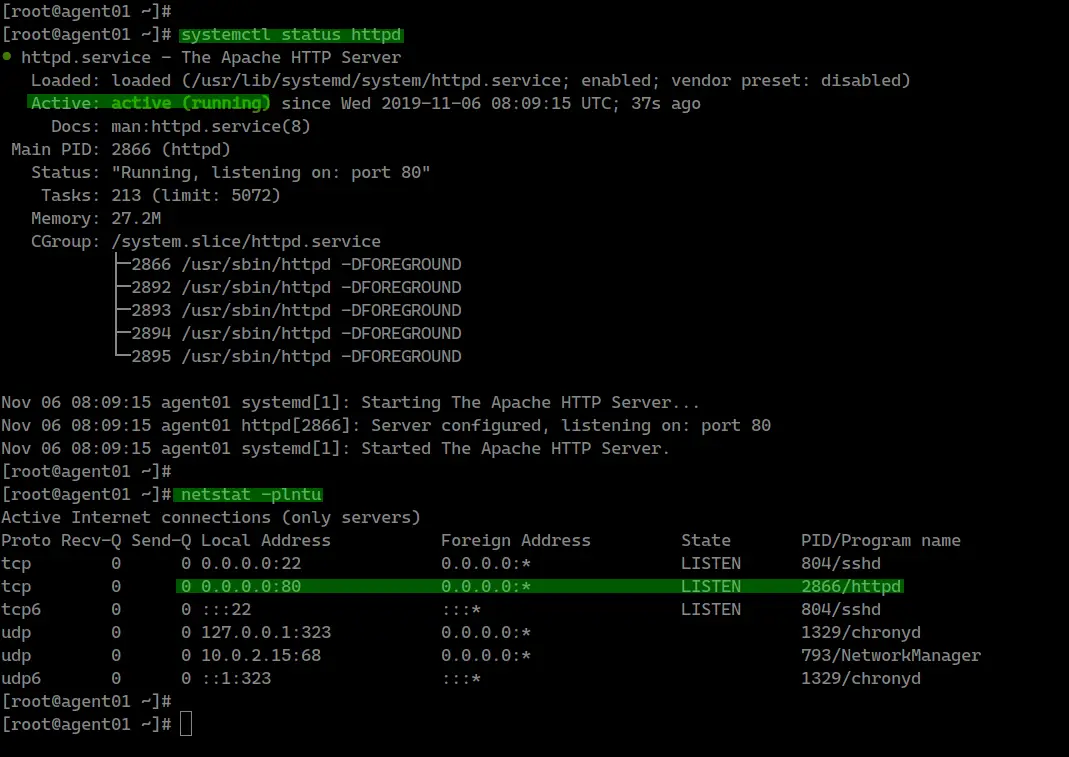
On the 'agent01' node, check the httpd service status and check the HTTP port '80'
systemctl status httpd
netstat -plntu
And you will get the httpd service is up and running on the 'agent01' server with the default HTTP port '80'. The httpd package has been installed through the puppet manifest that we've created at the top.
And as a result, the Puppet master and agent installation and configuration on CentOS 8 server have been completed successfully.

