How to Install Pimcore CMS on Ubuntu 18.04 LTS
Pimcore is a free and open-source enterprise content management system written in PHP language and uses MySQL/MariaDB for databases. It is fast, flexible, and designer and developer-friendly that allow us to manage and share all of our digital assets across any channel. Pimcore comes with an easy to use administrative backend interface for managing data and system configuration. Pimcore is fully flexible and editable, so you can personalize the site as per your needs.
In this tutorial, we will be going to learn how to install Pimcore CMS on Ubuntu 18.04 (Bionic Beaver).
Prerequisites
- A server running Ubuntu 18.04.
- A non-root user with sudo privileges.
Install LEMP Server
Pimcore CMS runs on web server, written in PHP and uses MariaDB as database. So you will need to install Nginx, PHP and MariaDB server to your system.
First, install Nginx and MariaDB server using the following command:
sudo apt-get install nginx mariadb-server -y
Once the installation is completed, start Nginx and MariaDB service and enable them to start on boot time with the following command:
sudo systemctl start nginx
sudo systemctl enable nginx
sudo systemctl start mysql
sudo systemctl enable mysql
Next, you will need to install the latest version of the PHP and PHP-FPM to your system. By default, the latest version of PHP is not available in Ubuntu 18.04. So you will need to add repository for that. You can add the PHP repository using the following command:
sudo apt-get install software-properties-common -y
sudo add-apt-repository ppa:ondrej/php
Once the repository is installed, update the repository and install PHP, PHP-FPM and other required libraries using the following command:
sudo apt-get install php7.1-0 php7.1-fpm php7.1-common php7.1-mbstring php7.1-cli php7.1-zip php7.1-xmlrpc php7.1-soap php7.1-gd php7.1-xml php7.1-intl php7.1-mysql -y
Once all the packages are installed, you will need to make some changes in php.ini file. You can do with the following command:
sudo nano /etc/php/7.1/fpm/php.ini
Make the following changes:
file_uploads = On
allow_url_fopen = On
memory_limit = 256M
upload_max_filesize = 200M
max_execution_time = 300
cgi.fix_pathinfo = 0
date.timezone = Asia/Kolkata
Save and close the file, when you are finished.
Configure MariaDB
Next, you will need to secure MariaDB. You can do this by running the following command:
sudo mysql_secure_installation
Answer all the questions as shwon below:
Enter current password for root (enter for none):
Set root password? [Y/n]: N
Remove anonymous users? [Y/n]: Y
Disallow root login remotely? [Y/n]: Y
Remove test database and access to it? [Y/n]:  Y
Reload privilege tables now? [Y/n]:  Y
Once the MariaDB is secured, log in to MariaDB shell with the following command:
mysql -u root -p
Enter your root password, then create a database and user for Pimcore:
MariaDB [(none)]> CREATE DATABASE pimcoredb;
MariaDB [(none)]> CREATE USER 'pimcoreuser'@'localhost' IDENTIFIED BY 'password';
Next, grant all privileges to Pimcore database with the following command:
MariaDB [(none)]> GRANT ALL ON pimcoredb.* TO 'pimcoreuser'@'localhost' IDENTIFIED BY 'password' WITH GRANT OPTION;
Next, flush the privileges using the following command:
MariaDB [(none)]> FLUSH PRIVILEGES;
Finally, exit from the MariaDB shell with the following command:
MariaDB [(none)]> EXIT
Install Pimcore
Next, you will need to download the latest version of the Pimcore to your system. You can download it from their official website using the following command:
wget https://www.pimcore.org/download/pimcore-latest.zip
Once the download is completed, unzip the downloaded file in the Nginx web root directory with the following command:
sudo mkdir /var/www/html/pimcore
sudo unzip pimcore-latest.zip -d /var/www/html/pimcore
Next, give proper permissions to the pimcore directory using the following command:
sudo chown -R www-data:www-data /var/www/html/pimcore/
sudo chmod -R 755 /var/www/html/pimcore/
Configure Nginx for Pimcore
Next, you will need to create an Nginx virtual host file for Pimcore CMS. You can do this with the following command:
sudo nano /etc/nginx/sites-available/pimcore
Add the following lines:
server {
    listen 80;
    listen [::]:80;
    root /var/www/html/pimcore;
    index  index.php index.html index.htm;
    server_name  example.com www.example.com;

    client_max_body_size 100M;

    location / {
    try_files $uri /app.php$is_args$args;
    }

    location ~ ^/app\.php(/|$) {
         include snippets/fastcgi-php.conf;
         fastcgi_pass unix:/var/run/php/php7.1-fpm.sock;
         fastcgi_param SCRIPT_FILENAME $document_root$fastcgi_script_name;
         send_timeout 1800;
         fastcgi_read_timeout 1800;
         include fastcgi_params;
    }
}
Save and close the file, when you are finished.
Next, enable Nginx virtual host file using the following command:
sudo ln -s /etc/nginx/sites-available/pimcore /etc/nginx/sites-enabled/
Finally, restart Nginx and PHP7.1-FPM service using the following command:
sudo systemctl restart nginx
sudo /etc/init.d/php7.1-fpm restart
Access Pimcore CMS
Pimcore is now installed and configured, it's time to access Pimcore web interface.
Open your web browser and type the URL http://example.com/install, you will be redirected to the following page:
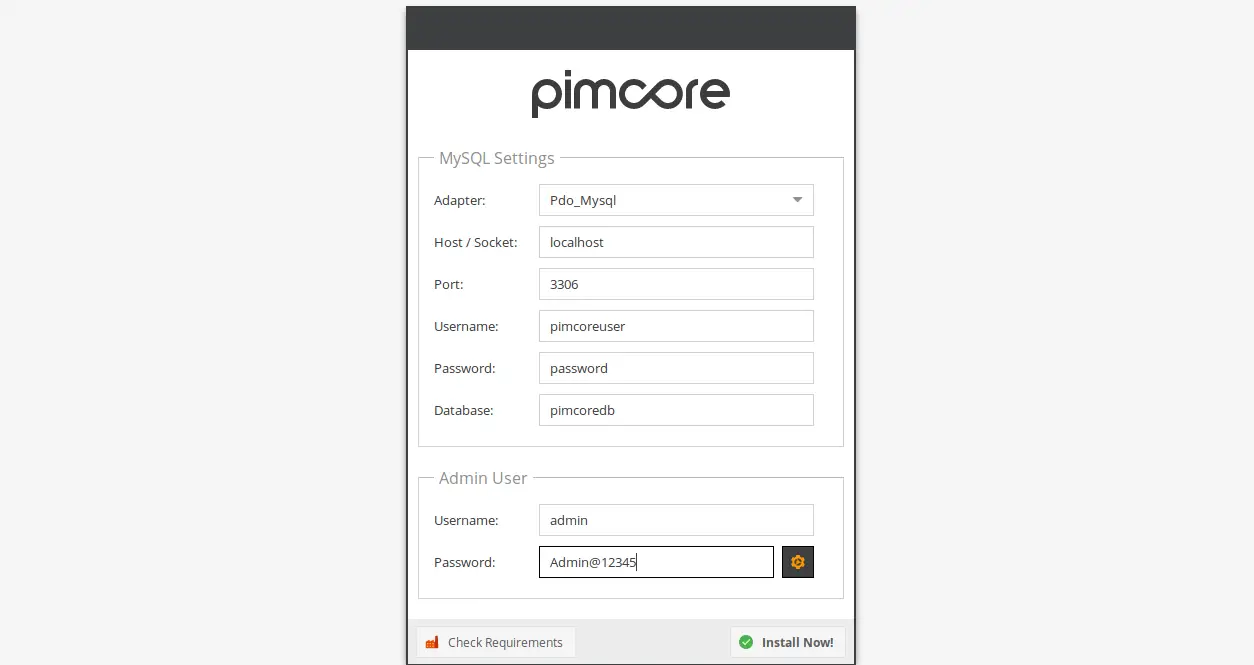
Here, provide your database name, database username, password and admin credential, then click on the Install Now button. Once the installation is completed, you will be redirected to the following page:

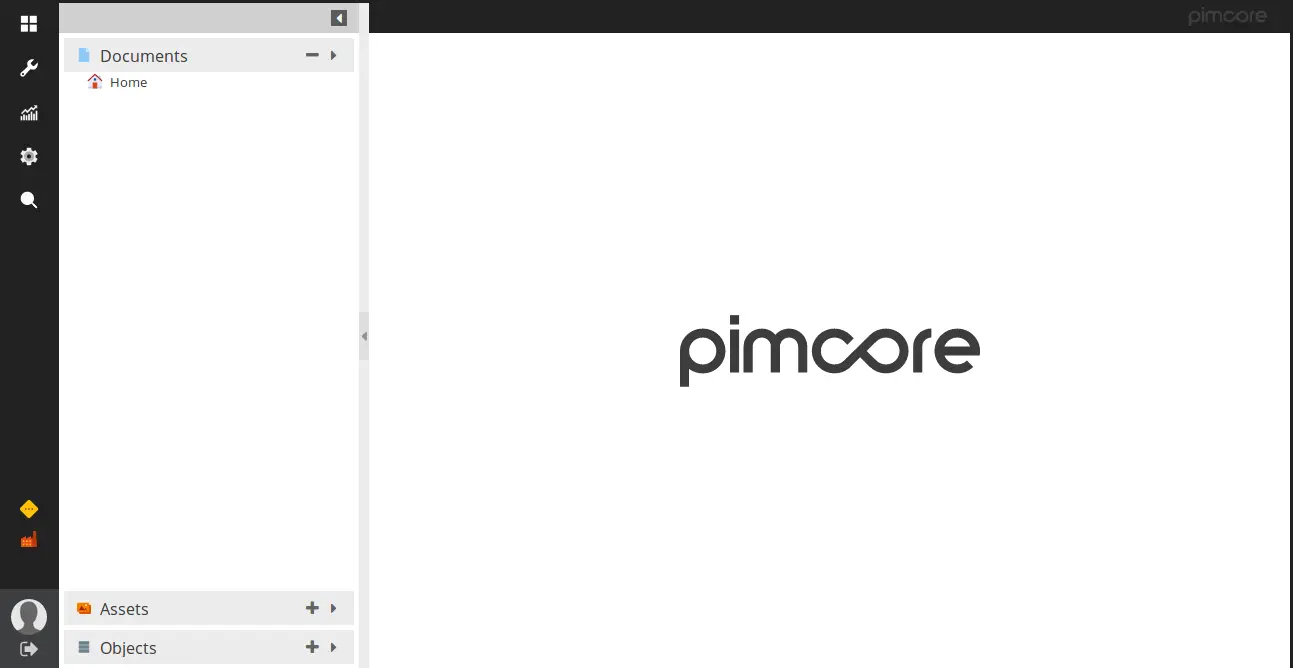
Now, provide your admin username and password, then click on the Login button. You should see the Pimcore CMS dashboard in the following page: