How to Install Nginx with Let's encrypt and get A+ from SSLLabs Test
In this tutorial, I will show you step-by-step how to install and configure the Nginx web server with Letsencrypt certificate. This guide will tell you about installing Nginx web server, installing the let's encrypt tool, generating SSL certificate lets encrypt, configuring the nginx virtual host with SSL, and creating additional SSL configuration to get the A+ from the SSL test SSL Labs.
Prerequisites
- Linux Server - Ubuntu 18.04 or CentOS 7.5
- Root privileges
What we will do?
- Install Nginx Web Server
- Configure Firewall UFW/Firewalld
- Install let's encrypt and Generate SSL Certificate
- Configure Secure SSL
- Configure Nginx Virtual Host with SSL
- Testing
Step 1 - Install Nginx Web Server
In this tutorial, we will guide you to install and configure the Nginx web server with Letsencrypt on both Linux servers - Ubuntu 18.04 and CentOS 7.5.
On Ubuntu 18.04.
Update the repository and then install nginx using the apt command below.
sudo apt update
sudo apt install nginx -y
On CentOS 7.5.
Install the EPEL repository to the CentOS system and install Nginx using yum command.
sudo yum install epel-release -y
sudo yum install nginx -y
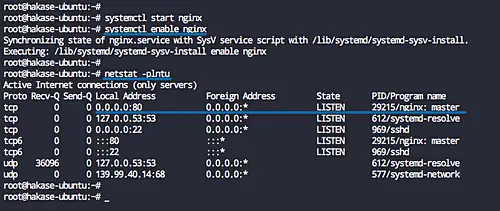
After the installation is complete, start the Nginx service and enable it to launch every time at system boot.
systemctl start nginx
systemctl enable nginx
The Nginx web server is now installed, and it's running on default HTTP port 80. Check it using netstat command below.
netstat -plntu
Step 2 - Configure Firewall UFW - Firewalld
It's recommended to turn on the Firewall on the server and open the specific port as needed. In this step, we will show how to open SSH, HTTP, and HTTPS ports on Linux servers Ubuntu 18.04 using UFW firewall, and Firewalld on CentOS 7.5 system.
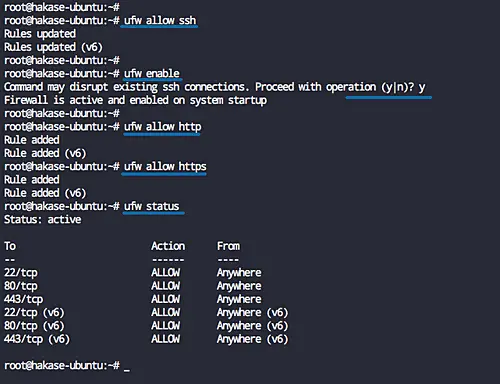
On Ubuntu 18.04 - UFW Firewall
Before enabling the UFW Firewall on Ubuntu system, make sure the SSH port is enabled on the list firewall configuration.
Add the SSH service port to the firewall configuration using the ufw command and then enable the UFW firewall service.
ufw allow ssh
ufw enable
Now add the HTTP and HTTPS services.
ufw allow http
ufw allow https
The SSH, HTTP, and HTTPS service ports have been added to the UFW Firewall service list, check it's using the command below.
ufw status
On CentOS 7.5 - Firewalld
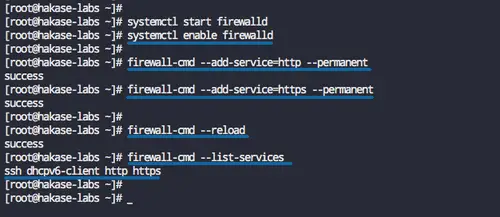
Before adding port and services to the firewelld, make sure the firewalld service is up and running.
Start the firewalld service and enable it to launch every time at system boot.
systemctl start firewalld
systemctl enable firewalld
Note:
- The SSH Service will be enabled by default on the Firewald service list.
Now add the HTTP and HTTPS services using the firewall-cmd command below.
firewall-cmd --add-service=http --permanent
firewall-cmd --add-service=https --permanent
Reload the firewalld configuration and check the services list.
firewall-cmd --reload
firewall-cmd --list-services
And you will get the SSH, HTTP, and HTTPS services on the list.
Step 3 - Install Letsencrypt and Generate Certificates
In this step, we will install the letsencrypt tool, and generate the strong SSL certificates Letsencrypt using the cerbot command.
On Ubuntu 18.04
Install the letsencrypt packages using the apt command below.
sudo apt install letsencrypt -y
On CentOS 7.5
Now install the letsencrypt packages on CentOS 7 using yum command below.
sudo yum install certbot -y
After the installation is complete, we will create a new configuration that will be used for generating SSL certificate files.
On Ubuntu 18.04
Go to the '/etc/nginx' configuration directory and create new configuration file 'cerbot.conf' under the 'snippets' directory.
cd /etc/nginx/
vim snippets/certbot.conf
Paste the following configuration there.
    location /.well-known {
        alias /var/www/html/.well-known;
    }
Save and exit.
Now edit the default Nginx virtual host file.
vim sites-available/default
Add following configuration under the 'server {..}' blocks.
include snippets/certbot.conf;
Save and exit.
On CentOS 7.5
Go to the '/etc/nginx' configuration directory and create new configuration file 'certbot.conf' under the 'default.d' directory.
cd /etc/nginx/
vim default.d/certbot.conf
Paste configuration below.
    location /.well-known {
        alias /usr/share/nginx/html/.well-known;
    }
Save and exit.
Now test nginx configuration and make sure there is no error, then restart the nginx service.
nginx -t
systemctl restart nginx
Next, generate the SSL letsencrypt certificates using the certbot command.
On Ubuntu 18.04
certbot certonly --rsa-key-size 4096 --webroot --agree-tos --no-eff-email --email [email protected] -w /var/www/html -d hakase-labs.io
On CentOS 7.5
certbot certonly --rsa-key-size 4096 --webroot --agree-tos --no-eff-email --email [email protected] -w /usr/share/nginx/html -d hakase-labs.io
Note:
- We will specify the RSA key size for our domain to '4096', and we will define the authentication method to the default web root directory '/var/www/html' on Ubuntu system, and '/usr/share/nginx/html' directory for CentOS 7 system.
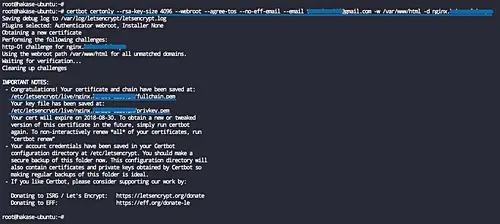
When it's complete, you will get all SSL certificate files for the domain name on the '/etc/letsencrypt/live' directory.
To get an additional security, we will generate the DHPARAM key '4096' using the OpenSSL command as shown below.
openssl dhparam -out /etc/nginx/dhparam.pem 4096
The DHPARAM key has been generated to the '/etc/nginx' directory.
Step 4 - SSL Configuration
In this step, we will define the SSL configuration for the Nginx web server. We will create new configuration 'ssl.conf' that contains tweaked SSL configuration security focused for Nginx web server.
On Ubuntu 18.04
Go to the '/etc/nginx/' configuration directory and create new SSL configuration 'ssl.conf' under the 'snippets' directory.
cd /etc/nginx/
vim snippets/ssl.conf
On CentOS 7.5
Go to the '/etc/nginx/' configuration directory and create new SSL configuration 'ssl/conf' under the 'default.d' directory.
cd /etc/nginx/
vim default.d/ssl.conf
Paste the following SSL configuration there.
# Specify the TLS versions
ssl_protocols TLSv1 TLSv1.1 TLSv1.2;
ssl_prefer_server_ciphers on;

# Ciphersuites recommendation from the chiper.li
# Use this chipersuites to get 100 points of the SSLabs test
# Some device will not support
#ssl_ciphers "ECDHE-RSA-AES256-GCM-SHA512:DHE-RSA-AES256-GCM-SHA512:ECDHE-RSA-AES256-GCM-SHA384:DHE-RSA-AES256-GCM-SHA384:ECDHE-RSA-AES256-SHA384";

# Mozilla Ciphersuits Recommendation
# Use this for all devices supports
ssl_ciphers 'ECDHE-ECDSA-AES256-GCM-SHA384:ECDHE-RSA-AES256-GCM-SHA384:ECDHE-ECDSA-CHACHA20-POLY1305:ECDHE-RSA-CHACHA20-POLY1305:ECDHE-ECDSA-AES128-GCM-SHA256:ECDHE-RSA-AES128-GCM-SHA256:ECDHE-ECDSA-AES256-SHA384:ECDHE-RSA-AES256-SHA384:ECDHE-ECDSA-AES128-SHA256:ECDHE-RSA-AES128-SHA256';

# Use the DHPARAM key and ECDH curve >= 256bit
ssl_ecdh_curve secp384r1;
ssl_dhparam /etc/nginx/dhparam.pem;

server_tokens off;
ssl_session_timeout 1d;
ssl_session_cache shared:SSL:50m;
ssl_session_tickets off;

# Enable HTTP Strict-Transport-Security
# If you have a subdomain of your site,
# be carefull to use the 'includeSubdomains' options
add_header Strict-Transport-Security "max-age=63072000; includeSubdomains; preload";

# Enable OSCP Stapling for Nginx web server
# If you're using the SSL from Letsencrypt,
# use the 'chain.pem' certificate
ssl_stapling on;
ssl_stapling_verify on;
ssl_trusted_certificate /etc/letsencrypt/live/hakase-labs.io/chain.pem;
resolver 8.8.8.8 8.8.4.4 valid=300s;
resolver_timeout 5s;

# XSS Protection for Nginx web server
add_header X-Frame-Options DENY;
add_header X-XSS-Protection "1; mode=block";
add_header X-Content-Type-Options nosniff;
add_header X-Robots-Tag none;
Save and exit.
Note:
- Specify the TLS versions for the site, only accept the TLSv1 TLSv1.1 TLSv1.2.
- Specify the SSL ciphersuite, and it's recommended to use the SSL ciphersuite of the Mozilla suggestion to get all devices compatibility.
- Enable HSTS, OSCP Stapling, and adding the XSS protection.
Step 5 - Configure Nginx Virtual Host with SSL
In this step, we will create a virtual host file for the domain name. We will create a new virtual host, a domain named hakase-labs.io, and its web root directory will be located at the '/var/www/site01' directory.
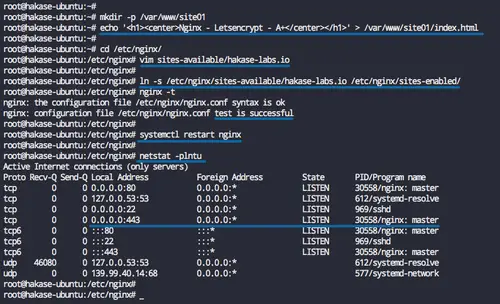
Create the new directory '/var/www/site01' and create the 'index.html' file inside.
mkdir -p /var/www/site01
echo '<h1><center>Nginx - Letsencrypt - A+</center></h1>' > /var/www/site01/index.html
Now go to the '/etc/nginx' configuration directory and create new virtual host file named 'hakase-labs.io' for ubuntu, and 'hakase-labs.conf' for CentOS 7 system.
On Ubuntu 18.04
cd /etc/nginx/
vim sites-available/hakase-labs.io
On CentOS 7.5
cd /etc/nginx/
vim conf.d/hakase-labs.conf
Paste the following sample Nginx virtual host configuration there.
server {
    listen 80;
    listen [::]:80;
    server_name hakase-labs.io;

    return 301 https://$host$request_uri;
}

server {
        listen 443 ssl http2;
        listen [::]:443 ssl http2;

        root   /var/www/site01;
        index index.html index.php index.htm;

        server_name  hakase-labs.io;
        error_log /var/log/nginx/hakase-error.log warn;

        ssl_certificate /etc/letsencrypt/live/hakase-labs.io/fullchain.pem;
        ssl_certificate_key /etc/letsencrypt/live/hakase-labs.io/privkey.pem;

        #SSL Configuration
        include snippets/ssl.conf;

        location ~ /.well-known {
                allow all;
        }


        location / {
            try_files $uri $uri/ =404;
        }


        location = /favicon.ico {
                log_not_found off;
                access_log off;
        }

        location = /robots.txt {
                allow all;
                log_not_found off;
                access_log off;
        }

        location ~* \.(js|css|png|jpg|jpeg|gif|ico)$ {
                expires max;
                log_not_found off;
        }

}
Save and exit.
Note:
- Change the 'include snippets/ssl.conf;' line. If you are using Ubuntu, leave it default. And if you are using CentOS, change the directory to 'default.d/ssl.conf'
Only on Ubuntu System
Enable the new virtual host file and test the configuration, and make sure there is no error.
ln -s /etc/nginx/sites-available/hakase-labs.io /etc/nginx/sites-enabled/
nginx -t
Now restart the nginx service.
systemctl restart nginx
The new virtual host with the HTTPS enabled and an additional SSL configuration has been created.
Check using the netstat command and you will get the HTTPS port 443 on the list.
netstat -plntu
Step 6 - Testing
Open your web browser and type the name of your domain, mine is 'http://hakase-labs.io'.
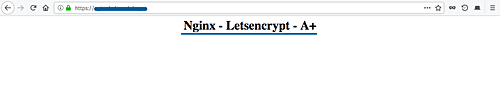
And you will be redirected to the HTTPS connection.
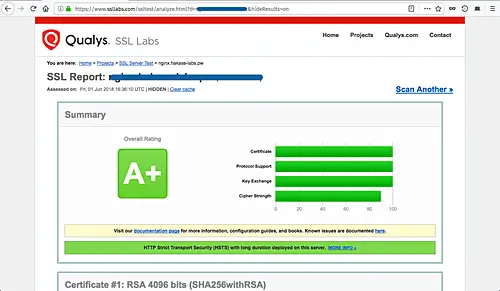
Now go to the SSL Test site 'https://www.ssllabs.com/ssltest/' and type your own domain name, then wait to get the results.
Following is my result of using the 'Mozilla Ciphersuite Recommendation'.
And following is my result of using the 'Cipher.li Ciphersuite Recommendation'.
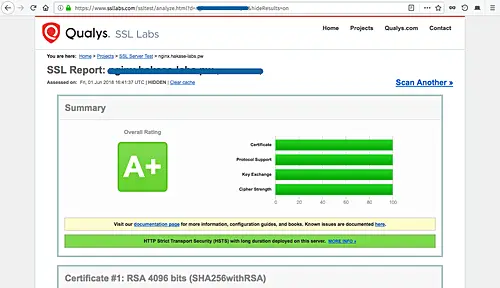
You will see all results have 'A+' results, and only differ on the 'Cipher Strength' on the Mozilla recommendations and the Cipherli.st Recommendation.
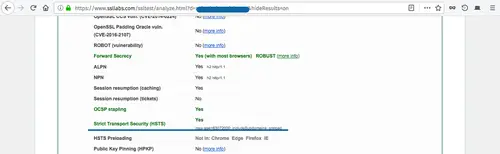
To check the OSCP Stapling and the HSTS on the server, scroll the test result page and you will get the result as shown below.
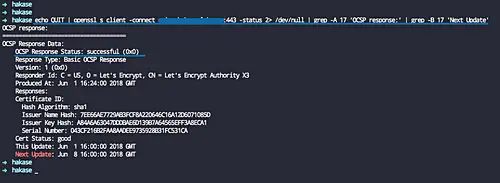
If you want to check the OSCP Stapling from the command line, check it using the following command.
echo QUIT | openssl s_client -connect hakase-labs.io:443 -status 2> /dev/null | grep -A 17 'OCSP response:' | grep -B 17 'Next Update'
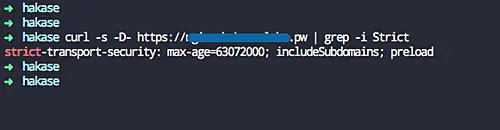
For the HSTS testing, check it using curl command below.
curl -s -D- https://hakase-labs.io | grep -i Strict
The Nginx web server installation and configuration with SSL Letsencrypt as well as getting the A+ from the SSLabs test have been completed successfully.

