How to Install Hubzilla on Ubuntu 18.04 LTS
Hubzilla is a free and open source platform for creating interconnected websites featuring a decentralized identity, communications, and permissions framework built using common web server technology. Hubzilla is customizable, so you can modify it as per your needs. Hubzilla comes with lots of features such as social networking discussion threads, web page hosting with a content management system, wiki and much more.
In this tutorial, I will show you the steps to install Hubzilla on Ubuntu 18.04 LTS (Bionic Beaver) server.
Requirements
- A server running Ubuntu 18.04.
- A non-root user with sudo privileges.
Install LAMP Server
First, you will need to install Apache, PHP and MariaDB to your system. First, install Apache and MariaDB by running the following command:
sudo apt-get install apache2 mariadb-server -y
Next, add the Ondrej repository in order to install the latest version of PHP. You can add it with the following command:
sudo add-apt-repository --yes ppa:ondrej/php
Next, update the system and install PHP with all the required libraries with the following command:
sudo apt-get update -y
sudo apt-get install php7.2 php7.2-mysql php7.2-curl php7.2-json php7.2-cli php7.2-gd php7.2-xml php7.2-mbstring imagemagick php7.2-zip wget -y
Once all the packages are installed, start Apache and MariaDB service and enable them to start on boot time with the following command:
sudo systemctl start apache2
sudo systemctl enable apache2
sudo systemctl start mysql
sudo systemctl enable mysql
Configure MariaDB
First, secure MariaDB installation using the following script:
sudo mysql_secure_installation
Answer all the questions as shown below:
    Enter current password for root (enter for none):
    Set root password? [Y/n]: N
    Remove anonymous users? [Y/n]: Y
    Disallow root login remotely? [Y/n]: Y
    Remove test database and access to it? [Y/n]:  Y
    Reload privilege tables now? [Y/n]:  Y
Once the MariaDB is secured, log in to MariaDB shell:
mysql -u root -p
Enter your root password and press Enter, then create a database and user with the following command:
MariaDB [(none)]>CREATE DATABASE hubzilla_db;
MariaDB [(none)]>CREATE USER 'hubzilla'@'localhost' IDENTIFIED BY 'password';
Next, grant all the privileges to the hubzilla database:
MariaDB [(none)]>GRANT ALL PRIVILEGES ON hubzilla_db.* TO 'hubzilla'@'localhost';
Next, flush the privileges and exit from the MariaDB shell:
MariaDB [(none)]>FLUSH PRIVILEGES;
MariaDB [(none)]>EXIT;
Install Hubzilla
First, change the directory to the /var/www/html and download the latest version of Hubzilla from Git using the following command:
cd /var/www/html
sudo git clone https://framagit.org/hubzilla/core.git hubzilla
Next, change the directory to the hubzilla and install hubzilla addons:
cd hubzilla sudo util/add_addon_repo https://framagit.org/hubzilla/addons.git hzaddons
Next, provide proper permissions to the hubzilla directory with the following command:
sudo chown -R www-data:www-data /var/www/html/hubzilla/
sudo chmod -R 755 /var/www/html/hubzilla/
Configure Apache for Hubzilla
Next, you will need to create an Apache virtual host file for Hubzilla. You can create it with the following command:
sudo nano /etc/apache2/sites-available/hubzilla.conf
Add the following lines:
<VirtualHost *:80>
     ServerAdmin [email protected]
     DocumentRoot /var/www/html/hubzilla
     ServerName example.com

     <Directory /var/www/html/hubzilla/>
          Options FollowSymlinks
          AllowOverride All
          Require all granted
     </Directory>

     ErrorLog ${APACHE_LOG_DIR}/hubzilla_error.log
     CustomLog ${APACHE_LOG_DIR}/hubzilla_access.log combined

</VirtualHost>
Save the file, then enable apache virtual host file with the following command:
sudo a2ensite hubzilla
Finally, restart Apache service to apply the changes:
sudo systemctl restart apache2
Access Hubzilla
Open your web browser and type the URL http://example.com. You will be redirected to the following page:
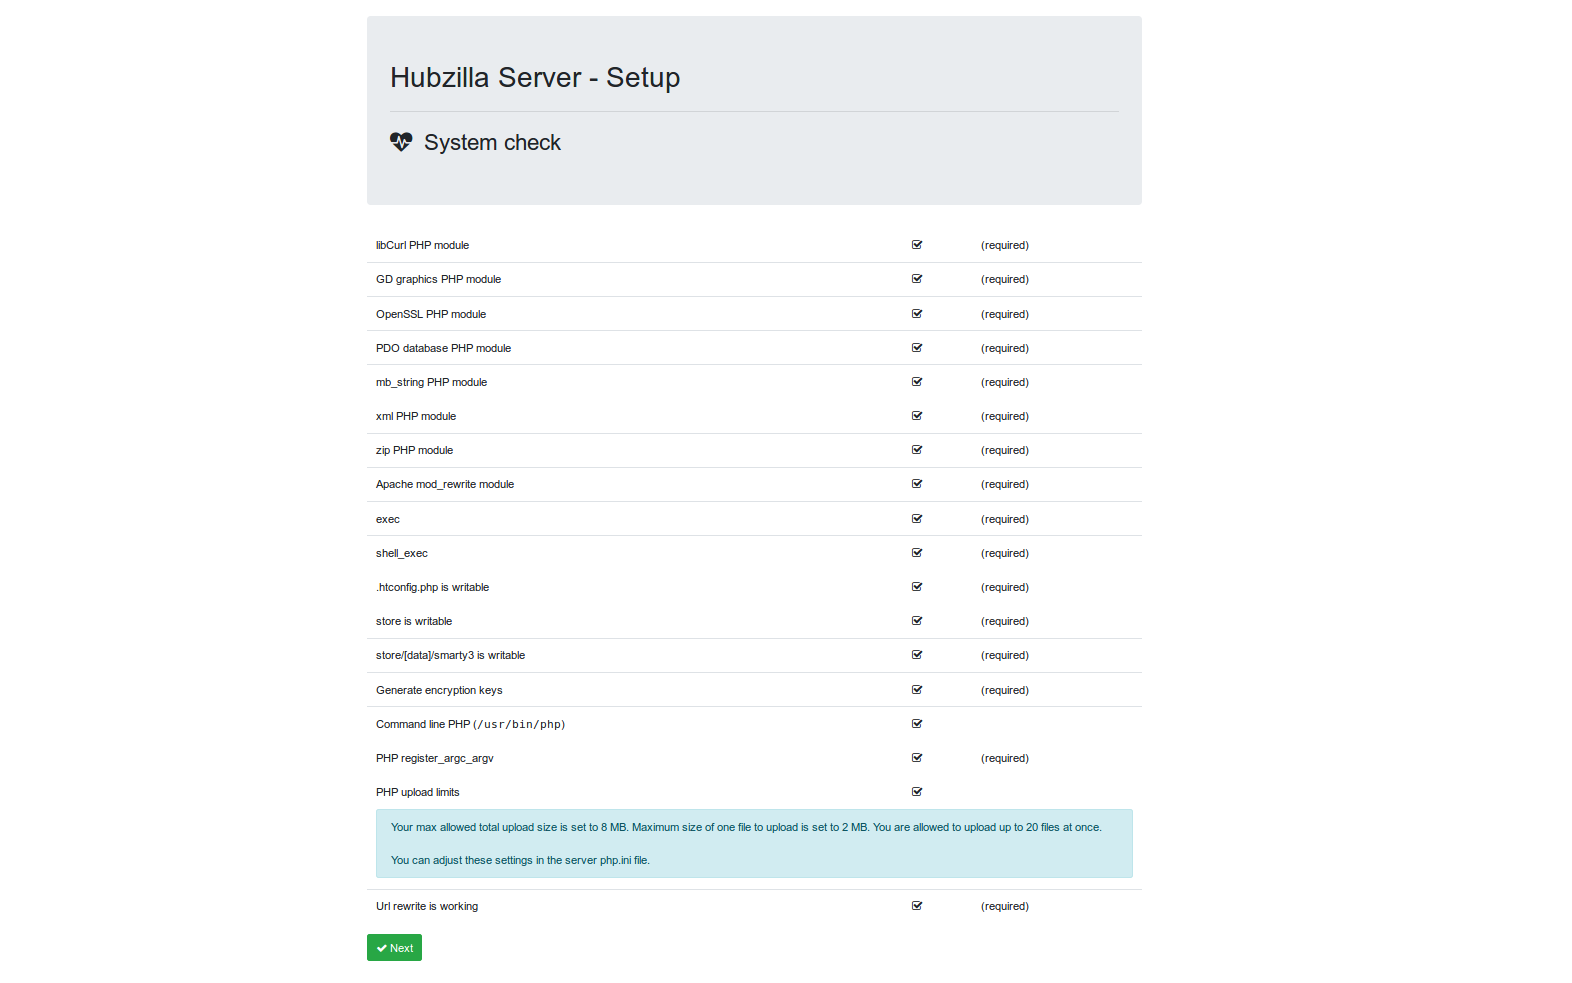
Make sure all the required packages are installed, then click on the Next button. You should see the following page:
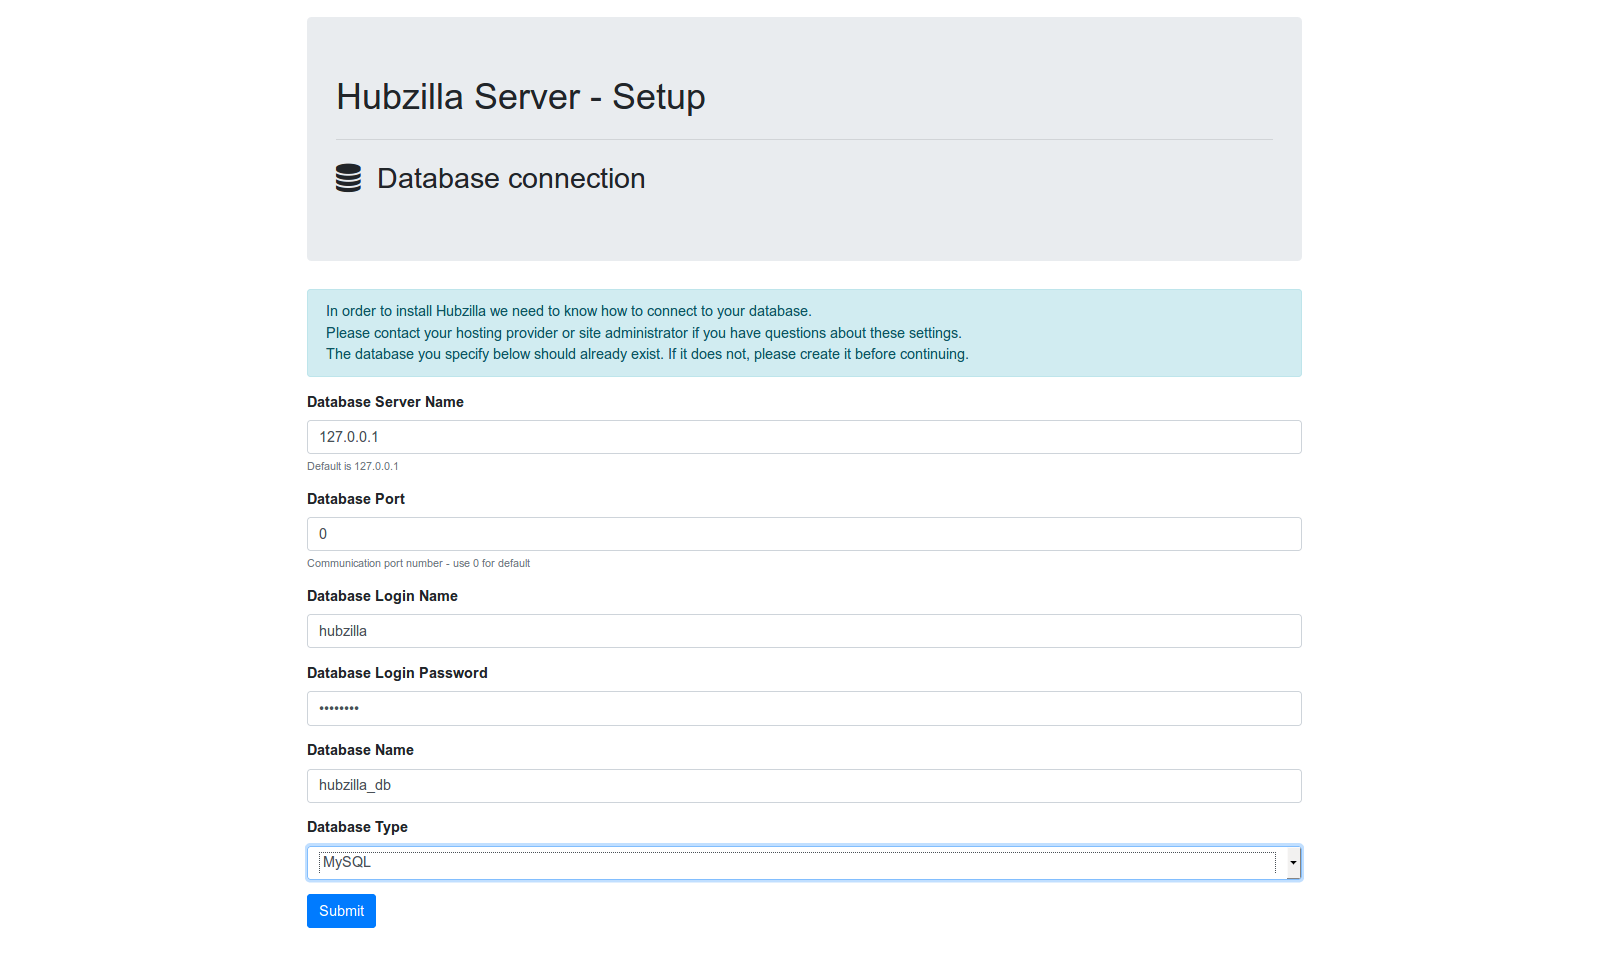
Now, provide your database credentials, then click on the Submit button. You should see the following page:
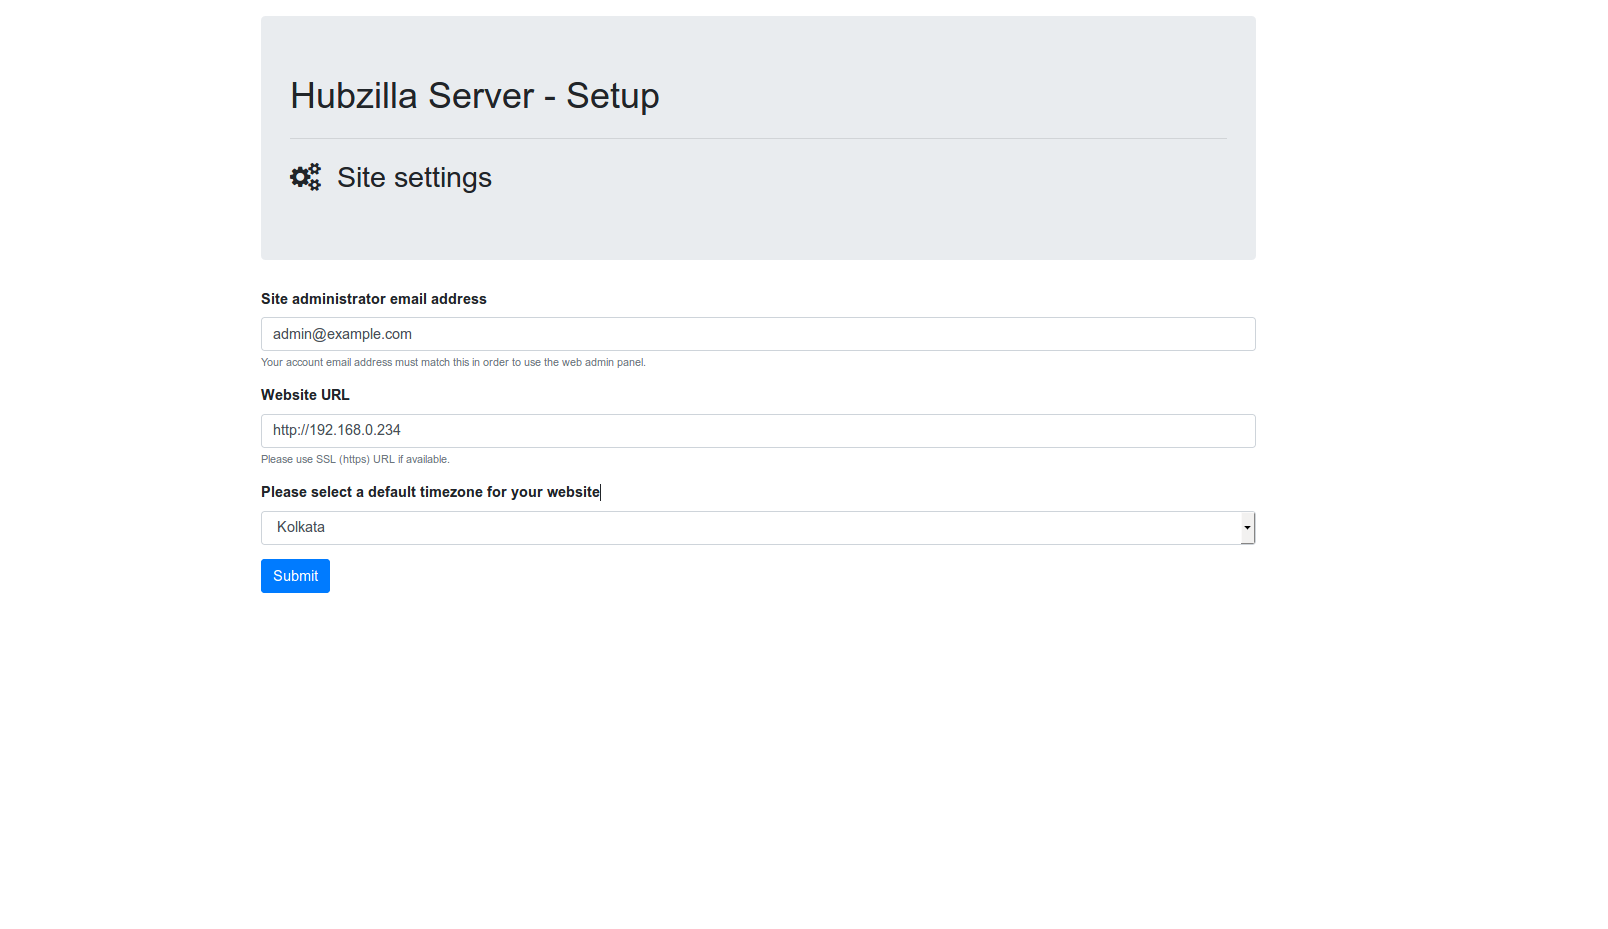
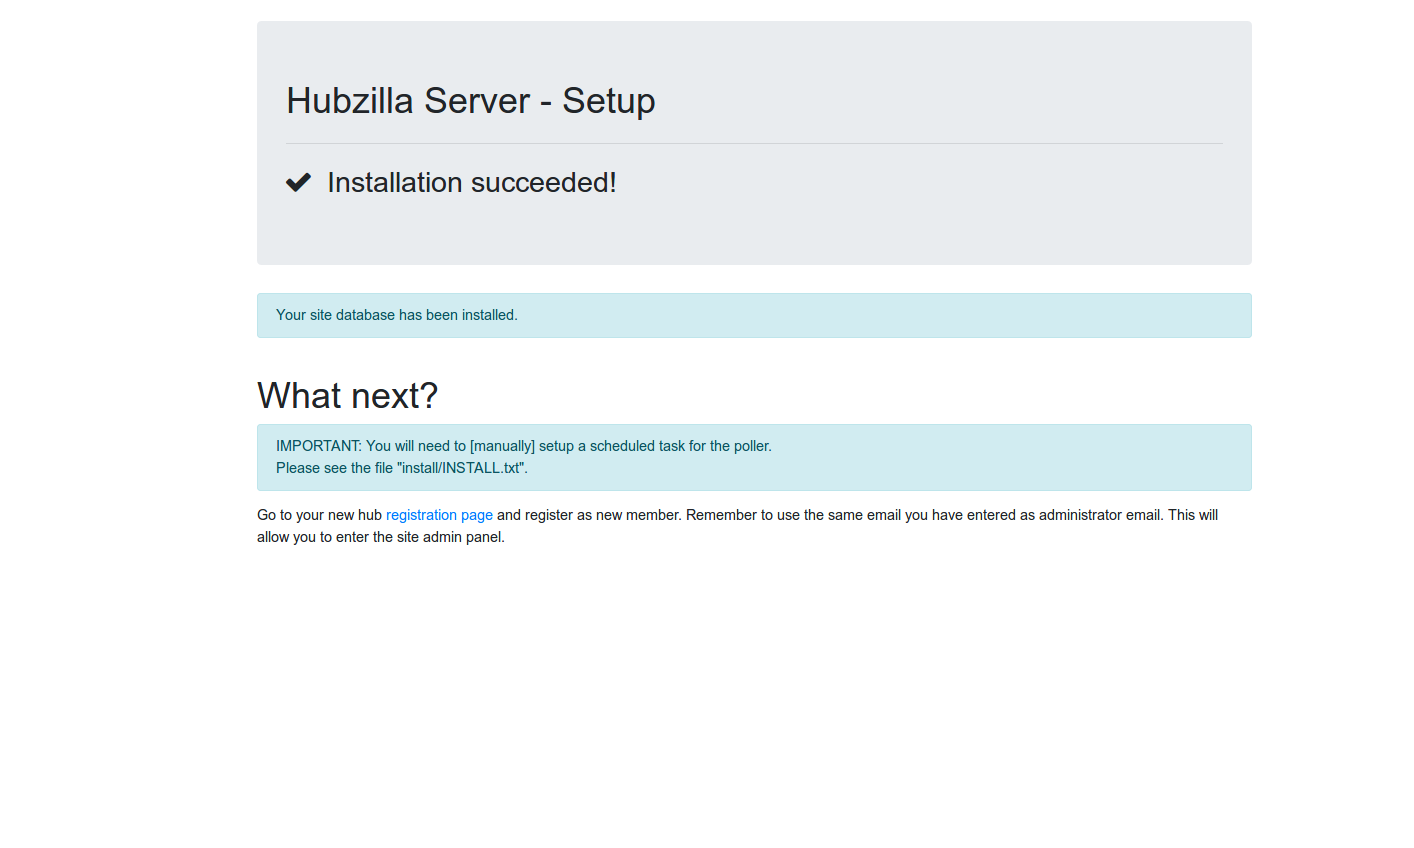
Next, provide your site admin email address and site URL, then click on the Submit button. Once the installation has been completed. You should see the following page: