Linux lsblk Command Tutorial for Beginners (8 Examples)
On this page
- Linux lsblk command
- Q1. How to use lsblk command?
- Q2. How to make lsblk display empty devices as well?
- Q3. How to make lsblk print size info in bytes?
- Q4. How to make lsblk print zone model for each device?
- Q5. How to make lsblk skip entries for slaves?
- Q6. How to make lsblk use ascii characters for tree formatting?
- Q7. How to make lsblk display info about device owner, group, and mode?
- Q8. How to make lsblk output select columns?
- Conclusion
In Linux, block devices are special files that refer to or represent a device (which could be anything from a hard drive to a USB drive). So naturally, there are command line tools that help you with your block devices-related work. Once such utility is lsblk.
In this tutorial, we will discuss this command using some easy to understand examples. But before we do that, it's worth mentioning that all examples mentioned here have been tested on an Ubuntu 18.04 LTS machine.
Linux lsblk command
The lsblk command in Linux lists block devices. Following is its syntax:
lsblk [options] [device...]
And here's how the tool's man page explains it:
       lsblk  lists  information  about  all  available or the specified block
       devices.  The lsblk command reads the sysfs filesystem and udev  db  to
       gather  information.  If  the udev db is not available or lsblk is com?
       piled without udev support than it tries  to  read  LABELs,  UUIDs  and
       filesystem  types  from the block device. In this case root permissions
       are necessary.

       The command prints all block devices (except RAM disks) in a  tree-like
       format  by  default.   Use  lsblk --help to get a list of all available
       columns.

       The default output, as well as the default  output  from  options  like
       --fs  and  --topology, is subject to change.  So whenever possible, you
       should avoid using default outputs in your scripts.  Always  explicitly
       define  expected columns by using --output columns-list in environments
       where a stable output is required.

       Note that lsblk might be executed in time when udev does not  have  all
       information  about recently added or modified devices yet. In this case
       it is recommended to use udevadm settle  before  lsblk  to  synchronize
       with udev
Following are some Q&A-styled examples that should give you a better idea on how lsblk works.
Q1. How to use lsblk command?
Basic usage is fairly simple - just execute 'lsblk' sans any option.
lsblk
Following is the output this command produced on my system:
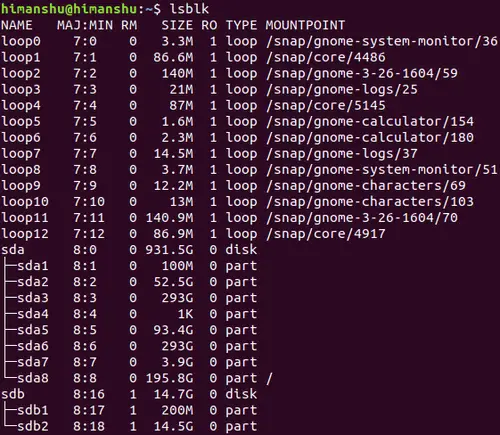
The first column lists device names, followed by corresponding major and minor device numbers, whether or not the device is removable (1 in case it is), size of the device, whether or not the device is read only, type of device (disk, partition, etc), and finally the device's mount point (if available).
Q2. How to make lsblk display empty devices as well?
By default, the lsblk command only displays non-empty devices. However, you can force the tool to display empty devices as well. For this, use the -a command line option.
lsblk -a
For example in my case, the above command produced the following output:
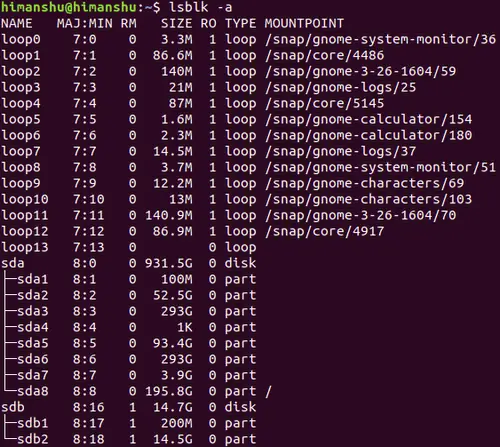
The 'loop 13' row is the new addition in this case.
Q3. How to make lsblk print size info in bytes?
By default, lsblk prints size information in human readable form. While this good, there are times when you may need size in bytes. What's good is that there's an option (-b) that does this.
lsblk -b
Following is an example output:
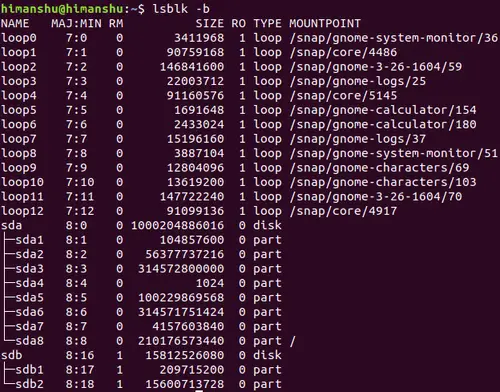
So you can see the 'Size' column now contains entries in bytes.
Q4. How to make lsblk print zone model for each device?
This you can do using the -z command line option.
lsblk -z
For example, here's the output the aforementioned command produced on my system:
NAME   ZONED
loop0  none
loop1  none
loop2  none
loop3  none
loop4  none
loop5  none
loop6  none
loop7  none
loop8  none
loop9  none
loop10 none
loop11 none
loop12 none
sda    none
??sda1 none
??sda2 none
??sda3 none
??sda4 none
??sda5 none
??sda6 none
??sda7 none
??sda8 none
sdb    none
??sdb1 none
??sdb2 none
Q5. How to make lsblk skip entries for slaves?
For this, you need to use the -d command line option, which tells lsblk to not print information related to holder devices or slaves.
lsblk -d
Here's an example output:
NAME   MAJ:MIN RM   SIZE RO TYPE MOUNTPOINT
loop0    7:0    0   3.3M  1 loop /snap/gnome-system-monitor/36
loop1    7:1    0  86.6M  1 loop /snap/core/4486
loop2    7:2    0   140M  1 loop /snap/gnome-3-26-1604/59
loop3    7:3    0    21M  1 loop /snap/gnome-logs/25
loop4    7:4    0    87M  1 loop /snap/core/5145
loop5    7:5    0   1.6M  1 loop /snap/gnome-calculator/154
loop6    7:6    0   2.3M  1 loop /snap/gnome-calculator/180
loop7    7:7    0  14.5M  1 loop /snap/gnome-logs/37
loop8    7:8    0   3.7M  1 loop /snap/gnome-system-monitor/51
loop9    7:9    0  12.2M  1 loop /snap/gnome-characters/69
loop10   7:10   0    13M  1 loop /snap/gnome-characters/103
loop11   7:11   0 140.9M  1 loop /snap/gnome-3-26-1604/70
loop12   7:12   0  86.9M  1 loop /snap/core/4917
sda      8:0    0 931.5G  0 disk
sdb      8:16   1  14.7G  0 disk
If you compare with output produced in previous cases, you can see no slave entries are produced in output in this case.
Q6. How to make lsblk use ascii characters for tree formatting?
By default, the type of tree formatting lsblk uses may not be user friendly in many cases. For example, copy-pasting it may cause formatting issues. So if you want, you can force the tool to use ascii characters for tree formatting, something which you can do using the -i command line option.
lsblk -i
Here's an example output:
NAME   MAJ:MIN RM   SIZE RO TYPE MOUNTPOINT
loop0    7:0    0   3.3M  1 loop /snap/gnome-system-monitor/36
loop1    7:1    0  86.6M  1 loop /snap/core/4486
loop2    7:2    0   140M  1 loop /snap/gnome-3-26-1604/59
loop3    7:3    0    21M  1 loop /snap/gnome-logs/25
loop4    7:4    0    87M  1 loop /snap/core/5145
loop5    7:5    0   1.6M  1 loop /snap/gnome-calculator/154
loop6    7:6    0   2.3M  1 loop /snap/gnome-calculator/180
loop7    7:7    0  14.5M  1 loop /snap/gnome-logs/37
loop8    7:8    0   3.7M  1 loop /snap/gnome-system-monitor/51
loop9    7:9    0  12.2M  1 loop /snap/gnome-characters/69
loop10   7:10   0    13M  1 loop /snap/gnome-characters/103
loop11   7:11   0 140.9M  1 loop /snap/gnome-3-26-1604/70
loop12   7:12   0  86.9M  1 loop /snap/core/4917
sda      8:0    0 931.5G  0 disk
|-sda1   8:1    0   100M  0 part
|-sda2   8:2    0  52.5G  0 part
|-sda3   8:3    0   293G  0 part
|-sda4   8:4    0     1K  0 part
|-sda5   8:5    0  93.4G  0 part
|-sda6   8:6    0   293G  0 part
|-sda7   8:7    0   3.9G  0 part
`-sda8   8:8    0 195.8G  0 part /
sdb      8:16   1  14.7G  0 disk
|-sdb1   8:17   1   200M  0 part
`-sdb2   8:18   1  14.5G  0 part
So you can see the output (see sda entries) now contains ASCII characters in tree formatting.
Q7. How to make lsblk display info about device owner, group, and mode?
This can be achieved using the -m command line option.
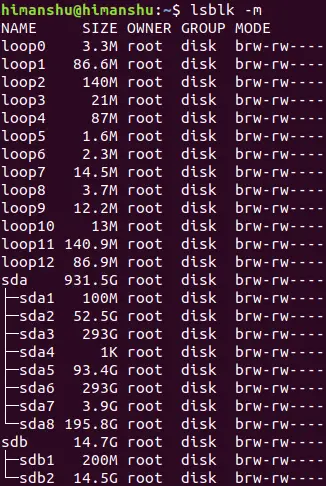
lsblk -m
Here's the output the aforementioned command produced in my case:
Q8. How to make lsblk output select columns?
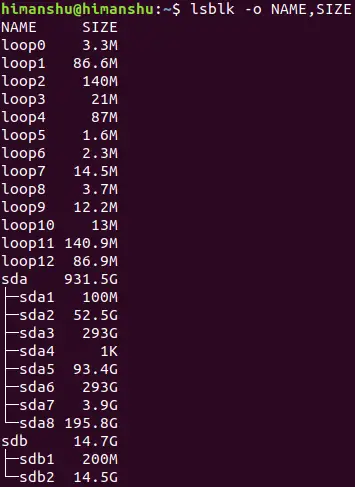
If you want, you can also direct lsblk to output only select columns, something which you can do using the -o command line option (which requires you to pass a comma separated list of columns that you want to display).
For example:
lsblk -o NAME,SIZE
The aforementioned command produced the following output:
Conclusion
If your Linux work involves accessing information related to block devices, then lsblk is a must know command for you. Here, in this tutorial, we have discussed several command line option this tool offers. To know more about lsblk, head to its man page.

