Linux shred Command Tutorial for Beginners (5 Examples)
Regardless of the OS you use, if you aren't into computer forensics or are a pro/enthusiast in general, you'll likely be surprised to know that when you delete a file, the file contents aren't actually deleted from the hard disk immediately.
However, there are tools that make sure the data becomes unrecoverable. In Linux, there's a command-line utility - dubbed shred - that's built for this purpose.
In this tutorial, we will discuss shred using some easy to understand examples. But before we do that, it's worth mentioning that all examples in this article have been tested on an Ubuntu 18.04 LTS machine and on Debian 10, but they should work on other Linux distributions like CentOS, Open SuSE, Fedora, and Gentoo as well.
Linux shred command
The shred command overwrites a file in order to make original contents unrecoverable. Following is the command's syntax:
shred [OPTION]... FILE...
And here's how the tool's man page explains it:
shred - overwrite a file to hide its contents, and optionally delete it

Overwrite the specified FILE(s) repeatedly, in order to make it harder for even very expensive
hardware probing to recover the data.
The following are some Q&A-styled examples that should give you a good idea on how the shred command works.
Q1. How does the shred command work?
If you just want to use it to overwrite a file, then all you got to do is to execute 'shred' with a file name as input.
shred [filename]
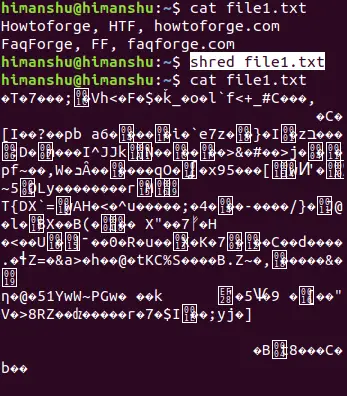
For example, I used it on file1.txt:
shred file1.txt
And the following screenshot clearly shows the file's content got overwritten by this tool.
Q2. How to change the number of times the file is overwritten?
By default, shred overwrites a file 3 times. However, if you want, you can change this number using the -n command line option.
For example, to make sure the tool overwrites the file 'file1.txt' 10 times, run the following command:
shred -n 10 file1.txt
Q3. How to make sure Shred deletes the file as well?
If you want shred to not only overwrite, but delete the file as well, then use the -u command-line option.
For example, I tried running the shred command in the following way:
shred -u file1.txt
And could confirm that the file actually got deleted.

Q4. How to selectively overwrite using shred?
Suppose the requirement is to only overwrite a set number of bytes from the file. This can be done using the -s command-line option, which requires you to pass the number of bytes as input.
For example, my file contained the following text:
Howtoforge
FAQForge
Linux
And I wanted shred to overwrite only 10 bytes. So for this, I used shred in the following way:
shred -s10 file1.txt
And here's how the operation affected the file contents:
?uTw?????
FAQForge
Linux
So you can see only the first 10 bytes were overwritten with garbage by the shred command.
Q5. How to tell shred the way to delete?
We have already discussed the -u command-line option that tells shred to delete the file in addition to overwriting it. But there's another option - dubbed 'remove' - that allows you to tell shred the way you want it to delete the file.
Following is how the man page explains the 'remove' option:
--remove[=HOW]
      like -u but give control on HOW to delete

       Delete  FILE(s)  if  --remove (-u) is specified.  The default is not to
       remove the files because it is common to operate on device  files  like
       /dev/hda,  and those files usually should not be removed.  The optional
       HOW parameter indicates how to remove a directory  entry:  'unlink'  =>
       use  a  standard  unlink call.  'wipe' => also first obfuscate bytes in
       the name.  'wipesync' => also sync each obfuscated byte to  disk.   The
       default mode is 'wipesync', but note it can be expensive.
Conclusion
As you may agree, the shred command is an important tool if your work involves dealing with - especially deleting - sensitive data. Here, in this tutorial, we have discussed some command-line options shred offers. Once you're done practicing these, head to the tool's man page to know more.

