How to start a vnc server for the actual display (scraping) with TigerVNC
VNC is a desktop sharing application (Virtual Network Computing) to connect and control a (remote or local) computer's desktop over a network connection.
However, on linux systems, many VNC server applications allow only to connect to a virtual desktop and not to the actual one. This howto offers you a solution, to connect via TigerVNC server to the actual active session on your Linux desktop.
Requirements
- A fully functional linux desktop environment
- root privilege (to install the TigerVNC server)
- basic knowledge of the linux shell
In order to get the latest packages, you may want to update.
user@hostname:~$ sudo apt-get update
This howto was tested on Debian/GNU Linux 9.5 (stretch) and Ubuntu 18.04
Install TigerVNC
First, you have to install the TigerVNC server.
user@hostname:~$ sudo apt-get install tigervnc-scraping-server
Note, that on most debian-based systems, there is a small package called tigervnc-scraping-server, which you need to install. You don't have to install the main TigerVNC server (package name: tigervnc-standalone-server) to have the functionality to connect to the running desktop session, only if you prefer to connect to a virtual desktop, too.
The TigerVNC server provides a smaller application (x0vncserver) to grant access to the active session.
Then, create a .vnc directory in your home:
user@hostname:~$ mkdir -p ~/.vnc
Create a password for your vnc session:
user@hostname:~$ vncpasswd
Password:
Verify:
Would you like to enter a view-only password (y/n)? n
Starting the VNC server
A short description of the x0vncserver:
x0tigervncserver is a TigerVNC Server which makes any X display remotely accessible via VNC, TigerVNC or compatible viewers. Unlike Xvnc(1), it does not create a virtual display. Instead, it just shares an existing X server (typically, that one connected to the physical screen).
Now that you have successfully installed TigerVNC server on your computer, created a password with the vncpasswd command, we can begin to start our vnc server. Make sure that you're on the active session, and write (as user):
user@hostname:~$ x0vncserver -passwordfile ~/.vnc/passwd -display :0

Wed Oct 10 22:17:16 2018
Geometry: Desktop geometry is set to 1920x1080+0+0
Main: XTest extension present - version 2.2
Main: Listening on port 5900
The option -passwordfile ~/.vnc/passwd reads the password file created earlier with the vncpasswd command. The second option -display :0 means, that you want to connect to the session on the display :0, which is usually the active session.
Now you can access your actual desktop with any vnc viewer application on the default vnc port 5900.
You can stop this process whenever you want by pressing Ctrl-c.
If you wish to run it in the background, type:
user@hostname:~$ x0vncserver -passwordfile ~/.vnc/passwd -display :0 >/dev/null 2>&1 &
Now all the output standard output and errors are redirected to /dev/null and with the & at the end, it will run in the background. However, you won't be able anymore to stop the vnc server by pressing Ctrl-c, instead you have to kill it's process id (see below section "Stopping the vnc server").
For more options and syntax, check the x0vncserver manual.
Stopping the VNC server
If your vnc server runs in the background, you have to know the process id, in order to stop it.
user@hostname:~$ ps -fu user | grep [x]0vncserver
user    1328    1   0 23:11 pts/2    00:00:00    /usr/bin/x0vncserver -display :0 -passwordfile /home/user/.vnc/passwd -rfbport 5900
The output will be like this, so notice the pid 1328. In order to stop the vnc server, we have to "kill" this process.
user@hostname:~$ kill -9 1328
The option -9 for the kill command will send the KILL signal to the process id to make sure that it stops.
Script to run the VNC server
There is a script to start and stop the x0vncserver application on github. For testing purposes, you download the psmisc package, too:
user@hostname:~$ sudo apt-get install git psmisc
Then, download the startvnc script using the git command:
user@hostname:~$ git clone https://github.com/sebestyenistvan/runvncserver
Cloning into 'runvncserver'...
remote: Enumerating objects: 77, done.
remote: Counting objects: 100% (77/77), done.
remote: Compressing objects: 100% (57/57), done.
remote: Total 77 (delta 25), reused 60 (delta 18), pack-reused 0
Unpacking objects: 100% (77/77), done.
Your output will look something like above.
Copy the startvnc script from the runvncserver directory to your home:
user@hostname:~$ cp ~/runvncserver/startvnc ~
Change permissions to executable, in order to execute the script:
user@hostname:~$ chmod +x ~/startvnc
Then, run the script.
user@hostname:~$ ./startvnc

Usage: ./startvnc start|stop|restart|status
This script will only work, if you have a .vnc directory in your home and created a vncpasswd (it checks for ~/.vnc/passwd file). We already created the .vnc directory and the password earlier.
To start the vnc server on the actual display, just type:
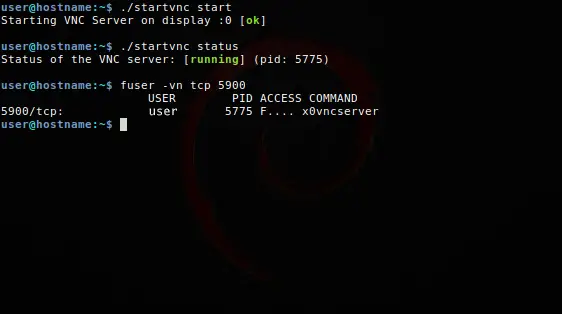
user@hostname:~$ ./startvnc start
Starting VNC Server on display :0 [ok]
You can test, if your vnc server is running with the option:
user@hostname:~$ ./startvnc status
Status of the VNC server: [running] (pid: 1328)
Few examples:

Or by checking the 5900 TCP port on your system with the fuser command (from the psmisc package):
user@hostname:~$ fuser -vn tcp 5900
                  USER      PID     ACCESS      COMMAND
5900/tcp:         user      1328    F....       x0vncserver
You'll get an output like this if the vnc server is running on port 5900.
More instructions for this script you can find in the readme file:
user@hostname:~$ less runvncserver/README.md
The script will create a logfile, where the output is stored. If something goes wrong or you can't start or stop the x0vncserver, take a look at the logfile under ~/.vnc/logfile
Start the VNC server automatically
If you want to access the active desktop session automatically, you need to edit the .xsessionrc file in your home directory.
user@hostname:~$ echo "/home/user/startvnc start >/dev/null 2>&1" >> ~/.xsessionrc
Replace user by your username and it will automatically run when starting the X session. The script logs its activity in ~/.vnc/logfile, if something goes wrong, you can check the log file there.

Notes
This tutorial doesn't deal with setting up a VNC virtual desktop.
Security
Be aware, that the x0vncserver doesn't use encryption by default, so use it carefully over the internet. If you want to use it remotely, you can tunnel it via ssh. However, there are other howtos where you can find a solution to encrypt your VNC session.
Or you can take a look at the ssvnc package.
VNC viewers
If you're looking for VNC viewers, there are plenty of them, for instance:
- gvncviewer
- tigervnc-viewer
- xtightvncviewer
- xvnc4viewer
Geometry
The x0vncserver on the actual display will use the same geometry as the running desktop on the :0 display. So if you set the -geometry option to a lower size, it won't get scaled, you'll just see a fraction of the desktop size.
Feedback
Feel free to write feedback. If you tested this tutorial or even the script on another system.