How to Install NFS Server and Client on Debian 12
This tutorial exists for these OS versions
- Debian 12 (Bookworm)
- Debian 11 (Bullseye)
- Debian 9 (Stretch)
- Debian 7 (Wheezy)
- Debian 5 (Lenny)
On this page
NFS or Network File System is a network protocol that allows you to mount a remote file system over the network. The NFS protocol uses a client-server architecture: the NFS server provides all directories or partitions that can be accessed, and the clients access all directories and file systems via the internal network connection using the rpcbind protocol.
The current state of the Network File System protocol is described below.
- NFSv2 and NFSv3 are still supported by the major operating systems, but for security reasons you must restrict access to the NFS server to the trusted local network. NFSv2 and NFSv3 are recommended for small and medium-sized deployments.
- The NFSv4 protocol provides basic security features such as authentication and encryption, but relies on Kerberos for these parts. So you need to make additional configurations to use NFSv4 with basic security features.
In this guide, I will show you how to install an NFS server and client on Debian 12. I will install the NFS server and configure NFSv4, including configuring exportsfs via the pseudo file system. In the end, you configure the Debian client to mount the NFS server only via NFSv4 and configure the automatic mounting via the file /etc/fstab.
Prerequisites
To complete this guide, ensure you have the following:
- Two Debian 12 servers - In this case, the server bookworm with IP address 192.168.10.15 will be used as the NFS server, and the server client1 with IP 192.168.10.20 will be used as the NFS client.
- A non-root user with sudo/administrator privileges.
Installing NFS Server
NFS or Network File System is a protocol for distributed file sharing. On Linux, including Debian, the NFS package is available by default on the official repository. Complete the first step below to install the NFS server package and learn how to manage the NFS server service.
Before jumping to the installation, run the apt command below to update the Debian repository and get the latest package information.
sudo apt update
Now install the NFS server package nfs-kernel-server using the apt command below. Input y to confirm the installation and press ENTER.
sudo apt install nfs-kernel-server nfs-common

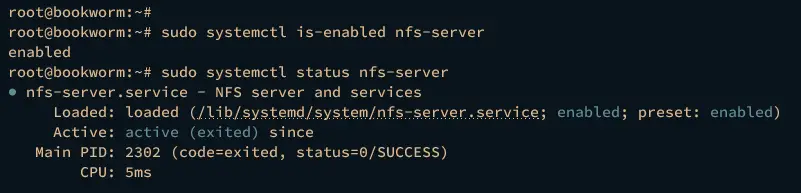
Once the nfs-kernel-server package is installed, the nfs-server service is created, running, and enabled by default on your Debian machine. Execute the following systemctl commands to verify the nfs-server service and ensure that the service is enabled and running.
sudo systemctl is-enabled nfs-server
sudo systemctl status nfs-server
You should get the output enabled, which means the nfs-server will be run automatically upon the system boot. You should see the message active (exited) or active (running) when running.
Furthermore, you can use the following command to start, restart, and stop the nf-server service.
sudo systemctl start nfs-server
sudo systemctl restart nfs-server
sudo systemctl stop nfs-server
Configuring NFSv4
At this time, the latest version of the NFS protocol is v4, which is enhanced in security and performance. In the following section, you will learn how to set up and enable NFSv4 on your NFS server.
Open the default NFS configuration /etc/default/nfs-common using the nano editor command.
sudo nano /etc/default/nfs-common
Change the paramter NEED_STATD to no and NEED_IDMAPD to yes. The NFSv4 required NEED_IDMAPD that will be used as the ID mapping daemon and provides functionality between the server and client.
NEED_STATD="no"
NEED_IDMAPD="yes"
Save the file and exit the editor when finished.
Now open the NFS server configuration /etc/default/nfs-kernel-server using the nano editor command below.
sudo nano /etc/default/nfs-kernel-server
Add the following configuration to disable NFSv2 and NFSv3 when running the nfs-server service, and disable mount requests from clients for both NFSv2 and NFSv3.
RPCNFSDOPTS="-N 2 -N 3"
RPCMOUNTDOPTS="--manage-gids -N 2 -N 3"
Save and exit the file when you are done.
Lastly, execute the following command to restart the nfs-server service and apply the changes. With this, your NFS server will only accept the NFSv4 protocol.
sudo systemctl restart nfs-server
Configuring Firewall via UFW
Enabling firewalld on your NFS server is a must, you can limit which internal networks that can access the NFS server. Complete this step to configure UFW (Uncomplicated Firewall) and secure your NFS server.
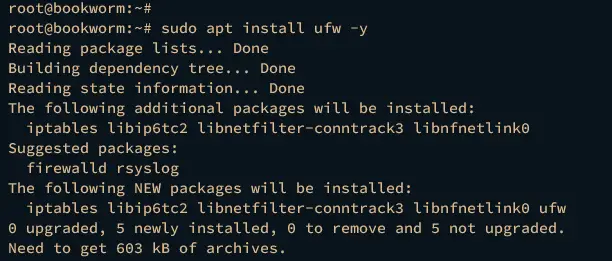
If the UFW is not installed, run the apt command below to install it.
sudo apt install ufw -y
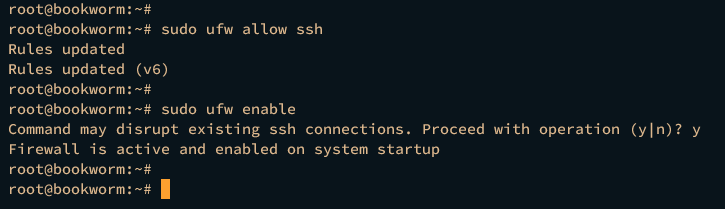
After UFW is installed, execute the ufw command below to allow the SSH service and enable UFW. Input y and press ENTER to confirm and enable UFW.
sudo ufw allow ssh
sudo ufw enable
You should get an output "Firewall is active and enabled on system startup" when the UFW is running and enabled.
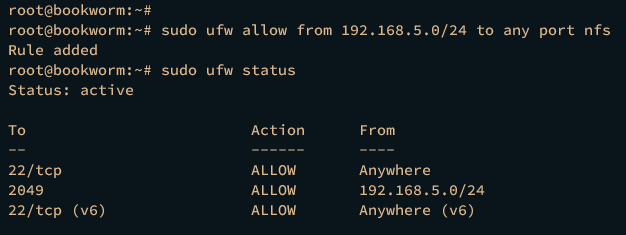
Next, execute the following ufw command to allow your local network subnet to access the NFS server. The following command will allow 192.168.10.0/24 to access the NFS server.
sudo ufw allow from 192.168.10.0/24 to any port nfs
Lastly, execute the following ufw command to reload and verify the UFW status.
sudo ufw reload
sudo ufw status
You should see the NFS port 2049 added to UFW; only network subnet 192.168.10.0/24 can access the port.
Setting Up Pseudo Filesystem and Exports
A Pseudo filesystem is a fake file system that allows you to set up NFS shared directory as a single filesystem. So, instead of using multiple shared directories, you can use a single pseudo filesystem for all of your shared directories.
In the following section, you will set up a pseudo filesystem on the NFS server and use it as the single shared filesystem for NFS clients.
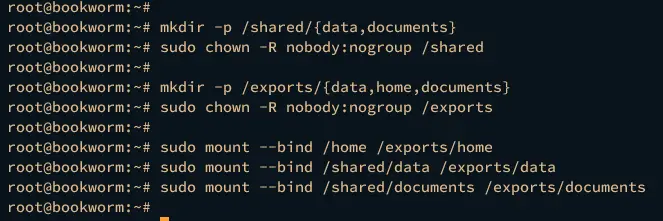
Run the following command to create new directories /shared, /shared/data, and /shared/documents. Then, change the ownership to nobody and nogroup via chown.
mkdir -p /shared/{data,documents}
sudo chown -R nobody:nogroup /shared
Now create other directories /exports, /exports/home, /exports/data, and /exports/documents using the command below. And be sure to change the ownership to nobody and nogroup.
mkdir -p /exports/{data,home,documents}
sudo chown -R nobody:nogroup /exports
Next, mount the /home directory as a pseudo filesystem to /exports/home directory, the shared directory /shared/data to /exports/data, and the shared directory /shared/documents to /exports/documents.
sudo mount --bind /home /exports/home
sudo mount --bind /shared/data /exports/data
sudo mount --bind /shared/documents /exports/documents
Verify the list of mounted filesystems using the command df command below. The -a parameter is used to show all available filesystems, including the pseudo filesystem.
sudo df -ah
You should see three pseudo filesystems available and mounted.

You can also set up a pseudo filesystem permanently via the /etc/fstab file. Open the /etc/fstab file using the nano editor.
sudo nano /etc/fstab
Add the following configuration to the file:
/home /exports/home    none bind
/shared/data /exports/data     none bind
/shared/documents /exports/documents    none bind
Save and close the file after finished.
You can add the /exports exported directory to the NFS server as a pseudo filesystem.
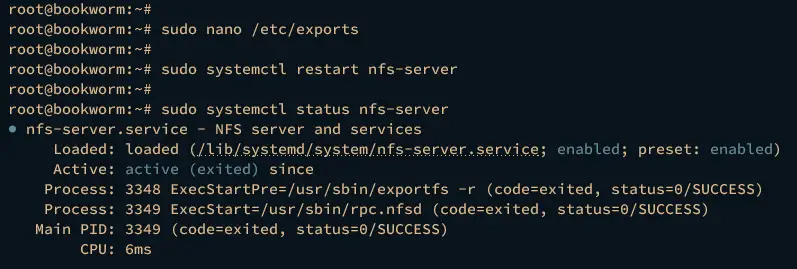
Open the file /etc/exports using the following nano editor command.
sudo nano /etc/exports
Add the following line to the file.
/exports 192.168.10.0/255.255.255.0(rw,no_root_squash,no_subtree_check,crossmnt,fsid=0)
Save and close the file when finished.
Below are some NFS options used for this case:
- rw : allow read and write access for both NFS server and client to the volume/directory.
- no_subtree_check : disables subtree checking, which has mild security implications, but can improve reliability in some circumstances.
- no_root_sqash : disable root squashing. This option is mainly useful for disk-less clients.
- fsid=0 : for NFSv4, this parameter is used to inform the NFS server that this export is the root of all exported filesystems.
Next, execute the following command to restart the nfs-server service and apply the changes. Then, verify the nfs-server to ensure that the service is running.
sudo systemctl restart nfs-server
sudo systemctl status nfs-server
You should be displayed an output like this:
Lastly, run the following command to check the exported directory and filesystem on the NFS server using the following command.
sudo showmount -e 192.168.10.15
sudo showmount -e
If everything goes well, you should see the /exports directory is exported on the NFS server.

Setting Up NFS Client
At this point, you've configured the NFS server with a pseudo filesystem and secured the NFS server via UFW. Now, you will be setting up the Debian client machine and mount the NFS server shared filesystem.
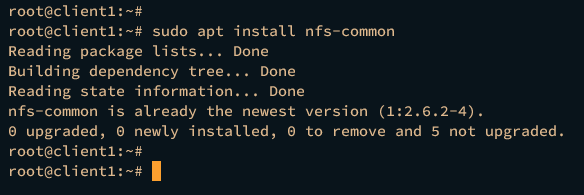
Log in to the client machine and update the Debian repository to get the latest package information. Then, install the nfs-common package via the apt command below.
sudo apt update
sudo apt install nfs-common
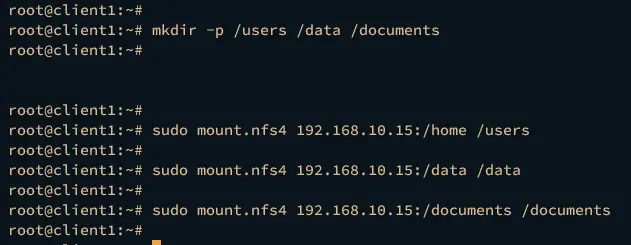
Once the package is installed, run the following command to create target mount directories /users, /data, and /documents.
mkdir -p /users /data /documents
Next, run the mount.nfs4 commands below to mount the exported pseudo filesystem to the target directory. In this case, the pseudo filesystem /home is mounted to /users directory, the /data to the /data directory, and /documents to the /documents directory.
sudo mount.nfs4 192.168.10.15:/home /users
sudo mount.nfs4 192.168.10.15:/data /data
sudo mount.nfs4 192.168.10.15:/documents /documents
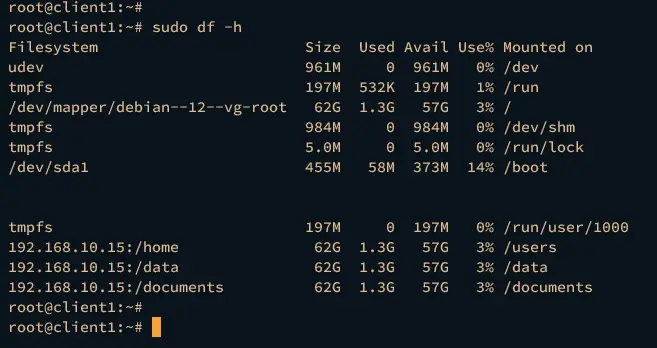
Verify the list of mounted filesystems using the df command below.
sudo df -h
If successful, you should see each pseudo filesystem from the NFS server is mounted to each target directory like this:
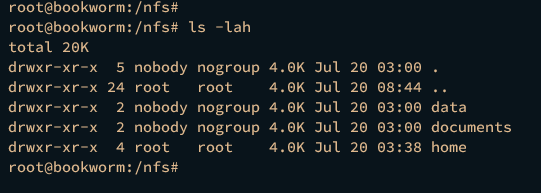
Furthermore, you can also mount the root of a pseudo filesystem like this. If you check the /nfs target directory, you should see three different directories /home, /data, and /documents.
mkdir -p /nfs
sudo mount.nfs4 192.168.10.15:/ /nfs -o soft,intr,rsize=8192,wsize=8192
Mount NFS Server via /etc/fstab
At the top, you have mounted the NFS server via the mount.nfs4 command. The following section will show you how to mount the NFS server permanently via /etc/fstab file.
First, remove the NFS server via the umount command below.
sudo umount /users /data /documents
Now open the file /etc/fstab using the following nano editor command.
sudo nano /etc/fstab
Add the following lines to the file.
192.168.10.15:/home /users nfs4 soft,intr,rsize=8192,wsize=8192
192.168.10.15:/data /data nfs4 soft,intr,rsize=8192,wsize=8192
192.168.10.15:/documents /documents nfs4 soft,intr,rsize=8192,wsize=8192
Save the file and exit the editor after finishing.
Next, run the systemctl command below to restart the systemd manager. Then, run the mount command to mount all available filesystems within the /etc/fstab file.
sudo systemctl daemon-reload
sudo mount -a
Then verify the list of mounted filesystems using the following df command. If successful, you should see that the NFS server is mounted to each target directory.
sudo df -h

You can also try to reboot the client machine to see the effect. If everything goes well, the NFS server should be mounted automatically via the /etc/fstab file.
sudo reboot
Conclusion
That's it! You've completed the installation of the NFS server and client on Debian 12 servers. You've also configured explicitly the NFSv4 and pseudo filesystem on the NFS server. Furthermore, you have secured the NFS server via UFW (Uncomplicated Firewall).
Lastly, you have also finished the configuration of the NFS client on the Debian machine and successfully configured the auto-mount NFS server via the /etc/fstab file on your Ubuntu machine. You can now start configuring it to suit your needs.

