Ansible Guide: The Ad-Hoc Command
The Ad-Hoc command is the one-liner ansible command that performs one task on the target host. It allows you to execute simple one-line task against one or group of hosts defined on the inventory file configuration. An Ad-Hoc command will only have two parameters, the group of a host that you want to perform the task and the Ansible module to run.
The Ad-Hoc command gives you more advantage for exploring ansible itself. You are able to perform tasks without creating a playbook first, such as rebooting servers, managing services, editing the line configuration, copy a file to only one host, install only one package.
In this tutorial, I will show the basic usage of the Ansible Ad-Hoc command. I will be using the Ad-Hoc command to perform simple tasks that may be needed for your daily basis as a system administrator.
Prerequisites
For this guide, we will be using two Ubuntu 18.04 LTS servers, Bionic Beaver. The ansible server will get the hostname 'ansible-node' with the IP address 10.5.5.20 and the Provision server with the hostname 'provision' and the IP address 10.5.5.21.
What we will do?
- Basic Ad-Hoc Command
- File Transfer
- Update and Upgrade
- Manage Package
- Manage Services
- Checking System
Basic Ad-Hoc Command Usage
Firstly, we will learn the basic usage of Ansible Ad-Hoc for managing servers. We will learn the Ansible Ad-Hoc basic command, using Ad-Hoc command with ssh password authentication, the privilege escalation, and using Ad-Hoc command against a group of hosts.
1. Basic Command
The basic command of ansible ad-hoc against 'all' hosts on the inventory file and using the 'ping' module.
ansible all -m ping
- The first parameter 'all' for all hosts on the inventory file.
- The second parameter inside the '-m' option for the module, running the ping module.
Now you will get the result as below.

An Ad-Hoc command against the provisioning server has been 'SUCCESS' without any changes made on the server and we get the result of the 'ping' module from the provisioning server 'pong'.
2. Filter Hosts Group and Single Host
Now you can use the Ad-Hoc command against a group of hosts that are already defined on the inventory file. You can use your custom inventory file or using the default inventory file '/etc/ansible/hosts'.
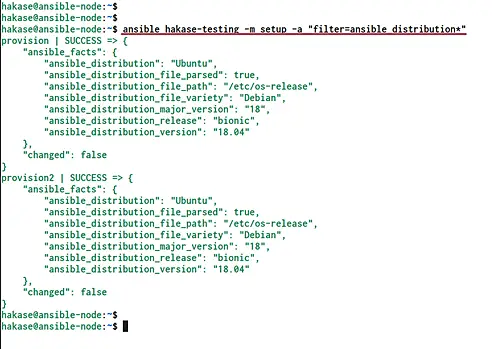
Below is an example to run the ad-hoc command against the group of hosts called 'hakase-testing' that are already defined on the default inventory configuration file.
ansible hakase-testing -m setup -a "filter=ansible_distribution*"
If you're using the custom inventory file, add the '-i' option followed the inventory file name.
ansible hakase-testing -i hosts -m setup -a "filter=ansible_distribution*"
You will get the same result.
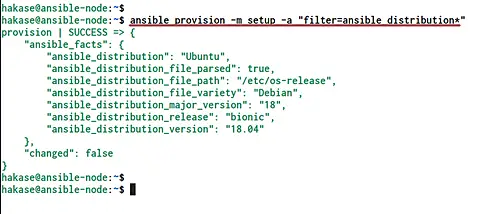
Now if you want to run against single host on the inventory configuration, you can use the name of the host such as below.
ansible provision -m setup -a "filter=ansible_distribution*"
And the ad-hoc command will run on the 'provision' server only.
3. Using SSH Password
Now we will perform an Ad-Hoc command using the prompted ssh password authentication. And in order to do this, you need to install the additional package called 'sshpass' on the 'ansible-node'.
Install sshpass package using the apt command below.
sudo apt install sshpass -y
Now run the ad-hoc command and add the '--ask-pass' option to the end.
ansible hakase-testing -m ping --ask-pass
And you will be asked the 'SSH Password' for the server.
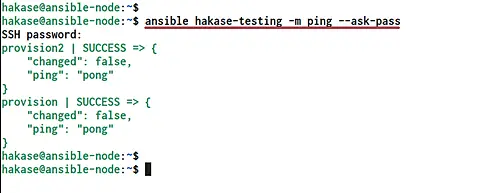
Type your ssh password and the ad-hoc command will be run against the server.
4. Privilege Escalation
The ansible provides features for the privilege escalation against servers. If you want to run the ad-hoc command as a non-root user, you can use the '--become' option to get the root privileges and the '-K' option to prompt the password.
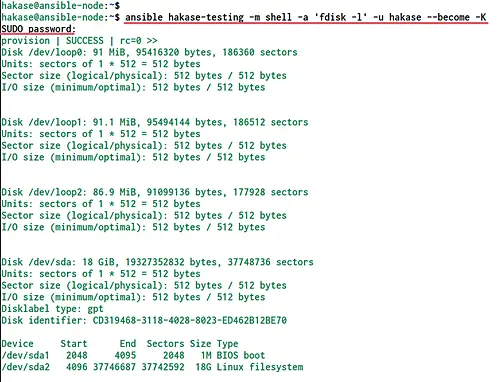
Run the ad-hoc command 'fdisk -l' as a user 'hakase' with the privilege option '--become' and the '-K' to prompt the 'SUDO Password'.
ansible hakase-testing -m shell -a 'fdisk -l' -u hakase --become -K
Below is the result.
File Transfer
Now we're going to use the Ad-Hoc command for File Transfer to and from the server. We can transfer a file to the provisioning server with the 'copy' module, and download file from the server using 'fetch' module.
1. Upload File to Host
For this example, we're going to run the ad-hoc command and using the 'copy' module to upload the sudoers configuration for user hakase to the '/etc/sudoers.d' directory on the group 'hakase-testing'.
Run the ad-hoc command below.
ansible hakase-testing -m copy -a 'src=/home/hakase/hakase-sudo.conf dest=/etc/sudoers.d/hakase owner=root mode=0644' -u hakase --become -K
Now you will be asked the 'SUDO Password' for the hakase user. Type the password and you will get the result as below.
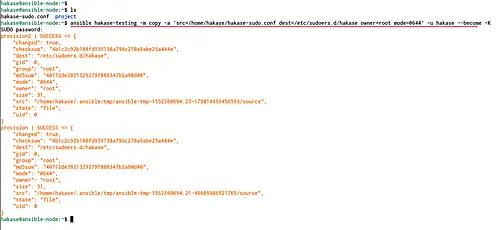
The file has been uploaded to the 'dest' destination directory, and you get the 'changed' result as 'true'.
2. Download File from the Host
Now we're going to use an ad-hoc command with the 'fetch' module for downloading the file from the provisioning server to the local 'ansible-node' server.
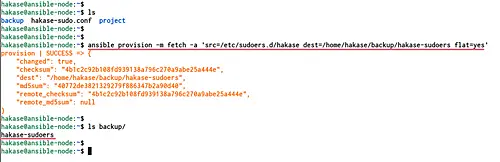
Download the configuration file '/etc/sudoers.d/hakase' from the 'provision' server to the local directory called 'backup'.
ansible provision -m fetch -a 'src=/etc/sudoers.d/hakase dest=/home/hakase/backup/hakase-sudoers flat=yes'
And you will get the file called 'hakase-sudoers' on the 'backup' directory.
Step 3 - Update Repository and Upgrade Packages
To update and upgrade the repository of Ubuntu servers, we can use the ad-hoc command with the apt module.
Update repository on the group hakase-testing.
ansible hakase-testing -m apt -a 'update_cache=yes' --become
Now update repositories and upgrade all packages to the latest version using the 'upgrade=dist' option.
ansible hakase-testing -m apt -a 'upgrade=dist update_cache=yes' --become
Wait for all packages is being upgraded.
Manage Packages
This is very useful when you're trying to build and debug your own playbook. Because sometimes you need an additional package to be installed on the system. So, this ad-hoc command will give you an easy way to install that package without login to each server.
1. Install Package
Install a single package using the ad-hoc command with the apt module as below.
ansible hakase-testing -m apt -a 'name=nginx state=latest' --become
2. Remove Package
Remove the package and purge all configuration related to the package.
ansible hakase-testing -m apt -a 'name=nginx state=absent purge=yes' --become
3. Autoremove
The example below is removing the nginx package and purge all configuration related and then remove all unused packages on the system.
ansible hakase-testing -m apt -a 'name=nginx state=absent purge=yes autoremove=yes' --become
Manage Services
In this step, we're going to use the service module on the ad-hoc command for managing the system service on the provisioning server.
1. Start Services
Start the nginx service and add it to the boot time.
ansible hakase-testing -m service -a 'name=nginx state=started enabled=yes' --become
You will get 'changed' and 'enabled' result as 'true'.
2. Restart Service
If you want to restart the service, you can use the following command.
ansible hakase-testing -m service -a 'name=nginx state=restarted' --become
The nginx service has been restarted.
3. Stop a Service
To stop the service, change the 'state' value to 'stopped'.
ansible hakase-testing -m service -a 'name=nginx state=stopped' --become
The nginx service on the servers 'hakase-testing' has been stopped.
Checking the System
Now we're going to use the 'shell' module inside the ad-hoc command. And we will do simple system monitoring using simple Linux command through the Ansible ad-hoc.
Firstly, install the 'sysstat' package to all servers using the ad-hoc command below.
ansible hakase-testing -m apt -a 'name=sysstat state=latest' --become
Wait for the 'sysstat' package installation.
Once it's complete, you're ready to check all servers.
1. Disk Available
Check the disk available on the root partition using the fdisk command.
ansible hakase-testing -m shell -a 'df -h /dev/sda2' --become
Change the '/dev/sda2' with your own path.
2. RAM Memory Usage
Now check the RAM Memory usage on all servers using the 'free -m' command.
ansible hakase-testing -m shell -a 'free -m' --become
And you will be shown the result as below.
3. CPU Usage
Checking the CPU usage of all servers using the mpstat command.
ansible hakase-testing -m shell -a 'mpstat -P ALL' --become
The mpstat command is part of the 'sysstat' package.
4. Open Ports
Checking the open ports on all system using the netstat through the ad-hoc command.
ansible hakase-testing -m shell -a 'netstat -plntu' --become
5. Uptime
Now check the uptime of each server.
ansible hakase-testing -m shell -a 'uptime' --become

