How to Install OSClass with Nginx on Ubuntu 18.04 LTS
This tutorial exists for these OS versions
- Ubuntu 20.04 (Focal Fossa)
- Ubuntu 18.04 (Bionic Beaver)
On this page
OSClass is a free and open source PHP script that can be used to create your own classifieds site. It is used by thousands of users for creating job listings, sales listing, real estate, and other similar listing websites. OSClass provides lots of features like built-in plugins, themes, multi-language, CAPTCHA, dashboard, SEO friendly and many more.
In this tutorial, we will learn how to install OSClass on Ubuntu 18.04 server.
Requirements
- A server running Ubuntu 18.04.
- A root password is setup to your server.
Getting Started
Before starting, you will need to update your system with the latest version. You can do this by running the following command:
apt-get update -y
apt-get upgrade -y
Once your server is updated, restart your server to apply the changes.
Install LEMP Server
Before starting, you will need to install Nginx, MariaDB, PHP and other required packages to your server. You can install all of them with the following command:
apt-get install nginx mariadb-server php7.2 php7.2-cli php7.2-fpm php7.2-common php7.2-mysql php7.2-gd php7.2-xml unzip -y
Once all the packages are installed, start Nginx and MariaDB service and enable them to start on boot time with the following command:
systemctl start nginx
systemctl start mariadb
systemctl enable nginx
systemctl enable mariadb
Once you have done, you can proceed to the next step.
Configure Database for OSClass
By default, MariaDB is not secured. So, you will need to secure it. You can do this by running the mysql_secure_installation script:
mysql_secure_installation
Answer all the questions as shown below:
    Enter current password for root (enter for none):
    Set root password? [Y/n]: N
    Remove anonymous users? [Y/n]: Y
    Disallow root login remotely? [Y/n]: Y
    Remove test database and access to it? [Y/n]:  Y
    Reload privilege tables now? [Y/n]:  Y
Once the MariaDB is secured, log in to MariaDB shell with the following command:
mysql -u root -p
Enter your root password when prompt. Then, create a database and user for OSClass using the following command:
MariaDB [(none)]> CREATE DATABASE osclassdb;
MariaDB [(none)]> GRANT ALL PRIVILEGES ON osclassdb.* TO 'osclass'@'localhost' IDENTIFIED BY 'password';
Next, flush the privileges and exit from the MariaDB shell with the following command:
MariaDB [(none)]> FLUSH PRIVILEGES;
MariaDB [(none)]> EXIT;
Once your database is configured, you can proceed to the next step.
Install OSClass
First, you will need to download the latest version of OSClass from their website. You can download it with the following command:
wget https://static.osclass.org/download/osclass.3.8.0.zip
Once the download is completed, extract the downloaded file to the Nginx root directory with the following command:
unzip osclass.3.8.0.zip -d /var/www/html/osclass
Next, change the directory to osclass and copy sample config file with the following command:
cd /var/www/html/osclass
cp config-sample.php config.php
Next, open config.php file and define your database settings:
nano config.php
Make the following changes:
 * The base MySQL settings of Osclass
 */
define('MULTISITE', 0);

/** MySQL database name for Osclass */
define('DB_NAME', 'osclassdb');

/** MySQL database username */
define('DB_USER', 'osclass');

/** MySQL database password */
define('DB_PASSWORD', 'password');

/** MySQL hostname */
define('DB_HOST', 'localhost');

/** Database Table prefix */
define('DB_TABLE_PREFIX', 'oc_');

define('REL_WEB_URL', 'rel_here');

define('WEB_PATH', 'http://localhost');
Save and close the file. Then, give proper permissions to the osclass directory with the following command:
chown -R www-data:www-data /var/www/html/osclass
chmod -R 755 /var/www/html/osclass
Once you have done, you can proceed to the next step.
Configure Nginx for OSClass
Next, you will need to create an Nginx virtual host file for OSClass. You can create it with the following command:
nano /etc/nginx/sites-available/osclass.conf
Add the following lines:
server {
    listen 80;
    listen [::]:80;

    server_name example.com;
    root /var/www/html/osclass;

    index index.php index.html;

    location / {
      try_files $uri $uri/ /index.php?$args;
    }

    location ~ \.php$ {
        include snippets/fastcgi-php.conf;
        fastcgi_pass unix:/var/run/php/php7.2-fpm.sock; # Check this
    }
}
Save and close the file, when you are finished. Then, enable Nginx virtual host file with the following command:
ln -s /etc/nginx/sites-available/osclass.conf /etc/nginx/sites-enabled/
Next, check Nginx for any configuration error with the following command:
nginx -t
You should see the following output:
nginx: the configuration file /etc/nginx/nginx.conf syntax is ok
nginx: configuration file /etc/nginx/nginx.conf test is successful
Next, restart Nginx service to apply all the changes with the following command:
systemctl restart nginx
You can also verify the Nginx service with the following command:
systemctl status nginx
You should see the following output:
? nginx.service - A high performance web server and a reverse proxy server
   Loaded: loaded (/lib/systemd/system/nginx.service; enabled; vendor preset: enabled)
   Active: active (running) since Thu 2019-03-28 15:19:49 UTC; 22min ago
     Docs: man:nginx(8)
 Main PID: 15044 (nginx)
    Tasks: 2 (limit: 1113)
   CGroup: /system.slice/nginx.service
           ??15044 nginx: master process /usr/sbin/nginx -g daemon on; master_process on;
           ??15050 nginx: worker process

Mar 28 15:19:49 ubuntu1804 systemd[1]: Starting A high performance web server and a reverse proxy server...
Mar 28 15:19:49 ubuntu1804 systemd[1]: nginx.service: Failed to parse PID from file /run/nginx.pid: Invalid argument
Mar 28 15:19:49 ubuntu1804 systemd[1]: Started A high performance web server and a reverse proxy server.
Once Nginx has been configured, you can proceed to the next step.
Access OSClass Web Interface
Open your web browser and type the URL http://example.com. You will be redirected to the following page:
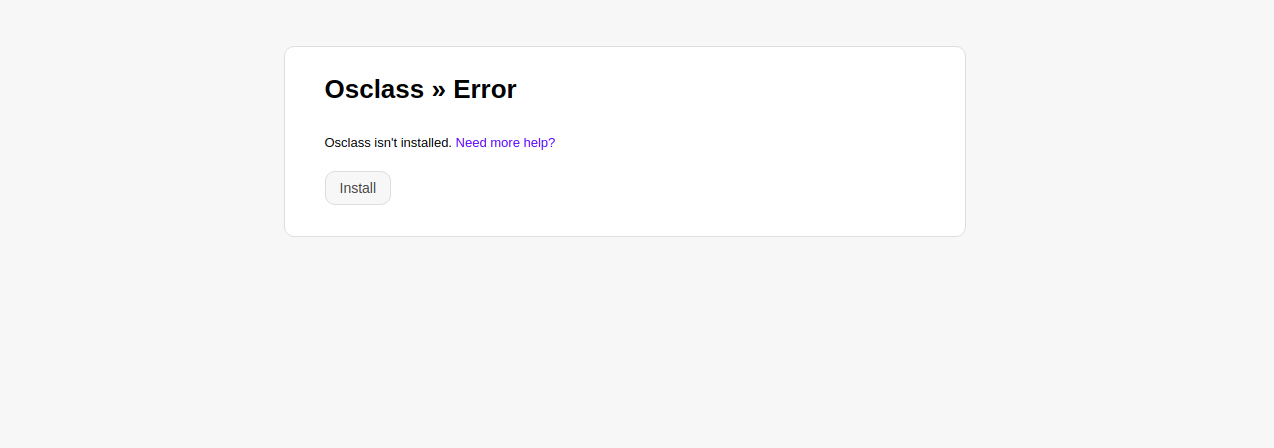
Now, click on the Install button. You should see the following page:
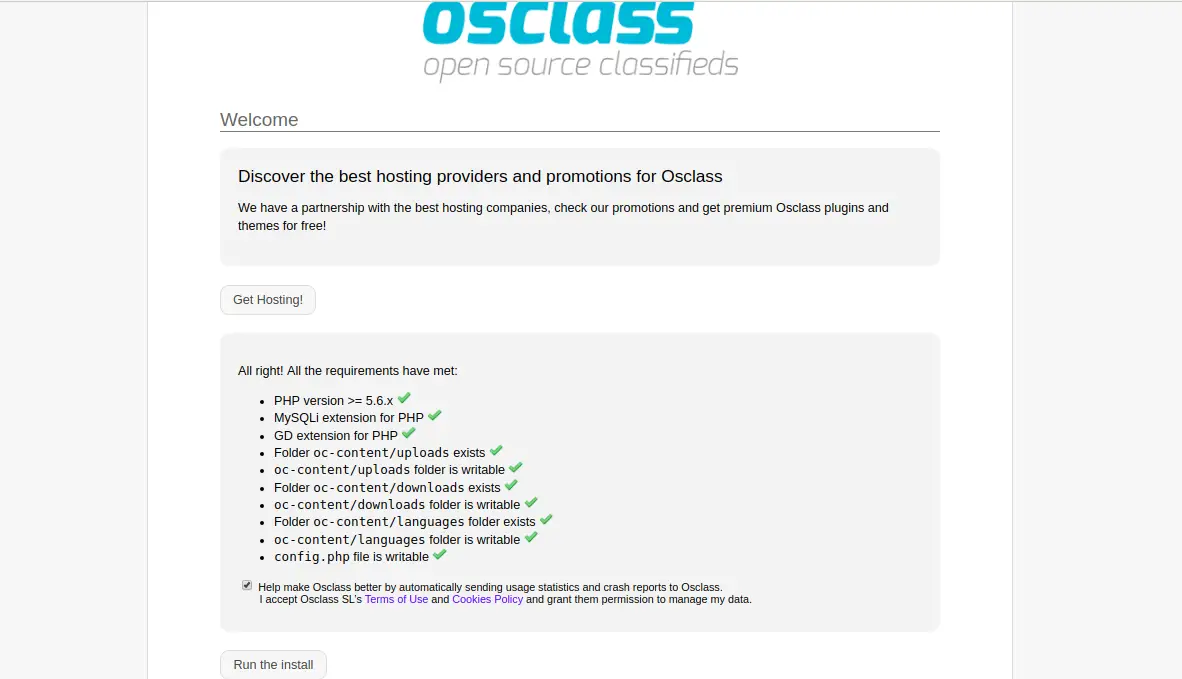
Make sure all the required dependencies have been installed, then click on the Run the install button. You should see the following page:
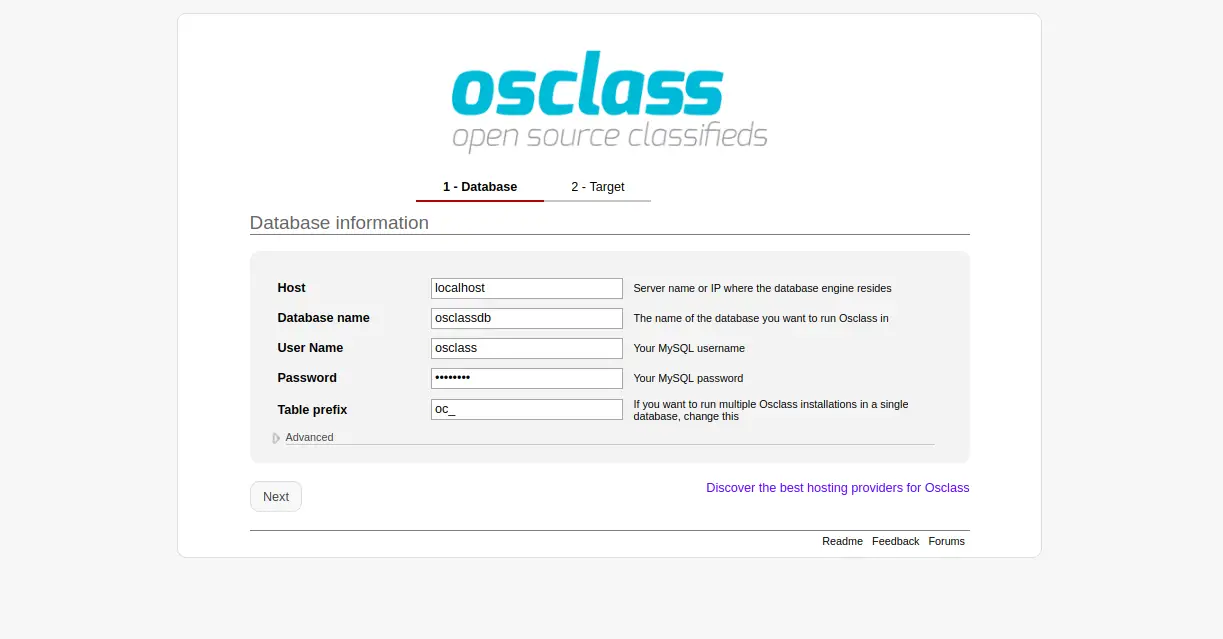
Now, provide your database details like database name, username, and password. Then, click on the Next button. you should see the following page:
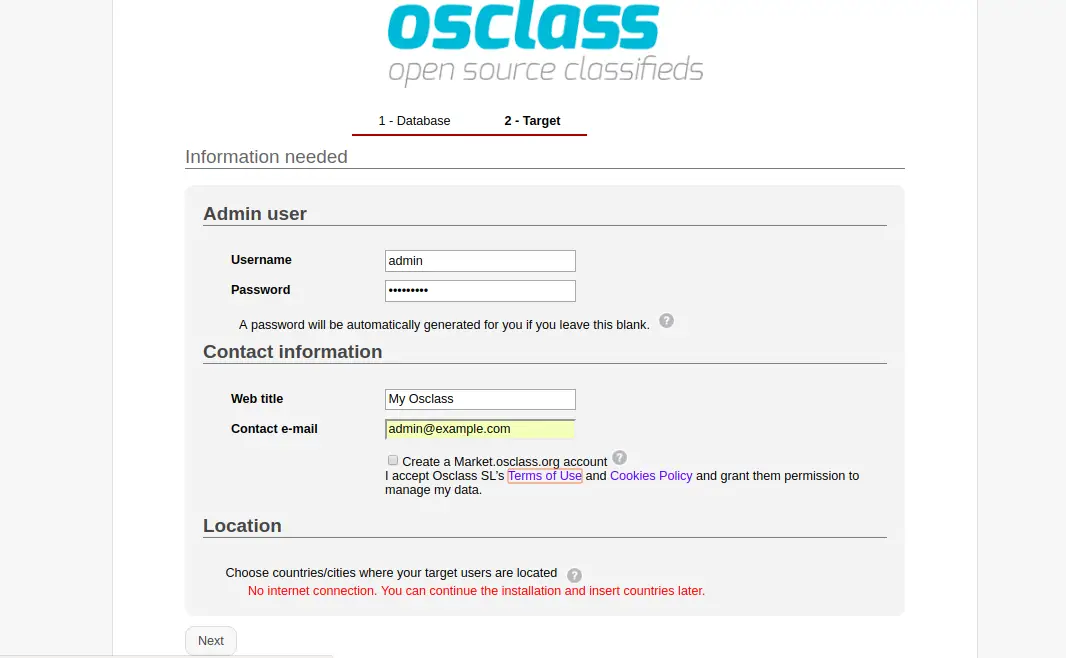
Now, provide your admin username and password, Web title and email address. Then, click on the Next button. You should see the following page:
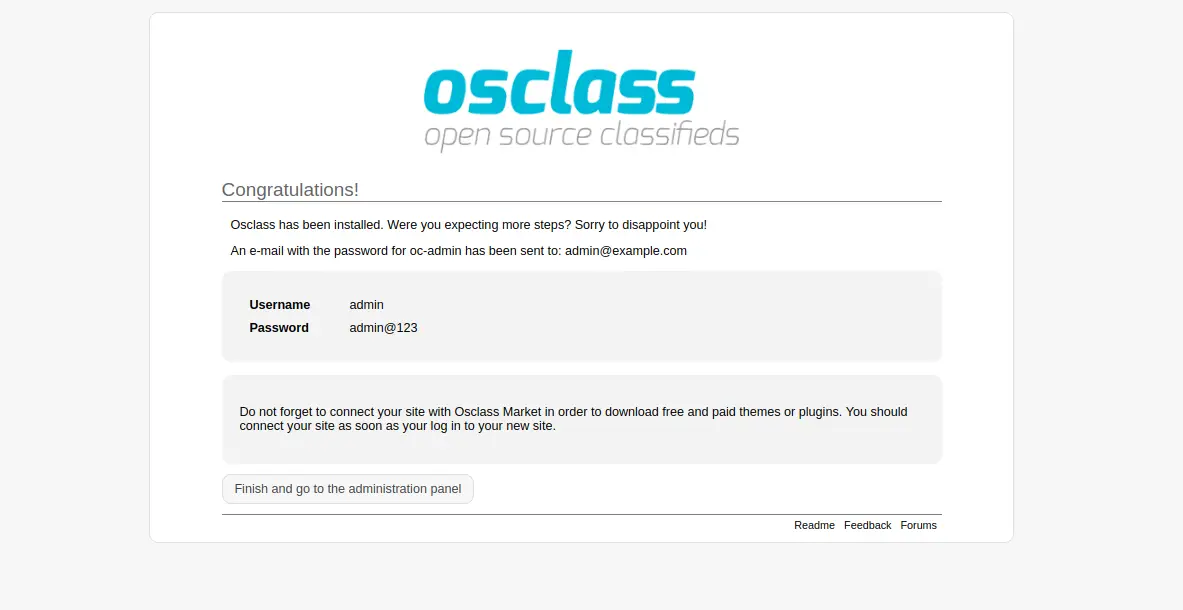
Now, click on the Finish and go to the administration panel button. You should see the following page:

Now, provide your admin username and password. Then, click on the login button. You should see the OSClass default dashboard in the following page:
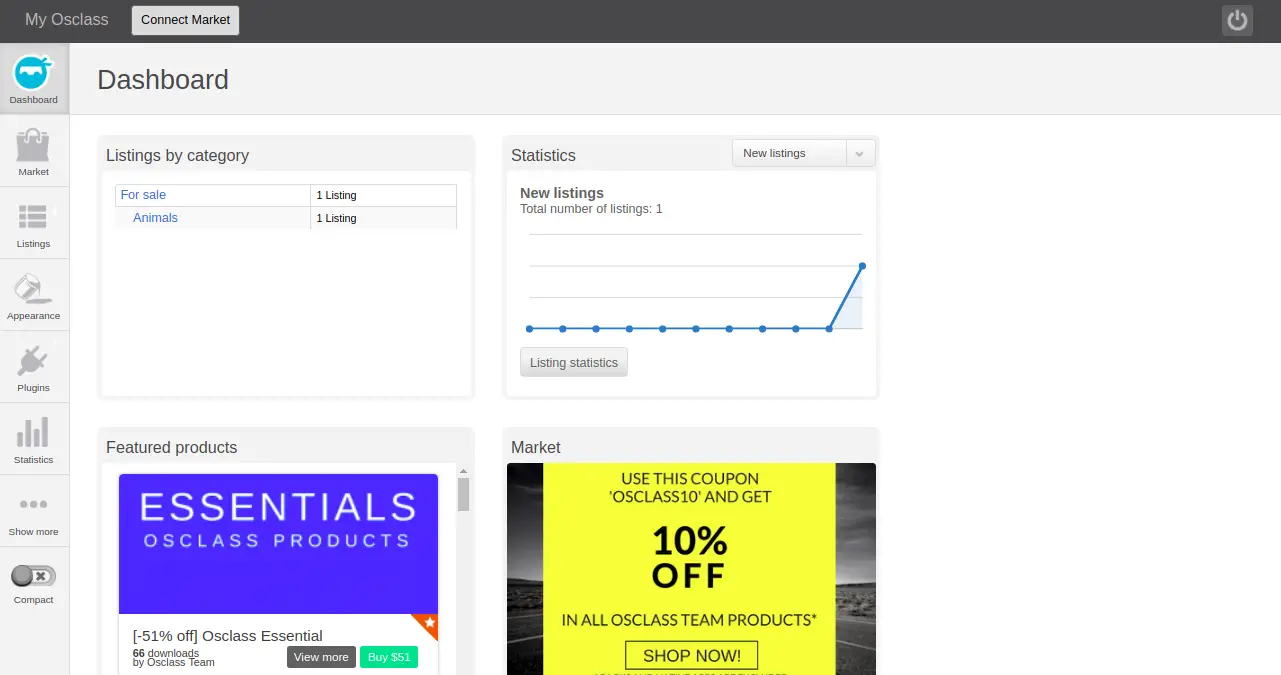
OSClass has been successfully installed.

