How to Install Craft CMS on Fedora 29
On this page
- Requirements
- Prerequisites
- Initial steps
- Step 1 - Install PHP and required PHP extensions
- Step 2- Install MariaDB and create a database
- Step 3 - Install
acme.shclient and obtain Let">) - Step 4 - Install and Configure NGINX
- Step 5 - Install Composer
- Step 6 - Install Craft CMS
- Step 7 - Complete the Craft CMS setup
- Links
Craft is an open source CMS written in PHP. Craft allows you to easily create and manage great-looking content, and to design and build exactly what you need. It's secure and scalable CMS with a big plugin ecosystem and the Craft source code is hosted on GitHub. This tutorial will walk you through the Craft CMS installation procedure on a fresh Fedora 29 system using Nginx as the web server and we will secure the website with a Let's encrypt SSL certificate.
Requirements
Craft requires the following:
- PHP version 7.0 or greater with the following PHP extensions: (ctype, cURL, GD or ImageMagick, iconv, JSON, Multibyte String, OpenSSL, PCRE, PDO MySQL Driver or PDO PostgreSQL Driver, PDO, Reflection, SPL, Zip, Intl, DOM)
- MySQL 5.5+ with InnoDB, MariaDB 5.5+, or PostgreSQL 9.5+
- At least 256MB of memory allocated to PHP
- At least 200MB of free disk space
Prerequisites
- An operating system running Fedora 29.
- A non-root user with sudo privileges.
Initial steps
Check your Fedora system version:
cat /etc/fedora-release
# Fedora release 29 (Twenty Nine)
Set up the timezone:
timedatectl list-timezones
sudo timedatectl set-timezone 'Region/City'
Update your operating system packages (software). This is an important first step because it ensures you have the latest updates and security fixes for your operating system's default software packages:
sudo dnf upgrade -y
Install some essential packages that are necessary for basic administration of the Fedora operating system:
sudo dnf install -y curl wget vim git sudo unzip socat bash-completion
Step 1 - Install PHP and required PHP extensions
Install PHP, as well as the necessary PHP extensions:
sudo dnf install -y php-cli php-fpm php-common php-curl php-gd php-pecl-imagick php-json php-mbstring php-mysqlnd php-pgsql php-zip php-intl php-xml php-pdo
To show PHP compiled in modules, you can run:
php -m

ctype
curl
exif
fileinfo
. . .
. . .
Check the PHP version:
php --version

# PHP 7.2.16 (cli) (built: Mar  5 2019 11:05:59) ( NTS )
# Copyright (c) 1997-2018 The PHP Group
# Zend Engine v3.2.0, Copyright (c) 1998-2018 Zend Technologies
Run sudo vim /etc/php.ini and set memory_limit to at least 256MB:
memory_limit = 256MStart and enable PHP-FPM service:
sudo systemctl start php-fpm.service
sudo systemctl enable php-fpm.service
We can move on to the next step, which is the database installation and setup.
Step 2- Install MariaDB and create a database
Craft CMS supports MySQL/MariaDB and PostgreSQL databases. In this tutorial, we will use MariaDB as a database server.
Install MariaDB database server:
sudo dnf install -y mariadb-server
Check the MariaDB version:
mysql --version
# mysql  Ver 15.1 Distrib 10.3.12-MariaDB, for Linux (x86_64) using readline 5.1
Start and enable MariaDB service:
sudo systemctl start mariadb.service
sudo systemctl enable mariadb.service
Run mysql_secure installation script to improve MariaDB security and set the password for MariaDB root user:
sudo mysql_secure_installation
Answer each of the questions:
New password: your_secure_password
Re-enter new password: your_secure_password
Remove anonymous users? [Y/n] Y
Disallow root login remotely? [Y/n] Y
Remove test database and access to it? [Y/n] Y
Reload privilege tables now? [Y/n] Y
Connect to MariaDB shell as the root user:
sudo mysql -u root -p
# Enter password
Create an empty MariaDB database and user for Craft CMS and remember the credentials:
mariadb> CREATE DATABASE dbname;
mariadb> GRANT ALL ON dbname.* TO 'username' IDENTIFIED BY 'password';
mariadb> FLUSH PRIVILEGES;
Exit from MariaDB:
mariadb> exit
Replace dbname, username and password with your own names.
Step 3 - Install acme.sh client and obtain Let's Encrypt certificate (optional)
Securing your website with HTTPS is not necessary, but it is a good practice to secure your site traffic. In order to obtain a TLS certificate from Let's Encrypt we will use Acme.sh client. Acme.sh is a pure UNIX shell software for obtaining TLS certificates from Let's Encrypt with zero dependencies.
Download and install Acme.sh:
sudo mkdir /etc/letsencrypt
git clone https://github.com/Neilpang/acme.sh.git
cd acme.sh
sudo ./acme.sh --install --home /etc/letsencrypt --accountemail [email protected]
cd ~
Check Acme.sh version:
/etc/letsencrypt/acme.sh --version
# v2.8.0
Obtain RSA and ECC/ECDSA certificates for your domain/hostname:
# RSA 2048
sudo /etc/letsencrypt/acme.sh --issue --standalone --home /etc/letsencrypt -d example.com --keylength 2048
# ECDSA
sudo /etc/letsencrypt/acme.sh --issue --standalone --home /etc/letsencrypt -d example.com --keylength ec-256
After running the above commands, your certificates and keys will be in:
- For RSA:
/etc/letsencrypt/example.comdirectory. - For ECC/ECDSA:
/etc/letsencrypt/example.com_eccdirectory.
Step 4 - Install and Configure NGINX
Craft CMS can work fine with many popular web server software. In this tutorial, we selected Nginx.
Install NGINX web server:
sudo dnf install -y nginx
Check the NGINX version:
nginx -v
# nginx version: nginx/1.14.2
Start and enable NGINX service:
sudo systemctl start nginx.service
sudo systemctl enable nginx.service
Configure NGINX for Craft CMS by running:
sudo vim /etc/nginx/conf.d/craft.conf
And populate the file with the following configuration:
server {

  listen 80;
  listen [::]:80;
  listen 443 ssl;
  listen [::]:443 ssl;

  server_name example.com www.example.com;

  root /var/www/craft/web;

  index index.php;

  ssl_certificate /etc/letsencrypt/example.com/fullchain.cer;
  ssl_certificate_key /etc/letsencrypt/example.com/example.com.key;
  ssl_certificate /etc/letsencrypt/example.com_ecc/fullchain.cer;
  ssl_certificate_key /etc/letsencrypt/example.com_ecc/example.com.key;

  location / {
    try_files $uri/index.html $uri $uri/ /index.php?$query_string;
  }

  location ~ [^/]\.php(/|$) {
    include default.d/php.conf;
    try_files $uri $uri/ /index.php?$query_string;
    fastcgi_split_path_info ^(.+\.php)(/.+)$;
    fastcgi_pass unix:/run/php-fpm/www.sock;
    fastcgi_index index.php;
    include fastcgi_params;
    fastcgi_param SCRIPT_FILENAME $document_root$fastcgi_script_name;
    fastcgi_param PATH_INFO $fastcgi_path_info;
    fastcgi_param HTTP_PROXY "";
  }

}
Replace example.com with your own domain name in the above file.
NOTE: For complete and production ready Nginx config for Craft visit https://github.com/nystudio107/nginx-craft. The config is intentionally simplified to keep config dense and simple.
Test NGINX configuration:
sudo nginx -t
Reload NGINX:
sudo systemctl reload nginx.service
Step 5 - Install Composer
Install Composer, the PHP dependency manager globally:
php -r "copy('https://getcomposer.org/installer', 'composer-setup.php');"

php -r "if (hash_file('sha384', 'composer-setup.php') === '48e3236262b34d30969dca3c37281b3b4bbe3221bda826ac6a9a62d6444cdb0dcd0615698a5cbe587c3f0fe57a54d8f5') { echo 'Installer verified'; } else { echo 'Installer corrupt'; unlink('composer-setup.php'); } echo PHP_EOL;"

php composer-setup.php

php -r "unlink('composer-setup.php');"

sudo mv composer.phar /usr/local/bin/composer
Check the Composer version:
composer --version
# Composer version 1.8.4 2019-02-11 10:52:10
NOTE: Composer installation commands will change in the future, so check https://getcomposer.org/download/ for the most up to date commands if the above commands don't work.
Step 6 - Install Craft CMS
Craft CMS can be downloaded with Composer or by manually downloading a .zip or tar.gz archive. In this tutorial, we will use Composer to download Craft CMS.
Create a document root directory where Craft CMS should reside in:
sudo mkdir -p /var/www/craft
Navigate to the document root directory:
cd /var/www/craft
Change ownership of the /var/www/craft directory to {your_username}.
sudo chown -R {your_username}:{your_username} /var/www/craft
To create a new Craft project, run this command:
composer create-project craftcms/craft .
Change ownership of the /var/www/craft directory to nginx:
sudo chown -R nginx:nginx /var/www/craft
Run sudo vim /etc/php-fpm.d/www.conf and set the user and group to nginx. Initially, they will be set to apache:
sudo vim /etc/php-fpm.d/www.conf
# user = nginx
# group = nginx
Create /var/lib/php/session/ directory and change ownership to nginx.
sudo mkdir -p /var/lib/php/session && sudo chown -R nginx:nginx /var/lib/php/session
Restart PHP-FPM service:
sudo systemctl restart php-fpm.service
In your web browser, go to http://<Hostname>/index.php?p=admin/install (substituting <Hostname> with your web server’s hostname). If you’ve done everything right so far, you should be greeted by Craft’s Setup Wizard.
Step 7 - Complete the Craft CMS setup
After opening your installation URL the page like below should appear. Click "Install Craft" button:

Accept the license by clicking on the "Got it" button:

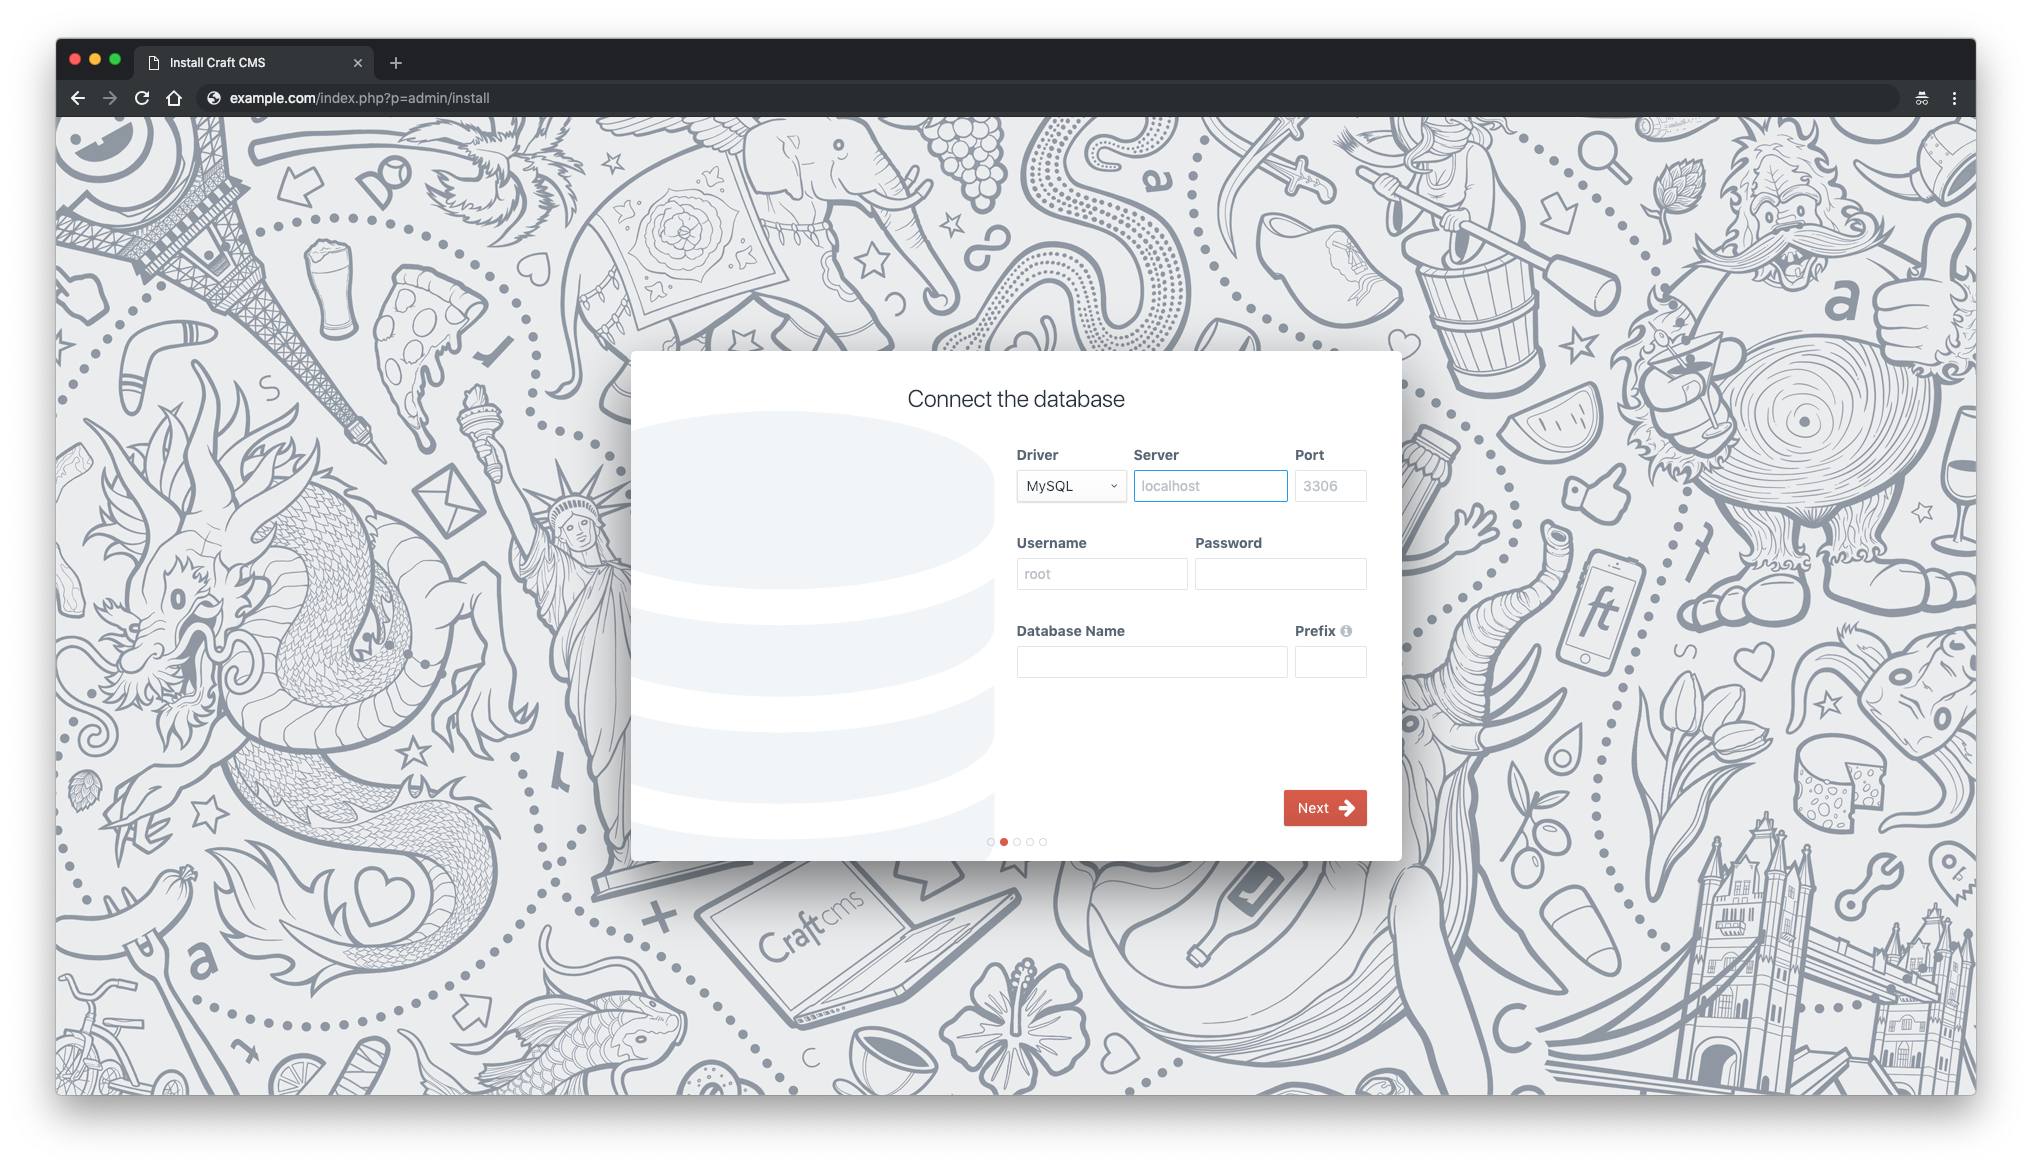
Fill in database details and click on the "Next" button:
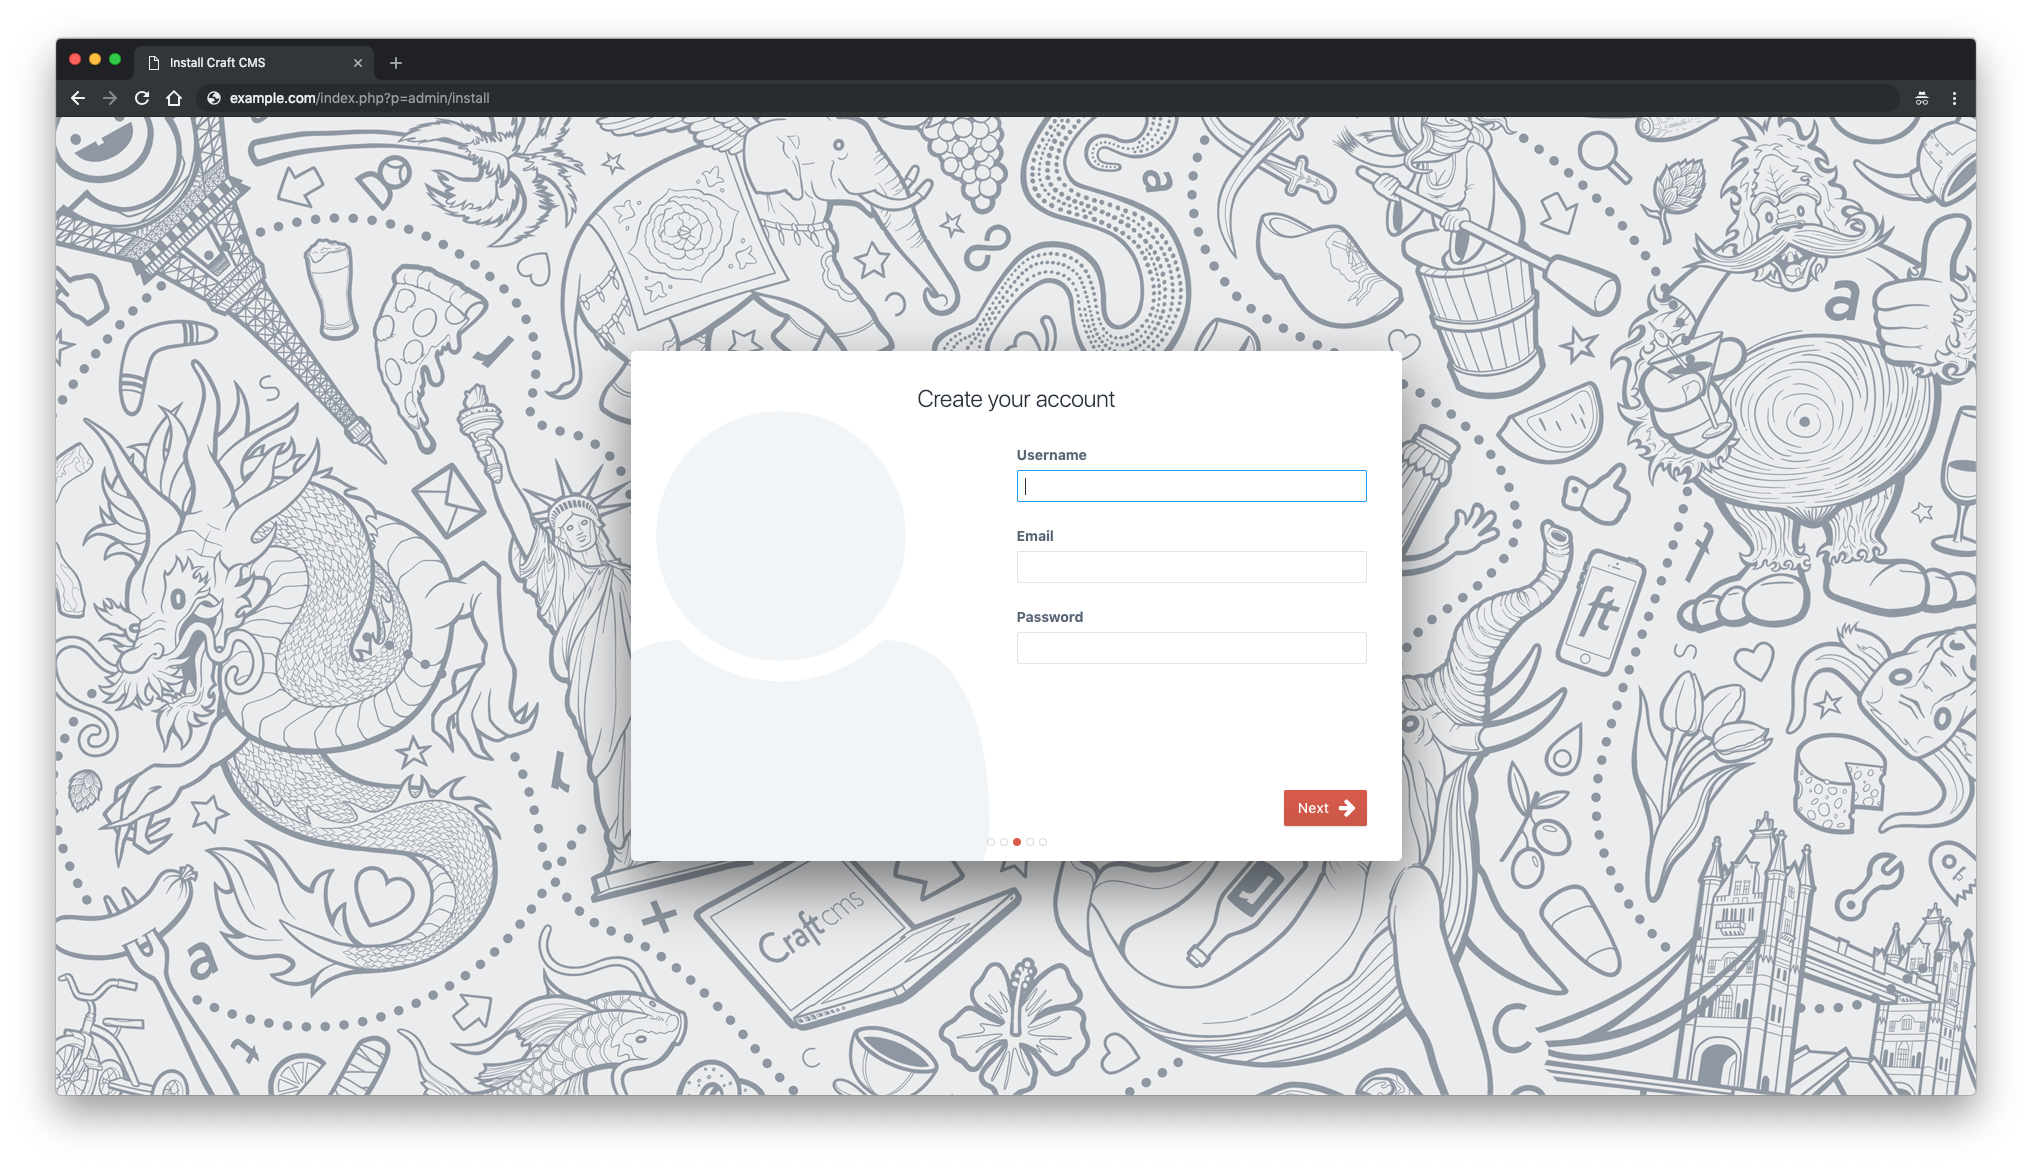
Create Craft account and click on the "Next" button:
Setup your site and click on the "Finish up" button:

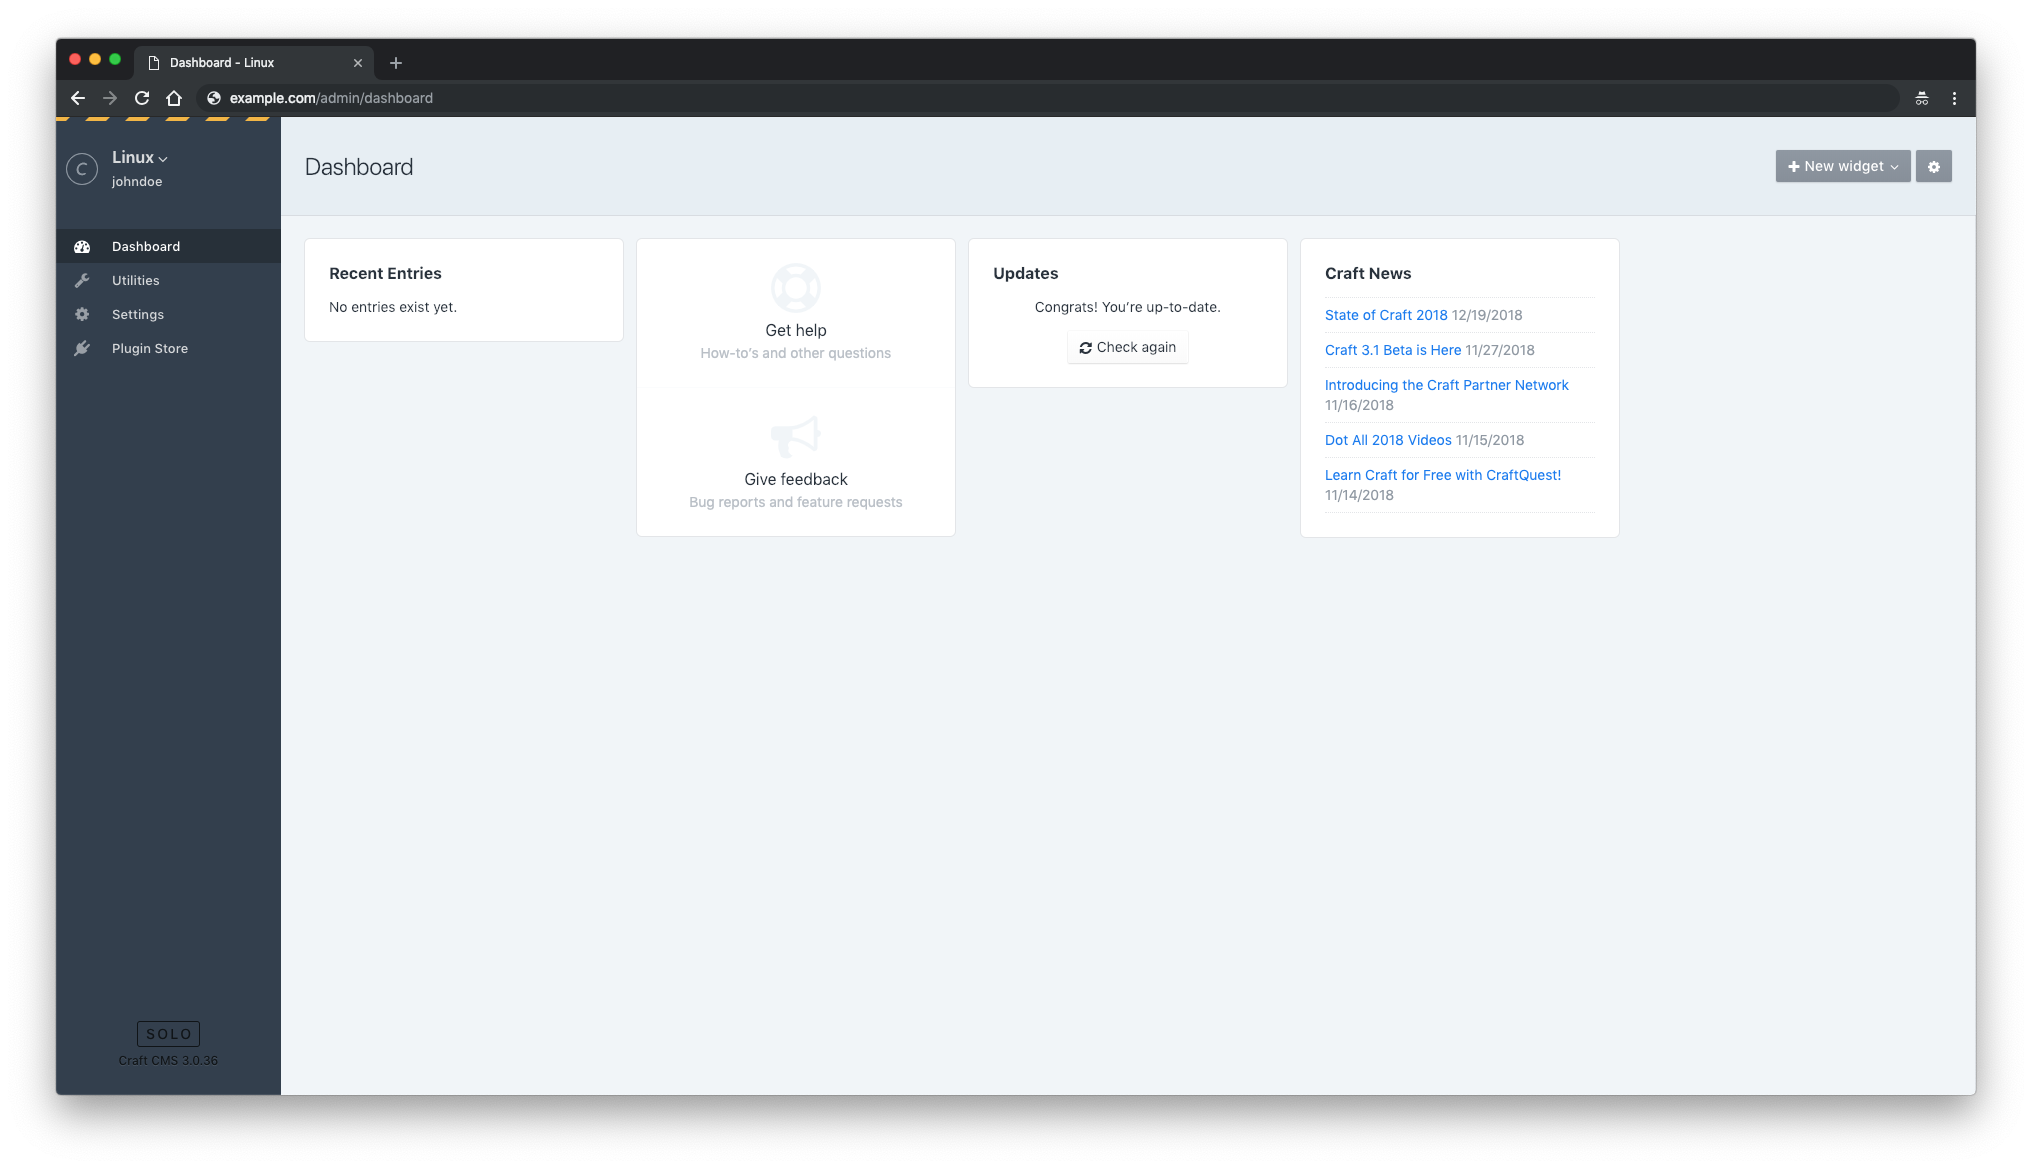
After this you should be redirected to the Craft admin page: