BoltWire CMS is an open-source content management system that runs on PHP – it’s easy-to-install, and comes with many features. While BoltWire CMS offers features that might not be as advanced as other PHP-based CMSes such as WordPress, Joomla, or Drupal, BoltWire can help you create personal or business websites in minutes just by uploading its content to your server. It also doesn’t require any databases, which makes it lighter and faster.
The installation is quite simple. If you follow our instructions carefully, you can finish installing BoltWire CMS on your Debian 9 VPS in less than 10 minutes. Let’s get started.
Table of Contents
Requirements:
- For the purposes of this tutorial, we will be using a Debian 9 Server.
- Full SSH root access, or a user with
sudoprivileges - A domain name pointing to your server’s IP address. In this tutorial, we will use
your_domain.comas a placeholder.
1. Log in via SSH and Update the System
First, you will need to log in to your server via SSH as a user with root access, or as the root user itself, as shown in our example:
$ ssh root@IP_Address -p Port_number
Make sure to replace “IP_ADDRESS” and “PORT_NUMBER” with your server’s actual IP address and SSH port number.
Once logged in, we need to make sure that your Debian 9 server is up-to-date by running the following commands:
$ apt-get update && apt-get upgrade
This will update the package index as well as update the software currently installed on the server to their latest versions.
2. Apache Web Server Installation
To install the Apache web server, run the following command:
$ apt-get install apache2
After the installation is complete, you should enable Apache to start automatically upon server boot with:
$ systemctl enable apache2
You can also check the status of your Apache service with the following command:
systemctl status apache2
Output:
● apache2.service - LSB: Apache2 web server
   Loaded: loaded (/etc/init.d/apache2; bad; vendor preset: enabled)
  Drop-In: /lib/systemd/system/apache2.service.d
           └─apache2-systemd.conf
   Active: active (running)
     Docs: man:systemd-sysv-generator(8)
  Process: 14855 ExecStop=/etc/init.d/apache2 stop (code=exited, status=0/SUCCESS)
  Process: 25472 ExecReload=/etc/init.d/apache2 reload (code=exited, status=0/SUCCESS)
  Process: 14879 ExecStart=/etc/init.d/apache2 start (code=exited, status=0/SUCCESS)
   CGroup: /system.slice/apache2.service
           ├─14896 /usr/sbin/apache2 -k start
           ├─17191 /usr/sbin/apache2 -k start
           ├─17689 /usr/sbin/apache2 -k start
           ├─18822 /usr/sbin/apache2 -k start
           ├─18833 /usr/sbin/apache2 -k start
           ├─18838 /usr/sbin/apache2 -k start
           ├─18849 /usr/sbin/apache2 -k start
3. Install PHP 7.2
Since PHP 7.2 is not available through the built-in repositories, we will use a third-party repo instead. PHP 7.2 can be installed using Ondřej Surý’s PPA – to do this, install the software-properties-common and python-software-properties packages:
$ apt-get install software-properties-common python-software-properties
Then, add the Ondřej PPA and update your sources:
$ add-apt-repository -y ppa:ondrej/php
$ apt-get update
Install PHP 7.2 using the following command:
$ apt-get install php7.2 php7.2-cli php7.2-common
To install modules related to PHP 7.2, you can use the following command:
$ apt install php7.2-mbstring php7.2-xmlrpc php7.2-gd php7.2-xml php7.2-cli php7.2-tidy php7.2-intl php7.2-curl php7.2-zip
Use the following command to check the PHP version currently installed on your server:
$ php -v
You should receive the following output:
PHP 7.2.15-0ubuntu0.18.04.1 (cli) (built: Feb  8 2019 14:54:22) ( NTS )
Copyright (c) 1997-2018 The PHP Group
Zend Engine v3.2.0, Copyright (c) 1998-2018 Zend Technologies
    with Zend OPcache v7.2.15-0ubuntu0.18.04.1, Copyright (c) 1999-2018, by Zend Technologies
After installing PHP 7.2, run this next command to open the PHP default configuration file for Apache. This command uses ‘nano’ to open the text file, but you can use your preferred text editor.
$ nano /etc/php/7.2/apache2/php.ini
Then make the changes on the following lines below in the file and save. The values below are the settings that we recommend you apply to your environment.
file_uploads = On
allow_url_fopen = On
memory_limit = 256M
upload_max_filesize = 100M
max_execution_time = 360
date.timezone = America/St. Louis
4. Download BoltWire Latest Release
Next, go to https://www.boltwire.com/downloads, click the “Download” button and copy the direct download link, then download it in your web root using wget and unzip the downloaded zip file.
At the time of writing, these next few commands are ready-made for you to use – however, the download link may change as time passes:
$ cd /var/www/html
$ wget https://www.boltwire.com/files/6/boltwire6.02.zip
$ unzip boltwire6.02.zip
Then run the following commands to set the correct permissions for BoltWire to function properly.
$ chown -R www-data:www-data /var/www/html/boltwire/
$ chmod -R 755 /var/www/html/boltwire/
5. Configure Apache BoltWire Site
Now we will configure the Apache configuration file for BoltWire. This file will control how users access BoltWire content. Run the following commands to create a new configuration file called boltwire.conf
$ nano /etc/apache2/sites-available/boltwire.conf
Then copy and paste the content below into the file and save it. Replace the your_domain.com string with your own domain name and directory root location.
<VirtualHost *:80>
     ServerAdmin admin@your_domain.com
      DocumentRoot /var/www/html/boltwire
     ServerName your_domain.com

     <Directory /var/www/html/boltwire>
          Options FollowSymlinks
          AllowOverride All
          Require all granted
     </Directory>

     ErrorLog ${APACHE_LOG_DIR}/your_domain.com_error.log
     CustomLog ${APACHE_LOG_DIR}/your_domain.com_access.log combined

</VirtualHost>
To enable the virtual host that we just created, run the following command:
ln -s /etc/apache2/sites-available/your_domain.com.conf /etc/apache2/sites-enabled/your_domain.com
And finally, restart Apache for the changes to take effect.
systemctl restart apache2
6. Access BoltWire
Now, open your web browser and type the URL of your server. In our case, the URL is http://your_domain.com/start.php. You will be redirected to the following page:
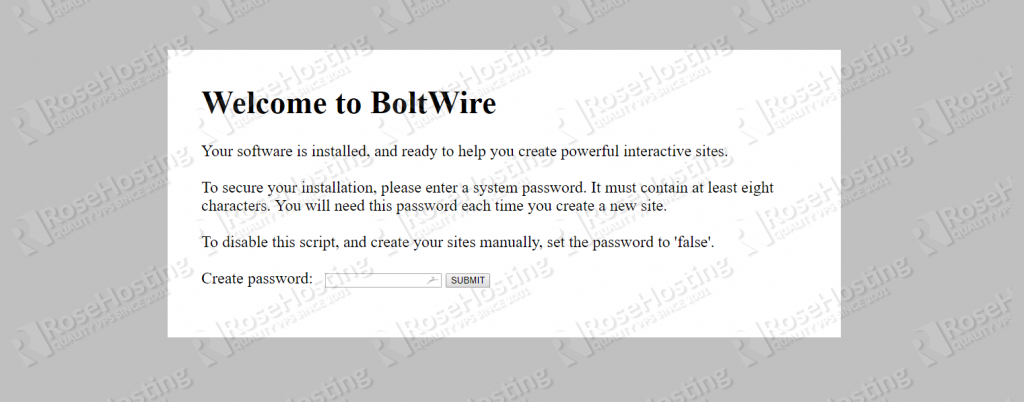
Now, provide a new password that will be used to access your sites’ administration page, then click on the SUBMIT button. You should see the following page:
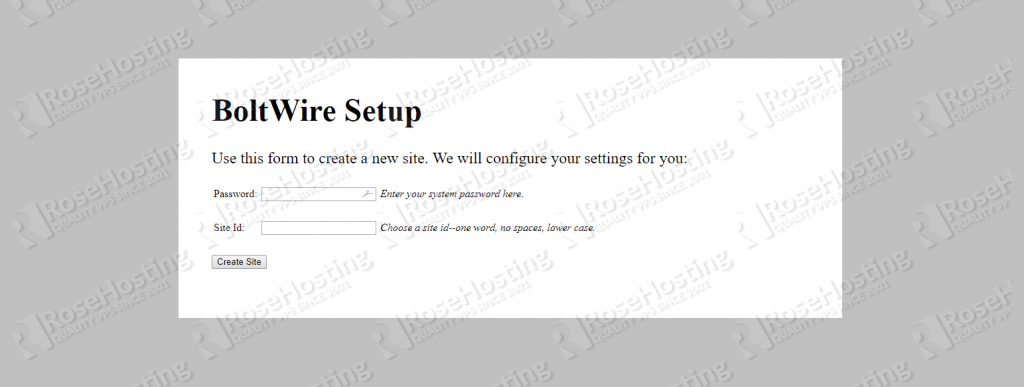
Now, provide your site password and site ID – the site ID is the name of the folder where the new site will be added to, which will be visible in the site’s URL. When done, click on the Create Site button.
Your first BoltWire site is now live. You can access it at http://your_domain.com/site_name/index.php. Replace site_name with the site name you chose earlier.
Congratulations. You have successfully installed BoltWire CMS on your Debian 9 VPS. You can now check the BoltWire CMS documentation for more information.
 Of course, you don’t need to do any of this if you use one of our Linux VPS Hosting services, in which case you can simply ask our expert Linux admins to install BoltWire CMS onto your Managed Debian 9 VPS for you. They are available 24×7 and will take care of your request immediately.
PS. If you liked this post, please share it with your friends on the social networks using the buttons below, or simply leave a comment in the comment section. Thanks.