
This article details all the steps needed to build a centralized logging architecture on Linux systems.
If you are a Linux system administrator, you probably spend a lot of time browsing your log files in order to find relevant information about past events.
Most of the time, you are not working with a single machine, but with many different Linux machines, each having its own local log storage.
Now if you were to browse logs for many different machines, you would have to individually connect to every single one of them, locate logs and try to find the information that you are looking for.
This is of course in the case where you can physically access the machine, presupposing that the machine is up and that you are not denied the access to it.
But what if we could have a centralized way to store our logs, on a remote machine?
What if we could access log files from a single point?
Wouldn’t it be easier and more reliable?
In this definitive guide, we are going to build a centralized logging system using Syslog on Linux systems.
We will go through every single step that you need to put in place to build a reliable, secure, and functional centralized logging system.
Ready?
I – What You Will Learn?
As always, let’s start by having a look at everything that you are going to learn if you follow the tutorial until the end.
With this tutorial, you are going to learn:
- How Linux logging works on a single instance, where to look after logs;
- What a centralized logging architecture looks like : advantages and drawbacks of using it;
- How to setup rsyslog forwarding from a client to a centralized server;
- How to secure log forwarding using the TLS protocol;
- How to send logs using reliable mechanisms such as action queues.
That’s a long program, but feel free to skip some sections if you are already comfortable with some of the concepts explained in this article.
II – How does Linux logging works on a single instance?
Let’s start with a bit of history about Linux logging.
a – General concepts of Linux logging
Before jumping into building our centralized logging architecture, there are some concepts about logging on a single instance that are mandatory to understand more complex concepts.
By default, your Linux operating system records logs about many events that are happening on your machine.
Linux uses the syslog protocol which defines a standard for every aspect of logging on an operating system (not only Linux, but also Windows) : defining what a message looks like, describing severity levels on messages, as well as listing the ports that syslog will be using.
Syslog can be used as a server (hosting the logs) or as a client (forwarding the logs to a remote server).
As a consequence, the syslog protocol also defines how log transmission should be done, both in a reliable and in a secure way.
If you are using a modern Linux distribution (like a Ubuntu machine, a CentOS or a RHEL one), the default syslog server used is rsyslog.
Rsyslog comes as an evolution of syslog, providing capabilities such as configurable modules that can be bound to a wide variety of targets (forwarding Apache logs to a remote server for example).
Rsyslog also provides native filtering as well as templating to format data to a custom format.
b – Where are logs stored on a Linux filesystem?
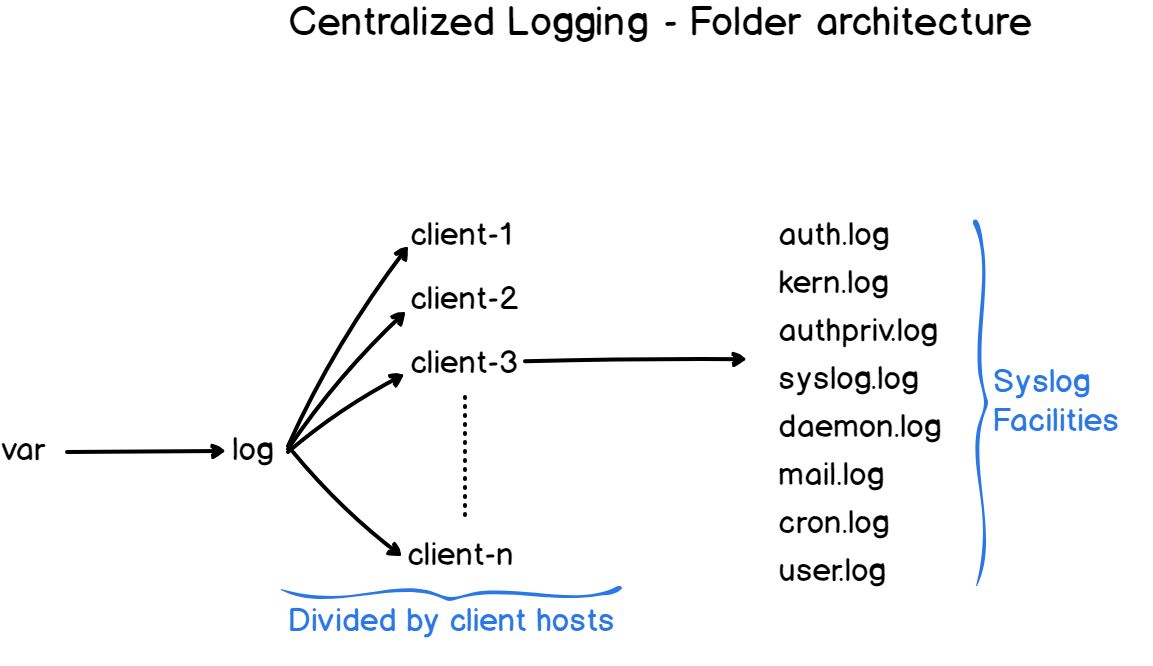
Long story short, logs are stored at /var/log/ on your filesystem.
At this location, you should see multiple log files, each one having a name describing what they actually store.
For a quick overview, you can execute the following command:
$ ls -l /var/log
-rw-r-----  1 syslog        adm               120999 Jul 24 18:04 auth.log
-rw-r--r--  1 root          root              127503 Jul 20 06:35 dpkg.log
-rw-r-----  1 syslog        adm                    0 Jul 15 06:25 kern.log
drwxrwxr-x  2 logstash      root                4096 Jul  8 18:33 logstash
drwxr-xr-x  2 root          root                4096 Sep 10  2018 lxd
drwxr-xr-x  2 mongodb       mongodb             4096 Jul  8 06:25 mongodb
As you can see, you have dedicated log files for authentication purposes or for kernel related logs.
/var/log does not contain only files, but it also contain dedicated folders that vendors create when the application is installed.
As you can see, I am running a MongoDB database on my instance.
As a consequence, I have a MongoDB folder in my log folder.
But why am I telling you all of this?
Because using this knowledge, we are going to lay the first brick of your centralized logging architecture.
Suppose that three machines are sending logs to my server, each machine is going to have its own own auth.log, kern.log or dpkg.log files.
As a consequence, you want logs to be stored in dedicated folders, one for each instance.
Here’s the folder architecture on the server side.
III – Designing a centralized logging architecture on Linux
Now that we have the basics of Linux logging, we are ready to design a centralized logging architecture.
As described in the first section, every machine in our pool is already writing logs via rsyslog.
However, natively, our machines are configured as client-server syslog instances.
They create logs, but they store them locally in the file system.
On our centralized logging architecture, client machines will be configured to use rsyslog as a client, and they will forward every single log to a remote rsyslog server, which is the central server.
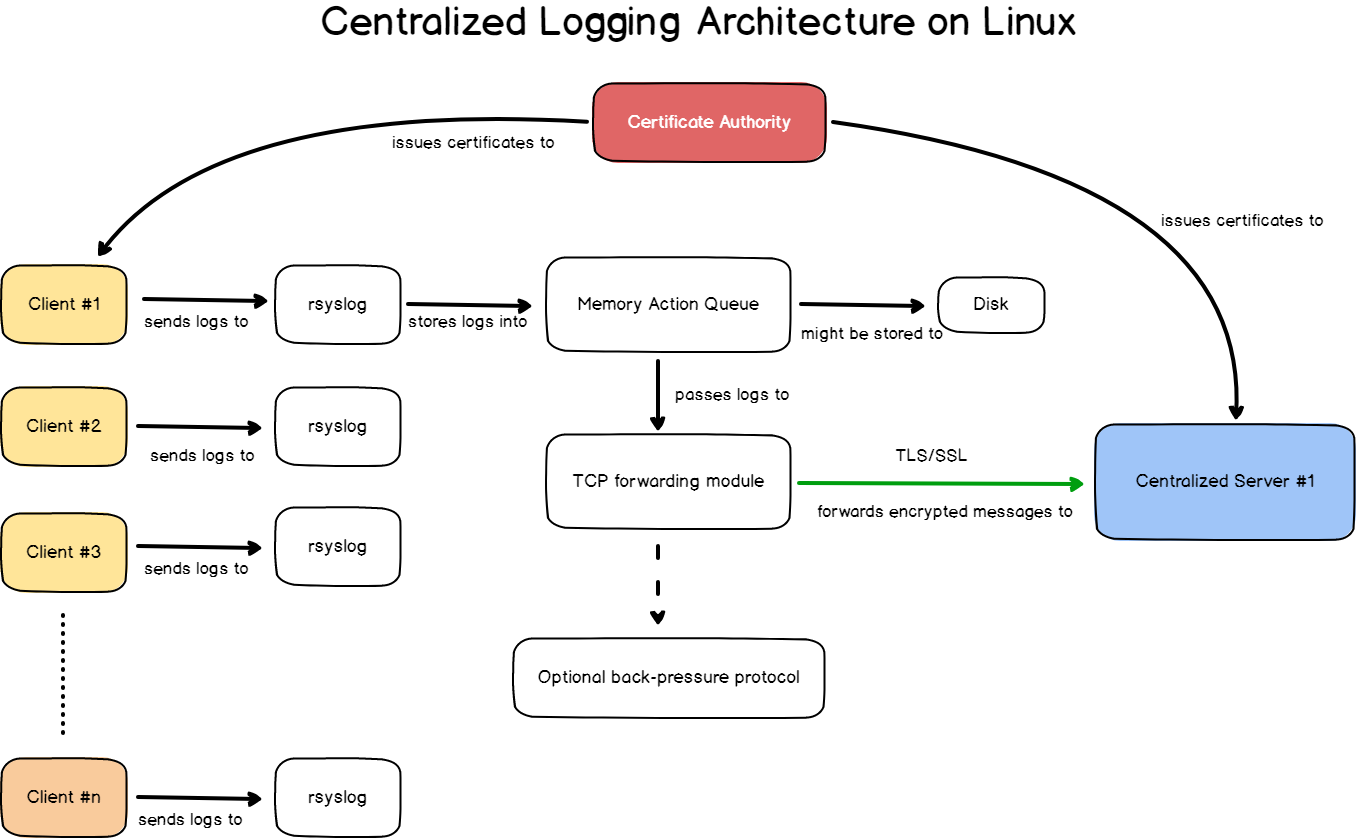
To be complete, our architecture has to:
- Be secure : that’s why we are going to implement TLS in the fifth section;
- Be reliable : if the entire network goes down for a minute, are all logs for this period lost forever? Not with action queues.
What are the advantages of such an architecture?
- You can inspect all your logs from a single place : you don’t rely on connecting individually to every machine on your pool, you can directly see the logs from the same filesystem.
- You have access to logs, even if the host is not accessible : if one of the machines is having issues and it cannot be reached, you would not be able to go through the filesystem to look after logs. With a centralized logging server, you have the opportunity to look at logs, without any physical access to the client machine.
- You can set up a complete log monitoring infrastructure : if you are interested in visualizing your logs with tools such as Kibana, I wrote a complete guide about it.
On the other hand, what would be for us the drawbacks of such an architecture?
- You risk overloading your syslog server : with this architecture, you are pushing logs to a remote server. As a consequence, if one machine goes crazy and starts sending thousands of logs, you risk overloading the log server. (if you want a reliable back-pressure control, you can check Filebeat by Elastic)
- If your log server goes down, you lose the ability to look at all the logs sent by the clients. Moreover, if the server goes down, clients will start storing messages locally until the server is available again, thus filling up disk space on the client side.
IV – Configure rsyslog to forward logs to a centralized server
a – Prerequisites
First, make sure that you have rsyslog on your instance.
$ sudo systemctl status rsyslog
If the service is unknown on your computer, you can install it by running:
$ sudo apt-get update && apt-get install rsyslog
$ sudo systemctl enable rsyslog
$ sudo systemctl start rsyslog
a – Configure your rsyslog server
First of all, you have to configure your rsyslog server for it to accept incoming logs on port 514.
We are going to use TCP for log transmission, but you can use UDP if you don’t care that much about reliability.
On the server, head to /etc/rsyslog.d folder.
This is the directory that stores templates as well as files that contain the rsyslog rules.
In this directory, there should be a 50-default.conf file.
We are going to create our own configuration file, prefixing it with a number lower than the configuration file one.
This way, our configuration file takes priority over the default one.
$ sudo touch 01-server.conf

# Listen for TCP
$ModLoad imtcp
# Listen on port 514
$InputTCPServerRun 514

$template RemoteServer, "/var/log/%HOSTNAME%/%SYSLOGFACILITY-TEXT%.log"
*.* ?RemoteServer
Our first rule!
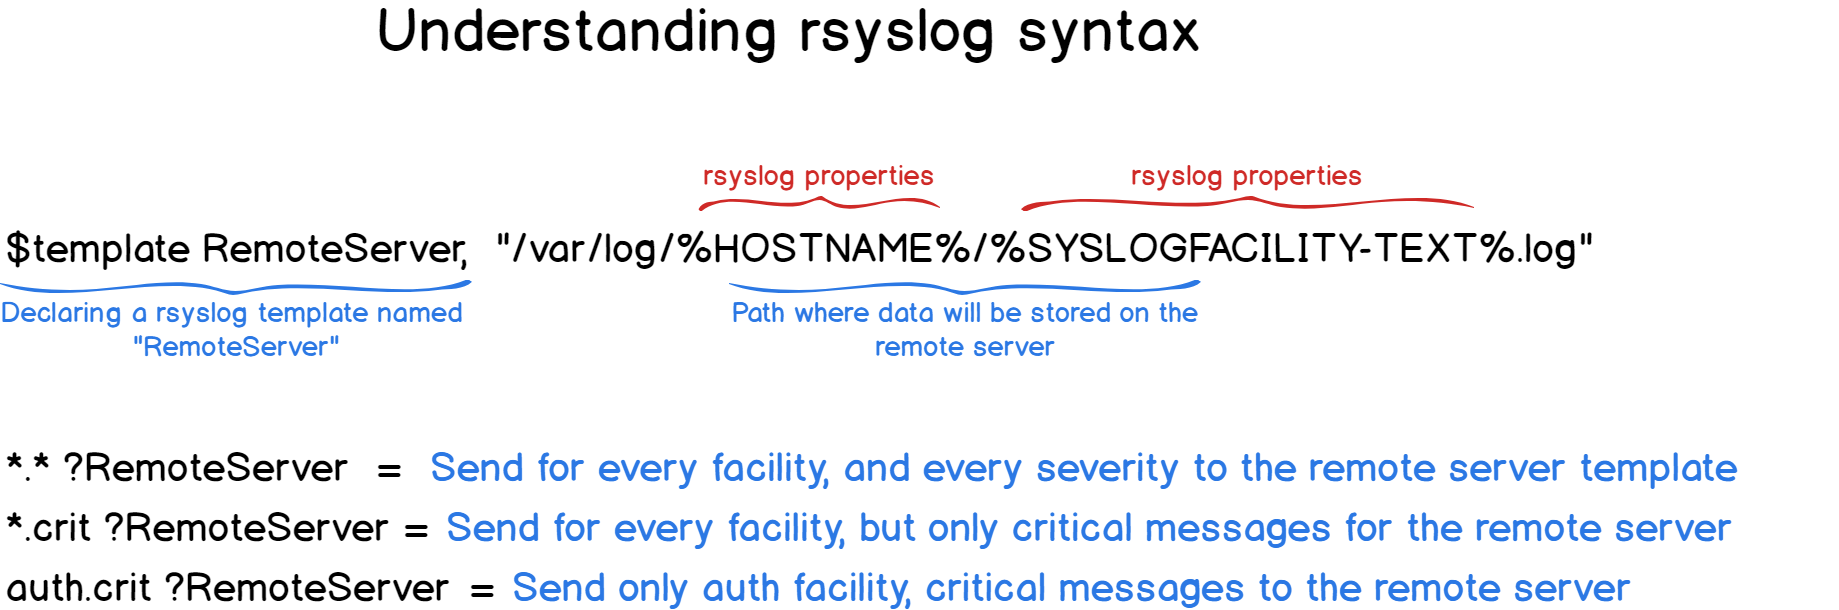
With this syntax, our log files will be grouped by hostname (aka the computer name sending the log) and then by syslog facility (kern, user, auth etc..)
Restart your rsyslog server, and make sure that it is now listening on the port 514 for TCP
$ sudo systemctl restart rsyslog
$ netstat -tna | grep :514
tcp        0      0 0.0.0.0:514             0.0.0.0:*               LISTEN
tcp6       0      0 :::514                  :::*                    LISTEN
Note : with this configuration file, your server logs are now longer directly stored in /var/log, but in /var/log/hostname, hostname being the current name of your host (in my case /var/log/schkn-ubuntu)
$ uname -a
Linux schkn-ubuntu 4.15.0-42-generic #45-Ubuntu SMP Thu Nov 15 19:32:57 UTC 2018 x86_64 x86_64 x86_64 GNU/Linux
b – Configure your rsyslog client
It is time to configure rsyslog as a client on our instance.
Now that we have rsyslog, head over to /etc/rsyslog.d.
Similarly to the procedure done on the server-side create a 01-client.conf file.
$ sudo vi 01-client.conf

*.*                         @@distant-server-ip:514
The configuration on the client side is pretty simple, plain simple forwarding.
Restart your rsyslog server, and make sure that:
- You have no errors on the client-side
$ sudo systemctl restart rsyslog
$ journalctl -f -u rsyslog- Your server now has the logs from the client
My client machine is named “antoine-Virtualbox” in my current setup, so I am looking for /var/log/antoine-Virtualbox.
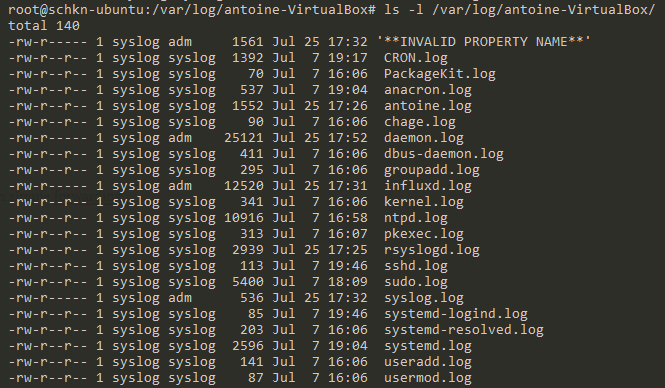
Awesome! Distant logs are now correctly stored on our server.
However, I have some bad news for you.
As we are using TCP for log transmission, it means that messages are not encrypted between the client and the server.
As a consequence, any hacker that sniffs the packets on your network will be able to see your logs, spy on their content and perform attacks on your host machines.
This is what we call a man in the middle attack.
As a proof, here’s a Wireshark instance sniffing my network and listening for a very specific IP.
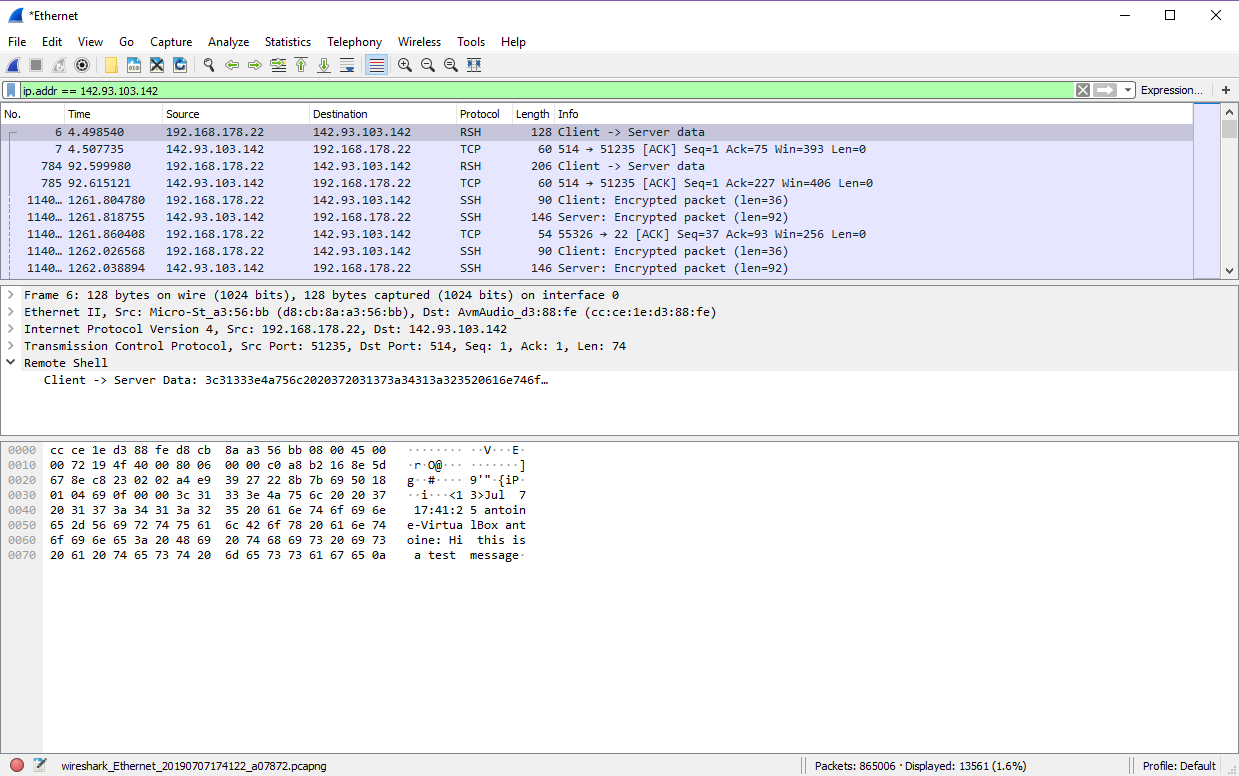
As you can see, the message is clearly visible and states : “Hi, this is a test message”.
Now imagine if the log message contained sensitive information about your host, that could be a complete security disaster.
This is why we are going to setup TLS, allowing us to encrypt the traffic between the client and the server.
At the end of the next chapter, I will provide you with a Wireshark screenshot, proving that the traffic is now encrypted.
Ready?
V – Encrypting rsyslog messages with TLS
In order for us to encrypt messages between the server and the client, we are going to use TLS and more precisely trusted certificates.
Without going into too many details, those trusted certificates will ensure that both client and server identities are verified.
With this protocol, the client and the server will first ensure that they are correctly talking to each other (as there is no one along the way with a fake identify), and then they will proceed to encrypt their messages.
As the client and the server exchanged their keys, they are able to decrypt messages on the fly.
In our setup, we will have a certificate authority signing the keys.
Communication between the hosts and the certificate authority is obviously encrypted too, so we need first to create a key-pair for the certificate authority.
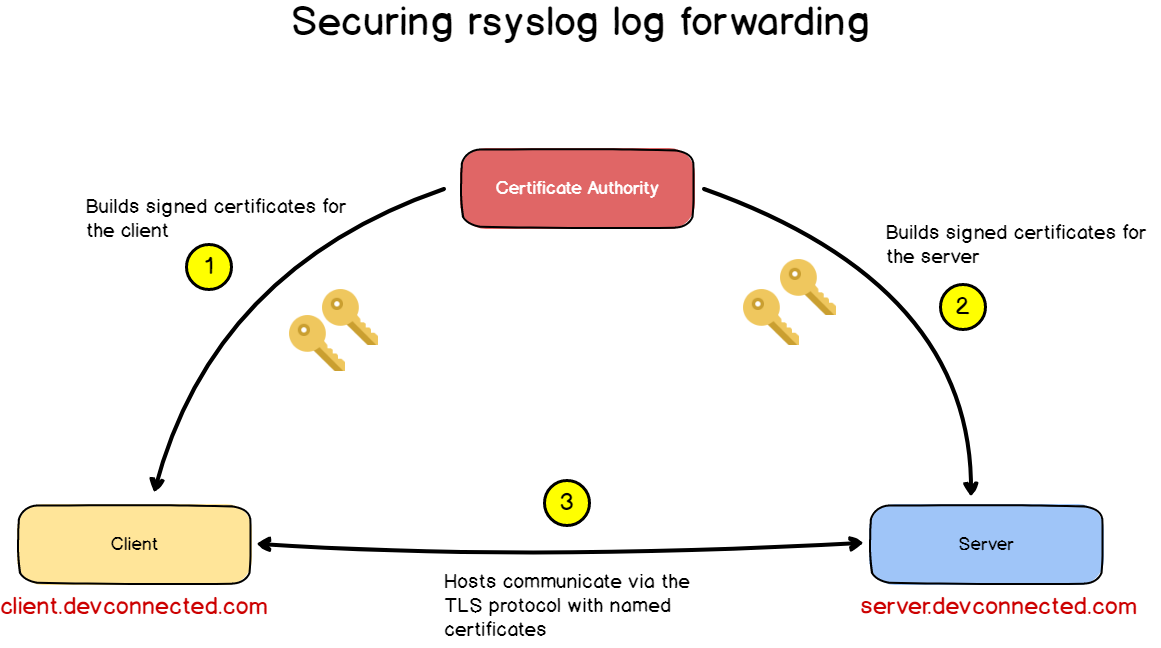
If you are just testing out, you can use your rsyslog server as a certificate authority.
a – Configuring your certificate authority
On the server, head over to /etc/ssl, and create a rsyslog directory.
$ sudo mkdir /etc/ssl/rsyslog
$ cd /etc/ssl/rsyslog
Install the gnutls-utils package (that might come as the gnutls-bin for some distributions) that enables SSL API’s on your server.
$ sudo apt-get install gnutls-utils
(or)
$ sudo apt-get install gnutls-bin
Generate a private key for the certificate authority:
$ sudo certtool --generate-privkey --outfile CA-key.pem
$ sudo chmod 400 CA-key.pem
Generate a public key on the certificate authority:
$ sudo certtool --generate-self-signed --load-privkey CA-key.pem --outfile CA.pem
# Common name: authority.devconnected.com
  # The certificate will expire in (days): 3650
  # Does the certificate belong to an authority? (Y/N): y
  # Will the certificate be used to sign other certificates? (Y/N): y
  # Will the certificate be used to sign CRLs? (y/N): y
You can leave the other questions blank as they will have no impacts on the final result.
b – Generating private/public keys for the server
Now that our certificate authority has keys to sign other keys, let’s create one for the rsyslog server.
First, create a private key for your server.
$ sudo certtool --generate-privkey --outfile server-key.pem --bits 2048Generate a certificate request for your server.
$ sudo certtool --generate-request --load-privkey server-key.pem --outfile server-request.pemGenerate the certificate for your rsyslog server and import trusted certificate authority keys into it.
$ sudo certtool --generate-certificate --load-request server-request.pem --outfile server-cert.pem --load-ca-certificate CA.pem --load-ca-privkey CA-key.pem

  # The certificate will expire in (days): 3650
  # Is this a TLS web client certificate? (Y/N): y
  # Is this also a TLS web server certificate? (y/N): y
  # Enter a dnsName of the subject of the certificate: server.devconnected.com
c – Generate private/public keys for the client
Similarly to what we have done before, let’s build our key pair for the client.
Create a private key for the client.
$ sudo certtool --generate-privkey --outfile client-key.pem --bits 2048Generate a certificate request for the client.
$ sudo certtool --generate-request --load-privkey client-key.pem --outfile client-request.pemCreate a certificate (a public key) for your client and import the certificate authority certificates inside.
$ sudo certtool --generate-certificate --load-request client-request.pem --outfile client-cert.pem --load-ca-certificate CA.pem --load-ca-privkey CA-key.pem

# The certificate will expire in (days): 3650
  # Is this a TLS web client certificate? (Y/N): y
  # Is this also a TLS web server certificate? (y/N): y
  # Enter a dnsName of the subject of the certificate: client.devconnected.com
Awesome! We now have key pairs for both our client and server.
d – Send generated keys to your hosts
Now that your keys are generated on the certificate authority, send your keys securely to the destination hosts.
For this, you can use scp.
For the server (simply switch to ‘client’ when you want to send keys to the client)
$ sudo -u root scp -i ~/.ssh/id_rsa CA.pem server-* root@server_ip_here:/etc/ssl/rsyslog/e – Configure your rsyslog server
Now that both servers and clients contain keys for encryption, let’s configure hosts to conclude this chapter.
First, install the gtls driver on your server.
$ sudo apt-get install rsyslog-gnutlsAs a reminder, we create a 01-server.conf file in the previous chapter.
Replace the content with the following configuration.
# Listen for TCP
$ModLoad imtcp
# GTLS driver
$DefaultNetstreamDriver gtls
# Certificates
$DefaultNetstreamDriverCAFile /etc/ssl/rsyslog/CA.pem
$DefaultNetstreamDriverCertFile /etc/ssl/rsyslog/server-cert.pem
$DefaultNetstreamDriverKeyFile /etc/ssl/rsyslog/server-key.pem
# Authentication mode
$InputTCPServerStreamDriverAuthMode x509/name
$InputTCPServerStreamDriverPermittedPeer *.devconnected.com
# Only use TLS
$InputTCPServerStreamDriverMode 1
# Listen on port 514
$InputTCPServerRun 514

$template RemoteServer, "/var/log/%HOSTNAME%/%SYSLOGFACILITY-TEXT%.log"
*.* ?RemoteServer
As you can see, we are adding a AuthMode, which is x509/name in this case.
This means that we are going to use a certificate that contains a “name” inside it.
Remember when we declare that we were “client.devconnected.com” or “server.devconnected.com” when we created the certificates?
This is exactly the information that the authentication is going to use, and you will get an error if the name does not match.
Don’t forget to restart rsyslog for the changes to be saved.
$ sudo systemctl restart rsyslogf – Configure your rsyslog client
On the client, we had a simple forwarding rule in a 01-client.conf file.
Again, install the gtls driver on your client.
$ sudo apt-get install rsyslog-gnutlsReplace the content with the following configuration.
# GTLS driver
$DefaultNetstreamDriver gtls
# Certificates
$DefaultNetstreamDriverCAFile /etc/ssl/rsyslog/CA.pem
$DefaultNetstreamDriverCertFile /etc/ssl/rsyslog/client-cert.pem
$DefaultNetstreamDriverKeyFile /etc/ssl/rsyslog/client-key.pem
# Auth mode
$ActionSendStreamDriverAuthMode x509/name
$ActionSendStreamDriverPermittedPeer server.devconnected.com
# Only use TLS
$ActionSendStreamDriverMode 1
# Forward everything to server.devconnected.com
*.* @@distant-server-ip:514
Restart your rsyslog client.
$ sudo systemctl restart rsyslogAwesome! Your logs should now be sent to your remote server. Run this command and make sure that you have no errors (if you do, I have a section for it at the end)
$ $ journalctl -u -n 100 rsyslogA promise is a promise, here’s my Wireshark between my server and my client, with a TLS encryption between them.
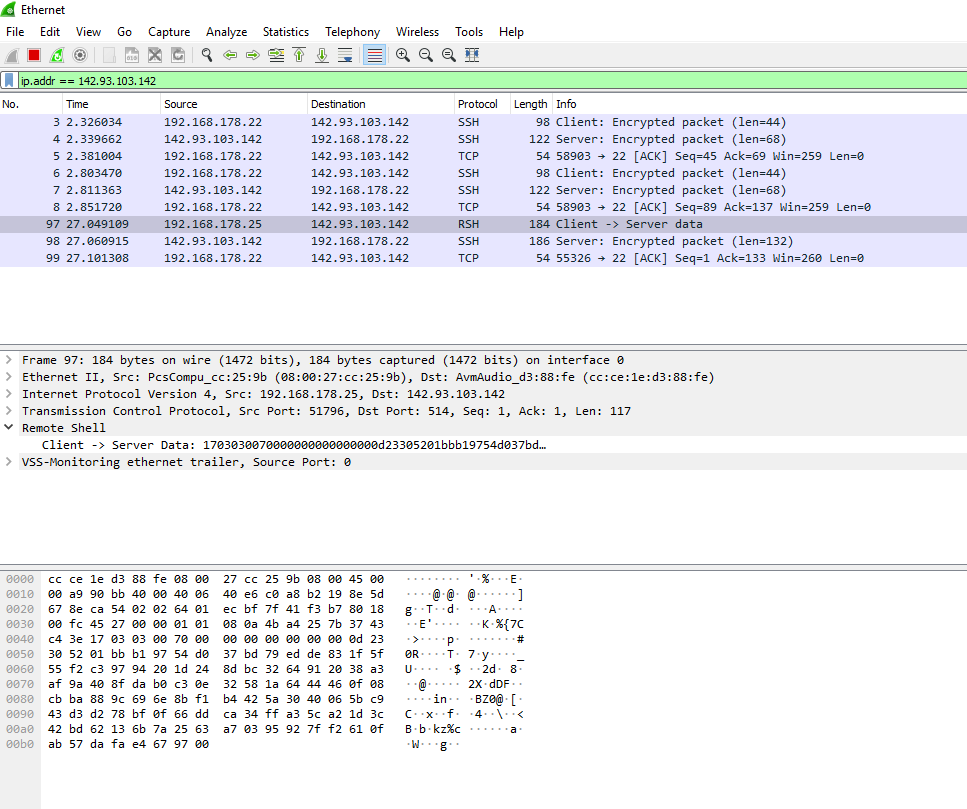
No way for you to decrypt the message.
Plot twist : I sent “Hi, this is a test message” again.
VI – Sending log messages reliably with action queues
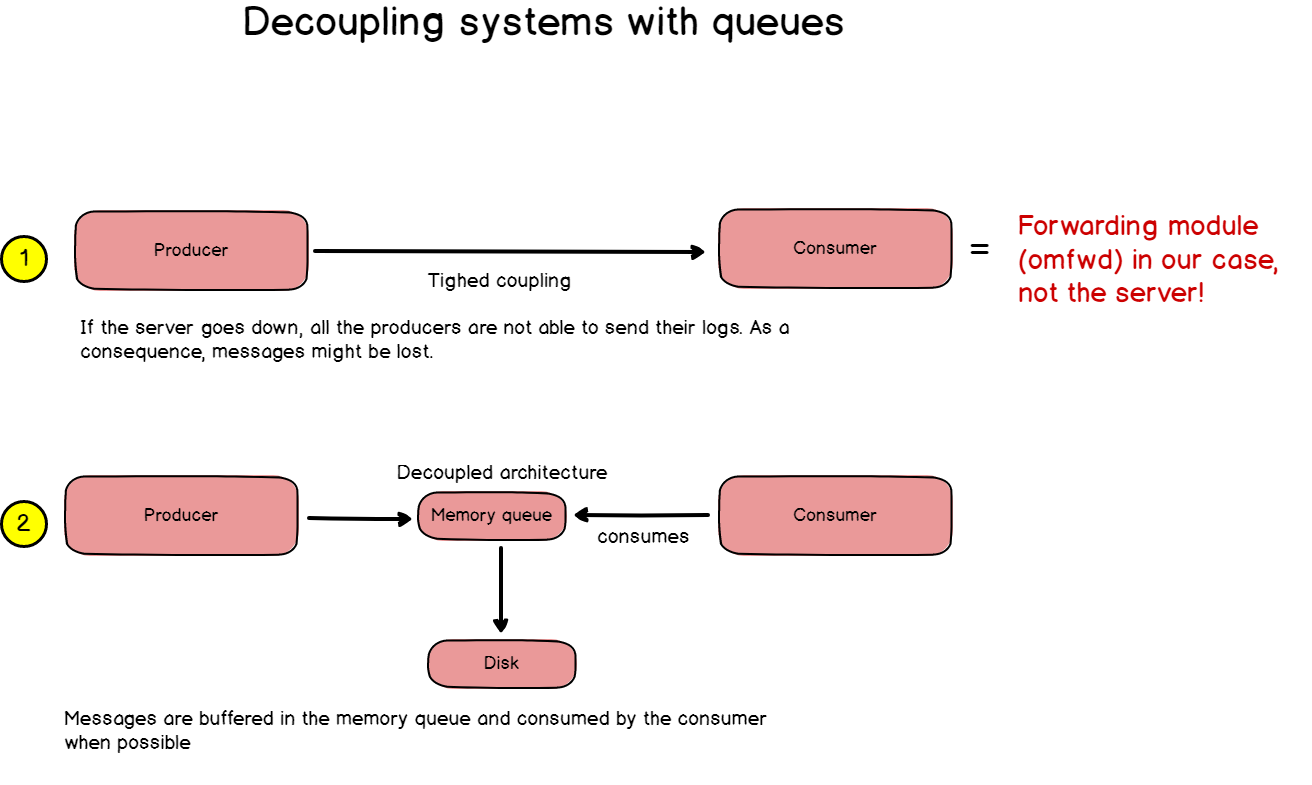
In the architecture that we designed before, there is one major issue that was not addressed before : reliability.
In our architecture, the client and the server are very tighly coupled.
What does it mean?
If the server goes down, your client will obviously not be able to send log messages, but they might also risk losing the logs messages forever.

Luckily for us, rsyslog has a contingency plan when it comes to bad forwarding : plain and simple disabling the faulty module.

This means that you won’t lose your messages (they still be stored locally), but you are losing your log forwarding all together.
Would you go back to your host to re-enable your forwarding module everytime the network goes down? I wouldn’t.
To solve this, we need to bring decoupling in this architecture.
If you read the Entreprise Integration Patterns book by Gregor Hohpe, reliability means queues.
a – Designing message reliability
First, let’s understand a couple of concepts related to rsyslog message queues.

In rsyslog, there are multiple ways for you to design queues, but eventually it comes up the three main categories:
- Direct : this is kind of a “no queue” mode where messages are directly passed from the producer to the consumer. Definitely not a mode we want implemented in our case;
- Disk queues: in this case, as messages are passed to the queue, they are reliably written to disk. In this case, you are safer when it comes to machine complete accidental shutdown, but the process is longer than memory queues. Writing to disk is more expensive that writing in the RAM;
- Memory queues: those queues will hold messages in memory for a given time and for a given amount of restricted space. After a while, they will be written to disk. This alternative is faster than disk queues.
For our architecture, we are going to use memory queues with a bunch of different options (all options are available here)
In your 01-client.conf file, append the following lines to your the configuration file.
$ActionQueueType LinkedList
$ActionQueueFileName rsyslog_backup
$ActionQueueSaveOnShutdown on
$ActionResumeRetryCount -1
...
# Parameters from the TLS section
$ActionSendStreamDriverAuthMode x509/name- LinkedList: we want memory allocation to be done on the fly, and not via a fixed array. This will create more overhead computation but you will benefit from it by gaining more space;
- Queue file name: this is the file where data is going to be written if data is eventually stored to disk. The path to it is $WorkDirectory/rsyslog_backup where WorkDirectory is the variable defined in your rsyslog.conf file;
- Save on shutdown: if the machine was to shutdown, the memory logs would be written to disk first;
- Resume retry count: when losing the forwarding module, rsyslog will try to reconnect to it indefinitely.
You can tweak it more given the specifications you are working with, but I will go with that for this tutorial.
Restart rsyslog, and make sure that you are not having any errors.
$ sudo systemctl restart rsyslog
$ sudo journalctl -f -u rsyslog.service
b – Demonstrating message reliability
Okay, now that we have message reliability put in place, let’s test it out.
On the server side, comment all the lines in your 01-server.conf file and restart rsyslog. From this point, your client should lose its connection to the server.
On the client:
$ sudo journalctl -f -u rsyslog.service
On the client, manually fire a log event.
$ logger -p 'auth.crit' 'Critial auth message, lost?'Verify that you are not receiving anything at all on the server, and that the client does not fire any preemptive message.
From there, your message is stored in memory, patiently waiting for the module to be back up.
Go to the server side, remove comments for all the lines, and restart your rsyslog server.
From there, your client will automatically re-enable the forwarding module.

But, did our server receive the message that was stored in the client memory? It did!

Congratulations, you designed (secure!) message reliability between rsyslog clients and a rsyslog server.
Common Errors
Here is a list of the different errors that you may encounter during the process:
- omfwd: TCPSendBuf error -2027, destruct TCP connection the x.x.x.x

Solution: if you are having this error in the TLS section, your TLS configuration is probably wrong. Either you have badly configured the certificates, or you have a wrong server configuration.
- Cannot connect to x.x.x.x : network is unreachable.

Solution : make sure that the IP address can be accessed from the client host. You can ping it by example.
$ ping 142.93.103.142
PING 142.93.103.142 (142.93.103.142) 56(84) bytes of data.
64 bytes from 142.93.103.142: icmp_seq=1 ttl=64 time=0.023 ms
64 bytes from 142.93.103.142: icmp_seq=2 ttl=64 time=0.056 ms
64 bytes from 142.93.103.142: icmp_seq=3 ttl=64 time=0.033 ms
--- 142.93.103.142 ping statistics ---
3 packets transmitted, 3 received, 0% packet loss, time 2047ms- Peer name not authorized : not permitted to talk to it. Names CN: name.domain.com

In the rsyslog configuration file, make sure that you have the $ActionSendStreamDriverPermittedPeers correctly set.
Bonus : A word on back-pressure protocols
Before ending this guide, there is one point that I want to address, as I think that it might be something that could be improved in this architecture.
a – Architectural improvements
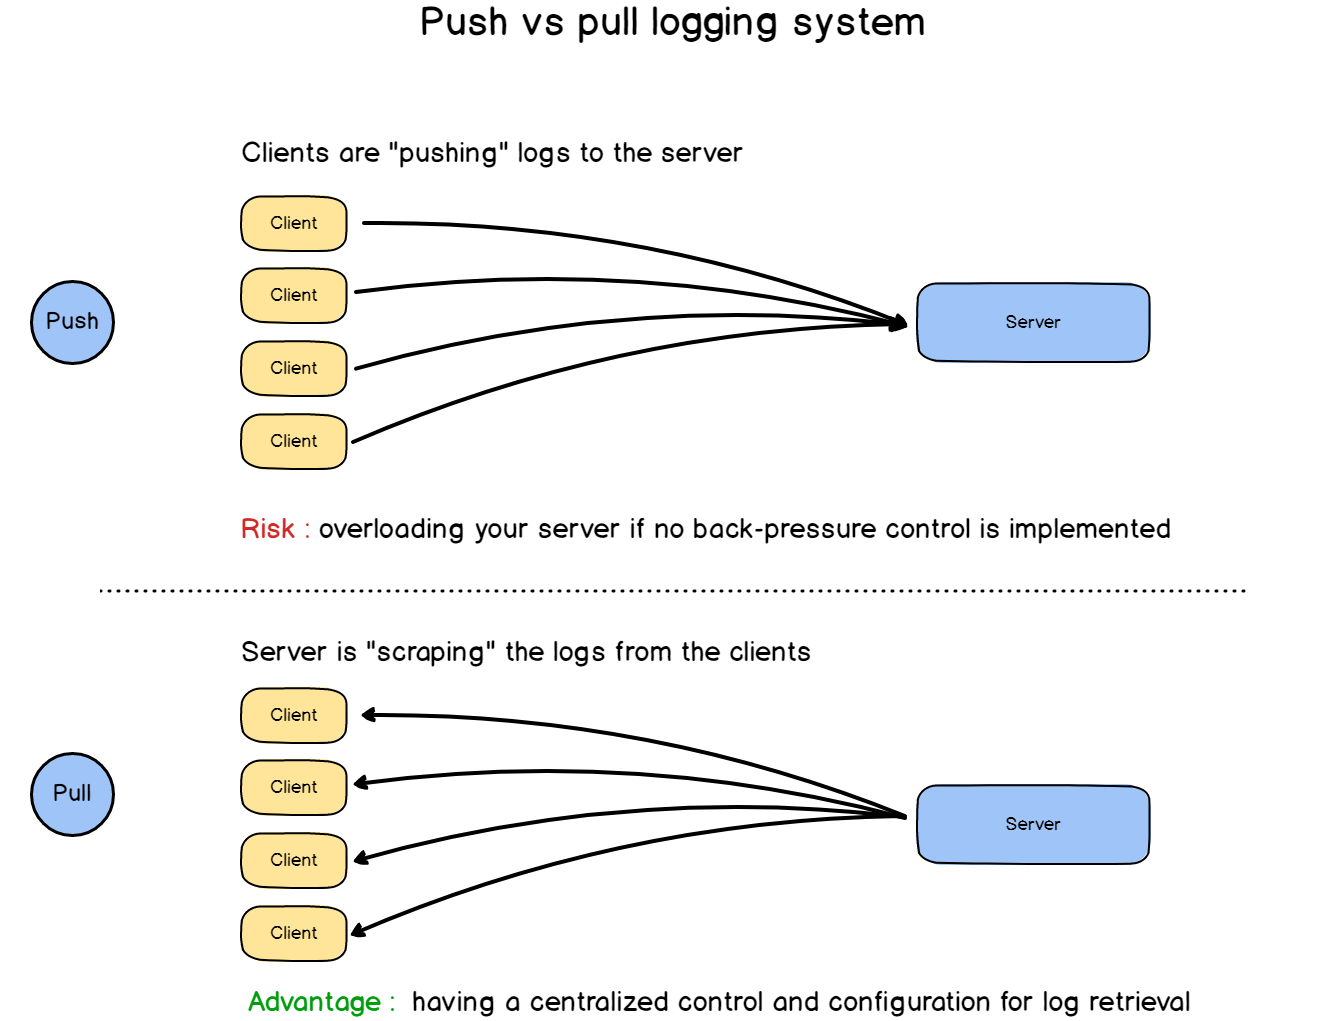
The architecture that we designed together can be seen as a “push” architecture. We essentially push logs from the client to the servers.
And that’s risky.
Why?
Because if the clients begin to send too many logs files to your server, you have the risks of overloading your entire system, preventing other clients to send data. From there, it is only a matter of time until your server goes down, or until you start losing logs files completely.
Here are some thoughts about how to handle this:
- Use the dequeueSlowDown rsyslog parameter to delay message execution, essentially putting a tempo on all the messages being sent. Here is a link to it.
- Use a back-pressure third-party product like Filebeat. Filebeat can be interesting if you are already working with the ELK stack all together. It implements native back-pressure protocol for you to set a rate on when the logs are being sent.
b – Push vs Pull logging systems
We have already tackled the difference between push and pull systems at least when it comes to open source monitoring solutions.
We have seen the advantage of building an active monitoring solution, but couldn’t we apply the same principles when it comes to centralized logging systems?
As our log files are stored to disks, there is definitely a way for us to parse those files regularly and extract logs, at a rate that we decide on the server side. This point removes the danger from having a client overloading our servers.
Are you aware of a system that is designed this way?
Conclusion
This last point ends this definitive guide about centralized logging for Linux systems.
In this guide, we went through pretty much all the aspects of centralized logging: from one single instance, to log forwarding to a central server in a secure and reliable way.
If you really want to go further on the subject, here are some videos that are related to the subjects, and that I found interesting.
I hope that you learned something today.
Don’t hesitate to check my other articles about monitoring or system administration, they are all equally detailed and insightful.
Until then, have fun, as always.
15 comments
[…] The Definitive Guide to Centralized Logging with Syslog on Linux […]
Well done! Your site/post structure, design, and tutorial quality are the best I saw so far in tech blogging. You are a hard-core perfectionist – keep it up. I wish you best 🙂
[…] reserved Trending Syslog : The Complete System Administrator Guide The Definitive Guide to Centralized Logging with Syslog… The 10 Best Software Engineering Books in 2019 Monitoring Linux Logs with Kibana and Rsyslog […]
[…] Linux File Permissions Complete Guide Syslog : The Complete System Administrator Guide The Definitive Guide to Centralized Logging with Syslog… The 10 Best Software Engineering Books in 2019 Monitoring Linux Logs with Kibana and Rsyslog […]
[…] Guide How To Install Git On Debian 10 Buster How To Install and Configure Debian 10 Buster… The Definitive Guide to Centralized Logging with Syslog… How To Install Logstash on Ubuntu 18.04 and… Home Linux System AdministrationBasics […]
“your server logs are now longer directly stored in /var/log” – this has no sense, maybe “now longer” should be “no longer” ?
“server logs are now … in /var/log/hostname” this was not mentioned in ANY other guide, and I thought I mess up with the config file! anyway, can you explain why and if this can be avoided?
“*.* ?RemoteServer” – there is a BUG, you need have on next line “& stop” otherwise incomming logs will be saved also in local system logs (deprecated syntax is “& ~”)
[…] you are interested about centralized logging, make sure to read our […]
Great stuff!!! I was searching for some hints on configuring TLS and at the same time Non-TLS logging on the server side – only using legacy syntax. Do you have an idea if that’s possible? I found some example using legacy and advanced syntax in the same conf-file. But that’s not the way I like to configure it 😉
Tombstoned.
Article does not work with Deb 9.9 / rsyslog 8.24
Hello,
If you provide me with the errors you are getting, I will probably be able to help you.
Best,
SCHKN
Hello, first of all congratulations for the excellent article.
I have a question to ask:
I have an rsyslog server that will have to be both a receiver and a transmitter.
At the moment my rsyslog send sends the system logs in TLS via the certificate (A) to an rsyslog receiver (A) in TCP.
In the future he will have to receive other logs from a client (B) and keep them in local files (all via TLS with another certificate (B))
Furthermore, the logs received from the client (B) must be sent to another client (C) via the certificate (B)
I try to make a pattern 🙂
my_RSYSLOG with certificate (A) [send ->] other rsyslog via certificate (A)
Client with certificate (B) [send ->] my_RSYSLOG with Certificate (B)
my_RSYSLOG with certificate (B) [send ->] other rsyslog client (C) via certificate (B)
What is the correct configuration to manage different certificates for log entry and exit?
Below is an extract of the current configuration:
$ InputTCPServerStreamDriverMode 1
$ InputTCPServerStreamDriverAuthMode anon
$ DefaultNetstreamDriver gtls
# certificate files
$ DefaultNetstreamDriverCAFile /etc/rsyslog-ssl/CAcertificate(A).pem
$ DefaultNetstreamDriverCertFile /etc/rsyslog-ssl/certificate(A).pem
$ DefaultNetstreamDriverKeyFile /etc/rsyslog-ssl/key(A).pem
auth, authpriv. * @@ rsyslog_receiver (A): 1234
=======================================
Hypothesis: (/etc/rsyslog.d/file_receive_and_forward.conf)
$ RemoteTCP2001 template, “/ path / to / log / aaaaaa.log”
$ RuleSet RemoteTCP2001
*. * -? RemoteTCP2001
$ InputTCPServerBindRuleset RemoteTCP2001
$ InputTCPServerRun 2001
/path/to/log/aaaaaa.log action (
type = “omfwd”
queue.type = “LinkedList”
action.resumeRetryCount = “- 1”
queue.saveOnShutdown = “on”
queue.filename = “rsyslog_backup”
queue.size = “10000000”
queue.dequeueSlowDown = “1000”
target = “CLIENT (C)”
port = “3001”
protocol = “tcp”
StreamDriver = “GTLS”
StreamDriverMode = “1”
StreamDriverAuthMode = “x509 / name”
StreamDriverPermittedPeers = “*”
tls.cacert = “/ etc / rsyslog-ssl / caCertificate (B) .pem”
tls.mycert = “/ etc / rsyslog-ssl / certificate (B) .pem”
tls.myprivkey = “/ etc / rsyslog-ssl / key (B) .pem”
)
… and so on for the other logs …
=======================================
Would such a configuration be correct to send some logs from my rsyslog to the client (C) through the certificate (B)?
Thanks in advance for your reply!
a typo:
Note : with this configuration file, your server logs are now longer
SHOULD BE:
Note : with this configuration file, your server logs are NOT longer
Thanks a lot!
Fantastic. Thanks very much for putting this together. Nice coverage of the important things a lot of other tutorials gloss over (persistence and security), using relevant, current technologies.